1
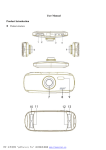
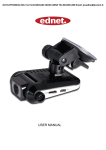
1
Table of Contents
Thank you! ............................................................................................................................................................................ 3
Rexing F9 Car DVR Highlights: .......................................................................................................................................... 3
Rexing F9 Appearance and features: .................................................................................................................................... 3
Rexing F9 Features and Description:.................................................................................................................................... 4
LCD Screen’s Icon Description: ........................................................................................................................................... 5
Installing and operating the Rexing F9 Car DVR Dashcam: ................................................................................................ 6
Rexing F9 Menu Settings: ................................................................................................................................................ 6
Take a Video ....................................................................................................................................................................... 8
Emergency File Lock ........................................................................................................................................................... 9
Mute/Unmute Microphone ................................................................................................................................................ 9
Video Settings ...................................................................................................................................................................... 9
Take a Photo ..................................................................................................................................................................... 11
Video Playback Mode ......................................................................................................................................................... 12
PC Mode: ............................................................................................................................................................................ 13
Specifications: .................................................................................................................................................................... 14
General Troubleshooting Information: ............................................................................................................................... 14
2
Thank you!
Dear customer,
Thank you very much for choosing the Rexing F9 Car DVR Dashcam.
Now you have a witness to prove your innocence in case of an unfortunate incident or accident.
Please read this user manual carefully and keep it safely in order to operate the product easily and get
better service.
All brand and product names are trademarks or registered trademarks of Rexing Inc. The information in
this manual is subject to change without notice.
Rexing F9 Car DVR Highlights:
This car DVR records at 1080p full HD resolution automatically when the car is turned on and turns off
automatically when the car turns off.
It has loop recording function that overwrites oldest files when the card is full.
It has built-in microphone and will record audio and video both unless the microphone is disabled.
Buttons have backlight that makes it easy to operate at night.
It can also be used as a mass storage disk or as a PC camera (webcam) when connected to a computer.
Rexing F9 Appearance and features:
(Note: Photo is for reference only)
3
Rexing F9 Features and Description:
Feature/Function
1.ON/OFF Button
2.REC
3.Menu button
4.UP/emergency
lock button
5.Down/MIC
button
6.Photo/Mode
button
7.mini HDMI Port
8. MicroSD(TF)
Slot
9. AV-OUT Port
10. USB interface
11. GPS interface
12.Mount Interface
13. Reset
14. Microphone
15. Camera Lens
16. Flashlight
Description
Hold on to the button for 3 seconds to turn on or turn off the device.
When the device is on, quick press of power button turns on or turns off IR LED
light.
Start/stop record. It also acts as confirm/ok key in Menu/settings.
In photo mode, it takes photo when pressed.
Short press to go into menu settings: Resolution, date time, format, etc…
Long press of the button (3 seconds) turns off the LCD screen, press any key to turn
the screen back on.
While it’s recording video, press this button for 3 seconds to trigger emergency lock
function and a key icon is displayed. In settings and playback mode, it acts as UP.
While it’s recording video, press this button to turn off (mute) Audio recording and
press again to start audio recording. The small microphone icon will have a red line
when muted.
In menu settings, this button acts as DOWN button.
In standby mode, press it 3 second to hide display icons, press it again to display
icons.
Toggle between Video Mode/Camera Mode/Playback Mode.
Allow you to connect your device to a TV that has a HDMI port. You will be able to
display High definition video footages on the TV。
Insert your microSD card here. Supports up to max. 32GB microSD card
Allow you to connect your DVR to another device that support AV-Input.
For instance, you will be able to view your video footages on a TV. AV Cable is
optional.
Charge or connect your device to your PC for file transfer.
It is optional for a GPS module to do GPS tracking
Attach suction cup mount here.
Insert the end of a small paper clip or stylus into the hole.
This resets and restarts the Car DVR in case it hangs or freezes.
Record and play sound
17. Speaker
CMOS Sensor Lens
A LED flash on the back gives you extra light when you need it.
A quick press of power button turns on/off this light.
Speaker for playback.
18. Screen
2.7” TFT LCD screen displays various icons depending upon dashcam’s settings.
19. PET
Plastic screen protector for TFT LCD.
Note: HDMI cable, AV-OUT cable and GPS module are optional and not included with the dash cam.
4
LCD Screen’s Icon Description:
Video Recording Mode
Camera Mode
Playback Mode
Motion Detector Mode
Loop Recording: 2 minutes time frame
Loop Recording: 3 minutes time frame
Loop Recording: 5 minutes time frame
Battery Status: Charging
Battery Status: Fully Charged
Battery Status: Low
MicroSD Card/ TF Card: Card has been inserted
G sensor
Microphone: On
Microphone: Mute
Playback Mode: Rewind (Event button)
Playback Mode: Play (Mode button)
Playback Mode: Fast Forward (MIC button)
File locked: Click on triangle event button to activate file lock during recording.
1080FH
D
Video Resolution available in 1080FHD/ 720P/ WVGA/ VGA
Exposure status: +0.0
Photo Quality: Fine/ Normal/ Economy
5
Installing and operating the Rexing F9 Car DVR Dashcam:
1. Find a clean area on the windshield and affix suction mount.
Be careful not to obstruct driver’s view. Best place is around the rear view mirror.
2. Place the suction mount into the dash cam’s mount insert.
3. Slide dashcam to the left to lock on the mount.
3. Once the dashcam is mounted on the windshield, rotate the mount to adjust viewing angle.
Battery: This CAR DVR has an internal, lithium-ion rechargeable battery but doesn’t have enough charge
to use it for video recording for a long time.
Charging the battery: connect device to cigarette lighter jack in your car using the included car charger.
It is recommended to plug in the car charger at all times to make sure it’s recording all the time and
doesn’t miss any incident or accident.
Replace the battery: It can be replaced only by Rexing Inc.
Insert MicroSD card or TF card
Load the Micro SD/TF card to start recording your video or take still images. We recommend a minimum
capacity of 4GB to maximum up to 32GB. Use of MicroSDHC is compatible and recommended.
Power On/Off
When the Car DVR is off, press the power switch once to turn on the device. A welcome
message will be displayed on screen.
Note: When this Car DVR is connected to charger in car cigarette lighter port, it automatically
turns on and starts recording when the engine is on and automatically turns off when engine
is off.
When the Car DVR is on, quick press of the power button turns on/off the IR LED light and long
press turns off the device. A goodbye message will be displayed on screen.
Camera
With this CAR DVR you can take both still photos and videos. Press Mode button to switch modes.
Rexing F9 Menu Settings:
Date/ Time
1. Click on [ M] twice
2. Use [Up]/Event and [Down]/MIC button to scroll for Date/Time function select [Date/Time] by clicking
on [OK] /REC button
3.Under Year- Click on [Up] and [Down] button to adjust the year of your choice
4.Click on [OK] button to confirm your choice
5.Under Month -Click on [Up] and [Down] button to adjust the year of your choice
6.Click on [OK] button to confirm your choice
7. Under Day - Click on [Up] and [Down] button to adjust the year of your choice
6
8.Click on [OK] button to confirm your choice
9.Under Hour - Click on [Up] and [Down] button to adjust the year of your choice
10. Click on [OK] button to confirm your choice
11. Under Minute - Click on [Up] and [Down] button to adjust the year of your choice
12. Click on [OK] button to confirm your choice
13. Under Second- Click on [Up] and [Down] button to adjust the year of your choice
14. Click on [OK] button to confirm your choice
15. Under display format - Click on [Up] and [Down] button to choose [DD/MM/YY].[MM/DD/YY]or
[YV/MM/DD]
16. Click on [OK] button to confirm your choice
Beep Sound
You can disable the b e e p sound your CAR DVR makes here.
1. Click on [M] twice
2. Use [Up] and [Down] button to scroll for Beep Sounds function
3.Select [Beep Sound] by clicking on [OK] button
4.Select [On] or [Off]
5.Click on [OK] button to confirm your choice
Language
Choose your prefer language.
1. Click on [M] twice
2. Use [[UP] and [Down] button to scroll for Language function
3.Select [Language] by clicking on [OK] button
4.Click on [Up] and [Down] button to select your preference
5.Click on [OK] button to confirm your choice
TV Mode
The two most common TV broadcast standards used are NTSC and PAL.
Choose your output formal when you hook your CAR DVR to your local TV.
1. Click on [M] twice
2. Use [Up] and [Down] button to scroll for TV Mode function
3...Select [TV Mode] by clicking on [OK] button
4.Click on [Up] and [Down] button to select your preference
5.Click on [OK] button to confirm your choice
Frequency
Please set according to the local power supply respectively; 50Hz or 60Hz.
1.
Click on [M] twice
2.
Use [Up] and [Down] button to scroll for Frequency function
3.
Select [Frequency] by clicking on [OK] button.
4.
Click on [Up] and [Down] button to select your preference
5.
Click on [ok] button to confirm your choice
7
Screen Saver
You may set your CAR DVR’s Screen Display to autom at ically shut off within certain time.
1. Click on [M] twice
2. Use [Up] and [Down] button to scroll for Screen Saver function
3.Select [Screen Saver] by clicking on [OK] button
4.Click on [Up] and [Down] button to select your preference
5.Click on [OK] button to confirm your choice
Delayed Shutdown
This option sets how long the Car DVR records after power is disconnected.
1. Click on [M] twice
2. Use [Up] and [Down] button lo scroll for Delayed Shutdown option.
3.Select by clicking on [OK] button
4.Click on [Up] and [Down] button to select your preference
5.Click on [OK] button to confirm your choice
Default Setting
Setting will be change to factory setting once you have selected this option.
1. Click on [M] twice
2. Use [Up] and [Down] button to scroll for Default Setting function
3.Select [Default setting] by clicking on [REC] button
4.Use [Up] and [Down] button to select [OK] or [Cancel]
5 ..Click on [OK] again to confirm your selection
Format
This is a shortcut to delete all your video and photo in your SD card without
Having the trouble o f d e l e t i n g one by one.
1. Click on [M] twice
2. Use [Up] and [Down] button to scroll for Format function
3.Select [Format] by clicking on [OK] button
4.Click on [OK] again when you see [SD Card]
5.Use [Up] and [Down] button to scroll [OK] or [Cancel] when you see 'All data will be deleted'
6.Click on [OK] again to confirm your selection
Note: You will not be able to recover your video or photo once you format the TF card.
Take a Video
Enter Video Mode (Note: Video mode is default when you turn the car DVR on.)
1. Click on [MODE] button till you see icon is displayed on the left hand side of the screen.
2. Click on [OK] button to start recording. There will be a red dot blinking on the display
3. Click on [OK] button again to stop recording.
Note: The camera will go to standby video mode on battery power. Press REC to record.
8
Emergency File Lock
This function allows you to lock your file on your microSD card immediately.
This will prevent the file from overwriting by the new files.
While the dashcam is recording,
1. Click on the event triangle button for few seconds when video is recording
2. A locked key icon will be showed on your screen.
Mute/Unmute Microphone
During Recording,
1. Hold on [MIC] button for 2 seconds to mute. You’ll see a red line over the mic icon.
2. Hold on [MIC] button for 2 seconds again to unmute.
Video Settings
Resolution
For the best recording results, always set resolution to 1080FHD
1.Click on [M]
2. Select [Resolution] by clicking on [OK] button
3. Click on [up] and [down] button to select [1080p]
4. Click on [OK] button to confirm
Loop Recording
This is a recording process that continues to record at the beginning, erasing the previously
recorded video and replacing it with the new ones.
1. Click on [ M ]
2. Select [Loop Recording] by clicking on [OK] button
3.Click on [Up] and [Down] button to select [1080FHD]
4.Click on [OK] button to confirm
Note: We strongly advise you not to t ur n off this function. Loop recording is a very usefulfunction
when T F c a r d ’ s memory space is full. This will allows your CAR DVR to continue recording by
overwriting the old videos even when memory space is full. Highly recommend user to set to a
minimum of 3 minutes loop recording.
WDR (Wide dynamic range)
This feature provide clear images even under backlighting, where the intensity of illumination
varies a lot-namely when there are very bright and very dark areas simultaneously in the
camera's field of view. WDR allows an imaging system to correct for the intense back light
surrounding a subject and thus enhances the ability to distinguish features and shapes on the
9
subject.
Exposure
It is the amount of light allowed to fall on each area unit of a photographic medium
(photographic film or image sensor) during the process of taking a photograph.
1. Click on [ M ]
2. Use [Up] and [Down] button to scroll for Exposure function
3.Select [Exposure] by clicking on [OK] button
4.Click on [Up] and [Down] button to select your preference
5.Click on [OK] button to confirm your choice.
Motion Detection
This function enables you to use your CAR DVR as a remote surveillance camera with
motion detection functionality. It uses the built-in camera to detect movements in the
surrounding area using an advanced motion detection algorithm. Camera will auto record if
it detects any movement.
1. Click on [M]
2. Use [up] and [down] button to scroll for Motion Detection function.
3. Select [Motion Detection] by clicking on [OK] button
4. Click on [up] and [down] button to select your preference
5. Click on [OK] button to confirm your choice.
Record Audio
1. Click on [M]
2. Use [up] and [down] button to scroll for Record Audio function
3. Select [Record Audio] by clicking on [OK] button
4. Click on [up] and [down] button to select your reference.
5. Click on [OK] button to confirm your choice
Date Stamp
You may choose to add date/time stamps to your pictures. However the date/time stamp is
not removable. So if you later decide to get rid of it, you can’t since the original image is
altered.
1. Click on [M]
2. Use [up] and [down] button to scroll for Date Stamp function
3. Select [Date Stamp] by clicking on [OK] button
4. Click on [up] and [down] button to select your [ON].
5. Click on [OK] button to confirm your choice
G-Sensor
This function acts like an accelerometer. It measures the acceleration and gravity forces
detected on the camera. At such case during recording, the device will auto do a file lock.
We strongly recommend you to set [High]
1. Click on [M]
10
2.
3.
4.
5.
Use [up] and [down] button to scroll for G-sensor function
Select [G-sensor] by clicking on [OK] button
Click on [up] and [down] button to select your [High].
Click on [OK] button to confirm your choice.
Take a Photo
Enter Camera Mode
1. Click on [MODE] b u t t o n t i l l y o u s e e i c o n i s displayed on t he lef t hand side of the screen.
2. Click on [Up] and [Down] button to zoom in or out
3.Click on [OK]/REC button to take a still image.
Photo Settings
Capture Mode
You may have the options to take a single shot or to activate self-timer function with time
frames of 2 seconds, 5 seconds and 10 seconds.
1. Click on [M]
2. Select [Capture Mode] by clicking on [ O K ] button
3.Click on [Up] and [Down] button to select your preference
4.Click on [OK] button to confirm your choice
Resolution
There are four different resolutions for a photo. They are 1 2M, 10M, 8M and 5M. For best results, this
CAR DVR and the subject should be stationary.
1. Click on [M]
2. Use [Up] and [Down] button to scroll for Resolution function
3...Select [Resolution] by clicking on [OK] button
4.Click on [Up] and [Down] button to select your preference
5.Click on [OK] button to confirm your choice
Here are some good resolution guidelines to consider:
•5M: A resolution that offers better image quality for use with craft projects. Also suitable for printing
and framing an 11-by-14-inch photo to hang at home
•8M: A resolution that's capable of providing attractive 16-by-20-inch prints
•10M: Optimal for printing larger (20-by-30-inch) projects, including posters and panoramas
The more you increase photo resolution, the more you'll improve image clarity and detail.
Sequence (Take multiple shots)
1. In camera mode, click on [M] button
2. Use [Up] and [Down] button to scroll for Sequence function
3 Click on [OK] to confirm selection
4. Use [Up] and [Down] button to select [On]
5. Click on [OK] button to confirm
Note: Once this option is selected, sequence shots of 3 images will be taken when
11
you click on [OK] button. To off this function, select [Off] for Sequence.
Quality
There are 3 types of quality for a photo. They are Fine, Normal and Economy
For best results, this CAR DVR and the subject should be stationary.
1. Click on [M]
2. Use [Up] and [Down] button to scroll for Quality function
3. Select [Quality] by clicking on [OK] button
4. Click on [Up] and [Down] button to select your preference
5. Click on [OK] button to confirm your choice
Here are some guidelines to consider:
• Fine: Give you the best photos, with sharper details at a larger file size
• Normal: Has the medium quality, with a matching reduction in the file size.
• Economy: Only good for emailing, not printing and uses the smallest 'file size.
Sharpness
There are 3 types of sharpness for a photo. They are Strong, Normal and Soft.
1. Click on [M]
2. Use [Up] and [Down] button to scroll for Sharpness function
3. Select [Sharpness] by clicking on [OK] button
4. Click on [Up] and [Down] button to select your preference
5. Click on [OK] button to confirm your choice
White Balance: Leave it at Auto or select among Daylight, Tungsten etc…
Color: Color, Black & White or Sepia
ISO: Leave it at Auto or select one option.
Exposure: Exposure compensation from -2 to +2. Default is 0.
Anti-Shaking: Image stabilization.
Quick Review:
This allows you to have a preview of your photo taken. You can set timer from 2 to 5 seconds.
1. Click on [M]
2. Use [Up] and [Down] button to scroll for Quick Review function
3 Select [Quick Review] by clicking on [OK] button
4. Click on [Up] and [Down] button to select your [Off], [2seconds] or [5seconds]
5. Click on [OK] button to confirm your choice
Video Playback Mode
1. Click on [MODE] button till you see blue triangle icon is displayed on the left hand side of the
screen. Here you can scroll through files (UP/Down), delete or protect a file.
2. Next, press MIC button to enter the file playback mode. The blue triangle icon will change to video
file icon.
12
3. Once you see the video file icon, press the bottom right Mode button again to play.
4. Click on [Up] button to rewind and [Down] button to fast forward the video file.
5. Press and hold Mode button for few seconds to return to video record mode.
Rewind/ Fast forward Video during a Playback
During the playback
To rewind
Click on [Up] button one time, you will see [-2X] on the screen. Press again to increase speed.
To fast forward
Click on [Down] button one time. you will see [2X] on the screen. Press again to increase speed.
Delete Files
In the playback mode,
1. Click on [M] menu button.
2. Use [Up] and [Down] button to scroll for Delete function
3. Select [Delete] by clicking on [OK] button
4. Click on [Up] and [Down] button to select your [Delete Current] or [Delete All]
5. Click on [OK] button lo confirm your choice
6. Click on [Up] and [Down] button to select your [Cancel] or [OK]
7. Click on [OK] button to confirm your choice
Protect (File Lock)
In the playback mode,
1. Click on [M] menu button.
2. Use [Up] and [Down] button to scroll for Protect function
3. Select [Protect] by clicking on [OK] button
4. Click [Up] and [Down] button to select your [Lock Current] / [Unlock Current]/ [Lock All]/ [Unlock All]
5. Click on [OK] button to confirm your choice
Slide Show
In the playback mode,
1. Click on [M] menu button.
2. Use [Up] and [Down] button to scroll for Slide Show function
3. Select [Slide Show] by clicking on [OK] button
4. Click on [Up] and [Down] button to select your [2 Seconds]/ [5Seconds]/ [8 Seconds]
5. Click on [OK] button to confirm your choice
PC Mode:
When this car DVR is connected to a PC, there are following options:
1. Mass Storage: Use this option to copy files.
2. PC Camera: Use this option to use this car DVR with your webcam programs.
3. Video Record: This option goes to standby mode. Press REC to record video.
13
Specifications:
Chipset
NT96650
Storage
DDR3 128M
Video Resolution
1080HFD 1920×1080 /1080P 1440×1080 /720P 1280×
720/ WVGA 848×480/VGA 640×480/QVGA 320×240
File Format
Image: JPG
Video : MOV
Power-off File Recovery
Function
Yes
Motion Detection
Yes
Date time stamp
Yes
Memory Card
Supports up to 32G MicroSD/ TF Card
Language System
English/French/ Spanish/ Portuguese/ German/
Italian/Simplified Chinese/ Traditional Chinese/ Russian/
Japanese
HDMI
Yes
AV-OUT
Yes
TV Standard
NTSC/PAL
USB
Yes
Audio Recording
Yes
General Troubleshooting Information:
Problem
Possible Reasons
The captured image is
not stored
1. MicroSD card might be full
2. Image is not saved before
the power outage.
Solution
Make sure to stop recording before
shutting down.
All buttons are invalid
or don’t respond
Procedural error or faulty
operation
Press RESET button to restart the
DVR.
Device doesn’t turn on
Device might be low on
battery
1.
Screen Saver function is
battery.
enabled.
2. Low Battery.
Charge the Battery or connect to
charger.
1. Click on [M] twice to the setup
page and change [Screen Saver] to
off.
2. Charge the battery
MicroSD card might be full.
Check your MicroSD card’s memory
space. Delete files if required.
Screen Auto power-off
Unable
to
pictures
or record videos
take
14
Auto stop recording in
video mode
Use a compatible SDHC
microSD card for HD video
recording.
“File error” when
trying to playback
pictures or videos
MicroSD card might be
corrupted. There are
bad sectors in the card.
Test if the microSD card is good.
Format the microSD card.
Get a microSD card of Class 10
speed.
Reformat the microSD card.
Test and replace the card if it’s bad.
No image is displayed 1. Cable plug might not be 1. Ensure AV/HDMI cable is plugged
on a high-definition TV plugged in properly.
into the TV properly.
screen
2. Wrong TV Input mode
2. Refer to the back panel of your TV
to track the correct TV input. Make
sure you have selected the correct
input.
Hazy Images
Lens might be dirty
LED light cannot be
turned on
Device might be low in
battery. LED light will not
be on when power is
insufficient.
There are horizontal
stripes interference
on the image
This could be due to wrong
light frequency setting.
Check if there are fingerprints or
dust on the lens. Clean it with a
micro fiber cloth if necessary.
Charge the Battery.
Please set according to the local
power supply respectively; 50Hz or
60Hz. For SG/MY: 50hz
For more information and support, please contact us.
Thank you.
15
16