1
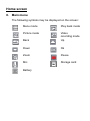
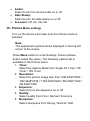
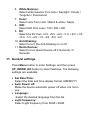
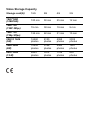
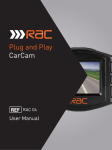
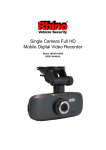
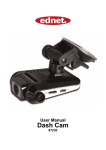
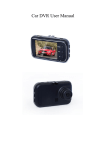
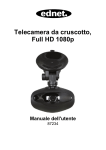
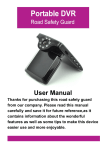
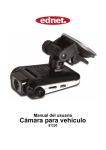
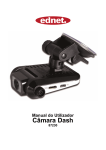
Dash Cam,
Full HD 1080p
User Manual
87234
1.
Package Content
•
•
•
2.
Car DVR
Suction mount
Car charger
Product overview
•
•
1.2m power cable
User manual
Getting started
3.
Power on/Power off
• Position the device in the vehicle using the suction
mount and press the Power button to turn it on. To
power off the device press the button again.
• You can also connect the device to the car charger.
It will automatically turn on and start recording when the
car engine starts. When the engine stops, the device will
automatically save the last file and turn off.
4.
Language Setting
To switch to other languages you need to do following
steps to change the menu to your language:
• Press Menu button twice
• Scroll down to page 3 and select “Language”
• Choose your language and press “OK”
5.
Charging
• Using the power cable: connect the device to the USB
port of a computer/Laptop
• Using the car changer: Connect the device to the car
charger. The device will start charging after the car
engine is turned on. The device will automatically turn on
and start recording. When the engine stops, the device
will automatically save the last file and turn off.
• Normally it takes approximately 2-3 hours to fully charge
the device. Operating the device while charging with the
Car Charger may extend the time of full charge.
Note:
Before using the device for the first time, please connect it
to the PC or notebook using the USB cable provided to
fully charge the battery. The battery is completely charged
in 2-3 hours.
6.
Inserting the microSD-card
• In accordance with the instructions in the direction of the
insert SD card into the SD card slot until it is fixed in the
SD card slot.
• To take out the SD card, please gently press down the
SD card, reveal a SD card after SD card pops-up.
Note:
After inserting the microSD card the device will
automatically recognize it as default storage and all
the data will be saved on this card.
Cautions:
• When using the SD card please make sure the SD card
if there is abnormal.
• Please pay attention to the direction of the SD card
inserted, if reversed insert it might damage the machine
and the SD card.
• If the device and SD Card is incompatible, please insert
an SD card again to try again.
• Please use the high speed SD card (SDHC class6 card).
Recording
• Connect the device to car charger, when the car engine
is turned on after 5 seconds, the device will start loop
video recording. When the car engine stops, the device
will save the last file and turn off after 15 seconds
Notice:
1. Press OK button on loop video recording,
the current file will be saved and the device
enters to standby mode.
2. When the microSD card is full, the device will
delete the first unlocked video file automatically.
7.
Taking pictures
• Press the Mode button (M) to select the photo mode
• Press OK button to take photos, taken photos are saved
on microSD Card
• Press the Mode button (M) in the photo mode, and then
press up/down button to set resolution and time
Home screen
8.
Main menu
The following symbols may be displayed on the screen:
Menu mode
Play back mode
Picture mode
Video
recording mode
Back
Up
Down
Ok
Zoom
Pause
Mic
Storage card
Battery
Settings
9.
Video Menu settings
Turn on the device and make sure the Video mode is
selected.
Note:
The appropriate symbol will be displayed in the top left
corner of the screen.
Press Menu button to enter Settings. Press up/down button
to select the option and press OK button to enter the select
mode, press up/down button to select and press OK again
to set the value. The following options list is available in the
Video menu:
• Recording Resolution:
Select the video image size from 1080HFD 1920*1080
//720P 1280*720 / WVGA 848*480 / VGA 640*480
• Loop recording:
Select the loop recording from off 1 min / 2 mins / 3 mins
• EV:
Select the EV from +2.0, +5/3, +4/3, +1.0, +2/3, +1/3,
+0.0, -1/3, -2/3, -1.0, -4/3, -5/3, -2.0
• Motion Detection:
In the standby mode, press Menu button to set the
function on, the device will start video recording
automatically if it detects a moving object and stop
recording when there is no movement detected.
•
•
•
Audio:
Select to turn the record audio on or off
Date Stamp:
Select to turn the date stamp on or off.
G-sensor: off, 2G, 4G, 8G
10. Picture Menu settings
Turn on the device and make sure the Picture mode is
selected.
Note:
The appropriate symbol will be displayed in the top left
corner of the screen.
Press Menu button to enter Settings. Press up/down
button select the option. The following options list is
available in the Picture menu:
1. Timer:
Select the capture Mode from Single 2S Timer / 5S
Timer / 10S Timer
2. Resolution:
Select the picture image size from 12M 4000*3000 /
10M 3648*2736 / 7.5M 3200*2400 / 5M 2592*1944 /
3M 2048*1536
3. Sequence:
Select to turn the sequence on or off
4. Quality:
Select quality from Fine / Normal / Economy
5. Sharpness:
Select sharpness from Strong / Normal / Soft
6. White Balance:
Select white balance from Auto / Daylight / Cloudy /
Tungsten / Fluorescent
7. Color:
Select color from color / Black & white / Sepia
8. ISO:
Select ISO from Auto / 100 / 200 / 400
9. EV:
Select the EV from +2.0, +5/3, +4/3, +1.0, +2/3, +1/3,
+0.0, -1/3, -2/3, -1.0, -4/3, -5/3, -2.0
10. Anti-Shaking:
Select to turn the Anti-Shaking on or off
11. Quick Review:
Select to turn Quick Review off 2 Seconds / 5
Seconds
11. General settings
Press Menu button to enter Settings, and then press
UP, DOWN, OK button to select Settings. The following
settings are available:
• Set Date/Time:
Select the date and time display format, MM/DD/YY
• Auto Power off:
Make the device automatic power off when it is not in
use.
• Language:
Select the desired language from the list.
• Light frequency:
Select Light frequency from 50HZ / 60HZ
• Screen Saver:
Select to turn LCD off 3 Minutes / 5 Minutes /
10 Minutes
• Image rotation:
Select to turn Off or On
• Format:
Select to format the microSD Card.
• Default Setting:
Select if return menu setting to defaults or not.
• Firmware version:
Displays the current system version.
12. Playback mode
Press Mode button (M) to enter playback mode. The last
recorded file will be displayed. Press the up/down
button to view the files.
Press the OK button to play the files. Meantime, under
play mode, press up/down to FORWARD / BACKWARD
the file, then press OK button to pause. Press the Menu
button back to the playback menu. To enter menu options
press Menu button, the following settings
are available:
Delete: Select the file / files you want to delete
Protect: Select the file you want to lock or unlock
13. USB connection
To download registered files on your PC/notebook, please,
connect the device to the PC or notebook via USB-cable
provided. After connecting the device to the PC the USB
menu will be displayed, containing Mass Storage and
PC Camera. Select Mass Storage and the device will
appear in “My computer” as the removable disk.
All registered files are stored in DCIM folder, videos are
stored in AVI format, and the pictures are stored in JPG
format. You can now download the files from the device.
14. PC Camera Mode
Connect the device to a computer via USB. It will show
Mass Storage/PC Cam starting up the device, press
up/down to select and then press OK to enter PC CAM
mode, then you can use the device as a PC Camera.
Safety precautions
Please observe all safety precautions before using 274.
Please follow all procedures outlined in this manual to
correctly operate the device.
• Do not attempt to disassemble or alter any part of the
device that is not described in this guide.
• Do not place the device in contact with water or any
other liquids. The device is NOT designed to be liquid
proof of any sort.
• In the event of liquid entry into interior of device,
immediately disconnect the device from the computer.
Continuing use of the device may result in fire or
electrical shock. Please consult your product distributor
or the closest support center.
• To avoid risk of electrical shock, do not connect or
disconnect the device with wet hands.
• Do not place the device near a heat source or directly
expose it to flame or heat.
• Never place the device in vicinity of equipments
generating strong electromagnetic fields. Exposure to
strong magnetic fields may cause malfunctions or data
corruption and loss.
Technical Specifications
Recording
Video format
1080FHD 1920*1080 //720P
1280*720/WVGA 848*480/VGA 640*480
AVI
Picture format
JPG
Power source
rechargeable battery
Interfaces
USB, microSD card (Supports
max 32GB, high-speed microSD card
recommended)
Built-in
Microphone
Operating
temperature
0 °~ 45°C
Video Storage Capacity
Storage card(G)
16G
8G
4G
2G
1920*1080
(1080FHD)
100 min
50 min
25 min
12 min
1280*720
(720P 50fps)
76 min
38 min
19 min
9 min
1280*720
(720p 30fps)
124 min
62 min
31 min
15 min
2592 X 1944
(5M)
16260
photos
8130
photos
4065
photos
2032
photos
3264*2448
(8M)
10252
photos
5126
photos
2563
photos
1281
photos
4032*3024
(12 M)
6824
photos
3412
photos
1706
photos
853
photos