1
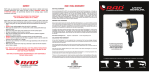
RAD® TOOL OPERATING INSTRUCTIONS
IMPORTANT: DO NOT OPERATE THE TOOL BEFORE READING THESE INSTRUCTIONS.
IF BREAKDOWN, MALFUNCTION OR DAMAGE OCCURS, DO NOT ATTEMPT TO REPAIR,
PLEASE CONTACT NEW WORLD TECHNOLOGIES INC. IMMEDIATELY.
REGULATOR CAGE SETUP
AIR PRESSURE REGULATOR
To increase air pressure (and torque),
turn the “T” handle clockwise
NOTE: THE TOOL MUST ALWAYS
BE RUNNING WHEN SETTING AIR
PRESSURE
RAD® TOOL STORAGE
1/2” NPT OUTLET
Install the supplied airline to
the 1/2” NPT outlet port on the
automatic oiler. The quick
connect fitting at the opposite
end of the hose will be
attached to the RAD® tool.
1/2” NPT INLET
Install your air supply to the
1/2” NPT female port in the
regulator. A minimum 1/2” air
line must be used capable of
100psi at 30 cfm.
LIQUID FILLED
PRESSURE GAUGE
TORQUE CHART
Always set air pressure
with tool running
WARNING LABELS
FILTER DRAIN VALVE
(bottom of air regulator and filter,
accessed from under cage assembly)
AIR FILTER
AUTOMATIC OILER
Fill the automatic oiler with air
tool oil only. Fill from the top,
or by removing and filling the
bowl, then reinstalling from the
bottom.
NOTE: AIR SUPPLY MUST BE A MINIMUM OF 100psi @ 30-50cfm
TOOL SETUP
C (Spline or Serpentine)
RAD PNEUMATIC TORQUE WRENCHES are reversible, non-impacting, torque controlled
tightening tools and must always be operated with the following:
• Clean dry air supply with a minimum flow of 100psi and 30cfm and 1/2" air line
• Cage Assembly with lubricator and regulator
• Impact Sockets
• Proper Reaction Arm
®
Where the intended usage is not with threaded fasteners, the safety of operation must be
evaluated and appropriate precautions taken. New World Technologies Inc. will be pleased to
advise you, should you have any questions.
These tools contain alloy components which may cause a hazard in certain explosive
environments.
Please call New World Technologies Inc. for further information.
Assembly
1) Blow out hoses before connecting.
2) Connect the wrench Air Inlet (A) to the outlet side of the Cage Assembly, observing airflow
direction.
3) Connect air supply to inlet side of the Cage Assembly using a minimum hose size of 1/2".
4) Check oil level in lubricator and fill to correct level.
5) Attach Reaction Arm (B) to Spline or Serpentine (C) adjacent to the Output Drive (D) of the
wrench and secure with circlip.
WARNING: TO AVOID HAZARD FROM WHIPPING AIR HOSES MAKE ALL CONNECTIONS
TO THE TOOL BEFORE TURNING ON THE AIR SUPPLY.
When the tool is in operation the Reaction Arm rotates in the opposite direction to the Output
Square Drive and must be allowed to rest squarely against a solid object or surface adjacent to
the bolt to be tightened. (See figure 2)
D (Output
Square Drive)
E (Forward and
Reverse Switch)
F (Trigger)
B (Reaction Arm)
A (Air Inlet)
WARNING: ALWAYS KEEP
HANDS CLEAR OF THE
REACTION ARM WHEN THE
TOOL IS IN USE OR SERIOUS
INJURY COULD RESULT.
Setting Torque for Bolt Tightening
Every RAD® torque wrench is supplied with an Torque Chart which relates torque
output to air pressure.
Set the torque as follows:
1) Ensure the Forward/Reverse (E) is set to "Forward".
2) Establish the air pressure required using the Torque Chart. Provided with the tool.
3) Adjust the regulator until the correct pressure is shown on the gauge.
DO NOT EXCEED MAXIMUM AIR PRESSURE SETTING
ON THE TORQUE CHART!
IMPORTANT: THE WRENCH MUST BE FREE RUNNING WHILE ADJUSTING THE
AIR PRESSURE TO GIVE THE CORRECT SETTING.
Setting Torque for Bolt Loosening
Set the torque as follows:
1) Ensure that Forward/Reverse switch is set to "Reverse".
2) Establish maximum air pressure from the Torque Chart and set the air pressure
the same as with tightening.
WARNING: EXCEEDING THE MAXIMUM AIR PRESSURE WILL OVERLOAD
THE WRENCH AND MAY CAUSE SERIOUS DAMAGE!
Operating the Wrench:
1) Fit the wrench with the correct size impact socket to suit the bolt to be
tightened.
2) Check that the Forward/Reverse switch is set correctly.
3) Rotate the handle to a convenient position relative to the Reaction Arm.
4) Fit the tool onto the bolt to be tightened with the Reaction Arm adjacent to the
reaction point. (see figure 2)
5) Squeeze the Trigger (F) partially to bring the Reaction Arm into contact with the
reaction point.
WARNING: KEEP HANDS CLEAR OF THE REACTION ARM!
WARNING: IN USE, THIS TOOL MUST BE SUPPORTED AT ALL TIMES IN
ORDER TO PREVENT UNEXPECTED RELEASE IN THE EVENT OF A
FASTENER OR COMPONENT FAILURE!
6) Fully depress Trigger and keep fully depressed until wrench stalls. If the Trigger
is released before the wrench stalls, full torque will not be applied to the bolt.
7) Release Trigger and remove the tool from bolt.
SAFETY
RAD® tools use pressurized air to develop very large forces to tighten and loosen
threaded fasteners. For your safety and that of others, WARNING LABELS and
ATTENTION LABELS are prominently attached to the carrying cages, reaction
accessories, and tools.
MAKE SURE YOU OBSERVE THE DIRECTIONS
ON THE WARNING LABELS AT ALL TIMES.
RAD® tools have been designed with safety in mind however, as with all tools you
MUST observe all general workshop safety practices, and specifically the following;
• Before using your new tool, get familiar with all its accessories and how they
work.
• ALWAYS wear safety goggles when the tool is in operation.
• Make sure the reaction arm is in contact with a solid contact point before you
operate the tool.
• Keep your body parts clear of the reaction arm and the contact point.
• Set your air pressure while the tool is running.
• Refer to the enclosed torque chart to set the correct air pressure regulator
setting for a required torque.
• NEVER exceed the maximum air pressure shown on the torque chart.
• ALWAYS use the regulator and oiler that is supplied. Failure to do this voids the
warranty and can place you in danger.
• Be sure to use a minimum 1/2” airline to the cage assembly as this will allow for
adequate air flow.
• Make sure the reaction arm snap ring is securely in place to hold the reaction
arm or blank in place.
RAD® TOOLS ARE SAFE AND RELIABLE. NOT FOLLOWING PRECAUTIONS
AND INSTRUCTIONS OUTLINED HERE CAN RESULT IN INJURY TO YOU
AND YOUR FELLOW WORKERS
NEW WORLD TECHNOLOGIES INCORPORATED IS NOT RESPONSIBLE
FOR ANY SUCH INJURY.
RAD® TOOL WARRANTY
USER
MANUAL
NEW TOOL WARRANTY
Any new tool branded with the RAD® name and purchased from New World Technologies Inc., or through one
of its authorized distributors or agents, is warranted to the original purchaser against defects in materials and
workmanship for a period of one (1) year from the date of original calibration. Under the terms of this
warranty, New World Technologies Inc., at its option and F.O.B. either its factory or an authorized service
center, will replace or repair for the original purchaser, free of charge, any part or parts, found upon
examination by New World Technologies Inc., to be defective in material or workmanship or both. If any
product or part is replaced or repaired under the terms of this warranty, that product or part will carry the
remainder of the warranty from the date of original calibration.
REPAIRED TOOL WARRANTY
Once a tool is beyond its new tool warranty, New World Technologies Inc., for a period of three (3) months
from the date of repair, will replace or repair for the original purchaser, free of charge, any part or parts, found
upon examination by New World Technologies Inc., to be defective in material or workmanship or both. If
any product or part is replaced or repaired under the terms and conditions of this warranty, that product or
part will carry the remainder of the warranty from the date of original repair.
To qualify for the above mentioned warranties, written notice to New World Technologies Inc. must be given
immediately upon discovery of such defect, at which time New World Technologies Inc. will issue an
authorization to return the tool. The defective item must promptly be returned to New World Technologies
Inc. all freight charges prepaid. When returning a tool, the reaction arm/s being used with the tool must also
be returned.
New World Technologies Inc.:
Telephone: 1 800 983 0044
Email: [email protected]
EXCLUSIONS FROM WARRANTY
At New World Technologies Inc.'s sole judgment, tools or accessories that have been altered, damaged,
misused, abused, badly worn due to excessive utilization, lost, or improperly maintained will NOT be covered
under the terms of this warranty.
Tools returned without the reaction arm/s will not be covered under the terms of this warranty.
Consumable parts and accessories (such as extensions, reaction blanks/arms) are not covered under this
warranty.
Tools that have been relabeled without prior written consent of New World Technologies Inc. will not be
covered under this warranty.
Equipment and accessories not manufactured by New World Technologies Inc. (measuring equipment, etc.)
are warranted only to the extent of the original manufacturer's warranty.
*There is no other express warranty. Implied warranties, including those of merchantability and fitness for a
particular purpose are limited to one year from date of calibration and to the extent permitted by law. Liability
for consequential damages under any and all warranties are excluded to the extent exclusion is permitted by law.
LEADING MANUFACTURER OF ADVANCED TORQUE SYSTEMS
www.radtorque.com
PNEUMATIC
BATTERY
ELECTRONIC
ELECTRIC