1
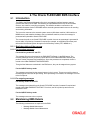
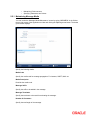
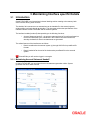
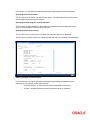
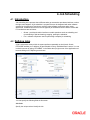
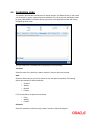
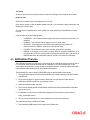
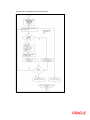
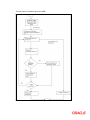
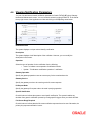
EMS Interface
Version-11.1
9NT1368-ORACLE FCUBSV.UM 11.1.0.0.0.0.0
[August] [2010]
Oracle Part Number E51575-01
Document Control
Author: Documentation Team
Group: UBPG
Created on: October 01, 2008
Revision No: Final
Updated by: Documentation Team
Reviewed by:
Development/Testing teams
Approved by: Software Quality
Assurance Team
Updated on: August 13, 2010
Reviewed on: August 13,
2010
Approved on: August 13, 2010
EMS Interface
Table of Contents
1.ABOUT THIS MANUAL..................................................................................................................................... 1-1
1.1
INTRODUCTION ........................................................................................................................................... 1-1
1.1.1
Audience ............................................................................................................................................ 1-1
1.1.2
Acronyms and Abbreviations ............................................................................................................. 1-1
1.1.3
Related Documents ............................................................................................................................ 1-1
1.1.4
Glossary of Icons ............................................................................................................................... 1-1
2.
THE ORACLE FLEXCUBE EMS INTERFACE ........................................................................................ 2-1
2.1
INTRODUCTION ........................................................................................................................................... 2-1
2.1.1
Brief description of the process ......................................................................................................... 2-1
2.2
MAINTAINING EMS DETAILS ..................................................................................................................... 2-1
2.2.1
Maintaining Message Media ............................................................................................................. 2-2
2.2.2
Message Media Control..................................................................................................................... 2-3
2.2.3
Maintaining Folder Structure ............................................................................................................ 2-4
2.2.4
Specifying Parameters and Values for fcubs.properties File............................................................. 2-5
3.
MAINTAINING INTERFACE SPECIFIC DETAILS ................................................................................ 3-1
3.1
INTRODUCTION ........................................................................................................................................... 3-1
3.1.1
Maintaining Account Statement Handoff........................................................................................... 3-1
4.
JOB SCHEDULING........................................................................................................................................ 4-1
4.1
INTRODUCTION ........................................................................................................................................... 4-1
4.2
DEFINING JOBS ........................................................................................................................................... 4-1
4.3
SCHEDULING JOBS ...................................................................................................................................... 4-4
4.4
CONTROLLING JOBS ................................................................................................................................... 4-5
4.5
NOTIFICATION PROCESS ............................................................................................................................. 4-6
4.6
VIEWING NOTIFICATION PARAMETERS..................................................................................................... 4-10
4.7
EMS PROCESS WITH SCHEDULING ARCHITECTURE ................................................................................... 4-11
4.7.2
Approach ......................................................................................................................................... 4-11
1. About this Manual
1.1
Introduction
This manual is designed to help acquaint you with the interface between Oracle FLEXCUBE and
the other systems within your bank.
This manual provides you extensive explanations about the various maintenances required for
the smooth exchange of data between Oracle FLEXCUBE and the applicable systems through
the interface. It also gives you an insight into the processes involved in the actual exchange of
data.
1.1.1 Audience
This manual is intended for the following User/User Roles:
Role
Function
Back office data entry Clerks
Input functions for maintenance related to the interface.
Back office Managers/Officers
Authorization functions.
1.1.2 Acronyms and Abbreviations
Abbreviation
Description
System
Unless and otherwise specified, it shall always refer to Oracle FLEXCUBE
system
1.1.3 Related Documents
You can refer to the XML Interface document, which outlines the details of the interface
mechanism between Oracle FLEXCUBE and a system external to it.
1.1.4 Glossary of Icons
This User Manual may refer to all or some of the following icons.
Icons
Function
New
Copy
Save
Delete
Unlock
Print
Icons
Function
Close
Re-open
Reverse
Template
Roll-over
Hold
Authorize
Liquidate
Exit
Sign-off
Help
Add row
Delete
row
Option
List
Confirm
Enter
Query
Execute
Query
Refer the Procedures User Manual for further details about the icons.
2. The Oracle FLEXCUBE EMS Interface
2.1
Introduction
The EMS or the Electronic Messaging Service is a messaging interface between external
systems and Oracle FLEXCUBE. This interface is implemented with the help of two windows
services, one each for In and Out processing. This interface enables a connection to be
established between Oracle FLEXCUBE and the external systems network resource for sending
and receiving information.
The in-service connects to the external system resource (Windows machine, UNIX machine or
MSMQ server) and transfers the data to the local windows machine, where the message is
processed and uploaded to Oracle FLEXCUBE.
The out-service polls on an Oracle FLEXCUBE out table. As soon as a message is generated in
the out table, it is picked up, formatted if required (for example, as a MS-Word document) and
delivered to the external system through one of the delivery modes (FTP, MSMQ etc.).
2.1.1 Brief description of the process
2.1.1.1 For incoming messages
For the delivery modes NT and FTP
The message files are to be placed in the EMS\SWIFT\In\Ready, in the EMS server. The
incoming message service (In-service) copies the file to the folder EMS\SWIFT\IN\WIP and
performs further processes like formatting etc. Once the processes are completed, the file is
moved to the folder EMS\SWIFT\IN\PROCESSED.
Though all the folders are maintained in the EMS server, they can be mapped to any system.
For the QUEUE delivery mode
The messages are placed by the external system in the in queue. They are moved from there to
the backup queue and sent for processing. Once processing is successful, the message is moved
to the final queue.
2.1.1.2 For outgoing messages
For delivery modes NT and FTP
The messages are selected from the Oracle FLEXCUBE out table, formatted if required and
moved to the folder EMS\SWIFT\OUT\WIP. From here, the file is picked up and moved to
EMS\SWIFT\OUT.
For the QUEUE delivery mode
The messages are sent to the out queue.
2.2
Maintaining EMS Details
The following maintenances are required for the EMS:
•
Message Media Maintenance
•
Message Media Control Maintenance
•
Maintaining Folder structure
•
Specifying Parameters and Values
2.2.1 Maintaining Message Media
You can invoke the ‘Message Media Maintenance’ screen by typing ‘MSDMEDIA’ in the field at
the top right corner of the Application tool bar and clicking the adjoining arrow button. The below
given screen displays:
Specify the following details:
Media Code
Specify the media used for message propagation. For instance, SWIFT, MAIL etc
Media Description
Describe the media code.
Message Suffix
Specify the suffix to be added in the message.
Message Terminator
Specify the terminator to be used for terminating the message.
Number of Characters
Specify the total length of the message.
Media Priority
Specify the media priority. Based on the priority, the messages are processed with the media
concerned.
Padding Required
Check this option if padding is required. Padding letters will be added at the end of each
message.
2.2.2 Message Media Control
You can invoke the ‘Message Media Control Maintenance’ screen by typing ‘MSDMCS’ in the
field at the top right corner of the Application tool bar and clicking the adjoining arrow button. The
below given screen displays:
Specify the following details:
Node
Specify the DB instance name.
Media
Select the media from the adjoining option list. The option list displays all the valid media
maintained in the system.
Status
Select the status. The following are the options available:
•
Active
•
Passive
Delivery Type
Indicate the Mode of delivery. The following are the options available:
•
Folder
•
Queue
In Directory
Specify the directory in which the message files are to be placed by external system (Only for
EMS_IN if delivery type is ‘Folder’).
Out Directory
Specify the directory in which the message files are sends to external system (Only for
EMS_OUT).
In Queue
Specify the queue in which the message files are to be placed by external system (Only for
EMS_IN if Delivery type is ‘Queue’).
Out Queue
Specify the queue in which the message files are sends to external system (Only for EMS_OUT).
Message Queue
Select the queuing software being used in bank.
2.2.3 Maintaining Folder Structure
Maintain the following folder structure:
2.2.3.1 Folder Structure for Delivery Mode Folder
You should maintain the following folder structure on the Application server machine:
The sub-folders for the media – MAIL and SWIFT – exist under the parent folder EMS.
2.2.3.2 Folder Structure for Delivery Mode Queue
You should maintain the following folder structure on the Application server machine:
The sub-folders for the media – SWIFT – exist under the parent folder EMS.
2.2.4 Specifying Parameters and Values for fcubs.properties File
You should be specify the following parameter values in fcubs.properties file
2.2.4.1 For Delivery Mode Folder
Parameter
Description
EMS_INT_QCF
Internal Queue Connection Factory. Example:
(EmsQcf)
EMS_OUT_JMS_DLQ
Out messages dead letter queue. Example:
(NOTIFY_QUEUE_DLQ)
EMS_IN_JMS_DLQ
In messages dead letter queue. Example:
(NOTIFY_QUEUE_DLQ)
EMS_FILE_TRANSFER_MODE
Mode of file transfer. Example: FTP etc.
FTP_SRVR
FTP Server IP Address. Example: 169.165.98.11(if
file Transfer Mode is ftp)
FTP_ID
FTP Server userId (if file Transfer Mode is ftp)
FTP_PWD
FTP Server Password. Example: 2fb0x66QSug=(FTP
Server Password in encrypt format)
EXG_SRVR
email server ip address or host name. Example:
mail.oracle.com
FRM_ADDR
source of email address. Example:
([email protected])
FILE_TYPE
file type. Example: .txt,.xlsx etc
SWIFT_FORMAT
1
MSG_DELIMITER
YES
MSG_TERMINATOR
YES
MEDIA
SWIFT
2.2.4.2 For Delivery Mode Queue
Parameter
Description
EMS_EXT_QCF
Out Queue Connection Factory - External System
EMS_INT_QCF
Internal Queue Connection Factory Examples(
EmsQcf)
EMS_OUT_JMS_DLQ
Out messages dead letter queue Examples
(NOTIFY_QUEUE_DLQ)
EMS_IN_JMS_DLQ
in messages dead letter queue Examples
(NOTIFY_QUEUE_DLQ)
EMS_INIT_CTX_FACT
Application server context factory class in which server
external queue create examples
(weblogic.jndi.WLInitialContextFactory)
EMS_PRVDR_URL
Application server ip address in which server external
queue create example weblogic server
t3://127.0.0.1:7001
EMS_QUEUE_PRINCIPAL
Application server User Id in which external queue
create.
EMS_QUEUE_CREDENTIALS
Application server Password in which external queue
create.
EMS_FILE_TRANSFER_MODE
Mode of file transfer Examples FTP etc..
FTP_SRVR
FTP Server IP Address Examples 169.165.98.11(if file
Transfer Mode is ftp)
FTP_ID
FTP Server userId (if file Transfer Mode is ftp)
FTP_PWD
FTP Server Password Examples 2fb0x66QSug=(FTP
Server Password in encrypt format)
EXG_SRVR
email server ip address or host name examples
mail.oracle.com
FRM_ADDR
source of email address examples
([email protected])
FILE_TYPE
file type examples .txt,.xlsx etc ..
SWIFT_FORMAT
1
MSG_DELIMITER
YES
MSG_TERMINATOR
YES
MEDIA
SWIFT
3. Maintaining Interface specific Details
3.1
Introduction
Oracle FLEXCUBE is an international universal banking solution catering to the treasury back
office functions among other modules.
The details of all customer account transactions can be handed off to the external systems
existing within your bank, through an interface. This document outlines the specifications of the
interface between Oracle FLEXCUBE and the external systems.
The interface handles (hands off) data pertaining to the following functions:
•
Account Statement hand off – the account statement hand off is performed based on
the account statement cycle, maintained in the customer account maintenance,
whereby the details of all account statements are generated.
The salient features of the interface are as follows:
•
Data is transferred to the external system (s) through ASCII files in predefined file
formats.
•
Data is handed off at the end of the business day as a Batch file to the external
system.
If Handoff fails you will need to trigger it once again.
3.1.1 Maintaining Account Statement Handoff
In Oracle FLEXCUBE, you can trigger the account statement generation online. System
generates one file for each account.
In this screen you can capture the following attributes for generating the account statement:
Specifying the account number
This is a valid account number maintained in the system. The branch where the account is held
will be displayed upon selecting the account.
Specifying the date range for account statement
The From and To date represent the date range for generating the account statement for the
account. Enter the dates in date–month-year format.
Specifying the account currency
This is a valid currency of the account for which the statement needs to be generated.
After the fields have been entered, the following screen with the account details will be displayed.
Selecting multiple account numbers
In this section you can capture the following attributes for generating consolidated account
statement for the customer having many accounts:
•
Customer Number – a valid customer number maintained in the system.
•
To Date – the date till which the account statement has to be generated.
4. Job Scheduling
4.1 Introduction
Job scheduling is the process where different tasks get executed at pre-determined time or when
the right event happens. A job scheduler is a system that can be integrated with other software
systems for the purpose of executing or notifying other software components when a predetermined, scheduled time arrives. The two types of job schedulers used in Oracle FLEXCUBE
FCJ architecture are as follows:
•
Quartz - provides scheduler interface to enable operations such as scheduling and
un-scheduling of jobs and starting, stopping, pausing the scheduler
•
Flux - software component used for performing enterprise job scheduling
4.2 Defining Jobs
A job is a business activity which the system performs repeatedly on timely basis. Oracle
FLEXCUBE enables you to define a job and schedule it using ‘Job Maintenance’ screen. You can
invoke this screen by typing ‘STDJOBMT’ in the field at the top right corner of the Application tool
bar and clicking on the adjoining arrow button.
You can specify the following fields in this screen.
Job Code
Specify the unique code to identify the Job.
Job Description
Specify a brief description of what the job is supposed to do.
Job Group
Specify the job group name to represent the same group of jobs for identification.
Job Type
Select the type of job from the drop-down list. The following options are available for selection:
•
PL/SQL
•
JAVA
Max Number Instances
Specify the maximum number of instances that needs to be queued up.
Example
If a job runs for more than the duration defined, the next instance of the same job will be ready for
processing. This parameter defines the job’s behavior in such cases,
If you maintain the job as ‘STATEFUL’, then the number of such missed instances will be queued up so that
it would start executing once this long running job ends. This field specifies the number of such job instances
that needs to be queued up.
If you maintain the job as ‘STATELESS’, it indicates the number of threads that can be executed in parallel.
If you maintain the max number instances as ‘0’,no instances are queued or parallel processed till
the current running instance is completed.
Scheduler
Specify the name of the scheduler. The system defaults the name to ‘SchedulerFactory’.
However, you can modify this name. This signifies the scheduler name which is configured as
part of infra.
Trigger Type
Select the type of the trigger from the drop-down list. The following options are available:
•
Simple - Interval based jobs.(i.e., every one hour)
•
Cron - Time based jobs.(i.e., Friday 4:30PM)
Scheduler Type
Select the type of scheduler from the drop-down list. The following options are available:
•
Quartz
•
Flux
Priority
Select the priority on which the system should execute the jobs in the scheduler from the dropdown list. The following options are available.
•
Normal
•
High
If two jobs with different priorities fire at the same time, then system gives preference to the job
with higher priority.
Message Queue
Specify the default JMS queue to which a job needs to send message. You can specify this only if
the job has to send messages to JMS.
Cron Expression
Specify the corresponding Cron expression for a job with trigger type as ‘Cron’. You need to do
this to determine the time and interval of job firing.
Class or Procedure
Specify the Java class file name if job type is ‘Java’ or the PL/SQL procedure name if the job type
is ‘PL/SQL’. This denotes which java class or pl/sql procedure the system should call when a job
fires.
Number of Submissions
Specify the number of times a job can fire before it is unscheduled from scheduler. This applies
only to trigger types maintained as ‘Simple’.
Interval
Specify the time interval between jobs. This applies only to trigger types maintained as ‘Simple’.
Trigger Listener
Specify a java class as a trigger listener which will be notified of events such as before job fired,
after job completed, misfired jobs.
Active
Check this box to set the job as active. The scheduler does not pick the inactive jobs for
scheduling.
Ds Name
Specify the name of the database schema to which the job has to connect. This attribute is used
in case of multi instance deployment of Oracle FLEXCUBE application.
Logging Required
Check this box to indicate that system should log each firing of job. This helps in logging the firing
time of job and key log info as part of that firing. This also enables tracking of each job’s firing
times and helps in identifying miss-fired jobs.
Startup Mode
Specify start up mode of the job from the drop-down list. The following options are available:
•
Auto - The job starts automatically when Oracle FLEXCUBE application starts
•
Manual - You should start the job manually in job controller by resuming the job.
Parameter Details
You can specify the job specific parameters, which are passed to job class or procedure at
runtime. The following details are captured here:
Parameter Name
Specify the name of the job parameter. The parameter name you specify here is passed to job
class or procedure at run time.
Data Type
Specify the data type of the parameter.
Parameter Value
Specify the value of the parameter.
4.3 Scheduling Jobs
All jobs for scheduling are stored in a static data store and each job is associated with a name
indicating where the job has to execute. Jobs are created in the Application Server and are
scheduled based on this data.
The job name should be unique across the schedulers available in the system.
When the application server starts, the job details from static data store will get cached. These
cached jobs will then be scheduled using either the quartz or flux scheduler.
For example, the notification process can be handled by the job schedulers as follows:
1. When a contract is created in Oracle FLEXCUBE, a database level trigger acting on the
contract main table inserts details like base table name, primary key fields, primary key
values and branch code into a notification log table and sets the process status of the
inserted record as ‘U’ (unprocessed).
2. The scheduled job polls the notification log table for unprocessed records and validates
whether notification is required.
3. If notification is not required, then the process status is set to ‘N’ (not required) in notification
log table.
4. If notification is required then notifications are sent to the respective destination and the
process status of the record is changed to ‘P’ (Processed) in notification log table.
4.4
Controlling Jobs
The details of jobs that are scheduled can be viewed using the ‘Job Details’ screen. In this screen
you can pause or resume a job that has been scheduled. You can invoke the ‘Job Details’ screen
by typing ‘SMSJOBBR’ in the field at the top right corner of the Application tool bar and clicking
the adjoining arrow button.
You can a search for a scheduled job by specifying any of the following:
Job Name
Select the name of the job that you want to search for from the option list provided.
State
Select the state of the job you want to search for from the option list provided. The following
options are possible for Quartz schedulers:
•
Acquired
•
Waiting
•
Blocked
•
Paused
For Flux schedulers, the options are as follows:
•
Firing
•
Waiting
•
Paused
Scheduler
Select the scheduler to which the job you want to search for has been assigned.
Job Group
Select the group to which the job you want to search for belongs, from the option list provided.
Next Fire Time
Select the time when the job is scheduled to be run next.
Click ‘Search’ button to view the details related to the job. You can pause a job by selecting it and
clicking the ‘Pause’ button.
You can resume a paused job by clicking ‘Resume’ button and the job is scheduled for its next
fire time.
A job can take any of the following states.
•
COMPLETE - This indicates that the trigger does not have remaining fire-times in its
schedule.
•
NORMAL - This indicates that the trigger is in the "normal" state.
•
BLOCKED - A job trigger arrives at the blocked state when the job that it is
associated with is a ‘Stateful’ job and it is currently executing.
•
PAUSED - This indicates that the job is manually paused from executing.
•
ERROR - A job trigger arrives at the error state when the scheduler attempts to fire it,
but cannot due to an error creating and executing its related job. Also, a job arrives at
ERROR state when the associated class for the job is not present in class path.
4.5 Notification Process
The notification process is in two layers. In the first layer the notification process as part of jobs in
FCJ scheduler sends minimal data required for notification to an internal JMS queue. In the
second layer the notification process as part of an MDB that listens on internal JMS queue builds
final notifications and sends them to their intended destinations.
The Notification Process in Oracle FLEXCUBE using the jobs scheduler is as follows:
1. The trigger generated from RAD inserts key details into a static notification log table instead
of Oracle AQ.
2. Once Job is triggered, a request is sent to EJB layer from job execution class and the
notification log table is polled for unprocessed records.
3. Each unprocessed record is locked.
4. The record is verified against the notification maintenance and checked whether notification
is to be sent or not.
5. If notification is to be sent, pre notification message xml is built and it is sent to internal
notify_queue(JMS queue).
6. The job is then rescheduled to fire next time based on the previous execution.
The notification process in MDB is as follows:
7. The Notification MDB listens on the internal notify JMS queue.
8. On any message received, the MDB identifies which schema to connect using the JNDI
name being present as part of the message xml.
9. Gateway notification processing package is called from MDB in order to build the actual
notifications.
10. In MDB the notifications built is processed and sent to the destination specified in
corresponding notification.
11. In case of any exception the whole transaction is rolled back.
12. If all notifications are successfully processed then transaction is committed.
The flow chart of notification process in scheduler:
The flow chart for notification process in MDB:
4.6
Viewing Notification Parameters
You can view and amend certain notification parameters in Oracle FLEXCUBE using ‘Gateway
Notification Maintenance’ screen. You can invoke this screen by typing ‘IFDNOTIF’ in the field at
the top right corner of the Application tool bar and clicking on the adjoining arrow button.
Notification Code
The system displays a unique code to identify a notification.
Description
The system displays a brief description of the notification. However, you can modify the
description in this screen.
Operation
Select the type of operation for the notification from the following.
•
Insert - to indicate a new operation of notification function
•
Update - To indicate a modification operation of notification
Gateway Operation
Specify the gateway operation name to execute query for the mentioned service.
Gateway Service
Specify the gateway service to be used to get the full screen response.
IO Request Node
Specify the gateway IO request node to be used in querying operation.
Specific Notification
Check this box to indicate the system to send specific notification. The system handles any
deviation from generic notification process by creating specific triggers once you check this field.
Full Screen Reply Required
Check this box to indicate that the full screen notification response has to be sent. Otherwise, the
primary key response notification is sent.
Head Office
Check this box to send notification only from head office.
4.7 EMS Process with scheduling architecture
4.7.1.1 The new EMS Process:
Incoming EMS Process
A job is scheduled to poll the incoming folder on timely basis. Once a message is received in the
folder, the job picks the message and sends it to an internal JMS queue. An MDB listening on the
queue will read the message and identifies the media and processes the message.
Outgoing EMS Process
A job is scheduled to poll the outgoing messages that are generated but not handed off. Each
messages polled will be sent to an internal JMS queue.
A MDB, acting upon the internal JMS queue will pick the message from queue and sends the
message to appropriate destination (Folder, or e-mail, or JMS queue).
4.7.2 Approach
The Outgoing EMS Process happens in two layers.
1. The EMS process as part of jobs in FCJ scheduler, polls the outgoing message table of
FLEXCUBE for generated and un-send messages. The job then sends minimal data about the
message to be handed off, to an internal JMS queue.
2. The EMS process as part of an MDB that listens on internal JMS queue to build final message
and to send to their intended destinations.
The Incoming EMS Process happens in two layers.
1. The EMS process as part of jobs in FCJ scheduler, which polls the pre configured folder for
messages and sends the messages read, to EMS internal queue.
2. The EMS process as part of an MDB, that listens on internal JMS queue identifies the message
from queue and calls the incoming messages service package in backend to process the
message. Additionally, the MDB can be made an independent unit to listen on external JMS to
process incoming messages.
The Incoming EMS Process as part of jobs scheduler is as follows:
1. Once job is triggered, it polls for messages in a folder(Configured for incoming messages).
2. Each message is then sent to an internal JMS queue.
3. The job is then rescheduled to fire next time.
EMS processes in MDB are as follows:
1. An MDB that listens on the internal EMS incoming queue will receive the message.
2. The media details are identified and incoming message processing package in backend is called
to process the message.
3. In case of any exception while processing, message will be sent to a deferred queue.
In case of messages directly arrive to JMS queue instead of a folder; the same MDB will be
configured to listen on specific queue.
EMS Interface
[August] [2010]
Version 11.1
Oracle Corporation
World Headquarters
500 Oracle Parkway
Redwood Shores, CA 94065
U.S.A.
Worldwide Inquiries:
Phone: +1.650.506.7000
Fax: +1.650.506.7200
www.oracle.com/ financial_services/
Copyright © [2010] Oracle Financial Services Software Limited. All rights reserved.
No part of this work may be reproduced, stored in a retrieval system, adopted or transmitted in any form or by any means,
electronic, mechanical, photographic, graphic, optic recording or otherwise, translated in any language or computer
language, without the prior written permission of Oracle Financial Services Software Limited.
Due care has been taken to make this document and accompanying software package as accurate as possible. However,
Oracle Financial Services Software Limited makes no representation or warranties with respect to the contents hereof and
shall not be responsible for any loss or damage caused to the user by the direct or indirect use of this document and the
accompanying Software System. Furthermore, Oracle Financial Services Software Limited reserves the right to alter,
modify or otherwise change in any manner the content hereof, without obligation of Oracle Financial Services Software
Limited to notify any person of such revision or changes.
All company and product names are trademarks of the respective companies with which they are associated.


![[January] [2010] Oracle Part Number E51573-01](http://vs1.manualzilla.com/store/data/005949232_1-523acd1fdebcb19bbe7f8615d255a7d7-150x150.png)