1
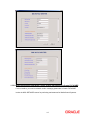
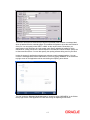
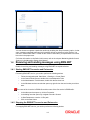
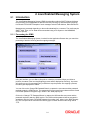
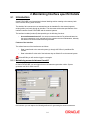
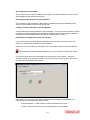
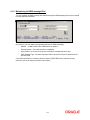
EMS.NET Interface
Version-11.0
9NT1316-ORACLE FCUBSV.UM 11.0.0.0.0.0.0
[January] [2010]
Oracle Part Number E51573-01
Document Control
Author: Documentation Team
Group: UBPG
Created on: October 01, 2008
Revision No: Final
Updated by: Documentation Team
Reviewed by:
Development/Testing teams
Approved by: Software Quality
Assurance Team
Updated on: January 04, 2010
Reviewed on: January 04,
2010
Approved on: January 04, 2010
EMS.NET Interface
Table of Contents
1.
THE ORACLE FLEXCUBE EMS.NET INTERFACE ............................................................................... 1-1
1.1
INTRODUCTION ........................................................................................................................................... 1-1
1.1.1
Brief description of the process ......................................................................................................... 1-1
1.2
INSTALLING AND UNINSTALLING THE EMS.NET SERVICES ....................................................................... 1-1
1.2.1
In-service and Out-service................................................................................................................. 1-1
1.3
MAINTENANCES REQUIRED FOR THE INTERFACE ........................................................................................ 1-2
1.3.1
EMS.NET installation check list ........................................................................................................ 1-2
1.3.2
Configuring EMS.NET....................................................................................................................... 1-3
1.4
RECEIVING AND SENDING MESSAGES USING EMS.NET ............................................................................. 1-8
1.4.1
Starting EMS.NET In-service and Out-service .................................................................................. 1-8
1.4.2
Stopping the EMS.NET In-service and Out-service ........................................................................... 1-8
1.4.3
Finding debug files ............................................................................................................................ 1-9
2.
JAVA ENABLED MESSAGING SYSTEM.................................................................................................. 2-1
2.1
INTRODUCTION ........................................................................................................................................... 2-1
2.1.1
Processing for JEMS ......................................................................................................................... 2-1
1. The Oracle FLEXCUBE EMS.NET Interface
1.1
Introduction
The EMS or the Electronic Messaging Service is a messaging interface between external
systems and Oracle FLEXCUBE. This interface is implemented with the help of two windows
services, one each for In and Out processing. This interface enables a connection to be
established between Oracle FLEXCUBE and the external systems network resource for sending
and receiving information.
The in-service connects to the external system resource (Windows machine, UNIX machine or
MSMQ server) and transfers the data to the local windows machine, where the message is
processed and uploaded to Oracle FLEXCUBE.
The out-service polls on an Oracle FLEXCUBE out table. As soon as a message is generated in
the out table, it is picked up, formatted if required (for example, as a MS-Word document) and
delivered to the external system through one of the delivery modes (FTP, MSMQ etc.).
1.1.1 Brief description of the process
For incoming messages
For the delivery modes NT and FTP: The message files are to be placed in the
EMS\SWIFT\In\Ready, in the EMS server. The incoming message service (In-service) copies the
file to the folder EMS\SWIFT\IN\WIP and performs further processes like formatting etc. Once the
processes are completed, the file is moved to the folder EMS\SWIFT\IN\PROCESSED.
Though all the folders are maintained in the EMS server, they can be mapped to any system.
For the QUEUE delivery mode: The messages are placed by the external system in the in
queue. They are moved from there to the backup queue and sent for processing. Once
processing is successful, the message is moved to the final queue.
For outgoing messages
For delivery modes NT and FTP: The messages are selected from the Oracle FLEXCUBE out
table, formatted if required and moved to the folder EMS\SWIFT\OUT\WIP. From here, the file is
picked up and moved to EMS\SWIFT\OUT.
For the QUEUE delivery mode: The messages are sent to the out queue.
1.2
Installing and Uninstalling the EMS.NET services
Details in regard to installing and uninstalling EMS.NET services are explained below.
1.2.1 In-service and Out-service
You need to perform the set of actions as described below for installing the EMS.NET services.
1. Open the windows command prompt. Go to: C:\WINNT\Microsoft.NET\Framework\v1.0.3705.
2. Type the following command line:
Installutil <path of service exe.>
For example, for In-service, your command line can be:
1-1
Installutil c:\emsexes\EMSInSrv.exe
For Out-service, your command line can be:
Installutil c:\emsexes\EMSOutSrv.exe
These will install the incoming and outgoing services as Windows services.
3. Navigate to Start Menu -> Settings -> Control Panel. In the Control panel browser, double
click on Administrative Tools. In the Administrative Tools browser, double click on the
Services icon.
4. In the Windows services console that opens, right click on the service that you wish to start.
The name of the In-service is EMSInSrv and the name of the Out-service is EMSOutSrv.
5. In the side menu that comes, click on Properties. In the dialog form that opens, go to the
LogOn tab. Enter the NT user name and password and click Apply
6. Before uninstalling the service, make sure you stop the service and also that the service
console is closed.
To uninstall the service:
Open the windows command prompt. Go to: C:\WINNT\Microsoft.NET\Framework\v1.0.3705.
Type the following command line:
Installutil /u <path of service exe.>
For example, for In-service, your command line can be:
Installutil /u c:\emsexes\EMSInSrv.exe
For Out-service, your command line can be:
Installutil /u c:\emsexes\EMSOutSrv.exe
These will uninstall the incoming and outgoing window services.
1.3
Maintenances required for the interface
Details of maintenances required for the interface are explained below.
1.3.1 EMS.NET installation check list
The check list for EMS.NET installation is detailed below.
1.3.1.1 Local system folder structure
You should maintain the following folder structure on the local Windows machine:
1-2
The sub-folders for the media – MAIL and SWIFT – exist under the parent folder EMS.
FTP
In the UNIX box, create a folder with two sub-folders, named IN and OUT. In the IN folder, create
two sub-folders – READY and FINAL.
QUEUE
Create four queues, named according to the following convention:
•
In Queue Name = “Queue Name”
•
Backup Queue Name = “Queue Name” + b
•
Final queue name = “Queue Name” + f
Example
•
In Queue Name = InQueue
•
Backup Queue Name = InQueueb
•
Final queue name = InQueuef
1.3.1.2 Folder having the binaries (.dll and .exe files)
Create a folder in the local machine for storing all the executable files. Copy all the .dll files (files
with the .dll extension in their names) and .exe files from the bin folders of all projects and paste
them into the .exe folder. For example, you could have a folder named C:\emsexes. You should
also maintain this path in the .ini file through the .ini file writer.
1.3.1.3 .INI files
Save the .ini file in a local machine folder.
1.3.2 Configuring EMS.NET
Configuration details for EMS.NET are explained below.
1.3.2.1 Maintaining of the .ini file
You have to maintain the .ini file through the .ini file writer. You can locate the necessary
executable in the binaries folder named EMSIniWritter. The .ini file is a ‘Read-Only’ file. You have
to remove this property before you run the EMSIniWritter.exe.
Double click on the Windows form executable EMSIniWritter. In this form, you can edit the .ini file.
1-3
In this screen enter the path where the .ini file has been saved. Press OK to confirm.
On your confirmation, the database connection string data is displayed if the number of database
instances that you have entered matches the number of database instances stored in the .ini file.
Otherwise, empty text boxes are displayed. Click on the NEXT button after editing the data or
after entering fresh data.
.ini file data are displayed as shown in the following five figures. You can edit the data according
to your requirements. Click on FINISH after you are done.
1-4
1-5
1.3.2.2 Media maintenance and Media Control System maintenance in Oracle FLEXCUBE
For this interface, you need to maintain certain messaging parameters in Oracle FLEXCUBE.
Invoke the MCS: DETAILED screen for performing maintenances for Media Control Systems.
1-6
You have to enter the File Prefix that you wish to be prefixed to the filename or message label,
which is handed off to the external system. This enables the System to know the source branch
of the file. You can specify either SWIFT or MAIL as the medium name. Remember, you
specification in this field has to be in the proper case. Specify whether the media for which
maintenance is being carried out is Queue based or File based and if Queue based, specify the
In Queue and Out Queue. You can also specify the queuing software being used in your bank.
Invoke the screen for performing maintenances relevant to each message medium. You can
invoke the ‘Message Media Control Maintenance’ screen by typing ‘MSDMCS’ in the field at the
top right corner of the Application tool bar and clicking the adjoining arrow button.
You can invoke the ‘Message Media Maintenance’ screen by typing ‘MSDMEDIA’ in the field at
the top right corner of the Application tool bar and clicking the adjoining arrow button.
1-7
You can choose to suppress a particular medium by enabling the ‘Stop Processing’ option. In that
case, messages supposed to be sent by this medium will not be picked up by the System. You
can enter / select either SWIFT or MAIL as the medium. Remember, you specification in this field
has to be in the proper case.
For further information on the fields in this screen, refer to the chapter ‘Maintaining Media Control
System’s in the Messaging System User Manual.
1.4
Receiving and sending messages using EMS.NET
Details for receiving and sending messages using EMS.NET are explained below.
1.4.1 Starting EMS.NET In-service and Out-service
For starting EMS.NET service, you need to perform the following actions:
•
Follow the navigation path: Start Menu -> Settings -> Control Panel.
•
In the Control Panel browser, double click on Administrative Tools.
•
In the Administrative Tools browser, double click the Services icon.
•
In the Windows services console that opens up, right click on the service that you wish to
start.
The name of the In-service is EMSInSrv and the name of the Out-service is EMSOutSrv.
•
In the side menu that opens up, click on Properties.
•
In the dialog form that opens up, navigate to the tab: General.
•
In Start Parameters, enter the .ini file path.
•
Click on the Start button.
1.4.2 Stopping the EMS.NET In-service and Out-service
For stopping EMS.NET service, you need to perform the following actions:
1-8
•
Follow the navigation path: Start Menu -> Settings -> Control Panel.
•
In the Control panel browser, double click on Administrative Tools.
•
In the Administrative Tools browser, double click on the Services icon.
•
Right click on the particular service name in the services console.
•
In the side menu that opens, click on Properties.
•
In the Service Property window, click on the Stop button.
Alternatively, you can click on the particular service name in the Services console and click on the
Stop button in the main menu screen in the Services console.
1.4.3 Finding debug files
The debug files are created in the debug path that you specify in the .ini file. The name of the Inservice debug file is EMS.txt. Debug files are generated in append mode.
The number of debug files created for the In-Service depends upon the number of ‘Delivery_by’
modes maintained for each media. The naming convention is
EMS_IN_DeliveryModeProcessID.log
Example
If a Delivery_by supports Queue, the name of the log file will look like “EMS_IN_QUEUE2432.log” where
2432 is the process id.
If a Delivery_by supports Folder, the name of the log file will look like “EMS_IN_NT1756.log” where 1756 is
the process id.
A debug file with the name ‘EMSInSrv.log’ containing information about the spawning of these
processes is also created.
The name of the Out-service debug file is a combination of EMSOut and the Process ID of the out
process spawned.
1-9
2. Java Enabled Messaging System
2.1
Introduction
The Java Enabled Messaging System (JEMS) that interfaces with the SWIFT Alliance facilitates
the processing of messages/advices that are received (incoming) by and transmitted (outgoing)
from Oracle FLEXCUBE. Examples of such messages include Credit Advices, Debit Advices etc.
Messages are processed depending on the media maintained for a customer. The media may be
SWIFT, Mail, Telex, or Fax. Data can be transmitted using a File System or the MSMQ/MQ
Series of queues.
2.1.1 Processing for JEMS
The Java Enabled Messaging System, invoked from the Application Browser lets you control the
processing of both the incoming and the outgoing messages.
Using this interface, you can Start or Stop either or both the processes. When you initiate a
process, the status of the Incoming/Outgoing process will be displayed as ‘Running’. A process
will continue to pool for messages until you decide to stop the process. On stopping a process,
the status gets displayed as ‘Halted’.
You can click on the ‘Change DB Password Button’ to capture the user name and the password
required to start the JEMS service. The password will be encrypted in accordance with the Oracle
FLEXCUBE password encryption logic, written in the JEMS property file.
Click on the ‘Change FTP Password Button’ to capture the UNIX machine user name and the
password required to start the JEMS service. The UNIX machine password will be encrypted in
accordance with the Oracle FLEXCUBE password encryption logic, written in the JEMS property
file. This is required to be done when the delivery type is ‘Folder’ and the mode being used is
‘FTP’.
2-1
The Java Enabled Messaging System is designed to be compatible with IBM's MQSA (MQ
Series Interface for SWIFT Alliance).
If for any reason, a process (Incoming or Outgoing) stops abruptly, click on ‘Refresh’ to view the
current status of the process.
2.1.1.1 Outgoing Message processing
All outgoing messages, after being generated in Oracle FLEXCUBE are stored in the
MSTB_DLY_MSG_OUT table. The status of these messages is ‘G’ implying that the messages
are generated and ready for transmission.
On initiating the Outgoing process, the messages generated in Oracle FLEXCUBE (with status
‘G’) are picked up for processing. The process will extract the messages from the
MSTB_DLY_MSG_OUT table in the form of text files and store the message files in the
appropriate directories. A separate directory is created for each media type and the directory is
addressed by the corresponding media name. For instance, the directory that stores fax
messages will be called ‘Fax’.
To recall, messages are transmitted via the media that is specified for the customer. In case of
mail messages, the process will check for the e-mail address of the customer (maintained
through the Customer Information Maintenance screen) and subsequently, sends the text file of
the message as an attachment to the concerned customer. The messages to be sent via Fax and
Telex are stored in their respective directories to be processed manually.
For processing SWIFT messages, depending on the customer’s choice, you can use a:
•
File based system or
•
Queue based system (MSMQ/MQ)
In the file-based system, the message is converted to the SWIFT standard and stored in a folder.
All the files in the folder are then transferred to the SWIFT server via the File Transfer Protocol
(FTP).
In the queue-based system, the messages are moved to the outgoing queues maintained for the
purpose.
For information on maintaining a queue, refer to the section titled ‘Maintaining Queue Details’
in this document.
After a message is processed and the hand off is successful, the message status gets updated to
‘H’ (Handed off) in the table. In the case of unsuccessful processing, the message status is
displayed as ‘R’ (Rejected).
2.1.1.2 Incoming Message processing
As in the case of the Outgoing process, so also Incoming messages received from the SWIFT
network/alliance are processed using a:
•
File based system or
•
Queue based system (MSMQ/MQ)
If the file-based system is used, the file consisting of the messages from the SWIFT network are
moved to the ‘Ready’ folder in Oracle FLEXCUBE. The messages are then extracted from the file
and stored individually in the MSTB_DLY_MSG_IN table.
2-2
In the queue-based system, the messages are processed from the incoming queues maintained
for the purpose.
For information on maintaining a queue, refer to the section titled ‘Maintaining Queue Details’
in this document.
Message Recovery
In the event, the Incoming process stops abruptly or encounters an error during processing; the
message details get logged in the Recovery table. This ensures that messages are not lost during
processing.
Every time you initiate the Incoming process, it will first check the Recovery table for the presence
of unprocessed messages. Only after processing the messages in the Recovery table, it will
proceed to process the messages from the Queue or the SWIFT server as the case may be.
2-3
EMS.NET Interface
[January] [2010]
Version 11.0
Oracle Corporation
World Headquarters
500 Oracle Parkway
Redwood Shores, CA 94065
U.S.A.
Worldwide Inquiries:
Phone: +1.650.506.7000
Fax: +1.650.506.7200
www.oracle.com/ financial_services/
Copyright © [2008] Oracle Financial Services Software Limited. All rights reserved.
No part of this work may be reproduced, stored in a retrieval system, adopted or transmitted in any form or by any means,
electronic, mechanical, photographic, graphic, optic recording or otherwise, translated in any language or computer
language, without the prior written permission of Oracle Financial Services Software Limited.
Due care has been taken to make this document and accompanying software package as accurate as possible. However,
Oracle Financial Services Software Limited makes no representation or warranties with respect to the contents hereof and
shall not be responsible for any loss or damage caused to the user by the direct or indirect use of this document and the
accompanying Software System. Furthermore, Oracle Financial Services Software Limited reserves the right to alter,
modify or otherwise change in any manner the content hereof, without obligation of Oracle Financial Services Software
Limited to notify any person of such revision or changes.
All company and product names are trademarks of the respective companies with which they are associated.
EMS Interface
Version-11.0
9NT1316-ORACLE FCUBSV.UM 11.0.0.0.0.0.0
[January] [2010]
Document Control
Author: Documentation Team
Group: UBPG
Created on: October 01, 2008
Revision No: Final
Updated by: Documentation Team
Reviewed by:
Development/Testing teams
Approved by: Software Quality
Assurance Team
Updated on: January 04, 2010
Reviewed on: January 04,
2010
Approved on: January 04, 2010
EMS Interface
Table of Contents
1.
ABOUT THIS MANUAL................................................................................................................................ 1-1
1.1
INTRODUCTION ........................................................................................................................................... 1-1
1.1.1
Audience ............................................................................................................................................ 1-1
1.1.2
Acronyms and Abbreviations ............................................................................................................. 1-1
1.1.3
Related Documents ............................................................................................................................ 1-1
1.1.4
Glossary of Icons ............................................................................................................................... 1-1
2.
MAINTAINING INTERFACE SPECIFIC DETAILS ................................................................................ 2-1
2.1
INTRODUCTION ........................................................................................................................................... 2-1
2.1.1
Maintaining account statement handoff............................................................................................. 2-1
2.1.2
Maintaining the EMS message filter.................................................................................................. 2-3
1. About this Manual
1.1
Introduction
This manual is designed to help acquaint you with the interface between Oracle FLEXCUBE and
the other systems within your bank.
This manual provides you extensive explanations about the various maintenances required for
the smooth exchange of data between Oracle FLEXCUBE and the applicable systems through
the interface. It also gives you an insight into the processes involved in the actual exchange of
data.
1.1.1 Audience
This manual is intended for the following User/User Roles:
Role
Function
Back office data entry Clerks
Input functions for maintenance related to the interface.
Back office Managers/Officers
Authorization functions.
1.1.2 Acronyms and Abbreviations
Abbreviation
Description
System
Unless and otherwise specified, it shall always refer to Oracle FLEXCUBE
system
1.1.3 Related Documents
You can refer to the XML Interface document, which outlines the details of the interface
mechanism between Oracle FLEXCUBE and a system external to it.
1.1.4 Glossary of Icons
This User Manual may refer to all or some of the following icons.
Icons
Function
New
Copy
Save
Delete
1-1
Icons
Function
Unlock
Print
Close
Re-open
Reverse
Template
Roll-over
Hold
Authorize
Liquidate
Exit
Sign-off
Help
Add
Delete
Refer the Procedures User Manual for further details about the icons.
1-2
2. Maintaining Interface specific Details
2.1
Introduction
Oracle FLEXCUBE is an international universal banking solution catering to the treasury back
office functions among other modules.
The details of all customer account transactions can be handed off to the external systems
existing within your bank, through an interface. This document outlines the specifications of the
interface between Oracle FLEXCUBE and the external systems.
The interface handles (hands off) data pertaining to the following functions:
•
Account Statement hand off – the account statement hand off is performed based on
the account statement cycle, maintained in the customer account maintenance, whereby
the details of all account statements are generated.
Features of the interface
The salient features of the interface are as follows:
•
Data is transferred to the external system (s) through ASCII files in predefined file
formats.
•
Data is handed off at the end of the business day as a Batch file to the external system.
If Handoff fails you will need to trigger it once again.
2.1.1 Maintaining account statement handoff
In Oracle FLEXCUBE, you can trigger the account statement generation online. System
generates one file for each account.
In this screen you can capture the following attributes for generating the account statement:
2-1
Specifying the account number
This is a valid account number maintained in the system. The branch where the account is held
will be displayed upon selecting the account.
Specifying the date range for account statement
The From and To date represent the date range for generating the account statement for the
account. Enter the dates in date–month-year format.
Linking a Location Code with an Account Number
Account statement can be generated for various locations. You can choose the location for which
the statement needs to be generated. Maintaining multiple locations for the customer facilitates
the sending of account statements to more than one address of the customer.
Indicating the message to be sent to a fourth party
You have the option to send the account statement to a fourth party. In case you opt for this
facility, you need to enter the details for the fourth party.
Indicate the name and address for the party for whom you want to send the account statement.
You are allowed to enter fourth party details only if you have checked ‘Fourth Party’ option
box.
If you want to generate account statement for all the accounts of the customer, , select the
‘Summary’ option. In the Summary screen, you can choose the customer for whom you want to
generate the account statement summary.
In this section you can capture the following attributes for generating consolidated account
statement for the customer having many accounts:
•
Customer Number – a valid customer number maintained in the system.
•
To Date – the date till which the account statement has to be generated.
2-2
2.1.2 Maintaining the EMS message filter
You can maintain the EMS message filter details through the EMS Message Filter screen invoked
from the Application Browser.
In this screen you can capture the following attributes for EMS messaging:
•
Module – a valid module code maintained in the system.
•
External system – the external system is displayed.
•
Queue Name – the name of the queue to which the message has to be sent.
•
Swift Message Type - the swift code that needs to be sent to the queue specified in the
previous field.
For detailed information on interface between Oracle FLEXCUBE and the relevant clearing
networks, refer to the Clearing interface user manual.
2-3
EMS Interface
[January] [2010]
Version 11.0
Oracle Corporation
World Headquarters
500 Oracle Parkway
Redwood Shores, CA 94065
U.S.A.
Worldwide Inquiries:
Phone: +1.650.506.7000
Fax: +1.650.506.7200
www.oracle.com/ financial_services/
Copyright © [2008] Oracle Financial Services Software Limited. All rights reserved.
No part of this work may be reproduced, stored in a retrieval system, adopted or transmitted in any form or by any means,
electronic, mechanical, photographic, graphic, optic recording or otherwise, translated in any language or computer
language, without the prior written permission of Oracle Financial Services Software Limited.
Due care has been taken to make this document and accompanying software package as accurate as possible. However,
Oracle Financial Services Software Limited makes no representation or warranties with respect to the contents hereof and
shall not be responsible for any loss or damage caused to the user by the direct or indirect use of this document and the
accompanying Software System. Furthermore, Oracle Financial Services Software Limited reserves the right to alter,
modify or otherwise change in any manner the content hereof, without obligation of Oracle Financial Services Software
Limited to notify any person of such revision or changes.


![[December] [2010] Oracle Part Number E51712-01](http://vs1.manualzilla.com/store/data/005705420_1-4b383e67b8ec6628c44005398bb7935f-150x150.png)