1
JKarel
A Stepping-Stone to Object-Oriented Programming in Java
User's Manual
2003 Heather Wellenius
1 Installing JKarel
JKarel depends upon the Java 2 Runtime Environment, Standard Edition 1.3.1 or later.
Mac OS X comes with this installed, but on Windows machines you can test whether this is
installed by opening a Command Prompt window and typing:
java –version
If you don't have version 1.3.1 or later, a current J2SE can be downloaded from:
http://java.sun.com/j2se/downloads.html
Unzip JKarel.zip into a directory of your choice. The directory JKarel will be created
containing all files that are needed to run the JKarel application.
Copyright 2003 Heather Wellenius
2
2 Running JKarel
JKarel has been tested to run on Microsoft Windows 98/2000/XP and Mac OS X. It may
also run on other operating systems that have a Java 2 Runtime Environment (see Installing
JKarel), but these are currently untested and the user must assume all responsibility for problems
that occur.
To run JKarel, simply double-click JKarel.jar located under the JKarel directory.
Alternatively, JKarel can be run from a Command Prompt window. Change to the JKarel
directory and type:
java –jar JKarel.jar
It is recommended that you read the next few pages of this User's Manual once you have
started the JKarel application for an overview of the various elements of the JKarel programming
environment.
Copyright 2003 Heather Wellenius
3
3 The JKarel Robot World
JKarel presents a robot world similar to the world of Karel++ (Bergin, Stehlik, Roberts,
& Pattis, 1997), composed of a grid of streets and avenues. There are one thousand streets and
one thousand avenues in the robot world. Streets run horizontally from west to east while
avenues run vertically, south to north. Robots move from one street intersection to the next and
each step is considered one block. Horizontal walls and vertical walls placed across a street or an
avenue block a robot’s path, preventing direct movement between neighboring intersections.
Beepers are objects in the robot world that robots can pick up, carry around, and put
down. Each robot carries a beeper bag to hold beepers that it finds along its path. As robots travel
around the world, they can pick up any beepers that they find on intersections and put down any
beepers that they are carrying in their beeper bag.
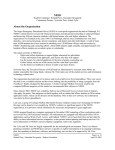
Figure 1 illustrates a JKarel world containing vertical and horizontal walls, two beepers,
and a robot. The number inside a beeper object indicates how many beepers are on an
intersection.
Figure 1 - JKarel World
A basic robot in the JKarel world can move forward one block, turn left, pick up a
beeper, and put down a beeper. It can also turn itself off when it has finished executing a
program. These basic commands will be introduced in section 5, JKarel Primitive Instructions.
Copyright 2003 Heather Wellenius
4
4 The JKarel Programming Environment
JKarel combines several tools within its programming environment to facilitate the
development of JKarel programs. As illustrated in Figure 2, it provides:
•
a program editor for writing JKarel program code
•
a grid area for building new robot worlds and viewing the graphical execution of
JKarel programs
•
log panes for viewing error messages and observing runtime information
The toolbar above the graphical world provides buttons that allow you to place walls and
beepers within the robot world. Above the editor there are buttons for saving, compiling,
executing, stepping through, and stopping the execution of a JKarel program.
Figure 2 - JKarel Application Window
There are two parts to a JKarel program: the JKarel program code and a graphical robot
world in which to run the program code. Once a world is constructed and the code is written,
then the program may be compiled and run. The following sections describe how robot worlds
Copyright 2003 Heather Wellenius
5
are built, how JKarel programs are compiled and executed, and how information that is displayed
in each of the logs can be used to debug program code.
Copyright 2003 Heather Wellenius
6
4.1 Building a Robot World
Initially, a robot world has only streets and avenues – no walls or beepers. It has a
western barrier to the left of 1st Avenue, and a southern barrier below 1st Street. It is possible to
execute a JKarel program in this empty world, and in such a world, a robot would be able to
travel almost anywhere since there are no obstacles for it to run into except the western and
southern barriers.
However, since a world without walls and beepers does not provide a basis for many
challenging JKarel programs, most programs rely on the construction of a more complex robot
world with walls and beepers. This allows for the creation of interesting tasks for a robot to
undertake.
The tools for drawing walls and beepers are located on the toolbar above the graphical
world:
Clicking on one of the three toolbar objects – representing a vertical wall, a horizontal
wall and a beeper – and then clicking anywhere in the grid draws the selected object in the robot
world at the coordinates clicked. Clicking multiple times on an intersection with the beeper tool
allows multiple beepers to be drawn on that corner. The number of beepers at an intersection is
denoted by the number drawn in the middle of the beeper.
To erase an object that has been drawn in the world, select the eraser
as well as the
object type to be erased:
In the picture above, the button for drawing a vertical wall is selected as well as the
eraser. In this configuration, clicking on any vertical wall that has been drawn in the world will
now erase that wall.
When a robot world has been completed, select Save World As… under File in the menu.
World files should be saved with a .wld extension. A saved world file can be re-opened, edited,
and saved again any time changes are made to it.
Copyright 2003 Heather Wellenius
7
4.2 Writing a Program
JKarel program code is written in the editor pane on the right side of the application
window. All program files must be saved before they can be compiled and executed, and must
have a .jkl file extension. Each program file provides a class definition that may have a main
procedure to be executed and/or a set of new robot instructions. More about the JKarel
programming language will be introduced starting in section 5, JKarel Primitive Instructions.
Copyright 2003 Heather Wellenius
8
4.3 Compiling a Program
Before a JKarel program can be executed, it must be compiled. Selecting the compile
button
will compile the current version of the program that is visible in the editor pane.
JKarel program files may be compiled at any time as they are being written, since compiling can
help identify program errors. Note that when you compile, the program will automatically be resaved.
Figure 3 - Compile Errors
Errors that are found during compiling appear in the Error Log, the 3rd tab of the log
panes. By default, only the first error encountered in a program is displayed, since subsequent
errors are often related to the first error and it is usually easier to fix one error at a time. This
option can be changed so that all errors are displayed, by selecting View All Errors under View in
the menu bar.
Figure 3 illustrates a compiled program that resulted in two syntax errors. The option to
View All Errors is selected, so all of these errors are listed in the Error Log at the bottom left
corner of the JKarel application window, and can be associated with specific lines of code
Copyright 2003 Heather Wellenius
9
displayed in the editor. The current line number (indicating the cursor's location in the editor
pane), is displayed below the editor pane.
Once all errors have been corrected, the program will compile successfully and will be
ready for execution.
Copyright 2003 Heather Wellenius
10
4.4 Executing a Program
A JKarel program file that has successfully compiled is ready for execution. If the
program relies on a particular robot world configuration in order to execute successfully, ensure
that this world has been created or opened before beginning execution of the program.
There are two ways to execute a program: playing straight through from beginning to
end, or stepping through one statement at a time. To execute the entire program from start to
finish, select
(Play). To step through the program code, select
(Step). It is possible to
step through a portion of a program and then play to the end, or play from the beginning and then
select the step button part of the way through in order to move slowly through the last few lines
of the program. The step button can also be thought of as a 'pause' in execution. At any point
during play or step execution, the stop button
may be selected to terminate execution of the
program.
A slider is provided to allow playback of a program in a range of speeds. It can be
adjusted during execution to fast-forward through a repetitive portion of code, or slowly advance
through a troublesome part.
During execution, there are two logs that display runtime information. The Execution
Log (1st tab in the log pane) displays each statement as it is executed. The Robot Log (2nd tab in
the log pane) lists all robots that currently exist in the world, and provides their current location,
direction, and the number of beepers they are carrying. These logs can be useful in debugging a
program that has compiled successfully, but is still not executing in the desired manner.
Program code is highlighted line-by-line in the editor as it executes in order to indicate
the statement that is currently executing. By following the highlighted code while stepping
slowly through the program, and by watching the execution in both the graphical world and the
Execution Log, errors can more easily be detected.
Copyright 2003 Heather Wellenius
11
4.5 Printing a Program
There are two ways you can print a JKarel program file – from within the JKarel
application, and from any simple text editor. PC users can use the print
icon on the JKarel
toolbar. This will print the program in the editor pane to the default printer connected to your
computer. There are inconsistencies with this way of printing depending on the printer –
selecting more than one copy may print the copies continuously without page separation. And
some printers may need a manual form feed to complete the printing.
Mac users and those who have trouble printing from within the JKarel application should
use the second method of printing. Open a JKarel program or copy and paste a program from the
JKarel editor pane into a text editor such as Notepad or Simple Text, and print it from within this
text editor.
Copyright 2003 Heather Wellenius
12
5 JKarel Primitive Instructions
UrRobot is the most basic type of robot in the JKarel language. It includes five
primitive instructions for performing the actions that are available to robots.
class UrRobot:
void move()
// A robot moves forward one block
void turnLeft()
// A robot turns 90 degrees to the left
void pickBeeper()
//
//
//
//
//
void putBeeper()
void turnOff()
A robot picks up a beeper from an
intersection to put in its beeper bag
A robot puts a beeper onto an
intersection from its beeper bag
A robot turns itself off
In a basic JKarel program, a robot of type UrRobot is initialized and the instructions
listed above are used to send a message to this robot. The following format is used for the
simplest JKarel programs that only include a main procedure:
class <NewClassName>
{
main
{
<robotInitialization>
<instruction>
...
<instruction>
}
}
A new class name, symbolized by <NewClassName>, can be made up of any
combination of letters, digits and the underscore character ('_'), but must begin with a letter, and
must not be one of the reserved words in JKarel. A list of JKarel reserved words is provided at
the end of this manual. By convention, class names begin with a capital letter.
The main procedure defines a task that a robot will do. It begins with a robot
initialization, followed by any number of instructions. When the main procedure ends, the
program ends.
Copyright 2003 Heather Wellenius
13
Robot initializations have a syntax that includes the name of the class (or type of robot)
being created, a name given to the robot and used to send messages to it, the keyword new, and
information about the robot’s initial street, avenue, direction, and the number of beepers it is
carrying. The following initialization creates a robot of type UrRobot named jkarel, and places
him on 1st Street and 1st Avenue, facing East, and carrying 2 beepers:
UrRobot jkarel = new UrRobot(1, 1, East, 2);
Each activity that a robot can perform is also known as a method. All instructions in a
main procedure following the robot initialization include the name of the robot, a period (or dot),
and the name of the method, as in the following:
jkarel.move();
The method name is followed by parentheses. Every instruction of this kind ends with a
semi-colon and it is good programming practice to place each instruction on a new line.
A complete program moving a robot three blocks east in the robot world and then turning
off, looks like this:
class Move3Blocks
{
main
{
UrRobot kate = new UrRobot(1, 1, East, 0);
kate.move();
kate.move();
kate.move();
kate.turnOff();
}
}
Copyright 2003 Heather Wellenius
14
5.1 Writing New Instructions
A class definition can also define new methods in addition to a main procedure. In order
to define new methods, a class must extend an existing class definition using the following
format:
class <NewClassName> extends <OldClassName>
{
<newMethodDefinition>
<newMethodDefinition>
main
{
<robotInitialization>
<instruction>
...
<instruction>
}
}
UrRobot is the class that will usually be extended in your first programs, since it
defines the basic robot instructions introduced so far. If a class is extended that does not exist, a
compile error will be generated. New method definitions are included at the top of the new class,
above the main procedure, and have the following format:
void <methodName> ( )
{
<instruction>
...
<instruction>
}
The rules for valid method names are the same as for valid class names – letters, digits
and the underscore character are all valid characters to use, but the name must begin with a letter
(by convention, methods begin with a lowercase letter to differentiate them from classes).
Similar to class names, method names must not be one of the JKarel reserved words. Unlike
instructions in the main procedure, instructions in a method do not specify a robot name. They
simply provide the method name, parentheses, and semi-colon, as in the following:
move();
Copyright 2003 Heather Wellenius
15
The following example combines all of the elements of a JKarel program outlined so far
in a program that creates a robot of type UrRobot, and instructs it to 'sweep' the beepers off of a
flight of stairs.
5.2 StairSweeper Example
The following example illustrates the construction of a simple robot world and the
program code that goes along with it. The first step is to build the robot world. Then, a class is
written for a new type of robot called a StairSweeper. A main procedure is written that
creates a StairSweeper robot and calls the StairSweeper methods to allow this robot to
collect all of the beepers in the world.
Using the Vertical Wall, Horizontal Wall, and Beeper buttons on the toolbar, build the
robot world illustrated in Figure 4. It is composed of three stairs, each topped with one beeper.
This world can be saved with any name, but for the purposes of this example, we will call it
stair.wld. This file is also included with the JKarel program and can be opened from File in the
menu bar.
Figure 4 - Robot World for StairSweeper Program
Now we will create a new type of robot, called a StairSweeper, which defines two
new methods: turnRight() and climbStair(). Select New Program File from File in the
menu bar, and copy into it the following lines of code (or select Open Program File and open the
included copy of StairSweeper.jkl):
Copyright 2003 Heather Wellenius
16
// New class to define a robot that will be able to
// climb stairs and pick up a beeper from each stair.
class StairSweeper extends UrRobot
{
// Turning right is accomplished
// with 3 left turns.
void turnRight()
{
turnLeft();
turnLeft();
turnLeft();
}
// Climbing a stair assumes the robot begins facing
// towards the stair, and ends facing in this same
// direction after climbing to the next stair.
void climbStair()
{
turnLeft();
move();
turnRight();
move();
}
// The main procedure creates a StairSweeper
// robot, and has it climb 3 stairs, picking
// up a beeper from each.
main
{
StairSweeper alex = new StairSweeper(1,1,East,0);
alex.climbStair();
alex.pickBeeper();
alex.climbStair();
alex.pickBeeper();
alex.climbStair();
alex.pickBeeper();
alex.turnOff();
}
}
// End of Program
Save this program file as StairSweeper.jkl. Note that the name of the class must be the
same as the file name (StairSweeper is the name of the class in this example, so the file must be
called StairSweeper.jkl).
This class defines turning right as making three left turns, since robots only know how to
turn left. It then defines climbing a stair as a sequence of four actions: turning left (to face north),
moving (to get one block north), turning right (to face east), and moving again (to get one block
east). Note that it is necessary to define the method turnRight() before using it in the
method climbStair(), since using a class or a method before it has been defined is not
Copyright 2003 Heather Wellenius
17
allowed. Trace this sequence of actions for climbing a stair in the world you created to see that it
works.
The main procedure creates a robot of type StairSweeper and then calls the methods
climbStair() and pickBeeper() alternately to move into position and pick up the beeper
on each stair. Initially, the robot is placed at the coordinates (1, 1) facing east. It is carrying no
beepers at the beginning, but by the end of the program it will be carrying 3 beepers. This change
in the robot's position, direction, and beeper count can be monitored in the Robot Log during
program execution.
After saving this program file, select compile
from the toolbar. A message should
appear to let you know that the compile has completed successfully. If there are any errors found
in the program file, they will be displayed in the Error Log. Look for the line numbers specified
in the error message(s) and correct the mistake(s) in the code. Save the program file again, and
re-compile it.
When the program has been successfully compiled, select the play
button. Watch the
execution in the world you built. When execution finishes successfully, the application should
appear as in Figure 5, with the robot pictured on the top stair facing east.
Figure 5 - Successful Execution of StairSweeper
Copyright 2003 Heather Wellenius
18
After execution has completed, the Execution Log should display the text below. The
different levels of indentation represent methods called from within other methods. Each
statement also identifies the object upon which a command is being executed, which may be
useful in later programs that initialize two or more robots.
Instantiated: StairSweeper: alex
Executing on alex: climbStair()
Executing on alex: turnLeft()
Executing on alex: move()
Executing on alex: turnRight()
Executing on alex: turnLeft()
Executing on alex: turnLeft()
Executing on alex: turnLeft()
Executing on alex: move()
Executing on alex: pickBeeper()
Executing on alex: climbStair()
Executing on alex: turnLeft()
Executing on alex: move()
Executing on alex: turnRight()
Executing on alex: turnLeft()
Executing on alex: turnLeft()
Executing on alex: turnLeft()
Executing on alex: move()
Executing on alex: pickBeeper()
Executing on alex: climbStair()
Executing on alex: turnLeft()
Executing on alex: move()
Executing on alex: turnRight()
Executing on alex: turnLeft()
Executing on alex: turnLeft()
Executing on alex: turnLeft()
Executing on alex: move()
Executing on alex: pickBeeper()
Executing on alex: turnOff()
Turning off now...
The Robot Log also displays runtime information pertaining to the current state of the
robot(s) in the world. It lists all robots in the world at the current time, along with their position,
direction, and the number of beepers they are carrying. The final display in the Robot Log after
execution of the StairSweeper program is the following:
alex:
Street: 4
Avenue: 4
Facing: East
Beepers: 3
Copyright 2003 Heather Wellenius
19
This identifies the robot alex as the only robot in the world at this time, and places him at
the coordinates (4, 4), facing East, and carrying 3 beepers. Try using the step button to step
through the program again. Press
Copyright 2003 Heather Wellenius
to see the execution of each statement.
20
6 Repetition Instructions
Repeating the same instruction or a sequence of instructions several times in a program
can lead to very long program code. Repetition instructions are helpful in specifying that a block
of code (a group of instructions set apart by curly braces) is to be executed a certain number of
times. The keyword loop is used, and the format for a loop block is the following:
loop ( <positiveNumber> )
{
<instruction>
...
<instruction>
}
The number of times to repeat the instructions within this block of code is specified
within the parentheses, indicated by <positiveNumber>. The turnRight() method from the
StairSweeper example provides an example of when the loop instruction could be used. Instead
of listing the same instruction three times, a loop is used to indicate this repetition:
void turnRight()
{
loop(3)
{
turnLeft();
}
}
Copyright 2003 Heather Wellenius
21
6.1 Example using loop
As an example of how a loop instruction becomes very useful, the following method uses
2 loops, one nested inside the other, to allow a robot to walk around a square with sides that are 6
blocks long. If a robot is placed at the origin (1, 1) facing east and executes this method, it will
walk 6 blocks east to (1, 7) and turn left, then 6 blocks north to (7, 7) and turn left, then 6 blocks
west to (7, 1) and turn left, and finally 6 blocks south to get back to (1, 1). It will do a final
turnLeft() and end facing east.
void walkSquareOfLength_6()
{
loop(4)
{
loop(6)
{
move();
}
turnLeft();
}
}
Copyright 2003 Heather Wellenius
22
7 Conditional Instructions
So far, the JKarel programs we have written can only be applied to specific robot worlds.
Given different worlds, executing a move(), pickBeeper() or putBeeper() instruction
in the program would cause an error shutoff if the robot tried to walk into a wall or handle a
beeper that wasn't there.
There are instructions in the JKarel language that allow a robot to look around and
determine if a particular action can be performed given his surroundings. By testing his
surroundings, a robot can determine if he is in a position to execute one of these instructions
before actually executing it, and avoid an error shutoff when the program is applied to different
worlds. Conditional instructions are used to test, and are written using the keyword if:
if ( <test> )
{
<instruction>
...
<instruction>
}
A test, indicated above by <test>, is a method that determines if something is true or
false. Methods used for testing, called predicates, can send back a boolean value – true or false.
When the test within an if instruction returns true, the instructions within the curly braces are
executed. However, if the test returns false, then the instructions within the curly braces are
skipped and execution continues with the instruction immediately after the entire block of code
that comprises the if instruction.
The next section describes a more advanced class of robot defined in JKarel that knows
how to determine information about its surroundings using predicates.
Copyright 2003 Heather Wellenius
23
7.1 Robot class
JKarel defines two classes of robots for use in programs and as the basis for new JKarel
classes. We have looked at class UrRobot, which defines the most basic robot actions. Class
Robot, which extends UrRobot, defines another type of robot. A Robot can do
everything an UrRobot can do as well as provide information about its surroundings. It can
indicate if it is standing next to a beeper or next to a robot, if it is facing in a particular direction
or carrying any beepers, and if the path in front of it is clear of a wall, enabling it to move
forward.
The methods in class Robot are provided in the definition below. Like class UrRobot,
the Robot class may also be extended in order to create new classes with other predicates based
on the eight predicates provided here.
class Robot:
boolean frontIsClear()
// Is a robot's path blocked by a wall?
boolean nextToABeeper()
boolean facingNorth()
//
//
//
//
//
boolean facingSouth()
// Is a robot facing south?
boolean facingEast()
// Is a robot facing east?
boolean facingWest()
// Is a robot facing west?
boolean nextToARobot()
Is a robot on a corner with
a beeper?
Is a robot on a corner with another
robot?
Is a robot facing north?
boolean anyBeepersInBeeperBag()
Copyright 2003 Heather Wellenius
// Does a robot have any beepers
// in its beeper bag?
24
7.2 Example using if
The following example demonstrates how predicates are used in if instructions to enable
a robot to face north, regardless of his current direction. When this method executes, if the robot
is facing east he must only turn left once, but if he is facing south he must turn twice and if he is
facing west he must turn three times. If he is already facing north when this method is invoked,
nothing will happen to change the direction he faces.
Note that the method in this example can only be invoked on a robot of type Robot, not
a robot of type UrRobot, since an UrRobot is not able to use the predicates defined in class
Robot (such as facingEast() or facingSouth()).
void faceNorth()
{
if (facingEast())
{
turnLeft();
}
if (facingSouth())
{
turnLeft();
turnLeft();
}
if (facingWest())
{
turnLeft();
turnLeft();
turnLeft();
}
}
Copyright 2003 Heather Wellenius
25
7.3 Predicates
New predicates can be written in any class that extends class Robot. The format of a
predicate is exactly the same as that of a regular method in JKarel, except that the return value is
boolean instead of void. A very simple predicate might look like this:
boolean frontIsBlocked()
{
return !frontIsClear();
}
There are three parts to the instruction in this predicate. The keyword return is used to
send either a true or false value back to whoever called this predicate. In order to determine
whether true or false should be returned, frontIsClear() is evaluated. The symbol '!' means
not, and negates whatever value follows it. Putting these pieces all together, this predicate will
return true if 'front is not clear' and return false if 'front is clear'.
The next predicate example illustrates the use of a conditional to determine what value
will be returned. If nextToABeeper() evaluates to false, the predicate should always return
false. In this case the keyword false may be used in the return instruction instead of a call
to another predicate. Similar usage of the keyword true is also allowed in return statements.
boolean nextToABeeper_AND_frontIsBlocked()
{
if (nextToABeeper())
{
return !frontIsClear();
}
return false;
}
Copyright 2003 Heather Wellenius
26
7.4 if/else Instruction
Sometimes certain actions should be performed only if a certain condition is true, and
other actions should be performed only if that same condition is false. The if/else instruction
allows this distinction to be made.
if (frontIsClear())
{
move();
}
else
{
turnLeft();
}
In the preceding example, a robot needs to either move forward (if there is no wall
blocking his path), or turn left to avoid crashing into a wall. The if instruction allows a set of
instructions to be executed if a condition is true and else allows a different set of instructions to
be executed if the condition is false.
Copyright 2003 Heather Wellenius
27
8 Another Repetition Instruction
The repetition instruction, loop, allows a block of code to execute a specific number of
times. As we saw in the previous section, it is sometimes preferable to use tests to determine
whether actions should execute. Similarly, it is often preferable to use a test to determine how
many times a block of code will be executed. The while instruction allows repetition of a block
of code as long as a test remains true. It has the format:
while ( <test> )
{
<instruction>
...
<instruction>
}
The test in a while instruction is just like a test in an if instruction. However, the test
is re-evaluated after every repetition of the instructions, and these instructions continue to be
executed until the test returns false.
The following example uses the predicate nextToABeeper() to test if there is a
beeper on the same corner as the robot. As long as there is at least one beeper, the robot picks it
up and tests for another beeper. This results in all beepers being picked up before the method
ends. Note that this example works even if there are no beepers on the corner!
void clearCornerOfBeepers()
{
while (nextToABeeper())
{
pickBeeper();
}
}
Copyright 2003 Heather Wellenius
28
Reserved Words
The following list of words contains keywords in the JKarel language, none of which can
be used as class names, robot names or method names.
boolean
class
East
else
extends
false
if
import
loop
main
North
return
South
true
void
West
while
References
Bergin, J., Stehlik, M., Roberts, J., & Pattis, R. (1997). Karel++: A gentle introduction to the art
of object-oriented programming. New York: John Wiley & Sons.
Copyright 2003 Heather Wellenius
29