1
688 Attack Sub
688 ATTACK SUB
USER MANUAL
-------------------------------------------------------------------------------
TABLE OF CONTENTS
1
2
3
4
5
6
7
Welcome Aboard.....................................................1
About the Game.....................................................1
Using This Manual..................................................2
Getting Started....................................................2
How to Get Help....................................................9
Quick Start Guide to TORPEX '89...................................10
Missions..........................................................18
Game Controls.....................................................29
Configuring 688 to Your Computer..................................29
Playing by Modem..................................................30
Using Two Modems..................................................30
Using a Null Modem Cable..........................................33
Other Game Controls...............................................34
Russian Script On/Off.............................................34
Sound On/Off......................................................34
Surrender.........................................................34
Turning Off Your Mouse............................................34
Boss Key..........................................................35
Submarine Controls................................................36
Reading Your Displays.............................................36
Radio Room........................................................42
Navigation Board..................................................43
Ship's Control Panel..............................................45
Sonar Room........................................................46
Periscope.........................................................48
Weapons Control Panel.............................................49
Status Panel......................................................51
Submarine Warfare.................................................52
Technical Reference...............................................60
Submarines........................................................60
Weapons...........................................................61
Ships.............................................................65
Aircraft..........................................................68
Appendix A........................................................70
Glossary..........................................................71
Index.............................................................73
Seite 1
688 Attack Sub
-------------------------------------------------------------------------------
1
WELCOME ABOARD
==============
There are only two kinds of ships: submarines and
targets.....
You are hereby given command of a nuclear-powered attack submarine, the
world's most powerful and versatile ocean-going defense weapon. You are
now a hunter/killer, a predator of the deep. You play a silent, sometimes
lethal game of hide and seek. Every minute you make countless decisions
that may have grave consequences for you, your crew....even your country.
About the Game
==============
You command an American Los Angeles or Soviet Alfa class submarine. You
prowl through a dark, undersea world, carrying out dangerous missions that
require predatory cunning and bold action. In peacetime, you track and hunt
potential enemies. In war, you ambush enemy convoys and defend your
warships; stalk ballistic missile submarines and duel other hunter/killers;
strike at inland targets from enemy waters and live to tell about it.
All the major systems of a modern attack submarine -- sonar, weapons
navigation, helm, radio and periscope -- are at your disposal. Over 40
separate controls let you feel what it's like to operate the world's most
sophisticated -- and deadly -- defense technology. At the same time, crew
transmissions and pictures remind you that as captain you manage men as
well as machines.
688 Attack Sub turns the most up-to-date technical information available
concerning subs into one of the hottest games on the market. Whether you
play the computer or challenge a friend to a modem game, you'll get hours
of pleasure from 688 Attack Sub's exciting graphics, fast pace, attention to
detail and variety of player options.
1
-------------------------------------------------------------------------------
Using This Manual
=================
This manual was written for IBM or IBM-compatible computers. If you're
using another type of computer, some commands and features described in
this manual may be different or unavailable on your computer system. If
you're using any computer OTHER than an IBM or IBM-compatible computer,
please read the Command Summary Card included in the package for
information specific to your computer.
The manual is both an introduction to the 688 Attack Sub simulation and a
reference manual. It's divided into two parts so you don't have to read it all
the way through in order to start playing.
Seite 2
688 Attack Sub
Chapters 1-2: Introduction to 688 -- The first two chapters are designed to
get you into the game quickly and painlessly. By no means do you have to
read both chapters -- if you're the type of player who doesn't like to read
manuals, follow the step-by-step instructions in Chapter 1 and you'll be
ready to choose a mission and begin play. However, the fastest way to get
your finger on the launch button is to let the Quick Start Guide in Chapter 2
lead you through the first mission, TORPEX '89. By showing you how to set
up an attack on several decommissioned warships, the Quick Start Guide will
introduce you to the sub's controls and basic game concepts.
Chapters 3-7: Captain's Reference -- Refer to these chapters only when
you need to know about something specific -- missions, controls, tactics,
or ship and weapon specifications.
Getting Started
===============
To play 688 Attack Sub, you need a computer with at lease one floppy drive
and 384k of free memory. Your system must be running on DOS 2.0 or
higher.
688 Attack Sub has an unusually large number of detailed screens, bitmaps
and text; in fact, over two megabytes of information, all of which had to be
compressed several times to fit onto the floppies included in the package.
The result is YOU CAN'T PLAY FROM THE ORIGINAL 688 DISK(S). Instead
2
-------------------------------------------------------------------------------
an install program on your original 688 disk creates a copy of the game from
which you'll play. The install program configures the game to your current
system. If you upgrade your system, you should create a new copy of the
game. The time it takes to make a copy of the game varies depending on your
hardware. Although the process can take up to several minutes, we felt the
extra time was a fair trade for the game's stunning graphics and fine detail.
5.25" users: You'll find two disks in the package: Disk #1 and Disk #2.
During installation, you'll have to swap these disks.
3.5" users: The entire game has been packed onto one disk. Whenever you're
asked to insert an original Disk (#1 or #2), insert the single disk included
in the package.
Installing 688 Attack Sub on a Hard Disk
========================================
To copy all the files from the original 688 disks to your hard disk, do the
following:
1.
2.
3.
4.
5.
6.
Turn on your computer and wait for the DOS prompt.
Insert the original Disk #1 in drive A or B.
Type A: or B: (whichever drive the original disk is in) and press <ENTER>.
Type INSTALL and press <Enter>. On slow machines, you may not see
anything on your screen for about a minute.
You'll be asked what kind of disks you want to install the game on. Type
1 and press <Enter> to install the game on your hard disk.
Next, you'll be asked where the original Disk #1 is. Type A or B
(whichever drive the original Disk #1 is in) and press <Enter>.
Seite 3
7.
8.
9.
688 Attack Sub
The machine will want to know which drive on your hard disk you're
going to install 688 Attack Sub on. The default drive is C. Press <Enter>
to install the game on drive C, or type the letter of the drive you want to
install it on, then press <Enter>.
Finally, you'll need to name the directory that the game will be stored
under, "688" is the default name. Press <Enter> to name the directory
"688", or type in a new name and then press <Enter>.
The install program will tell you when to take out Disk #1 and insert Disk
#2. When the installation is complete, put away the original disks for
safekeeping.
3
-------------------------------------------------------------------------------
When you want to start playing:
1. If you have a mouse, plug it in and load your mouse driver. If you're
using a Covox Speech Thing (tm), plug it in too.
2. Type CD\ and the name of the directory that the game is stored under
(for instance, if you chose the default name, "688", you'd type CD\688).
Press <Enter>.
3. At the prompt, type 688 and press <Enter>.
4. Type in the number of the monitor and color adaptor appropriate to
your computer: 1 for EGA, 2 for Tandy 1000, 3 for CGA, 4 for VGAMCGA, 5 for Hercules.
5. Type in the number of the sound adapter appropriate to your computer:
0 if you only have an internal speaker; 1 if you have an Ad Lib (tm) board;
2 if you Covox Speech Thing. What you hear depends on what
you have. If you only have an internal speaker, you won't hear the title
music but you'll still get sound effects (however, a Tandy computer
with Enhanced Sound Capability gives you both). The Ad Lib board reproduces the title music the best, but relies on the internal speaker for
sound effects. The Speech Thing reproduces both reasonably well. A
Tandy with Enhanced Sound Capability and an Ad Lib Board will give
you the best sound quality for the game.
6. Press the SPACEBAR to go directly to the MISSION SELECTION screen.
Installing 688 Attack Sub on Floppy Disks
YOU CAN'T PLAY FROM THE ORIGINAL 688 DISKS, so you'll have to install
the game on floppy disks from which you can play. Please format ONE of the
following configurations of disks before you do anything else:
A) two 5.25" 360K floppy disks
B) one 5.25" 1.2MB or one 3.5" 1.44MB floppy disk
C) two 3.5" 720K floppy disks
See your DOS manual if you don't know how to format disks. If you get one
of these messages during installation of game play, do the following:
Insert the disk with batch file
and press any key when ready
You should insert your
copy of 688 Disk #1
Insert disk with command.com:
You should insert your
DOS disk
4
------------------------------------------------------------------------------Seite 4
688 Attack Sub
To install the game on your blank disks, do the following:
1. Boot your system with DOS (2.0 or higher).
2. Insert the original 688 Disk #1 in drive A or B. Type A: or B: (whichever
contains the original disk) and press <Enter>.
3. Type INSTALL and press <Enter>. On slow machines, you may not see
anything for about a minute.
4. You'll be asked what kind of disks you want to install the game on. Type
the number of the disk configuration that's appropriate to you. 2 if you
have one 5.25" 1.2MB or one 3.5" 1.44MB floppy disk; 3 if you have two
5.25" 360K floppy disks; or 4 if you have two 3.5" 720K floppy disks.
Press <Enter> to choose the disk configuration.
5. The machine will ask if you have these disks ready at this time. Press
<Enter> if you have the blank disks read. If not, return to DOS by typing
NO and pressing <Enter>.
6. Follow the onscreen instructions. You'll have to swap disks from time
to time. When the installation is complete, put away the original disks
for safekeeping.
You only need one drive to play.
When you're ready to start:
1. If you have a mouse, plug it in and load your mouse driver. If you're
using a Covox Speech Thing, plug it in too.
2. Insert your copy of Disk #1 into drive A or B.
3. Type A: or B: (whichever contains the copy), the press <Enter>.
4. Type 688 and press <Enter>.
5. At the prompt, type in the number for the monitor and color adapter
appropriate to your computer: 1 for EGA, 2 for Tandy 1000, 3 for CGA,
4 for VGA-MCGA, 5 for Hercules.
6. At the next prompt, type in the sound adapter appropriate to your
computer. Type in the number of the sound adapter appropriate to your
computer: 0 if you only have an internal speaker; 1 if you have an Ad Lib
board; 2 if you have a Covox Speech Thing. What you hear depends on
what you have. If you only have the internal speaker, you won't hear the
title music but you'll still get sound effects (however, a Tandy computer
with Enhanced Sound Capability gives you both). The Ad Lib board reproduces the title music best, but relies on the internal speaker for
sound effects. The Speech Thing reproduces both reasonably well. A
Tandy with Enhanced Sound Capability and an Ad Lib board will give
you the best sound quality for the game.
5
-------------------------------------------------------------------------------
7. Press the SPACEBAR to go directly to the MISSION SELECTION screen.
Commanding 688 Attack Sub
=========================
The 688 Attack Sub simulation is divided into levels. At the top level is
the CONN (Conning tower), the game's main menu. From the CONN you can go
to different STATIONS. Each station is identified by its own icon which
appears as your cursor passes over the area.
Status Panel -+
|
+- Ship's Control
+- Weapons Control
| Panel
| Panel
|
|
Seite 5
688 Attack Sub
+-------------|---------|-------------------|-----------+
|
|
|
|
|
|
|
v
|
|
|
v
v
|
|
/|\
|
|
.-=!!==.
---+---=======+
|
|
\|/
|
|
|
| /\/
|
|
-( )( )/-\ |
| ^
|
() () |
| |
|
|
| |
+-------------------+
^
|
| |
|
|
|
|
|
| |
|
|
X
|
|
|
| |
|
|
|
|
|
| |
|
|
^
|
|
|
| |
|
|
|
|
|
|
+--|-------------------------|----|-----------------|---+
|
|
|
|
+- Radio Room Periscope -+
+- Navigation
+- Sonar Room
Board
Figure 1.1: 688 CONN
At each of the stations are controls for different parts of the sub.Some of the
controls are clustered into control groups; for instance, the controls for the
sound filter, active sonar and towed array make up the Sonar Control group.
The stations and their controls are "hot spots", areas that perform functions.
You give commands by moving the cursor to a hot spot and press
<Enter> or clicking a mouse button. There are two ways to move the cursor:
Using a mouse: A mouse (with a Microsoft(r)-compatible mouse driver) is
by far the easiest way to play the game. Your cursor will change color and/
or shape when it's over a hot spot. Click any button on your mouse to select
that function. If you encounter problems with your mouse, you may have to
disconnect it and use the keyboard to move the cursor. Turn to p.34 for
information on disconnection the mouse.
6
-------------------------------------------------------------------------------
Using the keyboard: Move the cursor using the <Tab> key and the arrow
keys. Pressing <Tab> while holding the <Shift> key down moves through the
groups in reverse. Use <Tab> or <Shift> + Tab to tab through the different
control groups; then use the right and left arrow keys (<- ->) to move the
cursor between positions within a control group. The up and down arrow
keys (^ v) will move the cursor through all the controls regardless of their
groupings (^ moves the cursor to the left; v moves the cursor to the right).
688 Attack Sub also has quick keys that instantly move your cursor to a
station of function. On every screen, each control group has been assigned
a number -- the number keys will move your cursor to the control groups
you see onscreen. The function keys (<F2>-<F10>) take you to the submarine's stations. Within each station, different controls have been assigned
letter keys (for example, pressing R at the Ship's Control Panel will move
your cursor immediately to the rudder control).
For the game's keyboard interface, see the table on the back inside cover of
Seite 6
688 Attack Sub
this manual.
In the rest of the manual, "select" means moving your cursor to a station or
control and activating it by pressing <Enter> or clicking the mouse button.
Choose a Mission, Configure 688
===============================
Choose a mission (mission descriptions begin on page 18). Once you select
a mission, the CONFIGURATION PANEL comes up. Set the sound, play level
and whether you want to play by modem (see p.29 for information on
configuring you computer). Select BEGIN GAME to start your mission.
If you plan on using the Quick Start Guide to TORPEX '89 in the next
chapter: On the MISSION SELECTION screen, select 688 from the column
next to TORPEX '89. Once you've selected the TORPEX '89 mission, the
CONFIGURATION PANEL will come up. Make sure to set the CONFIGURATION PANEL as follows:
1. Select NO MODEM game.
2. If you have a Covox Speech Thing, select the port your unit is plugged
into (LPT:1 or LPT:2). Otherwise, select DEFAULT.
7
-------------------------------------------------------------------------------
3. Set the play level on BEGINNER.
4. Select BEGIN GAME to start playing. You start in the sub's CONN. Before you do anything else, you must enter a Security Access Keycode
(see below).
Enter the Security Access Keycode
+------------------------------------------------------------+
|TARGET
|
|BEARING
RANGE
COURSE
SPEED
DEPTH |
|============================================================|
|
|
|
|
| Establishing satellite uplink......
|
| xxxxxxxxxxxxxxxxxxxxxxxxxxxxxxxxxxx
|
| xxxxxxxxxxxxxxxxxxxxxxxxxxxxxxxxxxx
|
| ALBANY: THERE ARE NO ???
|
|
|
|
|
|------------------------------------------------------------|
|
|
|
|
| +---+ +---+ +---+
| MSG PREVIEW |
ECM LEVEL
|
| | D | | I | | F |
|+----+ +----+| +---------------+ |
| +---+ +---+ +---+
||PREV| |NEXT|| | | | | | | | | | |
| < >
< >
< >
|+----+ +----+| +---------------+ |
|
|
| PERISCOPE ANTENNA |
|
SEND CODE
| |
| TRANSMIT | | | |DOWN|
|DOWN|
|
|
|
|
|
|============================================================|
|
|
|------------------------------------------------------------|
Seite 7
688 Attack Sub
|
|
| SPACE TO PAUSE
|
+------------------------------------------------------------+
Figure 1.2: Radio Room
You're in the sub's CONN. You can take your time: the game always pauses
when you're in the CONN, except in modem games. Select the Radio Room
by moving your cursor with the mouse or the <Tab> key until it changes into
the Radio Room icon. Enter the Radio Room by pressing <Enter> or any
button on your mouse while the Radio Room icon appears (you could also
have pressed R or F2 to go to the Radio Room). You're given the name of
a Los Angeles class submarine and the beginning of a sentence (in the
example in Figure 1.2, the code is "ALBANY: THERE ARE 10 ???"). Starting
on page 18, you'll find paragraphs marked with the names of Los Angeles
class submarines. Find the name of the sub -- they're in alphabetical order
-- then look at the paragraph that's directly to its side. Find the sentence
fragment you see onscreen, then enter the first three letters of the next
missing word. For example, the next missing word in the sentence asked for
in Figure 1.2 is DIFFERENT (p. 18). DIF would be the letters you'd enter into
the boxes on the screen.
8
-------------------------------------------------------------------------------
Use the arrows below the boxes to enter the letters. When you have the letters
in the right sequence, select SEND CODE. If you've transmitted the correct
security code, you will receive your mission orders. 688 Attack Sub will tell
you if you've sent an invalid code and will put you back in the CONN. If this
happens, go to the Radio Room to try again. You have as many tries as you
want.
Quitting the Game
To quite the game, select EXIT from the CONN. You'll be given a choice of
playing another mission, continuing your last mission, or exiting to DOS.
Select EXIT TO DOS.
How to Get Help
===============
You can get on-line help for all the controls with the Help feature. Press
<F1> within each station of from the CONN go get explanations of each feature.
Press the SPACEBAR to advance through the help screens. Before you dive
into the first scenario, try using the help key to take a "walking tour" of
your sub. When you're done, you'll at least have a nodding acquaintance with
all of the game's controls.
9
-------------------------------------------------------------------------------
2
QUICK START GUIDE TO TORPEX '89
Seite 8
688 Attack Sub
===============================
As a quick start to 688 Attack Sub, we'll run through the first mission,
TORPEX '89. Playing the mission should acquaint you with most of the game
controls and a few of the strategies. In TORPEX '89, you're the captain of the
Los Angeles (SSN 688) on a torpedo exercise in the Faeroe Island chain. Your
mission is to sink three decommissioned warships without being detected.
During the exercise you'll give commands by moving the cursor to the sub's
controls and clicking your mouse button or pressing <Enter>. You can move
the cursor by a variety of means. Turn to p. 6, Commanding 688 Attack Sub,
to learn the mouse and keyboard interface. For the sake of simplicity, we'll
use the word select to mean a two-step process: 1) moving your cursor to
a station or control; and 2) activating the station or control by pressing
<Enter> or a button on your mouse.
If you find yourself completely clueless about a station, a term, or a control,
press <F1> for help or go to the appropriate section in the manual. If the
telephone rings or some other crisis comes up, you can put the game on
pause by going to the CONN. When you're reading what to do next in the
exercise, go to the CONN so you won't lose valuable game time.
+- Select Exit
v
+------------------------------------------------------------+
|EXIT|T
|
|----+NG
RANGE
COURSE
SPEED
DEPTH |
|============================================================|
|
|
|
|
| Establishing satellite uplink......
|
| xxxxxxxxxxxxxxxxxxxxxxxxxxxxxxxxxxx
|
| xxxxxxxxxxxxxxxxxxxxxxxxxxxxxxxxxxx
|
| ALBANY: THERE ARE NO ???
|
|
|
|
|
|------------------------------------------------------------|
|
|
|
|
| +---+ +---+ +---+
| MSG PREVIEW |
ECM LEVEL
|
| | D | | I | | F |
|+----+ +----+| +---------------+ |
| +---+ +---+ +---+
||PREV| |NEXT|| | | | | | | | | | |
| < >
< >
< >
|+----+ +----+| +---------------+ |
|
|
| PERISCOPE ANTENNA |
|
SEND CODE
| |
| TRANSMIT | | | |DOWN|
|DOWN|
|
|
|
|
|
|============================================================|
|
|
|------------------------------------------------------------|
|
|
| SPACE TO PAUSE
|
+------------------------------------------------------------+
Figure 2.1: Radio Room
10
-------------------------------------------------------------------------------
1.
Exit the Radio Room. If you followed the instructions under Getting
started in Chapter 1, you've already a) selected TORPEX '89 from the
MISSION SELECTION screen; b) configured 688 to your computer on
Seite 9
688 Attack
the CONFIGURATION PANEL; and c) entered
Code and received your mission orders.
dio Room of the Los Angeles. Go to the
top left-hand corner of the screen.
2.
Sub
in the Security Access
You should now be in the RaCONN by selecting EXIT in the
Tour the CONN. You are now in the submarine's CONN. This is the main
menu of the game -- from here you can go to any of the submarine's
control stations. Press <F1> to get the locations and descriptions of
each of the stations (within each station, <F1> will tell you what all the
controls do). When you're done with the tour, select the Periscope icon.
1. Select Periscope +
2. Rotate Periscope
+
\
/
+---------------------\-------------------------------------/+
|TARGET: C:FORREST SHER\AN CLASS DESTROYER
/ |
|BEARING 175
RANGE 6.4\ COURSE 355
SPEED 9.5
DEPTH /ft|
|========================\===============================/===|
|
\
|
/
|
|
\
|
ESDI LEVEL
/
|
|
\
|
+----------------/----+ |
|
\
|
| | | | | | | | / | | | |
|
\ |
+--------------/------+ |
|
\ |-----------------/---------|
|
\|
/
|
|
X
\ PERISCOPE
/ANTENNA
|
|
\
|\ +----+
/ +----+
|
|
\
| \ | UP |
/
|DOWN|
|
|
\
|
+----+
/
+----+
|
|
\
|-----------/---------------|
|
\
|
/
|
|
\ |
PERIS/OPE ROTATION
|
|
\ |
/+-----+
|
|
\|
< | 000 | >
|
|
\
+-----+
|
|---------------------------------\--------------------------|
| +-+ +-+ +-+
| \
|
| |P| |F| |S|
| \
WEAPON CONTROL
|
| +-+ +-+ +-+
|
\
|
| +-+ +-+ +-+
+--------------+ | +-\------+
+--------+ |
| |I| |H| |O|
|
TARGET
| | | L\UNCH |
|
| |
| +-+ +-+ +-+
+--------------+ | +---\----+
+--------+ |
| +-+ +-+ +-+
^
|
\
|
| |C| |B| |T|
|
|
\
|
| +-+ +-+ +-+
|
|
\
|
|----------------|--------------------------\----------------|
|
|
\
|
| SELECT TARGET |
\
|
|----------------|-----------------------------\-------------|
|
|
\
|
| 02:52:48X
|
01:10:24Y
00:0\:04
|
|----------------|--------------------------------\----------|
|
\
3. Select Target +
4. Move cursor to
+
closest target
Figure 2.2: 688 Periscope
3.
Go to the Periscope. You are now at the periscope station. Look at the
map. You probably see a number of "X"'s. These are sonar contacts that
your sonar operator is picking up. At this point, he doesn't know what
the contacts are or their range, depth or speed. In this mission, you
won't have to worry about unidentified contacts until your sonar operator can identify them. You'll be receiving sonar contacts and they can
Seite 10
688 Attack Sub
be anything from enemy subs to schools of fish. The ocean's filled with
sounds -- the only reliable sounds are the ones your sonar operator
11
-------------------------------------------------------------------------------
can positively identify.
guesses.)
(In combat, however, you might make more
Sonar is not the only way to get positive identification of a target -- if
it's a surface ship, you can view it with your periscope. Right now you're
at periscope depth (20 ft), so go to the PERISCOPE button and select
it. Rotate the periscope until you see the destroyers. Select TARGET. A
crosshair-cursor will appear in the viewing window. Place the cursor on
the closest ship and press <Enter> or click the mouse button. Notice the
target information that fills the bar at the top of the screen. Now take a
look at the top-down map by selecting T on the 9-button map display
control in the lower left corner of the screen. At lease one of the "X"'s
should have turned into a letter. This means that you have a firm fix on
the target's location. If you can't see the letter, the target may be
outside the map area. Select O on the map display control until you get a
bigger view of the map. While your periscope is still up, return to the
CONN by selecting EXIT.
+------------------------------------------------------------+
| In an effort to reduce filesize the remaining figures have |
| been deleted.
|
+------------------------------------------------------------+
Figure 2.3: Navigation Board
4.
Set a waypoint. While your periscope is giving you a firm fix on your
targets, go to the Navigation Board so you can set the auto-pilot to steer
your sub toward your targets. Select SET from the WAYPOINT CONTROLS. A crosshair-cursor will appear on the map. Using the mouse or
the cursor keys, move the crosshair to a point near your targets. Press
12
-------------------------------------------------------------------------------
<Enter> or the button on your mouse to select that point.
appear marking the waypoint.
A number will
Now that you know the general direction you should be going, return
to the Periscope station and lower the periscope to avoid being
detected by surface radar. You may immediately lose the target
information at the top of the screen. Don't worry about it. After your
sonar man has listened for a few minutes, he'll get another fix on the
target with his passive sonar.
Seite 11
o
688 Attack Sub
See page 53 for a brief discussion of passive sonar.
Figure 2.4: Ship's Control Panel
5.
Set the throttle and depth. Even when the ship's auto-pilot is on, you're
still in control of the speed and depth of your sub. Go to the Ship's Control Panel by pressing <F4>. Set the throttle on 2/3. Select 150 FT
under AUTO FUNCTION. The crew will bring the sub to that depth. You
could also have done this manually using the DIVE PLANE CONTROL.
13
-------------------------------------------------------------------------------
Figure 2.5: Weapon Control Panel
6.
Load torpedoes. Torpedoes are never stored armed and ready in a
sub's torpedo tubes. Consequently, you must give an order to ready
them. Go to the Weapon Control Panel by pressing <F7>. Torpedo tube
1 should be already selected (the box around the number will be highlighted). Press R or 4 to move the cursor to the box and press <Enter>
or click a mouse button to arm and load the torpedo. Place your cursor
on the next tube and press <Enter> once to select the tube, then once
more to arm the torpedo. Do this for all four torpedo tubes. The two
auxiliary tubes hold noisemakers -- don't bother loading them, you
won't be needing them in this mission. The weapon's officer will inform
you when each of the torpedoes is armed. The torpedo icons will also turn
a darker color, indicating that they're ready to fire.
o
See page 57 for a brief discussion of noisemakers.
14
-------------------------------------------------------------------------------
Figure 2.6: Sonar Room
7.
Deploy Towed Array. Now press <F8> to go to the Sonar Room. Select
TOWED ARRAY. A towed array is a long cable with a series of microphones along its length. The towed array will improve your sonar
operator's listening capabilities but will limit the sub's top speed.
o
See page 47-48 for a brief discussion of towed arrays.
Figure 2.7: Navigation Board
8.
Compress time. If your sonar man doesn't have a fix on the destroyers,
you'll have to wait. This can take a few minutes. If you're impatient,
Seite 12
688 Attack Sub
go to the Navigation Board and select TIME under WAYPOINT CONTROLS. This speeds up the time. Keep your hand over the <Enter>
button. When your sonar man has a fix on one of the targets, deactivate
the time compression by pressing <Enter>.
15
-------------------------------------------------------------------------------
Figure 2.8: Weapon Control Panel
9.
Target and launch. Go to the Weapon Control Panel. If the ships are no
longer targeted, select TARGET again and move the cursor on the map
to the ship you want to attack. If the range is under 10 miles (the
maximum range of a 688 Attack Sub torpedo), you can go ahead and
fire a torpedo. Check that the box around torpedo tube 1 is highlighted.
If it isn't highlighted, select it once. Now select LAUNCH. It will take
more than one torpedo to sink a destroyer, so wait about 10 seconds,
then select LAUNCH again. If you're still out of range (10 miles or more),
you'll have to move in on the targets. This may require setting your
engine on a higher speed.
The sonar man will confirm if and when the
their target. If you think it's worth the
beginner mode, it probably is), you can go
your periscope to confirm a hit (the blood
this just to watch the flames rise). Fire
(the letter will disappear from the map).
torpedoes have reached
risk of detection (and in
to periscope depth and raise
and guts brand of captain does
torpedoes until the ship sinks
16
-------------------------------------------------------------------------------
Figure 2.9: Navigation Board
10. Set up your attacks on the next ship. If you're lucky, you're already in
range to strike your next target. If you're unlucky, you'll have to set
new waypoints to attack the other two ships. Remember that you can set up
to nine different waypoints and your sub will go to each of them in
numerical order.
11. End of exercise. The exercise ends when you sink all three ships or after
15 minutes have gone by. This is when you receive warm praise or a
sound verbal lashing from your superiors. Don't worry if you didn't do
too well this first time around. Run through the exercise again -- the
controls will begin to become second nature and your performance will
improve immediately.
You've been introduced to most of the submarine's controls. There are
only a few more that you haven't actually used. You might want to take
a few moments to read up on these as well:
o
o
Plot Projection
Sonar Computer
p. 43
pp. 46-47
Seite 13
o
o
o
Sonar Control
Torpedo Control
Status Panel
688 Attack Sub
pp. 47-48
pp. 50-51
p. 51
17
-------------------------------------------------------------------------------
3
MISSIONS
========
[Editor's Note: When you next see a name in []'s that is the name and the
following paragraph is the paragraph to be used in the
determination of the Security Access Code.]
[ALBANY]
688's perilous missions try the true mettle of a submarine captain. There are
10 different missions set in the geographical powder kegs of the world's
oceans. the missions progress chronologically from a cold war state of
mutual distrust to total war. The challenge of the earlier missions is one
faced daily by submarine commanders: determining if a situation is threatening
while trying to avoid ambiguous gestures that could lead to a shooting match
with foreign submarines. (Of course, in 688 you're free to "resolve" conflicts
in any way you like.) The later missions put the commander's abilities as a
hunter/killer to the test. In general, the missions become more and more
difficult -- as the war heats up, each side becomes more and more merciless
in their hunting.
In each mission, the action unfolds within only a small portion of the full
mission map. This "playfield" is usually an area of tactical interest to one
or both sides. If a player wanders too far away from where the action is, the
game will come to an end and a message from you CINC (Commander-in-Chief)
will inform you that you missed the boat. The idea is to keep the players
from going off on wild goose chases where nothing will challenge them.
[ALBUQUERQUE]
The following brief mission descriptions give you the necessary background
information that you won't get from your onscreen mission orders. You can
choose to command an American 688 or a Soviet Alfa. Both subs have their
advantages and disadvantages, but neither sub's abilities outweigh the value
of a cunning commander. A note on playing by modem: you can choose to
play by the mission objectives described here, or you can set your own.
There are no special objectives when playing by modem. Whatever objectives
you declare are valid -- even something as unsophisticated as "turn the
other guy into canned tuna". The worse thing that can happen is that your
CINC will scold you for your runaway battle lust -- and even HE can be
silenced by the <Esc> key.
18
-------------------------------------------------------------------------------
Seite 14
688 Attack Sub
Figure 3.1: Faeroe Islands -- Norwegian Sea
[ASHEVILLE]
688: Your superiors are going to look over your shoulder a few more times
before they let you sail off with a billion dollar sub. In this training
exercise, you only have 15 minutes to sink three decommissioned Forrest Sherman
class destroyers and prove that you're commander material. Your attack
must come swiftly and silently. Navy helicopters will be attempting to locate
your sub, so don't advertise you position with a lot of active sonar or by
leaving you periscope out of the water for too long.
Torpedoes: 22 Mark 48 ADCAP Torpedoes
Missiles: 2 Submarine-Launched Harpoon Anti-Ship Missiles
Noisemakers: 6
700: You command the Dallas (SSN 700) in a joint training exercise with the
Los Angeles. In this mission, you earn your commander's respect by beating
your colleague to the draw. Sink three of the five de-commissioned warships
to win the competition. You can play this on your own (against a computerrun Los Angeles) or by modem. Both subs are equipped with the above
weapons.
Modem: TORPEX '89 is the only mission in which you and your modem
opponent can match Los Angeles class subs against each other. One side
commands the Los Angeles and the other commands the Dallas. For the sake
of game balance, neither side has missiles in the modem game.
19
-------------------------------------------------------------------------------
Shake 'Em
=========
See Figure 3.1 for map of location
[ATLANTA]
688: American and Soviet naval forces sometimes practice ASW (AntiSubmarine Warfare) techniques on each other, rehearsing, as it were, for the
real thing. The experience the crews gain and the information gathered on
enemy tactics apparently make these high-tech games of superpower hideand-seek worth the risk. In this mission, a Soviet sub is tracking you. The
navy brass sees their own pride and budgets on the line, so the pressure's
on for you to shake this Russian sub. (See pp. 52-59, Submarine Warfare, for
tips on maneuvers you can try.) You must lose the Soviet sub for a period
of at least 3 minutes in order to be declared successful -- this means that
the Alfa can't detect you as an "X" (see p. 38, Sonar Contacts). The mission
will end once you've successfully evaded your opponent for the 3 minutes
of after the 20 minute time limit is up.
Torpedoes: 8 Mark 48 ADCAP Torpedoes
Missiles: 4 Submarine-Launched Harpoon Anti-Ship Missiles
Noisemakers: 6
Seite 15
688 Attack Sub
[AUGUSTA]
ALFA: As in every Navy, the only way up the ladder is by making your
superiors notice you. Prove that American high-tech equipment is no match
for Soviet training and you'll make a big impression on the fleet admiral.
Since you're practicing for real war, you must track the 688 in such a way that
you'd be able to destroy him if this were a combat situation. This means you
may not lose contact with the 688 for any period longer than 3 minutes (to
keep "contact" on the 688, it must appear as an "X" on a letter on your map
display -- see p. 38, Sonar contacts). Don't lose contact on the 688 at the
last minute or you lose. You must be close enough to the 688 that you could
fire on him and easily hit him (see pp. 58-59, Evading Torpedoes, for ranges).
Try and stay in the baffles (p. 59) of the 688 to stay undetected as long as
possible.
Torpedoes: 8 type 53 Torpedoes
Noisemakers: 4
Modem: In the modem game, the 688 has 20 torpedoes and the Alfa has 18.
20
-------------------------------------------------------------------------------
Sub Ops
=======
Figure 3.2: Barents Sea
ALFA: After a week-long operational test in the Barents Sea, you're ordered
to execute routine ASW (Anti-Submarine Warfare) maneuvers before returning to your home port of Severemorsk. Since imperialist submarines
sometimes try to follow outbound Soviet subs as they leave home waters,
you are given the job of "securing the port"--i.e., chasing off any intruders.
If you use active sonar ("pinging"), enemy subs will know you're there and
you'll scare them off (see p. 47, TARGETING PULSE). Be careful, though -spying subs may interpret pings from a long-distance as a prelude to a
torpedo attack...at which point they may decide to actively defend themselves. Your best bet is to get as close as you can (under one mile) before
you actively "ping" them. At very close range, the risk of being damaged by
their own torpedoes is too great--they'll be forced to simply run away.
Torpedoes: 18 Type 53 Torpedoes
Noisemakers: 4
21
-------------------------------------------------------------------------------
Mumar Cadaver
=============
Figure 3.3: Strait of Gibraltar
Seite 16
688 Attack Sub
[BALTIMORE]
688: The White House is blaming the Libyans for recent acts of terrorism. To
punish these "international criminals", a 688 is ordered to sink four Libyan
oil tankers as they exit the Strait of Gibraltar. The tankers are under the
protection of Libyan warships. Remember that the Strait is filled with traffic
so don't put the U.S. in a bad light by sinking non-Libyan ships.
Torpedoes: 20 Mark 48 ADCAP Torpedoes
Missiles: 4 Submarine-Launched Harpoon Anti-Ship Missiles
Noisemakers: 6
Escape
======
See Figure 3.3 for map of location
[BATON ROUGE]
688: Your crew is fatigued from month-long operations in the Mediterranean, so you're less than happy when your commander reports that there are
Soviet submarines waiting to "accompany" you out of the Strait of Gibraltar.
The Navy wants you to make a lasting impression on the Russians -- you
must pass through the western edge of the Strait undetected by Soviet subs.
(The Soviets shouldn't have contact on you when you reach the Atlantic. See
p. 38, Sonar Contacts.)
Torpedoes: 20 Mark 48 ADCAP Torpedoes
Missiles: 4 Submarine-Launched Harpoon Anti-Ship Missiles
Noisemakers: 6
Alfa: While returning from tour duty, your sub is suddenly ordered
back to the Strait of Gibraltar where you'll wait to intercept an American
attack sub. Intelligence sources observed a 688 in an Italian port and expect
it to exit the Mediterranean soon. You must keep contact on the 688 as it
enters the Atlantic (see p. 38, Sonar Contacts). Also, you must be at a range
at which you could easily destroy the 688 if you had to (see pp. 58-59,
Evading Torpedoes, for ranges). Try to be sly about this...active sonar
will not only make your presence known, it could be regarded as hostile action.
Torpedoes: 18 Type 53 Torpedoes
Noisemakers: 4
Modem: This mission provides a good battlefield for a one-on-one hunt and
kill scenario. However, even if you throw out the mission objectives and just
play "to the death", you should concentrate on moving to the west so you
won't wander out of the playfield and end the mission abruptly.
Goulash
=======
Figure 3.4: Mouth of the Adriatic Sea
Seite 17
688 Attack Sub
[BIRMINGHAM]
688: Under new leadership, Yugoslavia attempts to reform their economy
and widen their autonomy. To do so, they have chosen a capitalist model
and have asked for NATO's support. Perceiving a Yugoslavian alliance with NATO
as a threat to themselves and the other Warsaw Pact nations, the Soviets
invade Yugoslavia and attempt to set up a naval blockade. The U.S. and Italy
agree to provide Yugoslavia with covert military aid. A Los Angeles class
submarine is assigned as escort to provide maximum protection with a
23
-------------------------------------------------------------------------------
minimum of exposure. Your job is to get six cargo ships north to Trivat before
the rebellion is completely crushed. The Soviet warships have orders to sink
first, ask questions later--if they get close enough, your cargo ships are
history. You can try to lead the warships away, or you can make the seas safe
for free trade by destroying the warships before they're in range of the cargo
ships. The bottom line is: the cargo ships must get northeast safely.
Torpedoes: 20 Mark 48 Torpedoes
Missiles: 4 Submarine-Launched Harpoon Anti Ship Missiles
Noisemaker: 6
Cat Walk
========
Figure 3.5: Kunashir Passage
[BOSTON]
688: Sparked by the Yugoslavian conflict, a limited war in Europe begins and
quickly escalates into World War III. Your 688 has been assigned to patrol
an area north of Japan--an important sea lane through which a number of
Soviet SSBN's (nuclear-powered ballistic missile submarines) travel. A
Soviet SSBN has reportedly left Vladivostok the day before and is entering
your patrol sector. It may be under the protection of a Soviet attack
submarine (SSN). Your main objective is the SSBN--think of any
SSN's you encounter as dessert. Since slow-moving SSBN's can be extremely
difficult to detect, a Seahawk helicopter will try to aid you in locating
it. If the helicopter finds the boomer, it'll drop a "marker" buoy in its
vicinity. The marker buoy floats on the ocean surface and transmits a sonar
"ping", informing you that it's over the general location of the SSBN. Your
sonar officer will inform you when he detects a buoy, When you get the
24
-------------------------------------------------------------------------------
message, you should go to a depth of 150 ft or less so that you can target
the marker buoy. Note the bearing and the distance of the buoy: If you're too
far away to launch torpedoes, make a course for the buoy; if the SSBN is close
enough, launch torpedoes and direct them to the buoy's location, then set
the torpedoes in a search program.
Torpedoes: 20 Mark 48 Torpedoes
Missiles: 4 Submarine-Launched Harpoon Anti-Ship Missiles
Seite 18
688 Attack Sub
Noisemakers: 6
Alfa: Virtually all Soviet ships entering or leaving the main port of Vladivostok must traverse the Kunashir passage. This strategically critical "choke
point" connecting the Sea of Japan with the Pacific is a likely place for an
American attack on the outbound SSBN you've been ordered to protect. If it
comes down to combat, don't confuse the SSBN with the 688. Make sure you
know what you're firing on, because your torpedoes won't! The sonar
analyzer will help distinguish contacts and keep you from firing on
friendlies (see pp. 46-47, Sonar Computer).
Torpedoes: 18 Type 53 Torpedoes
Noisemakers: 4
Modem: This mission can also be played by modem.
Surprise Party
==============
Figure 3.6: Edge of the Celtic Shelf
25
-------------------------------------------------------------------------------
[BREMERTON]
688: The war is heating up. NATO is sending a large battle group to the
Norwegian Sea from the south in support of their current forces. The
Norwegian Sea is of vital significance to both sides--it represents the only
access the Soviet Northern Fleet has to the Atlantic Ocean. If NATO can keep
the Soviet Northern Fleet "bottled up" in home ports, American and
European shipping can continue delivering preciously needed arms and
supplies with minimum harassment. Your orders are to escort the reinforcements to the north and protect them from Soviet submarine attack.
Torpedoes: 20 Mark 48 Torpedoes
Missiles: 4 Submarine-Launched Harpoon Anti-Ship Missiles
Noisemakers: 6
Alfa: Your orders are to patrol your sector and proceed to attack any enemy
vessels you encounter. You stumble onto a large battle group and must
single-handedly engage the American ships. Good luck.
Torpedoes: 18 Type 53 Torpedoes
Noisemakers: 4
Modem: Since the Alfa is at a clear disadvantage in this mission, the stronger
player should take the Soviet side as a handicap.
Homecoming
==========
Seite 19
688 Attack Sub
See Figure 3.6 for map of location.
[BUFFALO]
688: In order to keep the war effort rolling, America must keep the sea lanes
to Western Europe open. As in two previous world wars, American shipping
forms convoys protected by warships. Your 688 is assigned to counter any
naval assaults on a convoy destined for France. In the event of an attack,
you'll have to quickly perceive what the biggest threats to the convoy are and
deal with them first.
Torpedoes: 16 Mark 48 Torpedoes
Missiles: 8 Sea lance Missiles
Noisemakers: 6
Alfa: The Soviet Stavka realizes that it only has to cut off the American
supplies to Europe and the war will come to an effective halt, perhaps
resulting in total victory for the Soviets. The massive Soviet submarine force
26
-------------------------------------------------------------------------------
is sent to sea to cripple the U.S. Navy. This time, your Alfa and an Oscar
class SSGN (nuclear-powered cruise missile submarine) wait in ambush for a
NATO convoy.
Torpedoes: 18 Type 53 Torpedoes
Noisemakers: 6
Modem: The sheer number of targets in the water make this an exciting-and difficult--scenario. With the Americans at a slight disadvantage,
stronger players should take the American side to balance the game.
Hit and Run
===========
Figure 3.7: Baltic Sea
[CHICAGO]
688: As the war between East an West escalates, the Navy decides that
forward defense is the only way to force the Soviets to back off. Forward
defense attempts to cripple or intimidate the enemy by attacking long range
targets behind enemy lines. The next step is to destroy inland targets--in
this mission, you've been sen to the Baltic Sea to deliver a load of Tomahawk
cruise missiles that will take out Soviet nuclear weapons facilities. When the
scenario begins, you're just off the coast of East Germany. One of the first
things you should so is raise your periscope to confirm your location. Switch
to top-down map by selecting T on the map display. Zoom out by
selecting O until you see a letter on the top down map. The letter is a preset waypoint for your Tomahawk missiles: this is the target you'll be firing
your missiles at (Cruise missiles such as the Tomahawk get their bearings by
Seite 20
688 Attack Sub
27
-------------------------------------------------------------------------------
comparing computerized maps with the local terrain -- what you're doing
is providing the missile with its first landmark, which the missile will use as
a reference point to guide itself to its target.) With your periscope still
raised, select TARGET. You have only 5 minutes to fire ALL four missiles.
Don't get too far away from the coast or you'll lose the targeted waypoint for
the missiles. After you fire the missiles, you must rely on your own cunning
to escape through the narrow, heavily patrolled passage out of the Baltic Sea.
Torpedoes: 20 Mark 48 Torpedoes
Missiles: 4 Submarine-Launched Tomahawk Cruise Missiles
Noisemakers: 6
28
-------------------------------------------------------------------------------
4
GAME CONTROLS
=============
Configuring 688 to Your Computer
-------------------------------Once you've selected a mission, you can adjust the following on the
Configuration Panel:
Sound: If you have a Covox Speech Thing, select the port your unit is plugged
into (LPT1: or LPT2:) -- otherwise, leave DEFAULT SOUND highlighted.
[CINCINNATI]
Play Level: 688 Attack Sub comes with two play levels -- BEGINNER and
STANDARD. You can choose play levels only when you're playing against the
computer. Modem games are automatically set on STANDARD.
BEGINNER -- Gives you certain advantages: you're quieter; your sonar
is more powerful than your opponent's; your sub can take more
damage; and your raised periscope isn't as noticeable by surface radar.
STANDARD -- You and your opponent have normal capabilities.
Modem: Select NON-MODEM if you want to play against the computer.
play against a modem opponent, see p. 30, Playing by Modem.
To
Exit: There are three ways to exit the Configuration Panel:
BEGIN GAME -- Begins the mission you selected on the Mission
Selection screen.
Seite 21
688 Attack Sub
MISSION SELECTION -- Returns you to the Mission Selection screen.
EXIT TO DOS -- Quits 688 Attack Sub altogether and returns you to
DOS.
NOTE: WHENEVER YOU CHANGE THE SETTINGS ON THE CONFIGURATION
PANEL, 688 ATTACK SUB SAVES THE NEW CONFIGURATION AS YOUR
DEFAULT SETTING.
29
-------------------------------------------------------------------------------
Playing by Modem
---------------Both computers will have to meet the specifications on p.2 of this manual.
Both players must have manuals and play disks of their own.
[CITY OF CORPUS CHRISTI]
688 Attack Sub can be played by using two Hayes@--compatible modems with
a minimum of 1200 BAUD or one null modem cable. In both instances, one
player will have to be designated the "originator" and the other the "answerer". The originator sets up the game and initiates the call (the originator
also foots the bill if there are any phone costs).
There are a few things you should know about playing against a modem
opponent. There are no pauses in a modem game. Any time spent in the
CONN is time wasted. Learn the Function keys and use them often to save
time. Also, time compression has no effect -- game time runs normally.
Using Modems
============
Preliminaries (both parties):
1. Choose one player to be the "originator" and the other to be the "answerer". Decide which mission you'd both like to play. Only missions 1,
2, 5, 7, 8, and 9 may be played by modem. While you're at it, decide who
gets what side (Los Angeles or Alfa).
2. Load 688 Attack Sub and select your mission.
3. At the CONFIGURATION PANEL, each player should select the communication (serial) port his or her modem line is connected to (MODEM
GAME ON COM1: or MODEM GAME ON COM2:).
What the originator does:
1. Enter your opponent's phone number under SET TELEPHONE NUMBER. There are 11 slots for standard phone numbers: enough for a
seven digit phone number, a three digit area code, and a single digit
prefix (for example, a "1" for long-distance calls). Select UP or DOWN
above and below the boxes to set the numbers. If you don't need 11
digits (i.e., your call is local), leave the extras blank at the end of the
number.
30
Seite 22
688 Attack Sub
-------------------------------------------------------------------------------
2. If you're using any special long-distance rate numbers like those offered by Sprint, M.C.I. and other companies, dial them now and wait for
the second dial-tone. The modem must detect a dial tone to start. You
can only use special long-distance rate numbers that leave you with a
dial tone so that the modem can dial your opponent's phone number.
3. Select ORIGINATE. Your computer will now try to establish communication with your opponents computer (a window will appear indicating
that the machines are attempting to communicate). If the call is successful, the message window will disappear and the scenario will
begin. If the call does not go through, a message will appear telling you
so. Select OK to have the computer try again.
[DALLAS]
What the answerer does: You have a choice of letting your computer answer
the phone or answering it yourself. If you're going to let the computer answer
the phone, select AUTO-ANSWER and wait for the computer to make the
connection (a message will appear telling you when this happens). If you
want to answer the call manually, wait for the phone to ring, then select
MANUAL ANSWER.
If you can't seem to establish any communication between the modems:
check the following:
A) Have you entered the right phone number? If it's wrong, some confused soul is getting a very irritating noise at the other end. Select
CANCEL and reset the phone number, then ORIGINATE again.
B) Did you select the correct communication port? Check to see which
port your modem is connected to and compare it with what you selected on the CONFIGURATION PANEL.
C) Are you and the other player clear on who's answering and who's
originating? If you're both selecting ORIGINATE, you won't get anywhere.
D) Is your modem working right? Check your modem manual to see that
it's hooked up properly and you're using it correctly. If you're getting
a dialtone but your modem refuses to dial, make sure the Carrier
Detect (CD) setting isn't "forced on". On most modems, Carrier Detect
is switch #6 -- it should be in the "up" (or off position.
31
-------------------------------------------------------------------------------
If you get cut off: Your computer will send you a message telling you it's no
longer communicating with your opponent's computer. Select OK to have
the computer attempt to re-establish contact or CANCEL to return to DOS.
Sending messages to your opponent: When you're playing by modem, you
can use the Radio Room to chat with your opponent. You can be at any depth
and you don't need to use your antenna. Select TRANSMIT and type your
message on the keyboard. Pressing <Enter> turns off the transmit mode and
sends the message.
Playing another mission: After a mission, 688 Attack Sub will maintain a
connection between you and the other player so you can play another game
without redialing. The game ends in the Radio Room so that the players can
type messages to each other and arrange for another game (see "Sending
messages to your opponent" above). Decide what mission you want to play
Seite 23
688 Attack Sub
and who is going to originate the call (either player can originate). Both
players must select EXIT from the top left corner of the Radio Room. A
message window will appear in the middle of the screen. Each player should
select PLAY AGAIN, then select the new mission. The originator selects
ORIGINATE. The answerer selects MANUAL ANSWER. (The modems will
know they're connected and the game will begin without one of the modems
needing to dial.)
[GROTON]
Quitting the game (READ THIS!): The game ends in the Radio Room. Select
EXIT from the top left corner. A message window will appear in the middle
of the screen. When you've played all the modem games you're going to play
for that day, select EXIT TO DOS. You MUST return to DOS in order to break
the modem connection. If you don't, the computer will still maintain contact
with the other modem...even if you've gone on to play a new mission against
the computer! That can add up to big bucks if the call was long-distance!
[HELENA]
Getting cut off during your game? Does your phone have "call waiting?" If
it does, you may be getting calls during your games which disrupt the
modem connection. You can temporarily stop your "call waiting" service so
that other calls won't interrupt your game. In many areas, you can do this by
dialing *70 on a touch-tone phone or 1170 on a rotary phone BEFORE you
"originate" or "answer". "Call waiting" will be cut off for the duration of a
32
-------------------------------------------------------------------------------
single call (i.e., your game). Note that these numbers may vary depending
on your location. Consult your phone company for the numbers in use in
your area.
Connecting the modems with a telephone cable: If your computers are near
each other (i.e., in the same room), it's sometimes possible to connect your
modems using regular telephone cable. Plug one end of the cable into the
jack marked "WALL" or "LINE" on your modem. Plug the other end into the
jack marked "WALL" or "LINE" on the other player's modem. Whether this
works depends entirely on the kinds of modems you have. Some modems
search for a dial tone before establishing contact with the other computer.
Obviously, a telephone cable by itself won't produce a dial tone, so this
method won't work with these kind of modems (if this is the case, you should
invest in a null modem, available at computer or electronic stores).
Using a Null Modem Cable
-----------------------You can also play a modem game using a "null modem". A null modem is
a cable that transmits information from your computer's communication
port to that of your opponent's. You don't need modems at all when you use
a null modem cable -- however, the two computers must each have a free
serial port connection and be near enough to connect with the null modem
cable. Ask your computer dealer for details on where you can get a null
modem cable. (See Appendix A for the specific wiring information.)
[HONOLULU]
Seite 24
688 Attack Sub
Preliminaries (both parties): With your computers off, connect the two
computers with the null-modem cable. Turn on the computers, load the
game, and go to the CONFIGURATION PANEL. Select the communication
(serial) port your null-modem line is connected to (MODEM GAME ON COM
1: or MODEM GAME ON COM2:).
What the originator does:
1. Select MISSION SELECTION and choose the mission.
(the originator) selects the side you'll play.
2. Select ORIGINATE.
The side that you
33
-------------------------------------------------------------------------------
What the answerer does:
1. Wait for the other player to "originate" the contact.
2. Select MANUAL ANSWER.
Other Game Controls
===================
Russian Script On/Off
--------------------The Alfa's controls are in a pseudo-Cyrillic script to remind you that you're
a Soviet officer fighting for world socialism. However, we realize that this
attempt to add flavor may be distracting to some players, so we made it an
optional feature. To turn the pseudo-Cyrillic script off, go to the CONN and
press <Ctrl>-R. To turn it back on, return to the CONN and press <Ctrl>-R
again.
Sound On/Off
-----------Toggle the sound on and off by pressing <Ctrl>-N. In some circumstances,
you may want to turn the sound off for a while. Depending on how fast your
computer is, sound effects may slow down the rate at which your machine
is updating the information on your maps. In some circumstances, this can
be critical. For example, if time compression is on, the information lost
while a sound is being produced could make a big difference.
Surrender (modem games only)
---------------------------There may come a time in a modem game where the only conclusion you
foresee consists of you and your sub scattered across several miles of ocean
floor. Rather than watch your crew get transformed into fish food, you can
surrender by pressing <Ctrl>-K. It's not the most honorable way to go, but
it does deny the other player the satisfaction of hearing his torpedoes rip
into your hull.
Turning Off Your Mouse
---------------------If you're having trouble with your mouse, you can turn it off without having
Seite 25
688 Attack Sub
to disconnect it. Press <Ctrl>-A to turn the mouse off altogether. The mouse
will still be enabled for other software. To turn the mouse back on, you must
exit to DOS and reboot the game.
34
-------------------------------------------------------------------------------
Boss Key
-------You're at work, and you're escaping the dull monotony of whatever it is
you're supposed to be doing with a quick game of 688. Just then, you hear
the familiar footsteps of your boss drawing closer. Rather than anxiously
awaiting the painful attitude adjustment he or she is going to inflict on your
head, press <F10>. This will pause the game and replace the screen with a
bogus DOS prompt. Wander off to the coffee machine or make it look like
you're doing something of vital importance to the company. When the
offending supervisor is out of view, press <F10> again to resume the
infinitely more interesting game. Kids, this works just as well with the
parental unit.
35
-------------------------------------------------------------------------------
5
SUBMARINE CONTROLS
==================
Most of the submarine controls are the same for both American and Soviet
subs -- they look different, and may be on different areas of the screen, but
they do the same things. The older Soviet Alfa class sub is missing some
high-tech equipment, such as the contour imaging display; any exceptions
pertaining to the Alfa are noted in the descriptions.
Reading Your Displays
--------------------[HOUSTON]
As an attack boat, your primary role is to stalk enemy vessels. To successfully do this, you must CONSTANTLY be aware of your position and course
relative to those of your target(s). Since in a submarine you can't actually
see anything around you, you can orient yourself with the aid of top-down maps
and the contour imaging display.
Top-dow maps are available at all stations except in the Radio Room -where only your location and target information are at hand -- and at the
Status Panel. Contour imaging is available at all stations except the Radio
Room, Status Panel and Periscope. At the Periscope, the map window
becomes your periscope view when you raise the periscope. (Note: the Alfa
isn't equipped with contour imaging.)
36
------------------------------------------------------------------------------Seite 26
688 Attack Sub
Top-Down Map
-----------Your Course
|
|
+--------------------------|-----------------------------+
|
_____________v___________________
|
|
| | | | | | | | | | | | | | | | |
|
|
|
|
|
|
|
|
|
SE
S
|
|
|
|
__
|
|
|
|
|
|\___|
|<---Your depth
|
|/
|
|
|
__|
|
|
|
|
|
====|===| <---Thermal Layer
|
|
|
|
__|
|
|
|
|
|
___|
|
|
O <------------------------------Your Position
|
__|
|
|
|
|
|
___|
|
|
|
|
|
X <-Sonar Contact __|
|
|
|
|
|
----|---| <---Depth of Water
|
|
|
|
1 <----------------------------Waypoint
|
|
|
|
Targets------> o
___|
|
|
\
|
|
\-------------> o
|
|
|
|--------------------------------------------------------|
| CRS: 151
SPEED: 125
DEPTH: 131 FT
|
+--------------------------------------------------------+
|-----------------------+--------------|
|
Your course, speed and depth
Figure 5.1: Top-Down Map
[HYMAN G. RICKOVER]
The top-down map gives you aerial perspectives of the area your submarine
is traversing and displays information collected by your sonar and periscope. The area can be viewed from ten different ranges using the zoom
feature. On the 688, select I and O from the Map Display Controls to zoom
in and out. To zoom in and out on the map aboard the Alfa, select DN and UP.
Selecting the zoom buttons repeatedly moves you quickly through the
magnifications. Your submarine is the fixed point in the center of the screen
(except at some of the highest zoom levels). Other information on your maps
include:
Ocean Depths
Seite 27
688 Attack Sub
-----------[INDIANAPOLIS]
Different shades on your map designate different depths. The darker the
shade, the deeper the water. (MCGA and VGA graphics modes will display
more layers between light and dark.) Depth can vary from 0 to greater than
2000 ft (since very few submarines can actually dive below 2000 ft, the exact
depth of really deep ocean doesn't matter). Always stay aware of the average
depth of the water you're sailing through (see Heads-Up-Display below). It's
possible to run aground -- somewhat embarrassing for a submarine
commander. To cross the shallowest waters (the lightest color on your topdown map), you'll have to surface.
37
-------------------------------------------------------------------------------
Sonar Contacts (letters)
-----------------------When you first receive a sonar contact, the ship's computer displays the
contact as an "X". An "X" means that you know what direction the sound
came from. The target's range, speed and depth are still a mystery. An "X"
ALWAYS appears halfway between you and the edge of the display regardless
of the zoom level. When your sonar operator gets a fix on a target, it's
assigned a letter so you can keep track of it. Letters always mark the exact
location of a target. The sonar operator still may not know exactly what the
target is. If he doesn't, UNKNOWN SURFACE CONTACT or UNKNOWN
SUBMERGED CONTACT will be displayed in the target information bar and
the target's letter will appear dark. When the sonar operator positively
identifies the target, the letter will turn a lighter shade. If a contact is
lost and regained, it may be assigned a new letter.
Waypoints (numbers)
------------------Waypoints (destinations) that you've set are displayed on the map as
numbers (see Waypoint Controls, pp. 43-44, on how to set and clear waypoints).
Contour Imaging Display
-----------------------Figure 5.2: Contour Map
38
-------------------------------------------------------------------------------
[JACKSONVILLE]
In 688 Attack Sub, the Los Angeles is equipped with a device called a "side
scanning sonar" that produces a contour image of the ocean floor. This is
useful when traveling near the ocean floor. A sophisticated, high-frequency
sonar beam scans the ocean terrain around the bow, port and starboard of
the submarine. The beam's high-frequency and short range make it virtually
undetectable by other ships' arrays -- there are no penalties for using the
contour imaging system. With the sonar information, a computer generates
Seite 28
688 Attack Sub
an image of the ocean terrain around the sub. Oval shapes designate sonar
contacts. The larger the oval, the closer it is to your sub. The ovals are
assigned letters, too, which always correspond with the letters displayed on
the top-down map.
To turn on the contour imaging display, select C from the map display control
on the left side of the screen. Use P,F and S to look to port, forward and to
starboard. (Note: the Alfa isn't equipped with contour imaging.)
Heads-Up-Display (HUD)
---------------------[KEY WEST]
The HUD is an overlay on the map that lets you quickly refer to your sub's
course and depth. A compass is displayed along the top of your view screen.
The white triangle in the middle of the line is your sub's current course. The
vertical gauge along the right side of the view screen shows your depth
relative to the ocean floor. The top marker on the left side of the gauge is
your sub's current depth. The bottom marker is the depth of the ocean directly
below you. Thermal layers are marked by longer lines on the right side of the
depth gauge. Always stay aware of how close you are to the ocean floor -keep a safe distance between you and the bottom maker or you may end up
with a ruptured hull. In the top left hand corner, the HUD will also tell you
what direction your periscope is currently pointing.
When you first boot the game, the HUD will be activated. If it's in the way of
a target you're viewing, you can turn the HUD on and off by selecting H from
the 9-button map display control of the 688. On the Alfa, select HUD to turn
the display on and off.
39
-------------------------------------------------------------------------------
Map Display Control
------------------The 688 has contour imaging, and the Alfa doesn't.
has more map controls than the Alfa.
+---------+
|+-++-++-+|
||P||F||S||
|+-++-++-+|
|+-++-++-+|
||I||H||O||
|+-++-++-+|
|+-++-++-+|
||C||B||T||
|+-++-++-+|
+---------+
Consequently, the 688
+-----------------------------+
| +-------+
+---------+
|
| | SCALE |
| CONTOUR | ( ) |
| +-------+
+---------+
|
|
+--+
|
|
|/\| UP
+---------+
|
|
+--+
| HUD
| ( ) |
|
+--+
+---------+
|
|
|\/| DN
|
|
+--+
|
+-----------------------------+
688 Map Display Control
P)ort -- Look to Port in contour
imaging or periscope view.
F)orward -- Look forward in
contour imaging or periscope view.
Alfa Map Display Control
UP -- Zoom out on top-down map.
DN -- Zoom in on top-down map.
CONTOUR -- Bottom contours on/off.
HUD -- Heads-Up-Display on/off.
Seite 29
688 Attack Sub
S)tarboard -- Look to starboard in
contour imaging or periscope view.
I)n -- Zoom in on top-down map.
H)eads-Up-Display -- HUD on/off.
O)ut -- Zoom out from top-down map.
C)ontour Imaging Display -- Turn
contour imaging on.
B)ottom -- Bottom contours on/off
(top-down map only).
T)op-Down Map -- Turn top-down map on.
Target Information
-----------------In the box at the top of the screen is the target information:
+--------------------------------------------------------------+
|TARGET A: FORREST SHERMAN CLASS DESTROYER
|
|BEARING: 185
RANGE: 27
COURSE: 315
SPEED 9.3
DEPTH 0FT|
+--------------------------------------------------------------+
[LA JOLLA]
In a typical combat situation, your map will be showing several sonar
contacts. Some may have been identified; others may still be undetermined.
Choose the TARGET command to find out what your sonar operator has
determined about the various objects in the water. The things the sonar
operator is trying to determine are:
40
-------------------------------------------------------------------------------
TARGET: What the target is. If the sonar operator doesn't know yet, "UNKNOWN CONTACT" will appear here. Sometimes the sonar operator will
know whether the contact is on the surface or submerged -- in this case,
"UNKNOWN SURFACE CONTACT" or "UNKNOWN SUBMERGED CONTACT" will appear here.
[LOS ANGELS]
BEARING: Where the target is IN RELATION TO YOUR SUBMARINE. It is important
to understand the difference between bearing and course. In determining a
ship's course, the northern point of the compass is the reference point (000
is North; 180 is south; etc.). In determining your target's bearing, YOUR
SUBMARINE is the reference point. Your bow (the tip of your ship) is 000, the
location of all other vessels in the water are reckoned from this point.
Moving clockwise, 090 is to your right (starboard); 180 is behind you (stern);
and 270 is to your left (port). In the figure above, the bearing of the
torpedo is about 045.
RANGE: How far away the target is from your ship.
nautical miles (nm).
This is measured in
COURSE: What direction on the compass the target is headed. When reckoning
course, North is 000. In the figure to the left, the sub's course is 090.
SPEED: How fast the target is going.
DEPTH: How deep the target is.
This is measured in knots.
This is measured in feet.
Seite 30
688 Attack Sub
Information Bar
--------------The crew reports to you from time to time to tell you when something has
happened. Crew reports and messages run from right to left along the
information bar directly below the stations controls. If for some reason a
message has to be repeated, the message will not scroll from right to left -instead, an audible "click" will tell you that the message currently in the
information bar is being repeated. Long strings of messages may interrupt
your game. You can make messages go by faster by pressing the SPACEBAR.
41
-------------------------------------------------------------------------------
Location and Time
----------------[LOUISVILLE]
On the information bar at the base of the screen are your sub's current map
coordinates. To the right of these is the number of minutes that have elapsed
during your current mission. Mission time runs twice as fast as real time
when time compression is activated (this is a rough approximation; the exact
ratio depends on the speed of your computer). Time compression isn't
available in modem games.
Radio Room
==========
All missions begin and end in the Radio Room where you receive your CINC's
warm praise or cold shoulder. However, this isn't the only function of the
Radio Room....
EXIT -- Returns you to the CONN.
PERISCOPE -- Raises or lowers your periscope.
(20 ft) to raise your periscope.
ANTENNA -- Raises or lowers your antenna.
(20 ft) to raise your antenna.
You must be at periscope depth
You must be at periscope depth
Message Review
-------------[MEMPHIS]
If messages from the crew are rolling by too quickly and you think you
missed something critical, you can review the messages in the radio room.
Select PREV to review the previous recorded message. It will appear in the
message bar, only darker than the current messages coming from your
crew. NEXT will scroll you forward through the recorded messages until you
come to the latest message.
Transmit
-------If you forgot your mission objectives, you can review your mission orders
DURING the mission by selecting TRANSMIT and typing MISSION. You must
Seite 31
688 Attack Sub
be at periscope depth and your antenna must be up.
42
-------------------------------------------------------------------------------
[MIAMI]
When you're playing by modem, you can use TRANSMIT to chat with your
opponent. For this, you can be at any depth and you don't need to use your
antenna. Select TRANSMIT and type your message on the keyboard.
Pressing <Enter> turns off the transmit mode and sends the message.
Navigation Board
================
EXIT -- Returns you to the CONN.
Plotting
-------[MINNEAPOLIS-SAINT PAUL]
ALL TRACKS -- Select this to view the tracks of all the targets displayed on
the screen. The tracks appear as small dots. The closer the dot are to each
other, the slower the target is moving. All tracks will be black except the
track of the current target, which will appear as a lighter color (red on most
screens).
TARGET TRACK -- Displays the target's track only.
PLOT PROJECTION -- Select this to see where you and a target will be in a
given amount of time assuming you both maintain your present course and
speed. You have to use this in conjunction with the TIME PROJECTION
feature. Enter the number of minutes you want to project into the TIME
PROJECTION slots. Now select PLOT PROJECTION. A light marker will show
you what your position will be in the selected amount of time IF you maintain
your present speed and course. A dark marker will show the currently
selected target's projected position. You can now direct torpedoes to go to
the projected point (see Torpedo Control on pp. 50-51).
TIME PROJECTION -- See PLOT PROJECTION above.
Waypoint Control
---------------[NEW YORK CITY]
A waypoint is a destination for your sub. Selecting waypoints activates the
auto-pilot, which will steer your sub to each of the waypoints in the order you
selected them. The auto-pilot won't set your speed for you. It will adjust
the speed down to make turns efficiently and quietly. After making the turn,
the auto-pilot will return to the previously set speed. (Note: the auto-pilot
is programmed not to return to FLANK speed -- if you were at FLANK speed
and you make a turn, the auto-pilot will only return you to FULL.) The autopilot won't control your depth, either, so make sure you're not too close to
43
------------------------------------------------------------------------------Seite 32
688 Attack Sub
the ocean floor. A waypoint is cleared only when you've reached it or when
you've selected CLEAR.
SET -- You can only set waypoints while viewing the top-down map. When
you select this command, a crosshair-cursor will appear in the viewing
window. Move the cursor to where you want your sub to go and press
<Enter> or any mouse button. A number will appear on your map marking
the waypoint. You may select up to nine waypoints. The ship's auto-pilot will
guide the sub to each waypoint in numerical order.
CLEAR -- Erases the last waypoint you set.
TIME -- Turns on the time compression feature, making game time go by
twice as fast (this is a rough approximation: the exact ratio depends on the
speed of your computer). Use this to speed up the game during longer
transits. Press <Enter> to return to normal time.
[NEWPORT NEWS]
AUTO-PILOT -- Turns the auto-pilot on or off. The auto-pilot will only
function if you have set at least one waypoint. Changing the rudder will
automatically turn OFF the auto-pilot. Changing depth or speed won't
effect the auto-pilot. (Note that the auto-pilot is oblivious to the ocean
depth. It won't take you to a higher depth if you're about to smash into the
bottom of the ocean.) If something comes up and you have to change your course
manually using the rudder (thus turning your auto-pilot off), you can always
head back to a waypoint as long as it's still set. Simply turn the auto-pilot
back on.
TARGET -- When you select this, a crosshair-cursor will appear on the
viewing window. Move the crosshair-cursor with the TAB key or mouse to the
target (typing the letter of a target will also move the crosshair-cursor).
you move the cursor to each of the targets on the screen, all available
information on the target appears in the TARGET INFORMATION box at the
top of the screen. Select a target by pressing <Enter> or clicking a mouse
button. Launched torpedoes will head for whichever target is currently
selected. Once the torpedoes are launched, however, you are free to target
any other contacts in the water.
As
44
-------------------------------------------------------------------------------
Ship's Control Panel
====================
EXIT -- Returns you to the CONN.
Cavitation Level Gauge
---------------------[NORFOLK]
Seite 33
688 Attack Sub
This gauge monitors the noise produced by cavitation. Cavitation results
from partial vacuums that form around the propeller blades when the
propeller is moving faster than the water around it can follow. Since the
bubbles produced by cavitation are very noisy, you want to avoid it as if it
were death itself. Two factors are involved here: acceleration and depth.
Quick acceleration causes your propeller to spin faster than normal, which
spells more noise. Depth effects the cavitation level, too. Since water
pressure increases with depth, partial vacuums don't form as readily around
your propellers the farther down you go. You can avoid high cavitation levels
by not setting your speed at FLANK or REVERSE. (Note: THIS GAUGE ISN'T
AVAILABLE ON THE ALFA.)
Dive Plane Control
-----------------[OKLAHOMA CITY]
Controls the rate at which you dive and surface. Lowering the handle
releases air from the ballast tanks, filling the tanks with seawater and
causing the sub to dive. Raising the handle releases compressed air into the
ballast tanks which blows out the water and causes the sub to rise. How far
you lower or raise the handle determines how fast you dive or rise -- for
instance, raising the handle a few degrees will cause the sub to rise very
gradually, while raising the handle all the way will cause the sub to rise
quickly.
Auto Functions
-------------Use the auto functions so you can order the crew to change your depth
without having to monitor the dive plane.
150 FT -- Brings you to a depth of 150 ft.
PERISCOPE DEPTH -- Brings you to periscope depth (20 ft).
EMERGENCY SURFACE -- Brings you to the surface at maximum rate. This
can be quite noisy. Do as it says and only use this in emergencies.
AUTO-PILOT -- See AUTO-PILOT, p.44.
45
-------------------------------------------------------------------------------
[OLYMPIA]
ENGINE CONTROL -- Set your speed with the engine control or throttle. The
numbers represent fractions or percentages of your total power output. You
can't go to STD (standard), FULL or FLANK at depths of 100ft or less because
you'd be making far too much noise for your own good. Use FLANK speed
to accelerate quickly, but remember that higher speeds have their penalties
-- not only do you become more audible to enemy sonar at high speeds, you
can't hear as much over your own engines and the water flowing over your
hydrophones. Part of the real art of submarining is knowing when you should
use high speeds and when you should cut your engines completely. REV
(reverse) will slow you down quickly but it is EXTREMELY noisy (the sub's
propeller is spinning opposite its normal direction, which produces a LOT of
cavitation, especially between 0 and 100 ft).
Seite 34
688 Attack Sub
[OMAHA]
RUDDER -- The rudder changes the ship's course PROVIDED you're moving
forward. The control is incremented, which means you can control the rate
at which you change course. The farther you move the handle to the left or
right, the "harder" (i.e., more sever) the turn. Remember that activating
the rudder will turn off the auto-pilot.
Sonar Room
---------EXIT -- Returns you to the CONN.
Sonar Computer
+-----------------------------------+
|__
| |
|_
| |
|__
| |
|_
| |
|__
| |
|--------------------------------+ |
|
|
||
|||
| ||| | |
|
|
|
||
||
||
|
|
+---|-----||-----||-----||-----|----+
|--+--||--+--||--+--||--+--|
|
|
|
|
Ships
Subs
Bio. Torp.
Figure 5.5: Sonar Analyzer.
[PASADENA]
ANALYZE -- All ships, submarines, torpedoes and marine life make distinctive sounds. Each of these sounds has a sound "signature" or frequency
pattern that distinguishes it from other sounds. Use the frequency analyzer
46
-------------------------------------------------------------------------------
to display the sound signature of your current target. The horizontal line of
the gauge represents the audible frequency spectrum (left being the low
frequency end and right being the high frequency end). The vertical line
represents the degree of sound received in that part of the frequency
spectrum. Different objects will "peak" in different parts of the spectrum.
Figure 5.5 shows where different objects TEND to peak in the sound spectrum.
As you can see, ships tend to make more noise in the low end of the
frequency spectrum; torpedoes in the higher end. Keep in mind that the
above diagram is only a rough approximation -- there are exceptions. To get
positive identification, you must be able to recognize the individual sound
signature of an object. This takes experience. Remember, it can be well
worth your while to know the signatures of torpedoes and enemy subs when
you're surrounded by "unknown contacts" and you need to act fast!
Seite 35
688 Attack Sub
Sonar Controls
-------------FILTER -- Sound waves travel at many frequencies in the ocean. Generally,
you'll want to have the filter set on BAND PASS so you can monitor all of
them. However, in critical situations, you may have to set this on HIGH PASS
to filter out everything except high frequency noise. Torpedo engines make
noise in the high frequency range, and torpedo sonar arrays usually emit
high frequency "pings" when actively searching for a target. Set the filtering
device on HIGH PASS when you want to see JUST torpedoes on your map
display.
[PHILADELPHIA]
TARGETING PULSE -- The targeting pulse is your active sonar. Selecting
this directs your sonar officer to send a sonar "ping" which temporarily
informs you of everything that's ahead of you. The problem is, it also alerts
just about everything to your presence. (See p. 53 for a brief description of
active sonar.)
TOWED ARRAY -- The towed array is a long cable with a series of
microphones along its length that heighten the sub's listening capabilities.
Figure 5.6 shows the relative listening capabilities of a submarine with a
towed array and without.
47
-------------------------------------------------------------------------------
Sonar Capabilities
\
100%
/
\
100%
/
\
/
\
/
\
/
\
/
\
/
\
/
\@/
50%
@
50%
----------------@---------------@
@
@
0-5%
@
@
----------------@---------------65%
/@\
65%
/ @ \
/ @ \
/
\
/
\
/
\
/
\
0-5%
Figure 5.6: Increased Sonar Capabilities With Towed Array
The disadvantage of dragging towed arrays is that they oscillate at high speeds
(creating a good deal of noise) and produce drag. For these reasons, towed
arrays limit the sub's speed: 2/3 in the 688; 50% in the Alfa.
Seite 36
688 Attack Sub
[PHOENIX]
Towed arrays can be over 2000 ft long. Consequently, the towed array must
be reeled out. As you expect, this takes a matter of minutes. Select TOWED
ARRAY once to deploy the towed array. Select it again to retrieve it.
Situations may arise in which you absolutely must accelerate quickly despite
the fact that your towed array is deployed. In these situations, you be given
the choice of cutting the array's cable or not. Once you've cut your towed
array, it's gone for the rest of the mission.
TARGET
-- Targets a vessel (See TARGET, p. 44).
PERISCOPE
=========
(Note: there is no contour imaging in the Periscope station.
controls only returns you to periscope view.)
C on the map
EXIT -- Returns you to the CONN.
ESM Level
--------[PITTSBURGH]
ESM stands for Electronic Sensing Measures.
This gauges how strong your
48
-------------------------------------------------------------------------------
opponent's search radar is at your location. Enemy radar can detect not only
your raised periscope but the wake it leaves in the water. This is true for a
raised antenna as well. The stronger the ESM signal, the faster you'll be
detected. Always lower your periscope or antenna as soon as you can.
PERISCOPE -- Raises and lowers your periscope. You must be at periscope
depth (20 ft) in order to do this. Watch the ESM level to keep your chances
of detection low. When you raise your periscope, the map display window
will turn into your periscope view. You can switch back and forth between
your map display and your periscope view: select T from the map controls
to switch to the top-down map, then select C to return to periscope view.
PERISCOPE ROTATION -- Use the arrows to rotate the periscope. The
direction of the periscope is relative to the bow of your submarine (the bow
is 000).
ANTENNA -- Use this to raise or lower your antenna so you can communicate
with satellites to receive mission orders and transmit messages. You
must be at periscope depth (20 ft) in order to do this. While your antenna is
up, watch the ESM level to keep your chances of detection low.
TARGET -- Targets a vessel (see TARGET, p. 44).
LAUNCH -- Launches a torpedo, noisemaker or missile (whichever is
Seite 37
688 Attack Sub
currently selected at the Weapons Control Panel).
Weapons Control Panel
=====================
EXIT -- Returns you to the CONN.
Torpedo Tubes and Auxiliary Tubes
[PORTSMOUTH]
The 688 is outfitted with four main torpedo tubes (at the bow) and two
auxiliary tubes (amid ships) for noisemakers. The Alfa has six torpedo tubes
at the bow only, but the sixth tube launches noisemakers (until you run out,
at which point it launches torpedoes). Armed weapons aren't store in the
torpedo tubes, so you have to order your crew to load torpedoes. First select
the torpedo tube you want to arm by moving the cursor to that tube. You
49
-------------------------------------------------------------------------------
must arm each tube individually. Press the activate button to highlight the
tube's number. Press the activate button again to start the arming cycle (an
icon of the type of torpedo in the tube will appear.) When the weapon is ready
to fire, the weapon icon will change colors. The weapons officer will also
inform you that the torpedo is ready to launch.
Missile Selection
[PROVIDENCE]
Though the more recent ships of the 688 are equipped with vertical
launch tubes for missiles, the Los Angeles itself fires its missiles from its
torpedo tubes. Since the room aboard a submarine is limited, only a small
number of missiles may be carried. Then number and type of missiles are preselected for each mission and are listed in Chapter 3, Missions (pp. 18-20).
Missiles are loaded and launched the same way torpedoes are. Select the
missile box, then select it again to initiate the arming cycle. The missile
icon will appear as long as you still have missiles on board. When the icon
turns a darker color, it's ready to fire. Select LAUNCH to fire the missile.
Missile specifications begin on p. 64.
TARGET -- Targets a vessel (see TARGET, p. 44).
LAUNCH -- Launches a torpedo, noisemaker or missile (whichever is
currently selected).
Torpedo Control
[SAN FRANCISCO]
The Torpedo Control Functions let you guide torpedoes to a target or location
or set them on an active search program. This is useful if your torpedo seems
to have "lost" its target or in those situations where you don't have a firm
fix on an enemy vessel that you want to try and take out.
Seite 38
688 Attack Sub
[SAN JUAN]
A launched torpedo has a guidance-wire connecting it to your sub. The
guidance-wire is 7.5 nm long: once it's cut, you can no longer control the
weapon. The weapons officer will inform you when a torpedo has gone off
course. The torpedo marker on the map will change to a darker color (red on
most machines). A torpedo with a guidance-wire will seek a target until
it detonates or runs out of fuel.
50
-------------------------------------------------------------------------------
[SALT LAKE CITY]
SELECT -- If you've launched a torpedo and you want to control it, you must
first press SELECT. A crosshair-cursor will appear in the viewing window. Use
the TAB key or mouse to select the torpedo you want to control, then press
<Enter> or click a mouse button. Now select one of the following:
SEARCH -- Sets the torpedo on active search. The torpedo will run a
search pattern and begin emitting sonar pings to help it find a target.
DIRECT -- Select this and a crosshair-cursor will appear on the map.
Move the cursor to where you expect your target to be if it maintains
its course and press <Enter> or click a mouse button. Directing a
torpedo will only send the torpedo to a specific location -- that in
itself isn't enough. When the torpedo's near its destination, you have
to set it on SEARCH so it will look for a target. If you don't
initiate a search pattern, your torpedo will drift until it runs out
of fuel.
[SCRANTON]
DETONATE -- Your own torpedo may lose its original target and end up
locking on you or a friendly ship. In a situation like this you may
decide it's safer to just blow it up. Make sure the torpedo is at a
safe range -- it doesn't have to actually hit something to do damage.
Status Panel
============
EXIT -- Returns you to the CONN.
[TOPEKA]
SELECT -- Your crew will tell you when a severe hit or scraping the bottom
has damaged one of the ship's systems. If you need to review the damage
your sub has taken, press SELECT repeatedly to scroll through the status of
each of the ship's systems. All systems will read "OK" unless you've
sustained damage. If the system has been damaged, the status bar will tell
you its operational condition in percentages. For example, a hard hit to the
stern could damage the ship's engines. The status might read: "Engines 75%
operational". This would mean you couldn't go faster than 3/4 of your top
speed. The diagram shows the sub's major systems -- any major systems
that have been damaged will be highlighted. (Note: NO DIAGRAM IS AVAILABLE ON
Seite 39
688 Attack Sub
THE ALFA.)
Remember that a damaged system is damaged for the DURATION of the
mission. In combat, your crew is too busy running the sub to repair anything.
At any given moment, you have to make do with what you have.
51
-------------------------------------------------------------------------------
6
SUBMARINE WARFARE
=================
A submarine isn't much more than an air-bubble enclosed by one or more
metal shells (hulls) and designed to move underwater at great depths.
All
submarines must do certain things: submerge, move forward, navigate and
monitor their surroundings. Therefore, they share certain design features.
Propulsion -- Submarines need power sources to propel them forward and
to provide energy for subsidiary systems such as life support, lighting,
navigation, weapons control, the periscope, etc. Internal combustion engines, like automobile engines, require air to burn fuel and are therefore
unsuitable for use while underwater. Two sources of power have proventhemselves effective for submarine propulsion, and both have their advantages and disadvantages. CONVENTIONAL SUBMARINES use electric batteries
while underwater, but these run down with use and must be recharged by
diesel engines. To do this, the submarine has to return to the surface, at
which point it becomes fair game for anybody who wants to shoot at it (it's
diesel engines make it pretty audible to enemy sonar, too). Despite this
disadvantage, conventional submarines remain popular among a majority of
the world's navies -- they're cheap, simple to operate, and virtually silent
when running on battery power.
NUCLEAR-POWERED SUBMARINES use a nuclear reactor to heat water, which
in turn drives a steam generator. They don't need to recharge batteries,
which nicely eliminates unsavory things like range limitations and the need
to surface. However, nuclear-powered submarines are costly and require
greater expertise to operate. Only large navies with huge resources can
maintain nuclear-powered submarines in their fleets. Nuclear-powered
submarines have one disadvantage: the pumps they need to cool their
reactors make them noisier than conventional submarines. However, their
ability to remain submerged for literally years makes this a suitable risk.
Submersion -- Submarines submerge by flooding ballast tanks with seawater, which causes the submarine to lose buoyancy and sink. To surface,
compressed air is blown into the ballast tanks, forcing the seawater back
52
-------------------------------------------------------------------------------
out again. Ballast tanks can be located within the pressure hull or between
the pressure hull and the outer hull. Some submarines have "saddle
tanks": streamlined tanks fitted to the outside of the hull. Diving planes
(fin-like appendages located on the sides near the bow or on the sail) control the angle of the dive.
Seite 40
688 Attack Sub
Sensors -- A submarine's most important sensors are its sonar and
periscope. Since the periscope can only be used near the surface, the
modern submarine must rely almost totally on sonar for its sensing.
Sonar stands for Sound Navigation Ranging and works on the principle
that all objects in the water produce sound waves or reflect them and are
thereby subject to detection.
ACTIVE SONAR devices actively emit sound waves (the legendary sonar
"ping"), which are reflected back by objects in the water. Sensitive
receivers on board the sub pick up the reflected waves, which are then
interpreted by sonar operators using processing devices. Active sonar
devices are usually bow-mounted, though some submarines (such as the
688) also have conformal arrays that run along the sides of the sub, giving
greater all-around sensing. Active sonar, though limited by the characteristic features and noises of the ocean, can give you a lot of critical
information about the objects directly before you. The major drawback of
active sonar is that it alerts just about everything in the vicinity of your
presence.
PASSIVE SONAR uses sensitive listening devices called hydrophones to
pick up sound waves that are already moving through the water. Passive
sonar has the advantage of not alerting everyone to your presence.
Unfortunately, it's something more of an art than a science, requiring
sophisticated spectrum analyzers, powerful microprocessors, intuition,
and, most importantly, TIME. Passive sonar capabilities can be greatly
increased with the use of a towed array, a long, tapered cable with many
hydrophones on it. While a towed array is helpful, it limits a submarine's
speed and maneuverability. Towed arrays are not effective in hard turns,
and the fact that they oscillate at high speeds (and create noise) limits the
overall speed of the submarine.
53
-------------------------------------------------------------------------------
Submarine Classifications
=========================
The U.S. Navy typically classifies submarines in two ways.
The first is by the
role the submarine is designed to fulfill. Traditionally, the submarine's
strategic purpose has been to hunt and attack enemy surface vessels,
whether merchant or military. While this is still a primary function, technological innovations have given the submarine new roles. Refined sensors
now allow submarines to hunt and attack enemy submarines. Finally, those
submarines outfitted with long-range cruise and ballistic missiles can strike
at land-based targets, too.
The role a submarine can perform determines what kinds of weapons it carries.
Attack submarines such as the Los Angeles generally carry mines, cruise
missiles of various sorts, and torpedoes. A few classes of submarines, such
as the Charlie and Oscar classes of the Soviet Union, are primarily cruise
missile platforms. Ballistic missile submarines typically carry long-range
ballistic missiles and a small number of torpedoes for defense.
Another way to classify a submarine is by its means of propulsion. Submarines are typically conventional or nuclear-powered (see "Propulsion"
above). Thus we have the following classifications:
SS
SSN
Conventional attack submarine
Nuclear-powered attack submarine
Seite 41
SSB
SSBN
SSG
SSGN
688 Attack Sub
Conventional ballistic missile submarine
Nuclear-powered ballistic missile submarine
Conventional guided missile submarine
Nuclear-powered guided misile submarine
The Ocean Environment
--------------------Since the ocean doesn't allow much light in, submarines are "blind" in the
most literal sense. Consequently, submarines rely on sound to gain information about the things around them. Sound waves travel through water at
speeds roughly four times greater than they do through air. Solid objects in
the water reflect sound waves, and a sonar operator with a good listening
device can listen to the sound waves and determine a number of important things
about an object that's near him: what it is, its location and speed, etc.
54
-------------------------------------------------------------------------------
However, the art of sonar is by no means simple. The ocean is a dynamic
environment, a fact that has, for better or worse, direct consequences on
a sonar operator's ability to pick up sound waves. There are several factors
which affect the transmission of sound waves, but the most important is
water density. Sound waves in water of a consistent density would travel in
a straight line, but sound waves moving from an area of water with a certain
density to an area with a different density will BEND. Two important
factors affecting the density of water are temperature and pressure.
Water Temperature -- Cold water, of course is denser than warm water.
Sound waves traveling from warm water into cold water will bend toward
the bottom of the ocean (a negative gradient), while sound waves
traveling from cold to warm will bend toward the surface (a positive
gradient). The temperature of water decreases with depth, but not as
gradually as you might expect. Instead, the ocean at any given time will
be made up of several thermal layers. The water is normally warmest near
the surface, forming a surface duct that can be tens to hundreds of feet
deep depending on your location. Below the surface layer the temperature
drops gradually with depth until it reaches another thermal layer (the
thermocline). The temperature falls quite rapidly below the thermocline
until it reaches a thin layer near the bottom (the permanent thermocline).
Water Pressure -- The greater the pressure, the more dense the water.
Water pressure increases the deeper you go, so sound waves bend up
with depth.
Figure 6.1: Thermal Layers
55
-------------------------------------------------------------------------------
Using the Ocean Environment to Your Advantage -- The complexity of the
ocean environment and its effects on sonar can provide the submarine
captain with numerous "hiding places" and the sonar operator with nuSeite 42
688 Attack Sub
merous headaches. Sound waves are typically "trapped" between thermal
layers, forming long sound channels. A submarine trying to escape detection can often cross a thermal layer and stand a good chance of evading
enemy sonar. Even within a sound channel, a submarine is not easily
detected. Look at figure 6.1 above. Part of the effect of bending sound
waves is that they tend to fall into a more or less single, or convergent
path. Convergent paths produce extensive areas where no sonar waves
penetrate. These areas, called shadow zones, can be exploited by submarine captains -- a submarine lurking in a shadow zone will be virtually
invisible to enemy sonar. There's no way to know whether you're precisely
in a shadow zone or not, but your best bet is to hide just below the thermal
layer. Tactically, this a good place to be anyway: it allows you to quickly
move between thermal layers and thus gives you an easy way of "dodging"
the enemy's sonar.
Evading Submarines
There's no foolproof way of evading a submarine that's pursuing you. If your
submarine is faster, you can outrun the other sub over the long run -however, this tactic gives the other sub plenty of time to call in help or, in
combat, to fire torpedoes and destroy you (the noise you create at top speed
also makes you a great target). It's better to try and out-maneuver the other
sub.
The first step is to do something that will make the other sub lose
contact on you. You can do this in a number of ways. As mentioned above,
slipping across a thermal layer gives the other sub a weaker return signal
(the sound waves bouncing off of you will tend to stay in the thermal layer
you're in). If you're lucky, the other sub will lose contact with you
altogether. Another tactic is to cut your engines and drift. Chances are,
the enemy has been tracking been listening to your engines turn. When you
cut your engines, his sonar operator will have to listen for something else:
the water rushing over the outer hull, your reactor pumps, etc. In any case,
it will take a moment for him to reestablish contact on you.
56
-------------------------------------------------------------------------------
Once you think the other sub has lost contact on you, change course. The
more unexpected the new course is, the better. You can turn to the side, turn
180 from the other sub's course and duck under him, or attempt to circle
around and start tracking HIM. Combining maneuvers is effective, too. You
can cut and drift, change course, drop below a thermal layer, then change
course again and silently speed off. The more imaginative and complex the
move, the better your chances of survival.
Using Noisemakers
Noisemakers are devices you fire from your torpedo tubes that simulate the
noises produced by your submarine. Enemy sonar -- whether submarine or
torpedo -- may be temporarily deceived into thinking that the noisemaker is
actually your submarine. Figure 6.2 shows the effective use of noisemakers
(the example demonstrates one sub evading another, but the principle is the
same for evading a torpedo). Sub A is being pursued by sub B. At 1., sub A
cuts his engines and drifts. Sub B immediately loses contact with A. 2. Sub
A releases a noisemaker to distract his pursuer. At the same time, A makes
a hard turn to either the right or left (in this case, the right). Sub A
can now use other maneuvers: he can dive below a thermal layer, or, while
he's still drifting, he can circle around and attempt to hide in sub B's
baffles.
Seite 43
688 Attack Sub
In combat, against torpedoes or submarines, noisemakers can only help you
survive. However, in peacetime, it may not be such a good idea to release
noisemakers in order to evade another submarine. Since noisemakers are
released by compressed air through torpedo or auxiliary tubes, the other sub
has no way of knowing whether you're launching a noisemaker to evade him
or a torpedo to kill him! He might answer your call by launching several
torpedoes in your direction.
57
-------------------------------------------------------------------------------
Evading Torpedoes
Torpedo Limitations -- There are no foolproof ways of evading torpedoes.
Modern torpedoes are intelligent and capable of recognizing decoys and
executing search programs. However, all torpedoes had limitations
which a knowledgeable submarine captain can exploit. Like a submarine,
a torpedo relies on sonar to pinpoint its target; however, the torpedo's
relatively small size limits the area it can sense. Its cone of vision -the area is actually "sees" or senses -- is small (perhaps on 20 degrees
wide directly in front of it) compared to a submarine's. If a submarine
captain can quickly maneuver his ship out of the torpedo's narrow cone of
vision, the torpedo will have to initiate a search program in order to try
and find him. Torpedoes are fairly "stupid" in the sense that their
reactions to a lost target are very mechanical. A torpedo doesn't have the
facility to "guess" where the target went when it escaped the torpedo's
sight. The torpedo can only initiate a pre-programmed search pattern, which
might very well take it in the wrong direction, giving the submarine a chance
to slip away.
Torpedoes are also limited by the amount of fuel they can carry. This gives
them a maximum range -- a point at which they run out of fuel and sink
to the bottom, where they self-destruct. In reality, torpedo ranges vary
from type to type. However, in 688 Attack Sub, all torpedoes have a range
of 10 nm (see Designer's Notes, p. 68). This makes it possible to outrun
torpedoes in certain circumstances.
Like submarines and ships, torpedoes also have a maximum Rate-of
Heading-Change (RHC). The RHC is nothing more than how tightly the
torpedo can make a turn. A torpedo's RHC is pretty good in comparison
to a ship's, but a torpedo can't run on a dime -- after all, it's swimming
at speeds greater than 45 kts! A submarine captain can maneuver such
that the torpedo is forced to turn in order to keep the target in view. If
the torpedo's RHC can't compensate for the change in the target's course, the
torpedo may "overshoot", loosing the target altogether.
Responses to a Torpedo Attack -- Figure 6.3 shows three evasive measure
sones (A, B and C,), each demanding a different response on the part of the
submarine captain. The numbers represent the approximate range of the
torpedoes -- notice that the range at which an evasive measure should be
58
-------------------------------------------------------------------------------
taken depends largely upon the torpedo's bearing. For example, if the
torpedo's bearing is 000, you'd have to take action sooner than if the
torpedo were coming from behind. Why? Because at 000, you and the
Seite 44
688 Attack Sub
torpedo are headed for each other -- the gap between you and the torpedo
is closing fast.
A) At long range, you should turn and out-run the torpedo. All torpedoes in
the game have a range of 10 nm. You only need to stay ahead of the torpedo
for a few miles and it will run out of fuel.
B) At medium range, turn so your sub is heading 90 degrees away from the
torpedo's course (choose the shortest path to get there). If you're real
lucky, you'll escape the torpedo's narrow cone of vision, which will force
it to initiate a search program to look for you.
C) At short range, the best you can do is turn so your sub is heading 150
or 210 degrees away from the torpedo's course (choose the shortest path to
get there). Hopefully you'll escape the torpedo's cone of vision or turn
so fast that the torpedo will "overshoot", giving you time to make a clean
get away.
The Baffles
Both the wake a submarine leaves as it moves through the water and the rotation of the screw (propeller) disrupt the transmission of sound directly behind
the sub. The "baffles" are, in effect, the submarine's blind spot. Even a
towed array, though diminishing the size of the baffles, does not completely
eliminate the problem. The experienced captain stays aware of the fact that
he sense virtually NOTHING to a narrow area astern.
59
-------------------------------------------------------------------------------
7
TECHNICAL REFERENCE
===================
Submarines
---------Although you can only play a Los Angels or Alfa, other submarine classes
make their appearances in one or more of the missions. The following
specifications will help you know what you're up against should you encounter
one of these submarines. For the sake of convenience, we've chosen to call
the Soviet subs by their USN designations, even when you're commanding the
Alfa. SInce very few players speak Russian, this probably won't be missed
much. Note that some of the specifications have been altered to balance game
play, particularly the maximum depth of certain Soviet submarines (see p. 68,
Designer's Notes).
Max.
Max.
Noise
Class
Nat.
Type
Speed
Depth
Level
Weapons
-------------------------------------------------------------------------AKULA
USSR
SSN
45 kt
1800ft
Above
Average
Type 53, Type 65
SS-N-16 A/S
ALFA
USSR
SSN
42 kt
1800ft
Above
Average
Type 53
CHARLIE
II
USSR
SSGN
24 kt
1800ft
Average
Type 53
SS-N-9
Seite 45
688 Attack Sub
FOXTROT
USSR/
Other
SS
16 kt
800 ft
Low
Type 40, Type 53
KILO
USSR
SS
16 kt
1200ft
Very
Low
Type 53
LOS
ANGELES
US
SSN
37 kt
1500ft
Low
MK 48 ADCAP
Harpoon, Tomahawk
Sea Lance A/S
60
-------------------------------------------------------------------------------
Max.
Max.
Noise
Class
Nat.
Type
Speed
Depth
Level
Weapons
-------------------------------------------------------------------------OSCAR
USSR
SSGN
35 kt
1800ft
Average
Type 53, Type 65
SS-N-16, SS-N-19
TRAFALGAR
UK
SSN
32 kt
1500ft
Low
Spearfish, Harpoon
TYPHOON
USSR
SSBN
24 kt
1800ft
Above
Average
Type 53, Type 65
SA-N-5, SS-N-16 A/S
VICTOR
USSR
SSN
32 kt
1800ft
Below
Average
Type 53, Type 65
Weapons
------The following weapons are used in the game by or against submarines.
Those multitude of weapons used by ships against airplanes, missiles, land
targets or other ships are not described here since they have little impact on
the submarine commander. Weapons flagged with icons are actually used
in the game by the 688 or Alfa. All other weapons described here appear in
the game but are used by ships or other subs.
Torpedoes
688 Attack Sub was designed to be a "hot" game, demanding quick
responses and daring moves on the part of players. Real submarine combat
may be intense, but all truth be told, there's a lot of waiting for things to
happen -- courses to be plotted, contacts to be identified, missiles to fly...
A computer game can't reproduce this aspect of naval combat and still call
itself a game: the excitement has to be the grab-you-by-the-shirt-collar
variety. With this in mind, the entire game was "scaled down" so that the
ranges at which things happen were greatly reduced (see p. 68, Designer's
Notes.) The result was that ALL torpedoes (Soviet and American) were given
an artificially short range of 10 nm.
61
-------------------------------------------------------------------------------
Torpedo
Nat.
Range
Max.
Speed
Payload
Notes
Seite 46
688 Attack Sub
-----------------------------------------------------------------------------MK 32
US/
10 nm
Various
40 kt
150 kg
warhead
Though somewhat obsolete, this
anti-submarine torpedo still finds
use in many of the world's navies
primarily aboard escort ships.
MK 46
US
10 nm
40 kt
44 kg
warhead
The Mk 46 is a deep-diving, highspeed ASW torpedo capable of
multiple search patterns and reattack. It can be launched from
surface ships and aircraft or be
carried by ASROC missiles.
MK 48
ADCAP
=====
US
10 nm
52.5kt
267 kg
warhead
The Mk 48 ADCAP (Advanced Capabilities) program was begun to
counter the operational characteristics of newer Soviet subs
such as the Alfa. The result of
the program was a faster, deeper-diving torpedo with better
acoustics and electronics.
MK 50
ALWT
US
10 nm
40 kt
45 kg
directed
energy
warhead
The Mk 50 Advanced Lightweight
Torpedo (ALWT) is the successor
to the Mk 46 torpedo. Most torppedo warheads have a large payload
that blasts outward in all directions. The directed energy warhead uses a smaller, directed
blast to "punch" a hole through
the ship's hull. This requires
even more precise delivery systems
so that the directed blast won't
just glance off the side but will
actually penetrate the ship's hull.
Spearfish
UK
10 nm
60 kt
directed
energy
warhead
Like the Mk 48 ADCAP, the Spearfish
was developed in direct response to
improved Soviet submarine technology (in particular the Alfa). This
heavyweight torpedo is faster, more
accurate and capable of greater
depths than its predecessor. The
Spearfish also uses a directed
energy warhead (see Mk 50 above).
62
-------------------------------------------------------------------------------
Max.
Torpedo
Nat.
Range
Speed
Payload
Notes
-----------------------------------------------------------------------------Type 40
406mm
USSR
10 nm
Unknown 100 kg
warhead
This relatively new, lightweight
torpedo is currently in use with
light destroyers and other sub
killers. It may also be found
aboard certain Soviet nuclear
submarines.
Type 53
USSR
10 nm
47.5 kt 400 kg
533mm has been the standard caliber
Seite 47
688 Attack Sub
533mm
=======
Type 65
660mm
used by the Soviet Navy and its
allies for many years.
USSR
10 nm
47.5 kt 900 kg
warhead
This heavyweight torpedo was only
recently developed and many ships
are currently being refitted to
accommodate its larger diameter.
63
-------------------------------------------------------------------------------
Missiles
-------Max
Missile
Nat.
Range
Speed
Payload
Notes
-----------------------------------------------------------------------------ASROC
US
AntiSubmarine
Weapon
2-10km
Secret
MK 46
Torpedo
The ASROC (Anti-Submarine Rocket)
is the principal ASW weapon of the
US Navy and is popular with over
ten other countries. The ASROC
consists of a ballistic rocket
carrying a Mk 46 torpedo. The
rocket drops the torpedo by parachute at a pre-determined point
near the target. Once underwater,
the torpedo homes in on the target,
by quickly placing a torpedo in the
vicinity of the target, the ASROC
reduces the submarine's reaction
time to the attack, increasing the
likelihood of scoring a hit.
Harpoon
SLCM
=======
US
130 km
.9 Mach 570 lb
high
energy
warhead
Must be at periscope depth and have
positive identification of your
target before you can launch this
weapon.
Tomahawk
SLCM
========
US
460 km 475 kt
(anti-ship)/
2600km
(land-attack)
1000 lb
high
energy
warhead
SS-N-14
USSR
AntiSubmarine
Weapon
55 km
.95mach See
Notes
Sea Lance US
ASW StandOff Weapon
==========
SECRET
SECRET
SECRET
Must be at periscope depth and have
positive identification of your
target before you can launch this
weapon.
The SS-N-14 (Silex) is a shiplaunched A/S missile believed to
carry a homing torpedo or lowlevel nuclear warhead to its target
The Sea Lance was designed to give
American attack submarines an edge
over Soviet subs by extending their
normal torpedo range. The missile
is launched from a submerged submarine. As the missile clears the
surface, a rocket motor is ignited
which carries the payload (a torpedo) to the target. As the missile
re-enters the water, the homing
device on the torpedo activates
Seite 48
688 Attack Sub
and begins searching for a target.
Exact figures for the Sea Lance
are currently not available. Testing is scheduled for July 1989.
64
-------------------------------------------------------------------------------
Ships
----As a submarine commander, you need to know as much about your targets as you
do about your own submarine. A ship's noise level will give you an idea of
how easily it can be tracked, while its type, size and maximum speed will tell
you how easily it can evade your attack. The kinds of weapons a ship carries
are also important -- they determine what the ship can do to your torpedoes
and missiles as well as your submarine. Armed ships generally rely on a three
point system of defense against incoming missiles and torpedoes. Surface-toair missiles (SAMs) and anti-torpedo missiles are the first line of defense,
typically being employed against long range targets. If missile defense is
unsuccessful, guns will be used. Phalanx and chaff make up the last line of
defense. Ships will attempt to protect each other as well as themselves,
firing at missiles and torpedoes destined for other ships. Keep this in mind
when setting up attacks on convoys and battle groups -- take out warships
first. Be wary around any ships carrying depth charges, depth bombs, and
anti-submarine (A/S) torpedoes or missiles (ASROC and SS-N-14's). The latter
are particularly dangerous because of their long range.
Max.
Noise
Class
Nat.
Type
Speed
Level
Weapons
-----------------------------------------------------------------------------CARGO
Various -----
20 kt
Very
High
-----
FORREST US
SHERMAN
DD
20 kt
High
Not applicable in scenario.
IOWA
US
BB
35 kt
High
Guns: 9 16in/50 guns; 12 5in/38 guns;
4 Mk 15 20mm CIWS
SLCMs: Tomahawk, eight quad lanuchers
SSMs: Harpoon, 4 quad launchers
KARA
USSR
CG
34 kt
Above
A/S Missiles: SS-N-14, 2 quad lanchers
Average Depth Bombs: A/S/anti-torpedo depth
bombs, 2 RBU 6000 12-barrelled
trainable launchers
65
-------------------------------------------------------------------------------
Max.
Noise
Class
Nat.
Type
Speed
Level
Weapons
-----------------------------------------------------------------------------Guns: 4 76mm/59 guns; 4 30mm Gatling
Seite 49
688 Attack Sub
guns
SAMs: SA-N-6, 6 launchers; SA-N-4, 2
twin launchers; SA-N-3, 1 twin launcher
KIDD
US
DDG
33 kt
Above
A/S Missiles: ASROC missiles
Average A/S Torpedoes: Mk 32, 2 torp tubes
Guns: 2 Mk 16 20mm CIWS 6 barreled
Phalanx
SAMs: SM-1 ER, 1 MK 13 dual-purpose
launcher
SSMs: Harpoon, 2 quad launchers
KIROV
USSR
BC
33 kt
High
A/S Missiles: SS-N-14, 1 quad launcher
A/S Torpedoes: Type 53, 10 tubes
Depth Bombs: A/S/anti-torpedo depth
bombs, 1 RBU 6000 12 barrel trainable
launcher, 2 RBU 1000 6 barrel trainable
lanchers
Guns: 2 100mm guns; 8 30mm gatling guns
SAMs: SA-N-6, 12 launchers; SA-N-4, 2
twin launchers
SSMs: SS-N-19
MERCHANT
Various ----
20 kt
High
----
NIMITZ
US
33 kt
High
Guns: 4 Mk 16 20mm CIWS 6 barrelled
Phalanx
SAMs: Sea Sparrow
CVN
66
-------------------------------------------------------------------------------
Max.
Noise
Class
Nat.
Type
Speed
Level
Weapons
-----------------------------------------------------------------------------OLIVER
HAZARD
PERRY
US
FFG
29 kt
Above
A/S Torpedoes: Mk 32 A/S torpedo, two
Average triple torpedo tubes
Guns: 1 76mm/62 Mk 75 gun; 1 20mm
CIWS Mk 17 six barrelled Phalanx
SAMs: SM-1 ER, 1 Mk 13 dual-purpose
launcher
SSMs: Harpoon, 1 single Mk 13 launcher
SACRAMENTO
US
AOE
26 kt
High
SLAVA
USSR
CG
12 kt
Above
A/S Torpedoes: Type 53 torpedoes, 8
Average torpedo tubes
Depth Bombs: A/S/anti-torpedo depth
bombs, 2 RBU 6000 12 barrel trainable
launchers
Depth Charges: Depth charges, 2 racks
SAMs: SA-N-6, 8 launchers, SS-N-4, 1
twin launcher
SSMs: SS-N-12
TANKER
Various ----
16 ky
Very
High
SAMs: Sea Sparrow, 1 Mk 29 system
----
Seite 50
688 Attack Sub
67
-------------------------------------------------------------------------------
Aircraft
-------Max.
Mission
Aircraft Nat. Speed
Endurance
Notes
-----------------------------------------------------------------------------Lockheed
P3C
Orion
US
415 kt
16 hours
This four-engine, land based plane
has served the US Navy well as an ASW
patrol aircraft. With its onboard
radar, forward looking infra-red, MAD
equipment and sonobouys the PC3 Orion
is used to detect, track and, if
necessary, destroy enemy submarines.
Sikorsky
US
SH-60B
Seahawk
Helicopter
126 kt
3 1/2 hrs.
Carried by a variety of cruisers,
destroyers, frigates and special helicopter-carriers, the Seahawk acts as
the forward sensors of the ship based
LAMPS III ASW system. With its search
radar, towed MAD system, sonobuoys and
dipping sonar, the helicopter provides
raw data to the parent ship's onboard
processors. The Seahawk also carries
two Mk 46 lightweight torpedoes, making
it a serious threat to enemy
submarines.
Designer's Notes
================
By Paul Grace
When John, Randy, and I started 688 Attack Sub, we wanted to design a game
where the strategic and tactical decisions that confront the player occur at
a reasonably exciting pace. An attack sub isn't a jet fighter, of course, but
we felt that a submarine game's potential for excitement and serious challenge
was at least equal to that of an air combat simulator -- and given the things
that today's billion-dollar subs can do, the potential might even be greater.
However, creating a submarine game that's both reasonably accurate as a
simulation yet exciting enough to play as a game presents certain problems.
For example, a long-range (two-speed) torpedo can travel up to 40 miles, at
speeds between 20 and 50 knots. Its run time could easily end up being more
than 30 minutes long. If we changed the game scale so that this is compressed
to a reasonable time frame for a game (say one or two minutes "real time"),
68
-------------------------------------------------------------------------------
then the speed of a helicopter (or worse, a missile) is so great that it can't
even be represented!
Seite 51
688 Attack Sub
To overcome this difficulty, we had to throw out "conventional" game
design theories (as might be published in trade journals) and invent something
truly radical. By selecting a "combat range" on the order of 15 miles, we've
brought real excitement to an otherwise slow process. The game scale is such
that ships move at a reasonable rate, torpedo run times are short enough to
provide a fast feedback loop without the need for too much time compression.
(In fact, by using this technique, time compression runs the entire game, not
a simplified statistical model.) The bad news is: many weapons have incorrect
maximum ranges.
Furthermore, (or, as we say at Electronic Arts, Farthermore,) we had to
simplify several features present in modern submarine warfare. Some of these
modifications were trivial (modern SONAR sounds more like a "warble" than a
"ping"). Other modifications had real game impact -- for example, we decided
to place the appropriate weapons on board your vessel at the start of each
mission, which improved the play balance of the missions greatly. The US
enjoys some strong advantages in weapons, and we wanted to focus on specific
problems facing hunter-killer commanders, not the intricacies of weapons
selection. For similar reasons, we left out nuclear "superweapons" that would
rob you of long-term satisfaction. You'll have to pretend you've used them
all up, you're stuck with what you have....
Please, NO telephone calls regarding the top speeds of the various
submarines modelled in the game. The published data in Jane's Defense Weekly
seems ludicrously low, while other sources would have us towing water-skiers
behind our beloved Los Angeles. We picked what WE felt were reasonable
speeds, and then balanced the game around those speeds.
Good hunting,
Paul Grace
69
-------------------------------------------------------------------------------
KEYBOARD COMMANDS
=================
<Enter>
Initiate command
Cursor Keys
<Tab>
<Left>
<Right>
<Up>
<Down>
<Shift>
--------------
Tab through control groups (one direction only)
Move between positions in a group (to the left)
Move between positions in a group (to the right)
Move between controls regardless of group (to the left)
Move between controls regardless of group (to the right)
Plus any of the above keys reverses the direction
You can play the entire game with just the above six keys.
Quick Keys
==========
<F1>
<Esc>
spacebar
<F2>
Calls up the help screen
Exit help
Go to next help screen
Go to Radio Room
Seite 52
688 Attack Sub
Go to Status Panel
Go to Ship's Control
Go to Periscope
Go to Navigation Board
Go to Weapon Control
Go to Sonar Room
Go to CONN
The ever-popular BOSS key
Go to specific control group
Go to exit
Go to exit
<F3>
<F4>
<F5>
<F6>
<F7>
<F8>
<F9>
<F10>
<1-9>
<O>
<X>
Ship's Control Panel
Navigation Board
R
E
D
.
5
1
G
W
K
Q
.
4
Rudder control
Engine control
Dive plane control
Autopilot
Auto Function
Display Controls
Target
Set Waypoint
Clear Waypoint
Time Compression
Autopilot
Plotting Controls
Weapon Control Panel
Periscope
G
R
A
M
L
2
3
1
G
U
N
L
=
1
Target
Torpedo Tubes
Auxiliary Tubes
Missile tubes - 688
Launch
Torpedo Control - 688
Torpedo Control - Alfa
Display Control
Target
Periscope Up/Down
Antenna Up/Down
Launch
Rotate Periscope Left
Rotate Periscope Right
Display Control
Sonar Room
Radio Room
G
3
2
4
1
A
P
S
T
2
Target
Analyze
Sonar Controls - 688
Sonar Controls - Alfa
Display Control
Antenna Up/Down
Periscope Up/Down
Send Code
Transmit
Message Review
Status Panel
S
Status
Map Keys
P
F
S
I
H
O
C
B
T
Look to port in contour mode *
Look forward in contour mode *
Look to starboard in contour mode *
Zoom in on top down map
Heads Up Display On/Off
Zoom out on top down map
Contour display imaging On/Off *
Bottom contours On/Off
Top down map On/Off
* indicates not available on the Alfa
Game Controls
<Ctrl-R>
Pseudo-Cyrillic On/Off (if you select a Russian boat you'll
Seite 53
688 Attack Sub
see what this means)
<Ctrl-N>
<Ctrl-A>
<Ctrl-K>
Sound On/Off
Disconnect Mouse
Surrender (modem game only)
===============================================================================
Downloaded From P-80 Systems 304-744-2253 * Since 1980 *
Seite 54
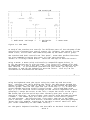
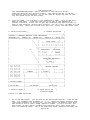

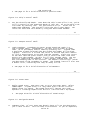
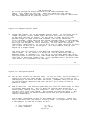


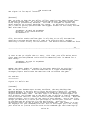
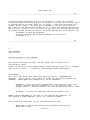
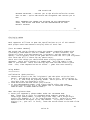
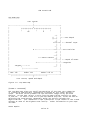

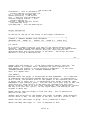
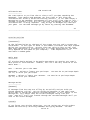
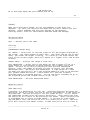


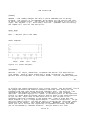
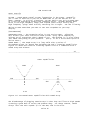
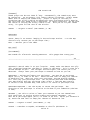
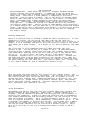
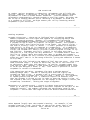
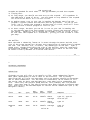
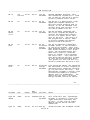
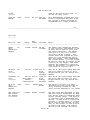
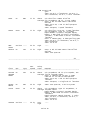


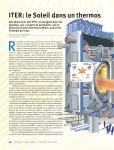

![Télécharger la documentation de conducteö [s]](http://vs1.manualzilla.com/store/data/006373371_1-af26308087bf5a6b266368401065138b-150x150.png)