1
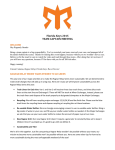
accessories that make a difference
www.xeniosusa.com
WHAT’S INSIDE THE BOX:
timer
(x1)
110/220 v
ac adaptor with
european plug
(x1)
remote control
(x1)
1
wall mounting
brackets w/hardware
(x2)
aaa batery set
for remote control
(x1)
TIMER
power cord plug
temp sensor
tracks for desk stands
wall-mounted brackets holes
service port
6 digits lcd display
2
2
110/220 v ac adaptor with european plug
- XFIT - interval training TIMER -
desk stand
(x2)
accessories that make a difference
www.xeniosusa.com
WHAT’S INSIDE THE BOX:
3
wall mounting brackets w/hardware
Hardware for wall mounting is not provided.
4
remote control
5
desk stand
6
aaa batery set for remote control
- XFIT - interval training TIMER -
3
accessories that make a difference
www.xeniosusa.com
first set up:
on a desk
The XFit - Interval Training Timer can be placed on a flat surface, such
as a desk. Make sure to use it on a stable surface to avoid timer’s tilts
and/or falls.
wall mounted
The XFit - Interval Training Timer can be wall-mounted by using provided hardware. Wall screws are not provided along with the timer.
Xenios USA and/or its international licensers are not responsible for any damage and/or injuries that may occour to persons,
animals, objects and/or properties, while wall-mounting the XFit - Interval Training Timer.
to plug it
WARNING: Do not use any other AC Adaptor than the one provided
with the XFit - Interval Training Timer. Do not supply the XFit - Interval
Training Timer with different voltage power than 110/220 V. Warranty
will void in case of mis-use of the XFit - Interval Training Timer.
4
- XFIT - interval training TIMER -
accessories that make a difference
www.xeniosusa.com
remote control:
IR sensor (must be headed toward the timer when using the remote)
Main on-off / editing procedures exit
general settings editing
0-9 numeric pad to input data and
store/recall workout programs
beeper / pre-workout-countdown control
workout programs editing
workout programs and stopwatch controlling
cursor moving
data entering and confirming
alarm snooze
alarm setting
count-up and count-down setting
clock/temperature mode
stopwatch on/off
temporary workout program
workout program editing
stopwatch beep-pacer
control / all workout
programs beep-pacer control
clock temporary display
battery housing (back side)
operation manual:
Main Functions and Features:
- Clock: HH:MM:SS format - 12/24H.
- Environment Temperature: Fahrenheit and Celsius degree format – from -20°C to +65°C
- Stopwatch: MM:SS:SS (1/10s)/(1/100 s) format – from 00:00:00 up to 99:59:99
. Beep-Pacer option
. START – STOP – LAP - RESET options
-Alarm: HH:MM format – 12/24h
. Up to 9 Daily Alarms can be set and stored
. 20s beeper per each alarm
- Interval Timer for training + resting workout programs :
. MM:SS format – from 00:00 up to 99:59
. Count-Up and Count-Down Training and Resting times
. Up to 9 different training times per each workout program
. Up to 9 different resting times per each workout program
. Up to 99 cycles per each training time, resting time and whole workout programs
. Complex Workout Programs: up to 9 training+resting time sub-routines can be gathered in to a macro-routine that can be cycled too
. Pre-workout session 10s countdown with loud beeper on last 3secs
. End-of-training time loud-beeper 3s countdown
. End-of-resting time loud-beeper 3s countdown
. End-of-workout session long-lasting loud-beeper
. Beep-Pacer option
. Quick-start temporary workout program
. Up to 10 storing address for workout programs.
- XFIT - interval training TIMER -
5
accessories that make a difference
www.xeniosusa.com
operation manual:
General Settings and main functions Operation Manual:
1. After having plugged the power ON, press
to switch the XFit - Interval Training Timer ON. The Timer enters in to the clock/temperature
displaying mode and it starts displaying, for example, 09 : 00 : 00.
Attention: when the power is plugged ON/OFF, the Timer beeps for a while. That is the normal signal of system bootstrap and
shut-down.
is pressed again to switch off the XFIT - Interval Training Timer Clock and Alarm functions keep running on
Attention: when
background.
Attention: when power is plugged OFF, all stored data (example: Clock settings, Workout Programs, Alarms etc..) will not go lost
forever. The Timer will keep them in to its internal chip memory.
2. Press
to enter in general settings editing mode. All settings can be edited by following the displayed step-by-step procedure.
Attention - General Editing Rules:
.Blinking digit stands for cursor position and it can be edited by using the numeric pad on the remote control.
.To input data by using the numeric pad on the remote, all digits must be entered, including the 0 value ones
Example: to input 00 : 05 when the initial displayed value is 00 : 00, and the first digit on left side is blinking, you must press
;
;
,
on the numeric pad of the remote control.
.Cursor (blinking digit) can be moved left and right side by using the left arrow and the right arrow on to the
remote control.
once. Timer goes back to clock/temp display mode.
.To exit from editing step-by-step procedure, just press
works also as “exit” button, just while on General Editing, Workout Program Editing and Alarm editing. .The button
If pressed while on any other function/mode, it will switch OFF the Timer.
a) First Step - Clock settings: the display shows, for example, 09 : 00 : 00. Enter the current time by using the format HH:MM:SS. Please be aware that H 1 stands for 24h clock format, while H 2 stands for 12h clock format. 12h and 24h format can be edited , to save the first step edited data.
too (please go to below step e). Press
b) Second Step-Clock displaying time while in clock/temperature mode: after having pressed Enter, the Timer displays 1 - : - - : 00, the last
.
2 digits stand for Clock displaying time (seconds). Enter a value between 01s. and 99s. then confirm with
If the entered value is, for instance, 08, the Timer displays the clock for 8 seconds and then the temperature will be displayed (for the time
setting of temperature displaying: go to below step c).
c) Third Step - Temperature displaying time while in Clock/Temperature mode: now the Timer shows 2 - : - - : 00. The last two digits stand for
. If the entered value is, for instance,
Temperature displaying time (seconds). Enter a value between 00s. and 99s. then confirm it with
08, the Timer displays the temperature for 8 seconds and then the clock will be displayed (for the time setting of clock displaying: go to above
step b). When the Timer is displaying the environment temperature, it displays T : 25 : °C or T : 70 °F. For temperature degree format setting
(Celsius / Fahrenheit) go to below step e).
d) Fourth Step - Temperature adjustment: now the Timer is displaying 3 - : - - : - 0. This setting step can let you adjust the environment
temperature sensor. Sometimes, due to suddenly and/or wide temperature changes, it may be necessary to manually set the correct environment temperature. If the Timer displays the correct temperature, please skip this step by confirming it with
and go to next setting
step. If a temperature adjustment is needed, please follow here below instructions:
.Use the button
and
to set if the actual displayed temperature need to be increased or decreased. When the Timer dis-
plays 3 - : - - : 0, it means the temperature will be increased (by the number of degrees entered by editing the last digit). When the Timer displays 3 - : - - : - 0, it means the temperature will be decreased (by the number of degrees entered by editing the last digit). Once set “-” or “ ” (for plus) on to the 5th digit, just enter, by using the numeric pad on the remote, the number (from 0° to 9°) of degrees you may need to adjust the temperature for. Then confirm with
.
e) Fifth Step - Clock format and Temperature format setting: now the Timer displays 4c(f) : h 1 (2) : 00.
.By editing the format of the clock (12h or 24h) and/or the format of the temperature (C°orF°) the display will change accordingly. “H1” stands for 24h clock format while “H2” stands for 12h. “C” stands for Celsius degree, while “F” stands for Fahrenheit degree.
.The first digit of the last group of two, stands, for temperature format setting: enter, by using the numeric pad on the remote, the value : 1 0 to switch the temperature format to Fahrenheit (display shows 4F : H 1 : 1 0) , or enter : 00 to switch the temperature
format (display shows 4C : H 1: 1 0) to Celsius.
.The second digit of the same group refers to clock format: enter, by using the numeric pad on the remote, the value : 0 1 to set 12h format clock (display shows 4C : H 2 : 0 1), or enter the value : 00 (display shows 4C : H 1 : 00) to set 24h format clock.
Confirm the entered data with
and then the Timer will exit from general setting procedure by going to the standard clock/temperature
mode.
6
- XFIT - interval training TIMER -
accessories that make a difference
www.xeniosusa.com
operation manual:
3. Beeper and Pre-Workout-Countdown setting: The XFit - Interval Training Timer is equipped with an internal beeper to loud-notice some
events. Its software is furthermore programmed to display a 10 seconds pre-workout-countdown, with beeper on last 3 seconds.
(sometimes the user who control the Timer with the remote, needs to train himself as well, so the pre-workout-countdown helps him to leave
the remote down and to join the training group).
Press
and the Timer displays PC : - - : 00. The first letter “P” stands for Pacer, while the second letter “C” stands for Countdown. The
last two digits on the right side can be adjusted by using the numeric pad on the remote, to switch ON/OFF either the Beeper (anytime the
beeper is required. Example: training timer pacer) and the Pre-Workout-Countdown (see Interval Timer Operation Manual section). Once set,
.
just confirm the data by pressing
. pc : - - : 00 stands for Beeper OFF and Pre-Workout-Countdown OFF.
. pc : - - : 0 1 stands for Beeper OFF and Pre-Workout-Countdown ON.
. pc : - - : 1 0 stands for Beeper ON and Pre-Workout-Countdown OFF.
. pc : - - : 1 1 stands for Beeper ON and Pre-Workout-Countdown ON.
to enter into clock/temperature mode. Timer alternate displays clock and temperature according to the entered general settings.
4. Press
While the Timer is waiting for data to be entered (any setting procedure), the
button is not activated.
Attention: Anytime the Timer is waiting for data entering by the user, and nothing happens within 90 seconds, it will go back to
clock/temperature mode by itself (timeout function).
Stopwatch Operation Manual:
1. Press
to enter the Timer in to the Stopwatch function. The Timer shows 00 : 00 : 00.
to start the count-up stopwatch.
.Press
.Press
to stop the stopwatch and to hold on the display the recorded time.
.Press
to go back to 00 : 00 : 00. (If
is pressed while stopwatch is working, the Timer will go back to 00 : 00 : 00 as well).
.While the stopwatch is working, press
to activate the LAP function. Timer stops just on display while it keeps counting the time on background. Press
to display again the count-up from the value it has reached by working on background.
Press
to just go back to 00 : 00 : 00.
Attention: if Beep-Pacer was set for stopwatch (see below number 2.), while the stopwatch is working on background for LAP
function, the beeper keep sounding too at the set pacer-time).
2. Stopwatch Beep-Pacer setting: press
after having entered in to the stopwatch function. The Timer will display F : 00 : 00, or
F- : 00 : 00 The former stands for beep-pacer ON, while the latter stands for beep-pacer OFF. To switch pacer ON/OFF, just use the buttons and . To set the pacer time (minutes and seconds), just enter MM : SS by using the numeric pad on the remote (enter a value between
00 : 0 1 and 99 : 99), then confirm all settings and data with
.
Example, if you set F : 00 : 05, the pacer beeps every 5 seconds, while the stopwatch is running.
and the Timer displays 00 : 00 : 00.
To go back to the Stopwatch, just press again
Attention: the beep-pacer function is not available if the beeper is deactivated by the general settings (see General Settings
Operation Manual at item 3) ).
alarm Operation Manual:
1. Press
to enter the Timer in to the Alarm function. The Timer shows - 1 : 00 : 00. The first digit on the left side stands for Alarm ON
(minus mark “-” isn’t displayed) / OFF (“-“ is displayed). The second digit (from 1 to 9) stands for the Alarm is being set (The Timer can store
up to 9 different Alarms). The rest of the editable digits stand for HH:MM (time the Alarm will sound).
Attention: the Alarm setting mode can be entered just while the Timer is on Clock mode. While the Timer is on any other mode,
will be deactivated.
the button
- XFIT - interval training TIMER -
7
accessories that make a difference
www.xeniosusa.com
operation manual:
2. To set Alarm ON/OFF, just move the cursor on the first left digit and change the mark (“-“ / “ ”) by using the buttons
and
on the
remote.
Attention: When any of the 9 Alarms is set and switched ON, it will sound every day at the set time. Beeper will sound once for
20 seconds. Beeper could be snoozed by using the
button on the remote. By snoozing the beeper while it is running, Alarm
will not be switched OFF and it will keep operating daily. To switch OFF any Alarm, it is necessary to enter in to the Alarm setting
procedure and select the Alarm to be switched OFF.
Attention: any set and switched ON Alarm, keep working even while the Timer is Switched OFF by having pressed the
Alarms will not work just when the power will be shut down.
button.
3. To select the Alarm to be set (from 1 to 9), just move the cursor on the second digit and then input from 1 to 9 by using the numeric pad
on the remote.
4. To set the time, the selected alarm will sound, just enter the value of HH:MM by using the numeric pad on the remote.
5. Once the Alarm setting is over, press
to confirm, store and exit to Clock mode.
6. To set more than one alarm, just enter again in to the alarm setting procedure and edit the next alarm (from 1 to 9).
Attention: when power is plugged OFF, all stored data (example: Clock settings, Workout Programs, Alarms etc..) will not go lost
forever. The Timer will keep them in to its internal chip memory.
works also as “exit” button, just while on General Editing, Workout Program Editing and Alarm editing.
Attention: the button
If pressed while on any other function/mode, it will switch OFF the Timer.
Attention: If the alarm time should come when any other beeper was set to sound (example: training time pacer), the alarm
function will be skipped.
Workout Programs Interval Timer Operation Manual:
Tips and Tricks for editing workout programs:
.Blinking digit stands for cursor position and it can be edited by using the numeric pad on the remote control.
.To input data by using the numeric pad on the remote, all digits must be entered, including the 0 value ones.
Example: to input 00 : 05 when the initial displayed value is 00 : 00, and the first digit on left side is blinking, you must ;
;
;
on the numeric pad of the remote control.
press
.Cursor (blinking digit) can be moved left and right side by using the left arrow and the right arrow on to the remote.
.While editing a previously set workout program, always make sure about all settings of the same program. The Timer keeps in memory all previously entered data, so you need to change all features according to the new program needs. .To enter in to the edit mode, it doesn’t mean to cancel all previously entered data for a workout program.
.To exit from editing procedure, just press
once. Timer goes back to clock/temp display mode.
Attention: the button
works also as “exit” button, just while on General Editing, Workout Program Editing and Alarm editing. If
pressed while on any other function/mode, it will switch OFF the Timer.
. After 90 seconds of inactivity while the Timer is on editing mode (waiting data to be entered by the user), the Timer will exit from editing mode by itself (timeout).
1. Temporary Workout Program Editing: to set a temporary workout program (to be used once and not to be stored), just start editing it by
pressing
.
.The Timer displays A 1 : 00 : 00 if a temporary workout program wasn’t ever set before, while the Timer displays
P : dn : or P : UP : if a temporary workout program was already set before. The last set temporary workout program will be kept in to the internal memory of the Timer for future uses and, once edited, it will be overwritten.
.If the Timer is displaying P : dn : or P : UP : you can either start the already set temporary workout program (please go to be
low number 4. to learn about workout programs executing) or edit it again (please go to below number 3. to learn about workout programs editing).
8
- XFIT - interval training TIMER -
accessories that make a difference
www.xeniosusa.com
operation manual:
2. Workout Program Storing:
The XFit - Interval Training Timer can store up to 10 workout programs and they can be stored and recalled by using the numeric pad on the
remote control (buttons from
to
).
.Press one of the
to
buttons of the numeric pad and the Timer will display either A 1 : 00 : 00 (if a workout program has never been stored in to that memory position) or P : dn : (or P : UP : ) (if a workout program has already been set and stored in to that memory address).
Attention: if an already stored workout program is edited again, once set and confirmed, the new program will overwrite the old
one. Stored workout programs can’t be just deleted. They can be just overwritten.
.To edit a workout program that will be confirmed and then stored, just follow the step-by-step instructions, starting from the be-
low point 3. (From points a) to i)
.To execute a stored workout program go to below number 4.
3. Workout program Editing:
Before to start editing a workout program, here below there is a quick scheme to show how unlimited are the chances of editing a workout
program on the XFit - Interval Training Timer.
Any single workout program, before to be executed and/or stored, can be edited up to have the following macro routine, made of several
sub-routines.
workout program: macro-routine
workout program: sub-routine
Training Time #1
.time: from 00m:00s up to 99m:99s,
.pacer: a beep any certain MM:00
.number of cycles: from 1 up to 99
Rest Time #1
.time: from 00m:00s up to 99m:99s,
.number of cycles: from 1 up to 99
from 1 to 99 cycles
+
workout program: sub-routine
Training Time #2
.time: from 00m:00s up to 99m:99s,
.pacer: a beep any certain MM:00
.number of cycles: from 1 up to 99
Rest Time #2
.time: from 00m:00s up to 99m:99s,
.number of cycles: from 1 up to 99
from 1 to 99 cycles
from 1 to 99 cycles
+
... up to training time #9 and rest time #9
- XFIT - interval training TIMER -
9
accessories that make a difference
www.xeniosusa.com
operation manual:
a) Press
or
buttons on the remote to set how the workout program will be executed by the Timer: as a count-up or as a count-down.
Your choice will be displayed by the Timer P : dn : stands for count-down and P : UP : stands fort count-up. Your choice will be also
displayed when the editing procedure will be over, the program will be stored and the Timer will be ready to run it.
Attention : Count-down or Count-Up execution modes are editable also before to run a program, without having to enter again in
to the whole workout programs editing procedure (see below j) and 4.)
b) Press
to start editing the workout program. The Timer displays A 1 : 00 : 00. The first digit of the second group blinks. “A1” stands for
“Training time #1”, 00:00 stand for MM:SS of the same training time. Workout Programs can be edited up to 9 groups of 9 training times
and 9 resting times each.
.You are now entering data for the first “A1” training time of the first sub-routine of the whole workout program you are on the way to edit. Just use the numeric pad on the remote to set MM:00 from a value of 00:01 to 99:99, then confirm with
.
c) Press
to set the beep-pacer for “A1” training time (if needed). The Timer displays PA : 00 : 00. Enter a value (minutes and seconds) for
beep-pacer by editing the MM:SS with the numeric pad on the remote. Then
to confirm. Example, if you set PA : 00 : 05, the pacer will
beep every 5 seconds, while the training time is running. Example, if you set PA : 00 : 00, the pacer will not work.
Attention: the beep-pacer function is not available when the beeper is deactivated by the general settings editing (see General
Settings at item number 3.)
Attention: the beep-pacer function can be set separately for each training time “A1”, “A2” , … of the whole workout program only
if a “all workout programs pacer” wasn’t set separately before to run any workout program (see below number 4.) Any set and
stored “single “A” – pacer” for each training time of any workout program will not work when a “all workout programs pacer” is
ON. Any set and stored “single “A” – pacer” for each training time of any workout program will start to work again when the “all
workout programs pacer” will be switched off (see below number 4.)
d) Press
to set the number of cycles of the “A1” training time (how many times the “A1” needs to be executed by the Timer, as a loop).
The timer displays CA : - - : 00. Edit the last two digits on the right side to set the cycles. 00 value and 01 value both stand for 1 cycle only.
Press
to confirm.
e) Press
to edit the first resting time of the first sub-routine of the whole workout program. The Timer displays U 1 : 00 : 00 and it will wait
you to enter the MM : SS for the first “U1” resting time. Just input an MM:SS value from 00 : 01 up to 99 : 99 by using the numeric pad on
to the remote, then confirm with
.
to set the number of cycles of the “U1” resting time (how many times the “U1” need to be executed by the Timer, as a loop).
f) Press
The Timer displays CU : - - : 00. Edit the last two digits on the right side to set the cycles. 00 value and 01 value both stand for 1 time only.
to confirm.
Press
Attention: the beep-pacer function is not available for “U1”, “U2”, “U3”, … resting times. So the button
is not activated for
“U1”, “U2”, “U3”, … setting.
Attention: if a “U1” resting time is not needed just skip the above step, or input 00:00 as “U1” resting time.
g) Press
to set the first “A+U” sub-routine number of cycles (how many times the first workout program sub-routine (example “A1 +
U1” need to be executed by the Timer, as a loop). The Timer displays C - : AU : 00. Edit the last two digits on the right side to set the cycles.
00 value and 01 value stand for 1 time only. Press
to confirm.
h) If one more sub-routine and training time (“A2”) is needed, just press again
to start over with a second training time - A2 : 00 : 00,
of the second sub-routine of the whole workout program you are about the set. Go back to the first step of program setting (above a) ) and
input all data for “A2” and, if needed, “U2” (second resting time of the second sub-routine of the whole workout program). Keep editing the
whole workout program up to “A9” and/or “U9”. If more training times and/or resting times are not necessary, just skip this step and to next i).
i) Press
to set the whole workout program number of cycles (how many times the whole workout program (example: ((“A1 + U1”) +
(“A2” + U2”)) need to be executed by the Timer, as a loop). The Timer displays AU : AU : 00. Edit the last two digits on the right side to set the
cycles. 00 value and 01 value both stand for 1 time only. Press
to confirm.
j) Press
to confirm the whole workout program and to exit editing. If the above editing procedure was started in order to store a workout
is pressed, the edited workout program will be stored in to the pre-selected memory address (from 0 to 9 on the remote).
program, once
The Timer displays P : dn : or P : UP : . Now you are ready to decide if the just-set workout program you are about to execute will be
a count-down program or a count-up program, and then to run it, or to quit from the editing procedure and go back to the Clock mode..
10
- XFIT - interval training TIMER -
accessories that make a difference
www.xeniosusa.com
operation manual:
4. Workout Program Executing: to execute a workout program just press
to let the Timer execute the last set temporary workout program
(Timer displays P : dn : or P : UP : ) or press one of the buttons of the remote control numeric pad to recall a stored workout program
(from
to
): the Timer will display, for example P 1 : dn : or P 1 : UP : .
. Before to start a workout program, a “all workout programs pacer” can be set, by pressing
. The Timer displays E : 00 : 00. By using the buttons
and
this function can be switched OFF or ON. E : 00 : 00 stands for ON, while E - : 00 : 00 stands for OFF. If this function is switched ON, a beep-pacer time can be set, by inputting MM:SS with the numeric pad on the remote (from 00:01 up to 00:99). Press
to confirm.
Attention: when the above function is switched ON, the stored single “A1”, “A2”, “A3”, … beep-pacers (see above point 3., c)) of
the workout program editing procedure manual), will not work and they will be replaced by the “all workout programs pacer”,
that will work the same for all training times (“A1”, “A2”, “A3”, ...) of all workout program/s. To go back to stored single training
times (“A1”, “A2”, “A3”, ...”) pacers, just switch OFF the above “all workout programs pacer” function.
.Before to start a workout program, you can select if it will be a count-up or a count-down program (either for training times and and
on the remote. If count-down or count-up modes are not selected before for resting times) by using the buttons
to start a workout program, the Timer will run the mode set when the program was edited and/or stored (see above 3., a)).
.Press
to run the workout program. The Timer starts with the 10s. pre-workout-countdown and the last 3s. will beep to loud-notice the users the first training time (“A1”) is about to start.
Attention: the Pre-Workout-Countdown and the Beeper may not work cause previously switched-off (see General Settings Operation Manual at item 3.)
.While the workout program is running, press
to temporary pause it and then
to resume it. Press
to stop the program and to go back to the beginning (Timer displays A 1 : 00 : 00).
. Beeper: while the workout program is running the beeper will sound:
- During the pre-workout-countdown on last 3 seconds - short beep;
- On pacer time - medium beep;
- On last 3 seconds of any training time (“A1”, “A2”, “A3”, …), to notice users the training time is about to over and the second cycle of such training time (or the next resting time, or the next training time of the next sub-routine) is go
ing to start; and resting time (“U1”, “U2”, “U3”, ...), to notice users the resting time is going to over and a new cycle of it, or the next set training time of the next sub-routine, is going to start. - short beep.
Attention: If the pacer for training time (“A1”, “A2”, “A3”, ...) should come during the last 3 seconds of the same training time
(when the end-of-training-time beep is activated by default), that beep will be a common one – short beep.
- On really last second of the whole workout program (really last second of the really last cycle of the really last resting time of the whole workout program) - long beep.
Attention: Do not forget that all beeper functions can be switched ON/OFF in general settings (see above General Settings Operation Manual at item 3.)
.While a workout program is running, press
to display the clock for a while (pre-set at 5 seconds). The workout program will function works when Timer is working on all keep running on background and come back to be displayed after 5 seconds.
modes and/or procedures, but the editing ones.
- XFIT - interval training TIMER -
11
®
Thanks for choosing our products !
XFit - Interval Training Timer
WARNINGS
Warning: this is an electricity power supplied device. For safety reason it is duly recommend to read and understand the herein user manual and warnings
sheet, before to use it.
• The XFit - Interval Training Timer comes with its AC adaptor/s. It can be plug in to 110 V and 220 V power networks. Do not use it with lower or higher voltage
cause either the adaptor and the Timer could get damaged and warranty will void. AC adaptor has its own power cord. It is not recommended to plug the power
cord in to a multi-slot power plug.
• Do not try to supply the device by using a third party AC adaptor. In case of use of any third parties’ components, XFit - Interval Training Timer warranty will
void.
• Do not use the XFit - Interval Training Timer in a damp environment and do not drop water on it or on the AC adaptor or on the remote control. Damp and/or
water will damage the XFit - Interval Training Timer and its accessories. Warranty will void in case of mis-use of the Timer.
• Operative Temp: from -20 C° up to +65 C°. The use of the Timer out of such temp range, will result in to a warranty void.
• Remote Control is provided with a set of AAA Batteries (2 pcs pack). It is recommended to remove batteries from remote control in case it will not be in use
for a long term. Long term stand-by may result in to batteries and remote control damages.
• XFit - Interval Training Timer, its remote control and batteries are not devices that can be disposed as general household waste. To dispose of them, please
consider the collection systems or facilities for appropriate recycling. Xenios USA invite all to protect environment.
• Do not try to open or repair the XFit - Interval Training Timer by yourselves. Warranty will void and Xenios USA, its international licensers and/or dealer will
not be responsible for any damages or personal injuries to persons, animals, objects or properties that may result from having come in touch with electric
components while they are operating.
• It is recommended to use only Xenios USA original spare parts. Any damage that may result by the use of third parties parts, will result in to a warranty void.
• The XFit - Interval Training Timer can be set either on a desk or mounted on a wall. Xenios USA and its international licenser and/or dealers will not be responsible for any kind of damages that may result from wall-mounting operations.
• Xenios USA® always recommends to carefully read all Warranty rules, Care and Maintenance instructions and Safety & Usage guidelines, before to use a Xenios USA®
product. Above charts are all available at www.xeniosusa.com
• This is a product thought, developed and manufactured for training purposes. Xenios USA LLC and its international licensers assume no liability or responsibility for accidents or injury to person or property that may result from improper use of this product. Always issue common sense when using a trainign tool: it will avoid any risks to injury
yourself, other persons around you, animals, objects and properties.
• Do not use this product if it, and/or any components are damaged, broken, missing or loose. Should this product or any of its component looks damaged or broken, please
contact the dealer you bought it from, or contact us directly at: [email protected]
• Be sure to consult your health professional or your physician before beginning any type of exercise program. It is always recommended to consult an expert trainer before
to attempting any kind of physical exercise. Avoid any over-training will prevent the risk of injuries to muscles, joints or tendons.
• Children shouldn’t use this product unless supervised by adults. All training tools are not a toy!
• Although Xenios USA® cares that all products are manufactured without the use of hazardous materials or poisonous chemicals and metals, Xenios USA® always recommends to avoid mouth or eyes be in touch with products’ surface. It is recommended to not swallow flakes or chips that may come form products’ surface finishing, such
as painting or chroming. Always pay attention to children: training tools are not a toy ! Xenios USA® and its international licensers are not responsible for any kind of allergic
reaction and/or personal injuries that may be caused to users by exercising with the Xenios USA® training products. Be aware that chemicals and metals, such as lead, nickel,
or cadmium are industrial environments common used materials and they may result in to allergies or body injuries.
• Some items (or parts of them) might smell once un-packed, due to the long stay in to their sealed package. It has to be considered normal and the smell will fade by
keeping the same products exposed to the air. Do not use harsh soaps or aggressive cleaning products to wash the products: they may result in to products damages and
warranty void.
• If you have any questions or comments about this product, please contact the dealer you bought it from, or contact us directly at: [email protected].
www.xeniosusa.com
The Xenios USA® registered trademark is owned, by and used under license from Xenios LLC – NY (USA)
Xenios USA® always recommends to carefully read all Warranty rules, Care and Maintenance instructions and Safety & Usage guidelines, before to use a Xenios USA® product. Above charts are all available at
www.xeniosusa.com XENIOS USA® reserves the right to change product design, construction materials and specifications at any time without notice. While every effort has been made to ensure that all graphic representations and descriptions of goods available from XENIOS USA® correspond to the actual goods, Xenios USA® and/or its International Licensers are not responsible for any variations from these descriptions. Error & omissions
excepted. Some of the products could not be available within all countries.
ACCESSORIES THAT MAKE A DIFFERENCE
®
© XENIOS USA LLC – NY (USA) all rights reserved. The use and the copy
of all the contents are not allowed, without the authorization of XENIOS USA LLC.
XENIOS USA® trademark and all the Registered Design Patents are owned by and used
under the license from XENIOS USA LLC – NY (USA)
www.xeniosusa.com Follow us on: