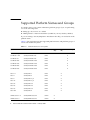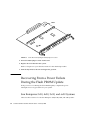
1
Solaris™ 8 2/04 Sun™ Hardware
Platform Guide
Sun Microsystems, Inc.
www.sun.com
Part No. 817-4347-10
February 2004, Revision A
Submit comments about this document at: http://www.sun.com/hwdocs/feedback
Copyright 2004 Sun Microsystems, Inc., 4150 Network Circle, Santa Clara, CA 95054 U.S.A . All rights reserved.
Sun Microsystems, Inc. has intellectual property rights relating to technology embodied in this product. In particular, and without limitation,
these intellectual property rights may include one or more of the U.S. patents listed at http://www.sun.com/patents and one or more
additional patents or pending patent applications in the U.S. and other countries.
This product or document is distributed under licenses restricting its use, copying distribution, and decompilation. No part of this productor
document may be reproduced in any form by any means without prior written authorization of Sun and its licensors, if any.
Third-party software, including font technology, is copyrighted and licensed from Sun suppliers.
Parts of the product may be derived from Berkeley BSD systems, licensed from the University of California. UNIX is a registered trademark in
the U.S. and in other countries, exclusively licensed through X/Open Company, Ltd.
Sun, Sun Microsystems, the Sun logo, Solaris, Answerbook, Netra, SunVTS, SunFDDI, Sun HSI/P, Sun HSI/S, SunForum, Sun ATM, Java 3D,
Sun StorEdge, Sun Blade, Sun Fire, and Sun Enterprise are trademarks or registered trademarks of Sun Microsystems, Inc. in the U.S. and other
countries.
All SPARC trademarks are used under license and are trademarks or registered trademarks of SPARC International, Inc. in the U.S. and other.
countries. Products bearing SPARC trademarks are based upon architecture developed by Sun Microsystems, Inc.
The Adobe® logo and the PostScript logo are trademarks or registered trademarks of Adobe Systems, Incorporated.
The OPEN LOOK and Sun™ Graphical User Interface was developed by Sun Microsystems, Inc. for its users and licensees. Sun acknowledges
the pioneering efforts of Xerox in researching and developing the concept of visual or graphical user interfaces for the computer industry. Sun
holds a non-exclusive license from Xerox to the Xerox Graphical User Interface, which license also covers Sun's licensees who implement OPEN
LOOK GUIs and otherwise comply with Sun's written license agreements.
Federal Acquisitions: Commercial Software - Government Users Subject to Standard License Terms and Conditions.
For SunForum™ 3.1, the following notice applies: Copyright© DATA CONNECTION LIMITED 2000; TELES AG 2000; Portions of this software
are Copyright© 1996-1998 RADVision Ltd. DATA CONNECTION is a registered trademark of DATA CONNECTION LIMITED in the U.S.
And other countries.
For OpenGL 1.3: OpenGL® is a registered trademark of Silicon Graphics, Inc in the U.S. and other countries.
For Sun Enterprise™ 10000 COD: Derived from the RSA Data Security, MD5 Message Digest Algorithim.
DOCUMENTATION IS PROVIDED “AS IS” AND ALL EXPRESS OR IMPLIED CONDITIONS, REPRESENTATIONS AND WARRANTIES,
INCLUDING ANY IMPLIED WARRANTY OF MERCHANTABILITY, FITNESS FOR A PARTICULAR PURPOSE OR NON-INFRINGEMENT,
ARE DISCLAIMED, EXCEPT TO THE EXTENT THAT SUCH DISCLAIMERS ARE HELD TO BE LEGALLY INVALID.
Copyright© 2004 Sun Microsystems, Inc., 4150 Network Circle, Santa Clara, CA 95054, Etats-Unis. Tous droits réservés.
Sun Microsystems, Inc. a les droits de propriété intellectuels relatants à la technologie incorporée dans ce produit. En particulier, et sans la
limitation, ces droits de propriété intellectuels peuvent inclure un ou plus des brevets américains énumérés à http://www.sun.com/patents
et un ou les brevets plus supplémentaires ou les applications de brevet en attente dans les Etats - Unis et les autres pays.
Ce produit ou document est protégé par un copyright et distribué avec des licences qui en restreignent l'utilisation, la copie, la distribution, et la
décompilation. Aucune partie de ce produit ou document ne peut être reproduite sous aucune forme, par quelque moyen que ce soit, sans
l'autorisation préalable et écrite de Sun et de ses bailleurs de licence, s'il y ena.
Le logiciel détenu par des tiers, et qui comprend la technologie relative aux polices de caractères, est protégé par un copyright et licencié par des
fournisseurs de Sun.
Des parties de ce produit pourront être dérivées des systèmes Berkeley BSD licenciés par l'Université de Californie. UNIX est une marque
déposée aux Etats-Unis et dans d'autres pays et licenciée exclusivement par X/Open Company, Ltd.
Sun, Sun Microsystems, the Sun logo, Solaris, Answerbook, Netra, SunVTS, SunFDDI, Sun HSI/P, Sun HSI/S, SunForum, Sun ATM, Java 3D,
Sun StorEdge, Sun Blade, Sun Fire, and Sun Enterprise sont des marques de fabrique ou des marques déposées de Sun Microsystems, Inc. aux
Etats-Unis et dans d'autres pays.
Toutes les marques SPARC sont utilisées sous licence et sont des marques de fabrique ou des marques déposées de SPARC International, Inc.
aux Etats-Unis et dans d'autres pays. Les produits protant les marques SPARC sont basés sur une architecture développée par Sun
Microsystems, Inc.
Le logo Adobe® et le logo PostScript sont des marques de fabrique ou des marques déposées de Adobe Systems, Incorporated.
L'interface d'utilisation graphique OPEN LOOK et Sun™ a été développée par Sun Microsystems, Inc. pour ses utilisateurs et licenciés. Sun
reconnaît les efforts de pionniers de Xerox pour la recherche et le développment du concept des interfaces d'utilisation visuelle ou graphique
pour l'industrie de l'informatique. Sun détient une license non exclusive do Xerox sur l'interface d'utilisation graphique Xerox, cette licence
couvrant également les licenciées de Sun qui mettent en place l'interface d'utilisation graphique OPEN LOOK et qui en outre se conforment aux
licences écrites de Sun.
La notice suivante est applicable á SunForum™ 3.1: Copyright© DATA CONNECTION LIMITED 2001; TELES AG 2000. Des parties de ce
produit logiciel sont protégées par Copyright© 1996-1998 RADVision Ltd. DATA CONNECTION est une marque déposée de DATA
CONNECTION LIMITED aux Estas-Unis et dans d'autres pays.
Pour OpenGL 1.3: OpenGL® est une marque déposée de Silicon Graphics, Inc.
Pour Sun Enterprise™ 10000 COD: Dérivé de RSA Data Security, MD5 Message Digest Algorithim.
Please
Recycle
LA DOCUMENTATION EST FOURNIE “EN L’ETAT” ET TOUTES AUTRES CONDITIONS, DECLARATIONS ET GARANTIES EXPRESSES
OU TACITES SONT FORMELLEMENT EXCLUES, DANS LA MESURE AUTORISEE PAR LA LOI APPLICABLE, Y COMPRIS NOTAMMENT
TOUTE GARANTIE IMPLICITE RELATIVE A LA QUALITE MARCHANDE, A L’APTITUDE A UNE UTILISATION PARTICULIERE OU A
L’ABSENCE DE CONTREFAÇON.
Contents
Preface
1.
xi
Installing Software From the Solaris CD
1
Automatic Installation of Solaris Software
1
Supported Platform Names and Groups
2
32-bit Kernel—Default on 200MHz or Lower UltraSPARC Systems
System Kernel Support
Supported Graphics
2.
6
6
7
Installing Software from the Solaris Software Supplement CD
Installing Supplement CD Software
9
11
Before Installing Supplement CD Software
11
Installing Supplement CD Software Using Solaris Web Start 2.0
12
Installing Supplement CD Software on a Standalone System Using
pkgadd 12
Validation Test Suite Software
(SunVTS Software) 16
SunVTS Packages
18
Installing SunVTS
18
Using SunVTS Software
OpenGL Software
18
18
v
Supported Platforms
19
Removing Old Packages
OpenGL Packages
20
Installing OpenGL
21
19
After Installing the Packages
21
Unexpected Slow Local Rendering
22
Sun Remote System Control for Sun Servers
Lights Out Management (LOM) Software
SunForum
23
24
24
Installing SunForum
Online Help
24
25
Network Adapter Drivers Included on the Supplement CD
Installing the Drivers
25
Platform Notes for Network Adapter Drivers
Configuring VLANs
Java 3D 1.3.1 API
25
26
28
Installation Dependencies
Installing Java 3D 1.3.1 API
28
29
Sun Enterprise 10000 SSP Software
29
Sun Enterprise 10000 Capacity on Demand 1.0 Software
Netra ct Platform Software
29
Installing Sun Fire 880 FC-AL Backplane Firmware
USBA 1.0 Framework
3.
30
Documents on the Supplement CD
AnswerBook2 Sets
30
33
33
Installing Solaris 8 2/04 AnswerBook Sets
Solaris 8 2/04 AnswerBook Packages
33
34
Solaris 8 2/04 on Sun Hardware AnswerBook Set
vi
Solaris 8 2/04 Sun Hardware Platform Guide • February 2004
34
29
25
Sun Enterprise 10000 SSP AnswerBook Set
Alternate Pathing AnswerBook Set
36
36
Capacity On Demand AnswerBook Set
37
Sun Computer Systems Manual Page Packages
37
Using Sun Computer Systems Manual Pages
38
Other Documents on the Computer Systems Supplement CD
HTML, PDF, PostScript, and Other Formats
4.
38
39
Updating the Flash PROM on the Ultra 1, Ultra 2, Ultra 450, and Sun Enterprise
450 Systems 41
Determining If the Flash PROM Needs Updating
Updating the Flash PROM
41
43
Capturing Configuration Variable Settings
Making the Flash PROM Write-Enabled
Before Updating the Flash PROM
44
45
48
Recovering From a Power Failure During the Flash PROM Update
53
Sun Ultra 1 and Ultra 2 Systems, Sun Enterprise 450 System, Sun Ultra 450
Workstation 54
Restoring NVRAM Configuration Variables
Error Messages
56
58
Retained Page/mmap Failure
58
Location of Flash PROM Jumpers in Sun Enterprise 450 System and the Ultra 450
Workstation 59
5.
Updating the Flash PROM on the Sun Enterprise 3x00, 4x00, 5x00, and 6x00
Systems 63
Determining If the Flash PROM Needs Updating
Updating the Flash PROM
63
65
Flash PROM Update Process
65
Capturing Configuration Variable Settings
Making the Flash PROM Write-Enabled
66
67
Contents
vii
Before Updating the Flash PROM
68
Location of Flash PROM Jumpers in Sun Enterprise Server Systems
Installing the P0601 Jumper
78
Recovering From a Power Failure During the Flash PROM Update
Sun Enterprise 3x00, 4x00, 5x00, and 6x00 Systems
6.
77
80
80
Power Management on
Sun Hardware 85
Supported Platforms and System Distinctions
85
System Architecture Distinctions
and Default Settings 87
SPARCstation 4 Issues
7.
87
Alternate Pathing 2.3.1 on the Sun Enterprise Servers
Preparing to Install or Upgrade
89
Performing an Initial Installation of AP
ssd Patch
92
93
Installing the AP 2.3.1 AnswerBook2 Collection
AP 2.3.1 AnswerBook2 Collection
101
Before Performing an Upgrade of AP
103
Backing Up Your Server
101
104
Uncommitted AP Database Entries
104
Checking Other Software Documentation
105
Simultaneously Upgrading AP and Solaris Software
Performing an Upgrade of AP
8.
89
105
106
OpenBoot Emergency Procedures
111
OpenBoot Emergency Procedures for Systems with Standard (non-USB)
Keyboards 111
OpenBoot Emergency Procedures for Systems with USB Keyboards
Stop-A
viii
112
Solaris 8 2/04 Sun Hardware Platform Guide • February 2004
112
Stop-N Equivalent
A.
112
Stop-F Functionality
113
Stop-D Functionality
114
Localized Packages on the Supplement CD
Japanese Localized Packages
German Localized Packages
116
118
Italian Localized Packages
118
French Localized Packages
120
Spanish Localized Packages
120
Swedish Localized Packages
122
Traditional Chinese Localized Packages
122
Simplified Chinese Localized Packages
124
Korean Localized Packages
Index
115
124
125
Contents
ix
x
Solaris 8 2/04 Sun Hardware Platform Guide • February 2004
Preface
The Solaris 8 2/04 Sun Hardware Platform Guide contains important information about
the Sun™ hardware supported by the Solaris™ 8 2/04 operating environment.
This manual:
■
■
■
■
Provides platform-specific installation instructions for the Solaris 8 2/04 software
Describes software provided on the Solaris Software Supplement CD and explains
how to install product software
Describes flash PROM update procedures necessary for some systems to run in
64-bit mode
Describes hardware and software requirements affecting Power
Management™ software
Note – For general Solaris 8 2/04 operating environment installation instructions,
refer to Chapter 1. For information about how to install software contained on the
Solaris Software Supplement CD and information about supported hardware, refer
to Chapter 2.
Where to Find Installation Information
The Solaris 8 2/04 software is delivered on three CDs or a single DVD:
■
Solaris 8 2/04 SPARC™ Platform Edition CDs (called the Solaris CDs throughout
this manual)
■
Solaris Software Supplement CD (called the Supplement CD throughout this
manual).
xi
Before installing the Solaris 8 2/04 software, check TABLE P-1 for listings of manuals
with information that may apply to your situation and TABLE P-2 for specific
installation information.
Note – All Solaris and SPARC documentation can be found on the Documentation
CD. All Sun hardware-specific documentation can be found on the Supplement CD.
Some co-packaged products contain documentation on their respective CDs.
TABLE P-1
Title
Description
Solaris 8 Start Here
Primary installation manual for this release of the
Solaris operating environment from the
Documentation CD
Solaris Advanced Installation Guide
Contains additional information about how to
install the Solaris operating environment on server
systems
TABLE P-2
xii
Related Documentation
Specific Installation Information
If you want to
Go to
Know more about new products
and peripherals
Chapter 2 in this manual
Know about late-breaking news
1. Solaris 8 2/04 Release Notes Supplement for Sun
Hardware
2. Solaris 8 2/04 Release Notes
3. Product Notes provided with your Sun hardware
platform
Begin the installation process from
the Solaris CDs
1. Solaris 8 2/04 Sun Hardware Platform Guide
2. Solaris 8 SPARC Installation Instructions
Install software for your
platform/peripheral from the
Supplement CD
Chapter 2 in this manual
Update your flash PROM for
64-bit operation
Chapter 4 and Chapter 5 in this manual
Install an AnswerBook™ from the
Supplement CD
Chapter 3 in this manual
Solaris 8 2/04 Sun Hardware Platform Guide • February 2004
How This Book Is Organized
This book is organized as follows:
Chapter 1 supports the Solaris 8 Start Here booklet by providing additional
installation instructions on how to install or upgrade to the Solaris 8 2/04 software
on specific Sun platforms and hardware options. It also lists supported Sun
hardware.
Chapter 2 describes how to install the software for Sun platforms and hardware
options and describes value-added software provided to users of Sun hardware.
Chapter 3 describes the locations and formats for the documentation on the
Supplement CD.
Chapter 4 describes the procedure for updating the flash PROMs for 64-bit operation
on Ultra™ 1, Ultra 2, Ultra 450, and Sun Enterprise 450 systems.
Chapter 5 describes the procedure for updating the flash PROMs for 64-bit operation
on Sun Enterprise™ 3x00, 4x00, 5x00, and 6x00 systems.
Chapter 6 describes the hardware and software requirements for running the Power
Management software on Sun hardware.
Chapter 7 describes installation of Alternate Pathing software.
Chapter 8 describes new OpenBoot™ emergency procedures for some systems.
Note – The information previously found in this document regarding Sun Fire
6800/4810/4800/3800 systems is now included in the Sun Fire 6800/4810/4800/3800
Systems Platform Administration Manual and the Sun Fire Midrange Systems Platform
Administration Manual.
Preface
xiii
Typographic Conventions
Typeface*
Meaning
Examples
AaBbCc123
The names of commands, files,
and directories; on-screen
computer output
Edit your .login file.
Use ls -a to list all files.
% You have mail.
AaBbCc123
What you type, when
contrasted with on-screen
computer output
% su
Password:
AaBbCc123
Book titles, new words or terms,
words to be emphasized.
Replace command-line
variables with real names or
values.
Read Chapter 6 in the User’s Guide.
These are called class options.
To delete a file, type rm filename.
* The settings on your browser might differ from these settings.
Accessing Sun Documentation
You can view, print, or purchase a broad selection of Sun documentation, including
localized versions, at:
http://www.sun.com/documentation
Sun Welcomes Your Comments
Sun is interested in improving its documentation and welcomes your comments and
suggestions. You can email your comments to Sun at:
[email protected]
Please include the part number (817-4347-10) of your document in the subject line of
your email.
xiv
Solaris 8 2/04 Sun Hardware Platform Guide • February 2004
CHAPTER
1
Installing Software From the Solaris
CD
This chapter covers the following topics:
■
■
■
■
■
“Automatic Installation of Solaris Software” on page 1
“Supported Platform Names and Groups” on page 2
“32-bit Kernel—Default on 200MHz or Lower UltraSPARC Systems” on page 6
“System Kernel Support” on page 6
“Supported Graphics” on page 7
Note – For initial instructions on installing this Solaris release, see the Start Here
document provided with the discs.
Automatic Installation of Solaris
Software
For the Sun hardware listed in TABLE 1-1, the Solaris 8 release requires no special
installation or upgrade instructions. If you plan to perform an automatic installation
of the Solaris 8 2/04 operating environment on your Sun hardware, refer to the
Solaris Advanced Installation Guide for all your installation needs.
1
Supported Platform Names and Groups
You need to know your system architecture (platform group) if you are performing
one of the following tasks:
■
■
Setting up a boot server on a subnet
Adding clients for network installation (standalone, servers, dataless, diskless)
If you are writing a custom JumpStart™ installation rules file, you need to know the
platform name.
TABLE 1-1 lists and categorizes the supported platform names and platform groups of
various Sun hardware systems.
TABLE 1-1
System
Platform Names for Sun Systems
32-Bit
Only*
32 & 64Bit†
64-Bit Only‡
Platform Name
Platform Group
Sun Blade™ 100
SUNW,Sun-Blade-100
sun4u
X
Sun Blade 150
SUNW,Sun-Blade-100
sun4u
X
Sun Blade 1000
SUNW,Sun-Blade-1000
sun4u
X
Sun Blade 1500
SUNW,Sun-Blade-1500
sun4u
X
Sun Blade 2000
SUNW,Sun-Blade-1000
sun4u
X
Sun Blade 2500
SUNW,Sun-Blade-2500
sun4u
X
Ultra™ 1
SUNW,Ultra-1
sun4u
X
Ultra 2
SUNW,Ultra-2
sun4u
X
Ultra 5
SUNW,Ultra-5_10
sun4u
X
Ultra 10
SUNW,Ultra-5_10
sun4u
X
Ultra 30
SUNW,Ultra-30
sun4u
X
Ultra 60
SUNW,Ultra-60
sun4u
X
Ultra 80
SUNW,Ultra-80
sun4u
X
Ultra 450
SUNW,Ultra-4
sun4u
X
SPARCstation™ 4
SUNW,SPARCstation-4
sun4m
X
SPARCstation 5
SUNW,SPARCstation-5
sun4m
X
Workstation Systems
2
Solaris 8 2/04 Sun Hardware Platform Guide • February 2004
TABLE 1-1
Platform Names for Sun Systems (Continued)
System
Platform Name
Platform Group
32-Bit
Only*
SPARCstation 10
SUNW,SPARCstation-10
sun4m
X
SPARCstation 20
SUNW,SPARCstation-20
sun4m
X
SPARCclassic
SUNW,SPARCclassic
sun4m
X
SPARCstation LX
SUNW,SPARCstation-LX
sun4m
X
SPARCstation LX+
SUNW,SPARCstation-LX+
sun4m
X
32 & 64Bit†
64-Bit Only‡
Entry/Workgroup Servers
Sun Fire V880
SUNW,Sun-Fire-880
sun4u
X
Sun Fire V480
SUNW,Sun-Fire-480
sun4u
X
Sun Fire V440
SUNW,Sun-Fire-V440
sun4u
X
Sun Fire 280R
SUNW,Sun-Fire-280R
sun4u
X
Sun Fire V250
SUNW,Sun-Fire-V250
sun4u
X
Sun Fire V240
SUNW,Sun-Fire-V240
sun4u
X
Sun Fire V210
SUNW,Sun-Fire-V210
sun4u
X
Sun Fire V120
SUNW,UltraAX-i2
sun4u
X
Sun Fire V100
SUNW,UltraAX-i2
sun4u
X
Sun Fire B100s
SUNW,Serverblade1
sun4u
X
Sun Fire B10n
SUNW,Serverblade1
sun4u
X
Sun Enterprise™
420R
SUNW,Ultra-80
sun4u
X
Sun Enterprise 220R
SUNW,Ultra-60
sun4u
X
Sun Enterprise 450
SUNW,Ultra-4
sun4u
X
Sun Enterprise 250
SUNW,Ultra-250
sun4u
X
Sun Enterprise 150
SUNW,Ultra-1
sun4u
X
Sun Enterprise Ultra
5S
SUNW,Ultra-5_10
sun4u
X
Sun Enterprise Ultra
10S
SUNW,Ultra-5_10
sun4u
X
Sun Enterprise 2
SUNW,Ultra-2
sun4u
X
Sun Enterprise 1
SUNW,Ultra-1
sun4u
X
Chapter 1
Installing Software From the Solaris CD
3
TABLE 1-1
System
Platform Names for Sun Systems (Continued)
Platform Name
Platform Group
32-Bit
Only*
32 & 64Bit†
64-Bit Only‡
Midrange and Midframe Systems
Sun Fire™ V1280
SUNW,Netra-T12
sun4u
X
Sun Fire 6800
SUNW,Sun-fire
sun4u
X
Sun Fire 4810
SUNW,Sun-fire
sun4u
X
Sun Fire 4800
SUNW,Sun-fire
sun4u
X
Sun Fire 3800
SUNW,Sun-fire
sun4u
X
Sun Enterprise 6500
SUNW,Ultra-Enterprise
sun4u
X
Sun Enterprise 5500
SUNW,Ultra-Enterprise
sun4u
X
Sun Enterprise 4500
SUNW,Ultra-Enterprise
sun4u
X
Sun Enterprise 3500
SUNW,Ultra-Enterprise
sun4u
X
Sun Enterprise 6000
SUNW,Ultra-Enterprise
sun4u
X
Sun Enterprise 5000
SUNW,Ultra-Enterprise
sun4u
X
Sun Enterprise 4000
SUNW,Ultra-Enterprise
sun4u
X
Sun Enterprise 3000
SUNW,Ultra-Enterprise
sun4u
X
SPARCcenter™ 2000
SUNW,SPARCcenter-2000
sun4d
SPARCserver™ 1000
SUNW,SPARCserver-1000
sun4d
Sun Fire 15K/12K
SUNW,Sun-Fire-15000
sun4u
Sun Enterprise
10000
SUNW,Ultra-Enterprise
sun4u
Netra 20
SUNW,Netra-T4
sun4u
X
Netra 120
SUNW,UltraAX-i2
sun4u
X
Netra 240
SUNW,Netra-240
sun4u
X
High-End Systems
X
X
Netra™ Servers
4
Solaris 8 2/04 Sun Hardware Platform Guide • February 2004
TABLE 1-1
Platform Names for Sun Systems (Continued)
32-Bit
Only*
32 & 64Bit†
64-Bit Only‡
System
Platform Name
Platform Group
Netra 1280
SUNW,Netra-T12
sun4u
X
Netra T1
AC200/DC200
SUNW,UltraAX-i2
sun4u
X
Netra X1
SUNW,UltraAX-i2
sun4u
X
Netra ct800
SUNW,UltraSPARC-IIi-Netract
sun4u
X
Netra ct400
SUNW,UltraSPARC-IIi-Netract
sun4u
X
Netra t 1400 & t 1405
SUNW,Ultra-80
sun4u
X
Netra t 1120 & t 1125
SUNW,Ultra-60
sun4u
X
Netra t1 100 & t1 105
SUNW,UltraSPARC-IIi-cEngine
sun4u
X
Ultra AX
Ultra-1-Engine
sun4u
X
Ultra AXi
UltraSPARC-IIi-Engine
sun4u
X
CP1400
UltraSPARC-IIi-cEngine
sun4u
X
CP1500
UltraSPARC-IIi-cEngine
sun4u
X
UltraAX-MP
UltraAX-MP
sun4u
X
UltraAX-MP+
UltraAX-MP
sun4u
X
UltraAXe
UltraAX-e
sun4u
X
UltraAX-e2
UltraAX-e2
sun4u
X
CP2020
UltraSPARCengine_CP-20
sun4u
X
CP2040
UltraSPARCengine_CP-40
sun4u
X
CP2060
UltraSPARCengine_CP-60
sun4u
X
CP2080
UltraSPARCengine_CP-80
sun4u
X
Board-Level Products
* Platforms that only support a 32-bit kernel or driver.
† These systems are 64-bit platforms that can boot a 32-Bit kernel or driver. They support 32-bit applications and drivers on a 32-bit kernel, and support 32-bit or 64-bit applications and 64-bit drivers on a 64-bit kernel.
‡ 64-bit platforms that do not support a 32-bit kernel or driver.
Chapter 1
Installing Software From the Solaris CD
5
32-bit Kernel—Default on 200MHz or
Lower UltraSPARC Systems
On UltraSPARC systems with 200MHz or lower processors, it is possible for a user
to run a 64-bit program designed to exploit a problem that could cause a processor
to stall. Since 64-bit programs cannot run on the Solaris 32-bit kernel, the Solaris
32-bit kernel is booted by default on these systems.
The code sequence that exploits the problem is very unusual, and is not likely to be
generated by a compiler. Assembler code had to be specifically written to
demonstrate the problem. It is highly unlikely that a legitimate handwritten
assembler routine would use this code sequence.
Users willing to assume the risk that a user might accidentally or deliberately run a
program that was designed to cause a processor to stall may choose to run the
Solaris 64-bit kernel on these systems.
You can determine the speed of your processor(s) by typing:
# /usr/sbin/psrinfo -v
You can change the default kernel from 32-bit on a system by modifying the boot
policy file. Edit the /platform/platform-name/boot.conf file so that it contains an
uncommented line with the variable named
ALLOW_64BIT_KERNEL_ON_UltraSPARC_1_CPU set to the value true as shown
in the example that follows:
ALLOW_64BIT_KERNEL_ON_UltraSPARC_1_CPU=true
See boot(1M) for more information about changing the default kernel.
You may also purchase an upgrade to your system, contact your Sun representative
for details.
System Kernel Support
All SPARC systems can run 32-bit applications. Systems using newer SPARC
processors (that is, UltraSPARC based systems) can boot and run a full 64-bit kernel,
which allows those systems to run 32-bit and 64-bit applications concurrently.
6
Solaris 8 2/04 Sun Hardware Platform Guide • February 2004
Systems running a 64-bit kernel require 64-bit versions of drivers and other software
modules that load directly into the kernel. A small number of applications may be
dependent on such components and thus would require versions of these
components specific to a 32-bit or 64-bit kernel. Also, 32-bit applications cannot link
to 64-bit libraries and vice versa. (The Solaris 8 operating environment includes
both 32-bit and 64-bit versions of system libraries.)
TABLE 1-1 indicates which systems can run 64-bit as well as 32-bit applications and
which systems can boot a 32-bit kernel, a 64-bit kernel, or both.
Supported Graphics
The following frame buffer cards are now supported in this release:
TABLE 1-2
Supported Graphics
Frame Buffer Card
First Supported:
Driver
Config Command
For More Information:
XVR-500
Solaris 8 HW 12/02
ifb
fbconfig
Sun XVR-500 Graphics Accelerator
Installation Guide
Part # 816-3028-12
XVR-1200
Solaris 8 HW 5/03
jfb
fbconfig
Sun XVR-1200 Graphics Accelerator
Installation and User’s Guide
Part # 816-7386-11
XVR-100
Solaris 8 HW 5/03
pfb
fbconfig
Sun XVR-100 Graphics Accelerator
Installation Guide
Part # 816-7560-12
XVR-600
Solaris 8 2/04
jfb
fbconfig
Sun XVR-600 Graphics Accelerator
Installation and User’s Guide
Part # 817-2195-10
Note – One frame buffer mentioned in the Solaris Handbook for Sun Frame Buffers, the
Sun XVR-1000 graphics accelerator, is not supported in Solaris 8 HW 12/02, Solaris 8
HW 5/03, nor in this release.
Chapter 1
Installing Software From the Solaris CD
7
8
Solaris 8 2/04 Sun Hardware Platform Guide • February 2004
CHAPTER
2
Installing Software from the Solaris
Software Supplement CD
This chapter describes the contents of the software on the CD labeled Solaris
Software Supplement CD. This CD is referred to in this document as the Supplement
CD.
TABLE 2-1 lists each type of software on the Supplement CD, and whether that
software is installed by default or by option.
TABLE 2-1
Solaris 8 2/04 Supplement CD Content and Installation Status
Software
Version
Solaris Web Start
CDRW software
1.1
Installed by default
Java 3D™ software
1.3.1
Installed by default
OpenGL® software
1.3
Installed by default
SunATM™ driver
5.0
Installed by default
SunFDDI™ PCI driver and SunFDDI SBus driver
3.0/7.0
Installed by default
SunForum™ software
3.1
Installed by default
SunHSI™ PCI driver and SunHSI SBus driver
3.0/3.0
Installed by default
SunVTS™ software
5.1 Patch Set 5
Installed by default
XML Library
2.4.12
Installed by default
Sun Fire B10n software
1.1
Optional
Remote System Control (RSC) for Sun Enterprise Servers
2.2.2
Installed by default
Alternate Pathing software
2.3.1
Optional
Capacity On Demand (COD) software
1.0
Optional
Lights Out Management software
2.0
Optional
Netra™ ct Platform software
1.0
Optional
9
TABLE 2-1
Solaris 8 2/04 Supplement CD Content and Installation Status (Continued)
Software
Version
Solaris Web Start
Netra t11xx Alarms software
2.0
Optional
Sun Enterprise 10000 SSP software
3.5
Optional
Sun Fire 880 FC-AL Backplane Firmware
1.0
Optional
System Management Services (SMS) software
1.4
Separate installation
The following table lists the versions of the software in the current Solaris 8 update
release, as well as the versions in the preceding Solaris 8 releases.
TABLE 2-2
Solaris 8 Supplement CD Content
Software
Solaris
8
10/00
Solaris
8
1/01
Solaris
8
4/01
Solaris
8
7/01
Solaris
8
10/01
Solari
s8
2/02
Solaris
8 HW
12/02
Solaris
8 HW
5/03
Solaris
8 HW
7/03
Solaris
8 2/04
Alternate
Pathing
2.3
2.3.1
2.3.1
2.3.1
2.3.1
2.3.1
2.3.1
2.3.1
2.3.1
2.3.1
CDRW
1.0
1.0
1.0
1.0
1.0
1.0
1.0
1.0
1.1
1.1
Capacity on
Demand
1.0
1.0
1.0
1.0
1.0
1.0
1.0
1.0
1.0
1.0
Java 3D
1.1.2
1.1.2
1.2
1.2.1
1.2.1_
01
1.2.1_
03
1.2.1_
03
1.2.1_
03
1.2.1_
03
1.3.1
Netra ct
Platform
1.0
1.0
1.0
1.0
1.0
1.0
1.0
1.0
1.0
1.0
Netra t11xx
Alarms
2.0
2.0
2.0
2.0
2.0
2.0
2.0
2.0
2.0
2.0
Lights Out
Management
2.0
2.0
2.0
2.0
2.0
2.0
2.0
2.0
2.0
2.0
OpenGL
1.2.1
1.2.1
1.2.1
1.2.1
1.2.2
1.2.2
1.2.2
1.3
1.3
1.3
PC launcher,
PC file viewer
1.0.1,
1.0.1
1.0.1,
1.0.1
1.0.1,
1.0.1
1.0.1,
1.0.1
1.0.1,
1.0.1
1.0.1,
1.0.1
1.0.1,
1.0.1
1.0.1,
1.0.1
1.0.1,
1.0.1
n/a,
n/a
RSC
1.0
2.0
2.1
2.1
2.2
2.2
2.2
2.2
2.2
2.2.2
ShowMe TV
1.3
1.3
1.3
1.3
1.3
1.3
1.3
1.3
1.3
n/a
SunATM
5.0
5.0
5.0
5.0
5.0
5.0
5.0
5.0
5.0
5.0
SunFDDI PCI
3.0
3.0
3.0
3.0
3.0
3.0
3.0
3.0
3.0
3.0
SunFDDI SBus
7.0
7.0
7.0
7.0
7.0
7.0
7.0
7.0
7.0
7.0
SunForum
3.0
3.1
3.1
3.1
3.1
3.1
3.1
3.1
3.1
3.1
SunHSI PCI
3.0
3.0
3.0
3.0
3.0
3.0
3.0
3.0
3.0
3.0
10
Solaris 8 2/04 Sun Hardware Platform Guide • February 2004
TABLE 2-2
Solaris 8 Supplement CD Content (Continued)
Software
Solaris
8
10/00
Solaris
8
1/01
Solaris
8
4/01
Solaris
8
7/01
Solaris
8
10/01
Solari
s8
2/02
Solaris
8 HW
12/02
Solaris
8 HW
5/03
Solaris
8 HW
7/03
Solaris
8 2/04
SunHSI SBus
3.0
3.0
3.0
3.0
3.0
3.0
3.0
3.0
3.0
3.0
SunVTS
4.1
4.2
4.3
4.4
4.5
4.6
5.1
PS1
5.1
PS2
5.1
PS3
5.1
PS5
Sun Enterprise
10000 System
Service
Processor
3.3
3.4
3.4
3.4
3.5
3.5
3.5
3.5
3.5
3.5
Sun Fire B10n
software
n/a
n/a
n/a
n/a
n/a
n/a
n/a
n/a
1.0
1.1
Sun Fire 880
FC-AL
Backplane
Firmware 1.0
n/a
n/a
1.0
1.0
1.0
1.0
1.0
1.0
1.0
1.0
System
Management
Services (SMS)
software
n/a
n/a
n/a
n/a
1.1
1.2
1.2
1.2
1.2
1.4
XML Library
n/a
n/a
n/a
n/a
n/a
n/a
2.4.12
2.4.12
2.4.12
2.4.12
Installing Supplement CD Software
There are at least two ways to install software from the Supplement CD:
■
■
Solaris Web Start 2.0
pkgadd
Note – The Supplement CD contents are not contained on the Solaris DVD for this
release.
Before Installing Supplement CD Software
If you have installed any of the Supplement CD software from a previous release,
you should remove the packages associated with that software before installing the
new software.
Chapter 2
Installing Software from the Solaris Software Supplement CD
11
Installing Supplement CD Software Using Solaris
Web Start 2.0
You can use Solaris Web Start 2.0 to install Supplement CD software after you have
installed the Solaris operating environment.
▼ To Install Supplement CD Software Using Solaris
Web Start 2.0
1. Insert the Supplement CD into your CD ROM drive.
2. In a shell, type:
# cd /cdrom/cdrom0
# ./installer
3. When the Solaris Web Start GUI is displayed, select Next.
4. See TABLE 2-1 on page 9. In the Solaris Web Start column, software is labeled
“Installed by default” or “Optional”.
a. If you want to install all of the default installed software, click Default Install,
then click Next.
b. If you only want to install some of the software products, click Custom Install,
then click Next. Select the software you want to install, then click Next.
Installing Supplement CD Software on a
Standalone System Using pkgadd
▼ To install packages for supported products from the
Supplement CD using pkgadd
1. Insert the Supplement CD into your CD-ROM drive.
The File Manager window is displayed.
2. In a shell, become superuser using the su command and the superuser password.
12
Solaris 8 2/04 Sun Hardware Platform Guide • February 2004
3. Type:
# /usr/sbin/pkgadd -d /cdrom/cdrom0/directory/Product package_names
or:
# cd /cdrom/cdrom0/directory/Product
# pkdadd -d . package_names
where directory is the software product directory from TABLE 2-3 and package_names
are the package names from TABLE 2-3.
The argument to the -d option must be a full path name to a device or directory. If
you do not specify the device on which the package resides, pkgadd checks the
default spool directory (/var/spool/pkg). If the package is not there, installation
fails.
To install a particular product, choose the appropriate packages:
TABLE 2-3
Software and Packages
Software
Version
Directory
Packages
Validation Test Suite Software
(SunVTS)
5.1 PS5
SunVTS_5.1_PS5/
SUNWvts
SUNWvtsmn
SUNWvtsx
XML library (required for SunVTS)
2.4.12
XML_Libraries_2.4.12/
SUNWlxml
SUNWlxmlx
OpenGL Runtime Libraries
1.3
OpenGL_1.3/
SUNWgldoc
SUNWgldp
SUNWgldpx
SUNWglh
SUNWglrt
SUNWglrtu
SUNWglrtx
SUNWglsr
SUNWglsrx
SUNWglsrz
Remote System Control Server
2.2.2
RSC_2.2.2/
SUNWrsc
SUNWrscd
SUNWrscj
Chapter 2
Installing Software from the Solaris Software Supplement CD
13
TABLE 2-3
Software and Packages (Continued)
Software
Version
Directory
Packages
SunForum
3.1
SunForum_3.1
SUNWdat
SUNWdatu
SunFDDI PCI driver
3.0
SunFDDI_PCI_3.0/
SUNWpfd
SUNWpfh
SUNWpfm
SUNWpfu
SunFDDI SBus driver
7.0
SunFDDI_SBus_7.0/
SUNWnfd
SUNWnfh
SUNWnfm
SUNWnfu
SunHSI PCI driver
3.0
SunHSI_PCI_3.0/
SUNWhsip
SUNWhsipm
SUNWhsipu
SunHSI SBus driver
3.0
SunHSI_SBus_3.0/
SUNWhsis
SUNWhsism
SUNWhsisu
Sun Hardware AnswerBook2
1.0
Sun_Hardware_Answerbook/
SUNWabhdw
Java 3D
1.3.1
Java3D_1.3.1/
SUNWj3doc
SUNWj3dem
SUNWj3drt
SUNWj3dut
SunATM 5.0
5.0
SunATM_5.0/
SUNWatm
SUNWatma
SUNWatmu
Alternate Pathing
2.3.1
Alternate_Pathing_2.3.1/
SUNWapdoc
SUNWapdv
SUNWapr
SUNWapu
SUNWabap
14
Solaris 8 2/04 Sun Hardware Platform Guide • February 2004
TABLE 2-3
Software and Packages (Continued)
Software
Version
Directory
Packages
Sun Enterprise 10000 SSP
3.5
System_Service_Processor_3.5/
SUNWsspue
SUNWsspst
SUNWsspr
SUNWssppo
SUNWsspop
SUNWsspob
SUNWsspmn
SUNWsspid
SUNWsspfp
SUNWsspdr
SUNWsspdo
SUNWsspdf
SUNWuessp
Sun Enterprise 10000 Capacity On
Demand (COD) software and
AnswerBook
1.0
Capacity_on_Demand_1.0/
SUNWcod
SUNWcodbk
SUNWcodmn
Netra ct Platform software
1.0
Netra_ct_Platform_1.0/
SUNW2jdrt
SUNWctac
SUNWcteux
SUNWctevx
SUNWctmgx
Netra t11xx Alarms software
2.0
Netra_t11xx_Alarms_2.0/
SUNWtsalm
SUNWtsalr
SUNWtsalu
Lights Out Management software
2.0
Lights_Out_Management_2.0/
SUNWlomm
SUNWlomr
SUNWlomu
CDRW
1.1
CDRW_1.1/
SUNWcdrw
Sun Fire B10n software and
manpages
1.1
Sun_Fire_B10n_Load_Balancing_Blade_1.1
SUNWclbut
SUNWclbx.u
Sun Fire 880 FC-AL Backplane
Firmware
1.0
Sun_Fire_880_FCAL_Backplane_Firmware_1.0/
SUNWfcbpl.u
Note – Packages for the SMS software are also included on the Supplement CD, but
should not be installed using the pkgadd command. For information on installing
SMS, and use of the smsinstall command, refer to the System Management Services
Installation Guide. The most recent version of this book is listed in Chapter 3.
Chapter 2
Installing Software from the Solaris Software Supplement CD
15
Note – For names and descriptions of localized packages, see Appendix A.
If a problem occurs during package installation, information about the problem is
displayed, followed by this prompt:
Do you want to continue with this installation?
Respond with either yes, no, or quit.
Validation Test Suite Software
(SunVTS Software)
The SunVTS validation test suite is a diagnostic tool designed to test Sun hardware.
By running multiple diagnostic hardware tests, the SunVTS software verifies the
connectivity and functionality of most SPARC hardware controllers and devices in a
32-bit or 64-bit Solaris operating environment.
SunVTS provides an infrastructure for programmers to develop their own tests and
run them using the SunVTS interface.
You can find the software for the SunVTS application on the Solaris Software
Supplement CD, and the documentation in the Solaris 8 2/04 on Sun Hardware
AnswerBook set.
16
Solaris 8 2/04 Sun Hardware Platform Guide • February 2004
TABLE 2-4 describes the main features of the SunVTS environment.
TABLE 2-4
SunVTS Diagnostic Tool Features
Feature
Description
SunVTS kernel (vtsk)
The SunVTS kernel controls all aspects of the testing. It is
a daemon designed to stay in the background, and to be
used when needed. Upon starting, the SunVTS kernel
probes the hardware configuration of the system under
test and waits for instructions from a SunVTS user
interface. During testing, the SunVTS kernel coordinates
the running of individual tests, and manages all the
messages (informational and error messages) sent by
these tests.
SunVTS CDE user interface
(vtsui)
This interface is designed to run on top of the Common
Desktop Environment (CDE). This user interface provides
the means to configure, run, and monitor SunVTS test
sessions for local and remote hosts.
SunVTS TTY user interface
(vtstty)
Because not every system has a monitor, SunVTS has a
TTY interface. This ASCII menu-based interface accepts
various key sequences to control the test options and the
test sessions. It can be used from a terminal, a shell tool,
or a remote login session through a modem.
Running an individual test
from the command line
Besides being run from a SunVTS user interface, each
individual hardware test can be run from a UNIX®
command line. Running a test alone can be helpful to
validate only one piece of hardware.
Custom test support
A SunVTS user can run third-party executable test
binaries under the SunVTS environment in the way that
the test, rather than the SunVTS kernel, fully controls its
input argument list and output log files. A user can
simply modify the .customtest file provided by
SunVTS to make it loosely coupled to the environment.
Chapter 2
Installing Software from the Solaris Software Supplement CD
17
SunVTS Packages
TABLE 2-5 provides a list of SunVTS packages needed to run the SunVTS diagnostic
tool.
TABLE 2-5
SunVTS Packages on the Supplement CD
Includes Packages
Name
Description
SUNWvts
Validation Test Suite
SunVTS kernel, user interface (UI), tests
and tools
SUNWvtsmn
Validation Test Suite Manual
Pages
Manual pages for SunVTS
utilities/binaries
SUNWvtsx
Validation Test Suite
64-Bit Validation Test Suite software
Installing SunVTS
See “Installing Supplement CD Software” on page 11.
Using SunVTS Software
To use SunVTS software, refer to the SunVTS documentation in the Solaris 8 2/04
AnswerBook Set. For new features, tests, and test enhancements for this release,
refer to the SunVTS 5.1 Patch Set 5 Documentation Supplement. For overall test
configuration modes, interfaces, and options, refer to the SunVTS 5.1 User’s Guide.
For individual test and quick reference information, refer to the SunVTS 5.1 Test
Reference Manual and the SunVTS Quick Reference Card.
OpenGL Software
The Sun OpenGL software for Solaris is the Sun native implementation of the
OpenGL application programming interface (API). The OpenGL API is an industrystandard, vendor-neutral graphics library. It provides a small set of low-level
geometric primitives and many basic and advanced 3D rendering features, such as
modeling transformations, shading, lighting, anti-aliasing, texture mapping, fog, and
alpha blending.
18
Solaris 8 2/04 Sun Hardware Platform Guide • February 2004
Supported Platforms
The Sun OpenGL 1.3 software for Solaris supports the following devices:
■
Creator Graphics, Creator3D Graphics, Elite3D Graphics, and Expert3D
Graphics—OpenGL functionality is accelerated in hardware.
■
SX, GX, GX+, TGX, TGX+, S24—OpenGL functionality is performed in software.
■
All Sun SPARC systems equipped with the following frame buffers are supported
on the OpenGL 1.3 software: the TCX, SX, GX, Creator, Elite3D, and Expert3D
families of frame buffers. This includes Ultra desktop, Sun Enterprise, and all the
legacy SPARCstation family.
Removing Old Packages
If you have older versions of the Sun OpenGL software for Solaris packages, you
must use the pkgrm command to remove them.
▼ To Remove Old Packages
1. Check to see whether any older versions of the OpenGL packages are installed
using the pkginfo command.
The pkginfo | egrep -i “OpenGL” command lists any existing OpenGL
packages that you have installed.
% pkginfo |
application
application
application
application
application
application
application
application
application
egrep -i “OpenGL”
SUNWffbgl
Creator Graphics (FFB) OpenGL Support
SUNWglrt
OpenGL Runtime Libraries
SUNWglrtu
OpenGL Platform Specific Runtime Libraries
SUNWglwrt
OpenGL Widget Library
SUNWafbgl
Loadable pipeline for UPA Bus Elite3D graphics
SUNWgldoc
Solaris OpenGL Documentation and Man Pages
SUNWglh
Solaris OpenGL Header Files
SUNWglut
Solaris OpenGL Utilities and Example Programs
SUNWglwh
Solaris OpenGL Widget Header Files
2. To remove the packages, become superuser:
% su
Password: superuser password
Chapter 2
Installing Software from the Solaris Software Supplement CD
19
3. Run pkgrm to remove all existing Sun OpenGL software for Solaris packages.
# pkgrm SUNWglrt SUNWglh...
OpenGL Packages
TABLE 2-6 lists the packages that are provided with the Sun OpenGL software for
Solaris.
TABLE 2-6
20
OpenGL Packages
Package Name
Description
Default Install Location
SUNWgldoc
OpenGL documentation and man
pages
/usr/openwin/share
SUNWgldp
OpenGL 32-bit loadable pipelines
for Creator, Creator3D, Elite3D,
Expert3D, Expert3D-Lite, XVR-500,
XVR-1000, XVR-1200, and XVR-4000
graphics accelerators
/usr/openwin/lib/GL/
devhandlers
SUNWgldpx
OpenGL 64-bit loadable pipelines
for Creator, Creator3D, Elite3D,
Expert3D, Expert3D-Lite, XVR-500,
XVR-1000, XVR-1200, and XVR-4000
graphics accelerators
/usr/openwin/lib/sparcv9/
GL/devhandlers
SUNWglh
OpenGL header files
/usr
SUNWglrt
OpenGL client-side runtime libraries
/usr/openwin/lib
SUNWglsr
OpenGL generic SPARC software
renderer
/usr/openwin/lib
SUNWglrtu
OpenGL libraries specific to
UltraSPARC™
/usr/openwin/platform/sun4
u/lib/GL
SUNWglsrz
OpenGL UltraSPARC software
renderer
/usr/openwin/platform/sun4
u/lib/GL
SUNWglrtx
Sun OpenGL 64-bit Runtime
Libraries
/usr/openwin
SUNWglsrx
OpenGL 64-bit UltraSPARC software
renderer
/usr/openwin/platform/sun4
u/lib/sparcv9/GL
Solaris 8 2/04 Sun Hardware Platform Guide • February 2004
Installing OpenGL
See “Installing Supplement CD Software” on page 11.
After Installing the Packages
After installing the packages, do the following:
▼ To Verify Package Installation
1. Exit the window system and restart it so that the window system loads the newly
installed GLX server extension.
2. To verify that the OpenGL libraries are installed correctly, run
ogl_install_check.
The ogl_install_check test program prints the version of the OpenGL library
and renderer used, and renders a rotating wheel. The program returns the following
output when it is run on an UltraSPARC Creator3D:
OpenGL Vendor:
OpenGL Version:
Sun Microsystems, Inc.
1.3 Sun OpenGL 1.3 for Solaris
For diagnostic purposes, the following values should be noted if Solaris OpenGL
software problems are seen:
OpenGL Renderer:
OpenGL Extension Support:
Creator 3D, VIS
GL_EXT_texture3D
GL_SGI_color_table
GL_SUN_geometry_compression
GL_EXT_abgr
GL_EXT_rescale_normal
OpenGL GLX Server:
Detail Status Report
GLX:
Context is direct.
GLX:
OpenGL Rendering in use
GLX:
Double Buffering in use
GLX:
Color Buffer (GLX_BUFFER_SIZE) = 24 bits
GLX:
Depth Buffer (GLX_DEPTH_SIZE) = 28 bits
GLX:
Stencil Buffer (GLX_STENCIL_SIZE) = 4 bits
GLX:
RGBA (True Color/Direct Color) Visual in use
OpenGL Library:
Detail Status Report
Number of color bits (R/G/B/A): 8/8/8/0
Frame Buffer Depth (GL_DEPTH_BITS):28
Chapter 2
Installing Software from the Solaris Software Supplement CD
21
Unexpected Slow Local Rendering
Whenever possible, Sun OpenGL software for Solaris renders directly to the frame
buffer, bypassing the X server. This is enabled by Sun’s DGA mechanism for locking
portions of the screen. However, a Solaris security feature only allows the user who
originally logged in to the window system to use DGA to lock portions of the screen.
Only owners of the window system have access to DGA.
If you notice poor performance when rendering locally, the cause may be this Solaris
security feature. For example, if you start the window system, and another user at
the workstation changes to that user’s own environment using su, the application
will not run via DGA even though the second user is running the application locally.
If you notice slow local rendering, run the ogl_install_check diagnostic
program (found in /usr/openwin/demo/GL) to determine whether the application
is running via DGA. If the OpenGL GLX server status report from the
ogl_install_check program says that the GLX context is indirect, edit the login
permissions to enable DGA access for all users.
To give all local users access to DGA, follow these steps:
▼ To Give All Local Users Access to DGA
1. Become superuser:
% su
Password: superuser password
2. Edit permissions to allow world read/write access to the following devices:
% chmod 666 /dev/mouse /dev/kbd /dev/sound/* /dev/fbs/*
This enables DGA access for all users for the duration of the current window system
session (subject to X authorization, see xhost(1)).
22
Solaris 8 2/04 Sun Hardware Platform Guide • February 2004
3. Edit the /etc/logindevperm file and change the default permissions of all
devices listed in the file to 0666 to allow world read/write access.
For example, in the following lines in logindevperm, change 0600 to 0666 so that
the next time you log in and restart your window system, it will still be accessible by
all users.
/dev/console
/dev/console
/dev/console
0600
0600
0600
/dev/mouse:/dev/kbd
/dev/sound/*
# audio devices
/dev/fbs/*
#frame buffers
Note that your system is no longer secure.
Sun Remote System Control for Sun
Servers
Sun Remote System Control (RSC) is a secure server management tool that lets you
monitor and control a Sun Enterprise 250, Sun Fire 280R, Sun Fire V880, or Sun Fire
V480 server over modem lines and over a network, using Solaris operating
environment or Microsoft Windows clients. RSC can also notify you when server
problems occur. RSC provides remote system administration for geographically
distributed or physically inaccessible systems. All hardware functionality required to
support RSC is already included with your Sun Enterprise 250, Sun Fire 280R, Sun
Fire V880, or Sun Fire V480 server.
The Sun Remote System Control for Sun Servers software is provided on the
Supplement CD. For installation information, see “Installing Supplement CD
Software” on page 11. For configuration information for Remote System Control, see
Remote System Control (RSC) 2.2 User’s Guide.
To install RSC client software on a computer running the Microsoft Windows 98,
Windows NT 4.0, or Windows 2000 operating environment, load the Supplement CD
into the systems’s CD-ROM drive. The InstallShield application starts automatically,
prompts you for a directory name, and installs the RSC executable in the location
that you specify.
Chapter 2
Installing Software from the Solaris Software Supplement CD
23
Lights Out Management (LOM)
Software
Lights Out Management (LOM) Software is a secure server management tool that
lets you monitor and control select Sun Fire and Netra servers via a terminal
concentrator or modem. LOM is currently supported on Sun Fire V100, Sun Fire
V120, Sun Fire V1280, Netra T1, Netra X1, Netra t1, Netra t1400/1405, and Netra
1280 servers. LOM provides remote systems administration for geographically
remote or physically inaccessible systems. All hardware functionality to support
LOM operation is incorporated into the supported server platforms.
The LOM software is provided on the Supplement CD. For installation information,
see “Installing Supplement CD Software” on page 11.
For configuration/operation instructions for Lights Out Management see the
relevant chapter in the User Manual that came with the supported server.
SunForum
SunForum is a data conferencing product for Sun workstations. It is based on the
T.120 standard, which enables your Sun system to conference over intranets and the
Internet with other T.120 products, such as Microsoft NetMeeting and PictureTel
LiveShare Plus, version 4.0.
SunForum includes the following features:
■
■
■
View and control applications shared from other UNIX or PC machines that are
based on the T.120 protocol.
Share local Solaris applications, which can be viewed and controlled by any
conference participant.
Exchange ideas and data using the whiteboard, clipboard, chat, and file transfers.
Installing SunForum
See “Installing Supplement CD Software” on page 11.
24
Solaris 8 2/04 Sun Hardware Platform Guide • February 2004
Online Help
You can read information about SunForum online. You can access help from the
Help menu located on any SunForum menu bar.
Network Adapter Drivers Included on
the Supplement CD
The following software is provided on the Supplement CD contained in your Solaris
8 2/04 Media Kit:
■
■
■
■
■
SunFDDI PCI driver software
SunFDDI SBus driver software
SunHSI PCI driver software
SunHSI SBus driver software
SunATM 5.0 software
Note – SunFDDI supports booting from the 32-bit kernel or the 64-bit kernel.
SunFDDI will attach to whichever you choose to boot from with no special user
interaction.
Installing the Drivers
Note – Before installing driver software from the Supplement CD, make sure that
you have already installed the adapter hardware. Refer to the appropriate Platform
Notes for more information.
See “Installing Supplement CD Software” on page 11.
Platform Notes for Network Adapter Drivers
Refer to the following platform notes for more information:
■
■
Platform Notes: Sun FDDI Adapters
Platform Notes: The Sun GigabitEthernet Device Driver
Chapter 2
Installing Software from the Solaris Software Supplement CD
25
■
■
■
■
■
■
■
Platform
Platform
Platform
Platform
Platform
Platform
Platform
Notes:
Notes:
Notes:
Notes:
Notes:
Notes:
Notes:
The SunHSI/P Device Driver
The SunHSI/S Device Driver
SunATM Driver Software
The hme FastEthernet Device Driver
The eri FastEthernet Device Driver
Sun GigaSwift Ethernet Device Driver
Sun Quad FastEthernet Device Driver
Configuring VLANs
VLANs: Virtual Local Area Networks (VLANs) are commonly used to split up
groups of network users into manageable broadcast domains, to create logical
segmentation of workgroups, and to enforce security policies among each logical
segment. With multiple VLANs on an adapter, a server with a single adapter can
have a logical presence on multiple IP subnets. By default, 512 VLANs can be
defined for each VLAN-aware adapter on your server.
If your network does not require multiple VLANs, you can use the default
configuration, in which case no further configuration is necessary.
VLANs can be created according to various criteria, but each VLAN must be
assigned a VLAN tag or VLAN ID (VID). The VID is a 12-bit identifier between 1
and 4094 that identifies a unique VLAN. For each network interface (ce0, ce1, ce2
and so on), 512 possible VLANs can be created. Because IP subnets are commonly
used, it’s best to use IP subnets when setting up a VLAN network interface. This
means that each VID assigned to a VLAN interface of a physical network interface
will belong to different subnets.
Tagging an Ethernet frame requires the addition of a tag header to the frame. The
header is inserted immediately following the Destination MAC address and the
Source MAC address. The tag header consists of two bytes of Ethernet Tag Protocol
Identifier (TPID, 0x8100) and two bytes of Tag Control Information (TCI). FIGURE 2-1
shows the Ethernet Tag Header format.
26
Solaris 8 2/04 Sun Hardware Platform Guide • February 2004
Octet
1
TPID (0 x 8100)
2
3
3 bits
1 bit
12 bits
4
User_priority
FIGURE 2-1
▼
CFI
VID
Ethernet Tag Header Format
To Configure Static VLANs
1. Create one hostname.cenum file (hostname6.cenum file for IPv6) for each VLAN
which will be configured for each adapter on the server, using the following
naming format that includes both the VID and the physical point of attachment
(PPA):
VLAN logical PPA = <1000 * VID> + <Device PPA>
ce123000 = 1000*123 + 0
Example: hostname.ce123000
This format limits the maximum number of PPAs (instances) you can configure to
1000 in the /etc/path_to_inst file.
For example, on a server with the Sun GigabitEthernet/P 3.0 adapter having an
instance of 0, that belongs to a member of two VLANs, with VID 123 and 224, you
would use ce123000 and ce224000, respectively, as the two VLAN PPAs.
Chapter 2
Installing Software from the Solaris Software Supplement CD
27
2. Use the ifconfig(1M) to configure a VLAN virtual device, for example:
# ifconfig ce123000 plumb up
# ifconfig ce224000 plumb up
The output of ifconfig -a on a system having VLAN devices ce123000 and
ce224000:
# ifconfig -a
lo0: flags=1000849<UP,LOOPBACK,RUNNING,MULTICAST,IPv4> mtu 8232 index 1
inet 127.0.0.1 netmask ff000000
hme0: flags=1000843<UP,BROADCAST,RUNNING,MULTICAST,IPv4> mtu 1500 index 2
inet 129.144.131.91 netmask ffffff00 broadcast 129.144.131.255
ether 8:0:20:a4:4f:b8
ce123000: flags=1000843<UP,BROADCAST,RUNNING,MULTICAST,IPv4> mtu 1500 index 3
inet 199.199.123.3 netmask ffffff00 broadcast 199.199.123.255
ether 8:0:20:a4:4f:b8
ce224000: flags=1000843<UP,BROADCAST,RUNNING,MULTICAST,IPv4> mtu 1500 index 4
inet 199.199.224.3 netmask ffffff00 broadcast 199.199.224.255
ether 8:0:20:a4:4f:b8
3. On the switch, set VLAN tagging and set VLAN ports to coincide with the VLANs
you’ve set up on the server. Using the examples in Step 2 , you would set up
VLAN ports 123 and 224 on the switch.
Refer to the documentation that came with your switch for specific instructions for
setting VLAN tagging and ports.
Java 3D 1.3.1 API
The Java 3D 1.3.1 API is a set of classes for writing three-dimensional graphics
applications and 3D applets. It gives developers high level constructs for creating
and manipulating 3D geometry and for constructing the structures used in rendering
that geometry. Application developers can describe very large virtual worlds using
these constructs, which provide Java 3D software with enough information to render
these worlds efficiently.
Installation Dependencies
■
28
OpenGL 1.1 software or later
Solaris 8 2/04 Sun Hardware Platform Guide • February 2004
■
JDK 1.2.1 software or later
Installing Java 3D 1.3.1 API
See “Installing Supplement CD Software” on page 11.
Sun Enterprise 10000 SSP Software
For SSP installation and update procedures, as well as SSP release notes, see the Sun
Enterprise 10000 SSP Installation and Release Notes, a printed copy of which is
included in your media kit.
Sun Enterprise 10000 Capacity on
Demand 1.0 Software
For Capacity on Demand software installation, as well as release notes, see the Sun
Enterprise 10000 Capacity on Demand 1.0 Installation Guide and Release Notes.
Netra ct Platform Software
The Netra ct Platform 1.0 software on the Supplement CD contains the software
required to support environmental monitoring, alarms (RSC software), and SNMP
monitoring of the Netra ct servers.
The two current Netra ct servers are the Netra™ ct 800 and the Netra ct 400.
The software should not be installed on servers that are not Netra systems.
Chapter 2
Installing Software from the Solaris Software Supplement CD
29
Installing Sun Fire 880 FC-AL Backplane
Firmware
A backup image of the Sun Fire 880 FC-AL Backplane Firmware is provided on the
Supplement CD. In the unlikely event that the firmware on a Sun Fire 880 FC-AL
backplane becomes corrupted, you can use the backup image to flash update the
system with its original firmware. The flash update procedure is performed with the
luxadm download subcommand and is described in Platform Notes: Using luxadm
Software, part of the Solaris on Sun Hardware Documentation Set on the
Supplement CD.
Note – Before you can flash update the system, you must install the backup image
from the Supplement CD onto the Sun Fire 880 system disk. If you use Solaris Web
Start to install the Supplement CD software, the Sun Fire 880 FC-AL Backplane
Firmware is not included in the default installation. To install the backup firmware,
choose the Custom Install option and select the Sun Fire 880 FC-AL Backplane
Firmware. For installation instructions, see “Installing Supplement CD Software” on
page 11.
By default, the firmware image is installed in the following location on the
Sun Fire 880 system disk:
/usr/platform/SUNW,Sun-Fire-880/lib/images/int_fcbpl_fw
Once the image is installed on the disk, perform the flash update procedure using
the luxadm download subcommand with the -f option as descibed in
Platform Notes: Using luxadm Software.
USBA 1.0 Framework
The SUNWusb and SUNWusbx packages of this software release (provided on the
Solaris Software CD) feature a dual USB framework consisting of both the original
Solaris 8 2/02 USB framework and the USBA 1.0 framework. This new framework
supports devices and ports using either USB 2.0 or USB 1.x specifications.
The USBA 1.0 framework supports high speed USB 2.0 devices, is more evolved, and
offers better performance than the original USBA framework. The original
framework is delivered for compatibility with all USB drivers existing prior to this
release.
30
Solaris 8 2/04 Sun Hardware Platform Guide • February 2004
USB 2.0 ports already exist on Sun Blade 1500 and Sun Blade 2500 systems. Other
SPARC systems using an NEC-based, USB 2.0 PCI card may also take advantage of
the full 2.0 functionality.
Please note:
■
■
■
■
■
The keyboard and mouse must be connected to an on-board USB port for use
when booting the system and working with the window manager.
While USB 2.0 devices can operate on a USB 1.x port, their performance will be
significantly better when connected to a USB 2.0 port.
USB 1.x devices connected through a USB 2.0 hub to a USB 2.0 port do not work
in this release.
Please see the hardware-specific Getting Started Guide or the installation
reference documentation which came with your system for diagrams and
connection information.
For further details and release notes about the USB dual framework, please see
the USB documentation at:
www.sun.com/desktop/whitepapers.html
■
The man pages explaining new USB functionality are now installed in the
standard location with most Solaris man pages.
Chapter 2
Installing Software from the Solaris Software Supplement CD
31
32
Solaris 8 2/04 Sun Hardware Platform Guide • February 2004
CHAPTER
3
Documents on the Supplement CD
Documents on the Supplement CD are divided into three formats:
■
■
■
AnswerBook2 collections
Man pages
Other formats
AnswerBook2 Sets
For customers using Sun hardware, four sets of online manuals in AnswerBook2
format are provided on the Supplement CD.
Installing Solaris 8 2/04 AnswerBook Sets
See “Installing Supplement CD Software” on page 11 for information about
installing the Sun Computer Systems AnswerBook2 packages.
Refer to the Solaris 8 Advanced Installation Guide for information about installing
AnswerBook sets.
33
Solaris 8 2/04 AnswerBook Packages
The following table lists the packages that are provided for the Solaris 8 2/04
AnswerBook collections.
TABLE 3-1
Solaris 8 2/04 AnswerBook Packages on the Supplement CD
AnswerBook Package Location
Description
Sun_Hardware_Answerbook/Product/SUNWabhdw
Solaris on Sun Hardware
AnswerBook collection
System_Service_Processor_3.5/Product/SUNWuessp
SSP AnswerBook collection
Alternate_Pathing_2.3.1/Product/SUNWabap
Alternate Pathing
AnswerBook collection
Capacity_on_Demand_1.0/Product/SUNWcodbk
Capacity on Demand
AnswerBook collection
Solaris 8 2/04 on Sun Hardware AnswerBook Set
This AnswerBook set includes general manuals as well as Platform Notes, which are
manuals that cover use of Solaris 8 2/04 software with specific Sun hardware
products.
This AnswerBook set includes:
Title
Contents
Solaris 8 2/04 Sun Hardware Platform Guide
Contains information about installing software from the
Supplement CD and other system products hardware issues.
Solaris on Sun Hardware Reference Manual
Supplement
Information to help you find a compilation of manual pages
provided in packages on the Supplement CD. Includes man
pages that cover SunVTS software.
Solaris Handbook for Sun Peripherals
Information about installing drives and other peripherals for
use with the Solaris 8 2/04 software environment. Covers issues
such as configuring SCSI addresses.
NFS Server Performance and Tuning Guide
Information about the performance and tuning of an NFS
server.
SunVTS 5.1 User’s Guide
Basic instructions on using the SunVTS diagnostic software.
SunVTS 5.1 Test Reference Manual
Information about each test provided with the SunVTS
diagnostic software.
SunVTS 5.1 Patch Set 5 Documentation
Supplement
Supplemental information about new tests and new capabilities
added to the base VTS version via a Patch Set (PS).
34
Solaris 8 2/04 Sun Hardware Platform Guide • February 2004
Title
Contents
SunVTS Quick Reference Card
A quick reference card for the SunVTS diagnostic software.
PCI: SBus Comparison
Feature differences between SBus and PCI.
Platform Notes: The hme FastEthernet Device
Driver
Information on how to configure the hme device driver for use
with the Ultra Workstation series platform, Sun Enterprise
servers, SunSwift SBus adapter, SunSwift PCI adapter, and PCI
SunFastEthernet card.
Platform Notes: SPARCstation 10SX and 20
System Configuration Guide
Information about how to take advantage of graphics memory
and acceleration features of these systems.
Platform Notes: Sun Enterprise 6000, 5000,
4000, and 3000 Systems
Sun Enterprise X000-specific OpenBoot™ commands, including
those for board hot-plug operations. Also contains board hotplug procedures, and miscellaneous related information.
Platform Notes: Sun Enterprise 250 Server
New OpenBoot commands, configuration variables, and disk
drive hot-plug procedures. Also provides procedures for
mapping between logical and physical device names for
internal storage devices.
Platform Notes: Sun Ultra 450 Workstation
and Sun Enterprise 450 Server
New OpenBoot commands, configuration variables, and disk
drive hot-plug procedures. Also provides procedures for
mapping between logical and physical device names for
internal storage devices.
Platform Notes: Using luxadm Software
Instructions on using the luxadm administrative program with
the Sun StorEdge A5000, the SPARCstorage Array, and the Sun
Fire 880 internal storage array..
Platform Notes: Sun FDDI Adapters
Information about how to configure the SunFDDI driver
software and use the SunFDDI network utilities.
Platform Notes: Sun GigabitEthernet Device
Driver
Information on how to configure the Sun GigabitEthernet driver
software.
Platform Notes: The SunHSI/S Device Driver
Describes how to configure the SunHSI SBus driver software.
Platform Notes: The SunHSI/P Device Driver
Describes how to configure the SunHSI PCI driver software.
Platform Notes: The SunATM Driver Software
Describes how to configure the SunATM driver software.
Platform Notes: the Sun Quad FastEthernet
Device Driver
Describes how to configure the Sun Quad FastEthernet driver
software.
Platform Notes: Sun GigaSwift Ethernet Device
Driver
Describes how to configure the Sun GigaSwift Ethernet driver
software.
Platform Notes: the eri FasEthernet Device
Driver
Describes how to configure the eri FastEthernet driver software.
Dynamic Reconfiguration User’s Guide for Sun
Enterprise 6x00,5x00,4x00, 3x00 Systems
Information about how to use dynamic reconfiguration software
features on these Sun Enterprise servers.
Chapter 3
Documents on the Supplement CD
35
Title
Contents
Sun Enterprise 10000 IDN Error Messages
Describes error messages for IDN on the Sun Enterprise 10000
system.
Sun Enterprise 10000 IDN Configuration
Guide
Contains configutation information for IDN on the Sun
Enterprise 10000 system.
Sun Fire 880 Dynamic Reconfiguration User’s
Guide
Contains information about how to use dynamic configuration
software features on the Sun Fire 880 system.
Sun Enterprise 10000 SSP AnswerBook Set
This AnswerBook set includes:
Title
Contents
Sun Enterprise 10000 SSP 3.5 User Guide
User information for Sun Enterprise 10000 System Service
Processor (SSP) software
Sun Enterprise 10000 SSP 3.5 Reference
Manual
Man pages for Sun Enterprise 10000 System Service Processor
(SSP)
Sun Enterprise 10000 Dynamic
Reconfiguration Reference Manual
Man pages for Sun Enterprise 10000 Dynamic Reconfiguration
Sun Enterprise 10000 InterDomain
Networks User Guide
User information for Sun Enterprise 10000 InterDomain Networks
(IDN) software
Alternate Pathing AnswerBook Set
This AnswerBook set includes:
Title
Contents
Sun Enterprise Server Alternate Pathing 2.3.1
User Guide
User information for Alternate Pathing software
Sun Enterprise Server Alternate Pathing 2.3.1
Reference Manual
Man pages for Alternate Pathing software
36
Solaris 8 2/04 Sun Hardware Platform Guide • February 2004
Capacity On Demand AnswerBook Set
This AnswerBook set includes:
Title
Contents
Sun Enterprise 10000 Capacity on Demand 1.0
Administrator Guide
System administrator information for Capacity on Demand on
the Sun Enterprise 10000 server
Sun Enterprise 10000 Capacity on Demand 1.0
Reference Manual
Man pages for Capacity on Demand on the Sun Enterprise
10000 server
Sun Computer Systems Manual Page
Packages
Manual pages for products you install using Solaris Web Start 2 will be
automatically installed. If you want to install a man page for a product but do not
want to install the product, you can use pkgadd to install the man page.
TABLE 3-2
Sun Computer Systems Manual Page Packages on the Supplement CD
Package
Name
Description
SUNWvtsmn
Validation Test Suite Manual Pages
Manual pages for SunVTS drivers/binaries
SUNWnfm
SunFDDI SBus Manual Pages
Manual pages for SunFDDI SBus
SUNWpfm
SunFDDI PCI Manual Pages
Manual pages for SunFDDI PCI
SUNWapdoc
Sun Alternate Pathing Manual Pages
Manual pages for Sun Alternate Pathing
SUNWhsism
SunHSI/S Manual Pages
Manual pages for SunHSI SBus
SUNWhsipm
SunHSI/P Manual Pages
Manual pages for SunHSI PCI
SUNWsspmn
SSP Manual Pages
Manual pages for SSP
SUNWcodmn
Capacity on Demand Manual Pages
Manual pages for COD
SUNWlomm
LOMLite Manual Pages
Manual pages for Lights Out Management
SUNWtsalm
TS91 Alarm and Monitor Manual Pages
Manual pages for TS91 Alarm and Monitor
SUNWclbut
Manual Page Supplement for Sun Fire
B10n
Manual pages for the Sun Fire B10n, located
in the Supplement CD directory
Sun_Fire_B10n_Load_Balancing_
Blade_1.0
Chapter 3
Documents on the Supplement CD
37
This release no longer requires the SUNWs8hwman and SUNWs8hwman1 packages. All
new manual pages are installed from the Solaris CD into the standard /usr/man
directory.
If you have used the Solaris 8 HW 12/02, 5/03, or 7/03 releases, you can now
remove the /opt/SUNWs8hwman and /opt/SUNWs8hwman1 directories from your
MANPATH list.
Using Sun Computer Systems Manual Pages
To view the man pages you have installed, use the man command as you would for
the man pages installed as part of the Solaris operating environment installation.
These additional man pages are also available in the Solaris on Sun Hardware
Reference Manual Supplement in the /Docs/REFMAN_SUPP directory of the
Supplement CD.
Other Documents on the Computer
Systems Supplement CD
The following table lists the documents on the Computer Systems Supplement CD
that are not part of AnswerBook sets and are not man pages:
38
Solaris 8 2/04 Sun Hardware Platform Guide • February 2004
HTML, PDF, PostScript, and Other Formats
TABLE 3-3
HTML, PDF, PostScript, and Other Documents on the Supplement CD
Path
Comment
Docs/README/README_en.html
Readme file for Solaris 8 2/04 Sun Computer
Systems Supplement CD
Docs/HWPG/HWPG_en.pdf
Solaris 8 2/04 Sun Hardware Platform Guide (also
available in hardcopy and AnswerBook form)
Docs/VTS_PS5_DOC_SUPP/VTS_PS5_DOC_SUPP_en.pdf
SunVTS 5.1 Patch Set 5 Documentation Supplement
Docs/SSP_RN/SSP_RN_en.pdf
Sun Enterprise 10000 SSP 3.5 Installation Guide
and Release Notes
Docs/COD_RN/COD_RN_en.pdf
Sun Enterprise 10000 Capacity on Demand 1.0
Installation Guide and Release Notes
Docs/SUN_E10K_DR_UG/SUN_E10K_DR_UG_en.pdf
Sun Enterprise 10000 Dynamic Reconfiguration
User Guide
Docs/SUN_E10K_DR_CONFIG_GUIDE/SUN_E10K_DR_
CONFIG_GUIDE_en.pdf
Sun Enterprise 10000 DR Configuration Guide
Docs/FBH/FBH_en.pdf
Solaris Handbook for Sun Frame Buffers (includes
information about the XVR-500 frame buffer)
Docs/REFMAN_SUPP/REFMAN_SUPP_en.pdf
Solaris on Sun Hardware Reference Manual
Supplement
Docs/DMFE/DMFE_en.ps
Platform Notes: The dmfe Fast Ethernet Device
Driver
Docs/SUN_FIRE_MIDRANGE_DR_UG/SUN_FIRE_
MIDRANGE_DR_UG_en.pdf
Sun Fire Midrange Systems Dynamic
Reconfiguration User Guide
Docs/SUN_FIRE_15K12K_DR_UG/SUN_FIRE_15K12K_
DR_UG_en.pdf
Sun Fire 15K/12K Dynamic Reconfiguration User
Guide
SunForum_3.1/Docs/sunforumUG.ps
SunForum™ User’s Guide
RSC_2.2.2/Product/SUNWrscd
Remote System Control 2.2 User Guide
Note: This document is installed from a package
as part of the RSC software installation.
System_Management_Services_1.4/Docs/SMS_RN/
SMS_RN_en.pdf
System Management Services (SMS) 1.4 Release
Notes
System_Management_Services_1.4/Docs/SUN_FIRE_
HIGHEND_SOG/SUN_FIRE_HIGHEND_SOG_en.pdf
Sun Fire High-End Systems Software Overview
Guide
System_Management_Services_1.4/Docs/SMS_INST/
SMS_INST_en.pdf
System Management Services (SMS) 1.4 Installation
Guide
Chapter 3
Documents on the Supplement CD
39
TABLE 3-3
HTML, PDF, PostScript, and Other Documents on the Supplement CD
Path
Comment
System_Management_Services_1.4/Docs/
SMS_ADMIN/SMS_ADMIN_en.pdf
System Management Services (SMS) 1.4
Administrator Guide
System_Management_Services_1.4/Docs/
SMS_REFMAN/SMS_REFMAN_en.pdf
System Management Services (SMS) 1.4 Reference
Manual
Docs/SMS_DR_UG/SMS_DR_UG_en.pdf
System Management Services (SMS) 1.4 Dynamic
Reconfiguration User Guide
Note – The _en indicates an English language document. Other languages may be
indicated, depending on locale.
40
Solaris 8 2/04 Sun Hardware Platform Guide • February 2004
CHAPTER
4
Updating the Flash PROM on the
Ultra 1, Ultra 2, Ultra 450, and Sun
Enterprise 450 Systems
This chapter describes how to update the flash PROM on the Ultra™ 1, Ultra 2, Ultra
450, and the Sun™ Enterprise™ 450 systems.
Some systems require a higher level of OpenBoot™ firmware in the flash PROM to
run the 64-bit mode of the Solaris™ 8 operating environment. The OpenBoot
firmware is contained within a single flash PROM for the Ultra 1, Ultra 2, Ultra 450,
and the Sun Enterprise 450 systems.
Note – Only those systems identified in this chapter and the following chapter need
the flash PROM upgrade.
The flash PROM devices, which contain OpenBoot, are electrically erasable and
writable devices. This means that the firmware can be updated without removing
the flash PROM from the system board.
Determining If the Flash PROM Needs
Updating
Only sun4u systems that can run the 64-bit mode of the Solaris 8 2/04 operating
environment might need the flash PROM update. Systems that can only run the 32bit mode (such as those in the sun4c, sun4d, and sun4m platform groups) do not
require updated firmware to run Solaris 8 2/04 software.
41
Note – If the Solaris 8 2/04 operating environment notified you that the flash PROM
in your system needs updating, skip the steps in the procedure “To Determine If
Your System Requires a Flash PROM Update” on page 42 and go directly to
“Updating the Flash PROM” on page 43.
▼
To Determine If Your System Requires a Flash
PROM Update
1. Determine the architecture type of your system.
% uname -m
TABLE 4-1
Determining the System Architecture
If your system architecture type is . . .
Then . . .
• sun4u
Go to Step 2.
• sun4c, sun4d, sun4m
You do not need a flash PROM update. Do not proceed
further.
2. Determine the system type of your system.
% uname -i
TABLE 4-2
Determining the System Type
If your system type is one of the
following systems. . .
Then . . .
SUNW,
SUNW,
SUNW,
SUNW,
Go to Step 3 for each system type.
Ultra-1
Ultra-2
Ultra-4
Ultra-Enterprise
Not in the above list
You do not need a flash PROM update. Do not
proceed further.
3. Determine the version level of the firmware in your system. Type:
% prtconf -V
42
Solaris 8 2/04 Sun Hardware Platform Guide • February 2004
TABLE 4-3
Determining the Firmware Version Level
If your system type is . . .
And you see a number
lower than . . .
Then . . .
Otherwise . . .
SUNW, Ultra-1
3.11.1
Proceed to “Updating the
Flash PROM” on page 43.
You do not need a flash
PROM update. Do not
proceed further.
SUNW, Ultra-2
3.11.2
Proceed to “Updating the
Flash PROM” on page 43.
You do not need a flash
PROM update. Do not
proceed further.
SUNW, Ultra-4
3.7.107
Proceed to “Updating the
Flash PROM” on page 43.
You do not need a flash
PROM update. Do not
proceed further.
SUNW, Ultra-Enterprise
3.2.16
Proceed to “Updating the
Flash PROM” on page 43.
You do not need a flash
PROM update. Do not
proceed further.
Updating the Flash PROM
This section describes the following:
■
■
■
■
■
Capturing configuration variable settings
Installing the Solaris 8 2/04 operating environment
Making the flash PROM write-enabled
Steps to perform before updating the flash PROM
Updating the flash PROM
Note – For step-by-step instructions, follow the procedures beginning with “To
Capture the Configuration Variable Settings” on page 44.
After installing the Solaris 8 2/04 operating environment on your hardware, set the
write-protect/enable flash PROM jumper to the write-enable position (Sun Ultra 1
and Ultra 2 systems) before you attempt to update the firmware in the flash PROM.
To change the write protection state of the Sun Enterprise 450 system, turn the
external front panel keyswitch.
Refer to the recovery procedure covered later in this chapter if there is a power
interruption during the update process.
Return the write-protect/enable jumper (Sun Ultra 1 and Ultra 2 systems) to the
write-protect position after updating the firmware in the flash PROM.
Chapter 4
Updating the Flash PROM on the Ultra 1, Ultra 2, Ultra 450, and Sun Enterprise 450 Systems
43
When your system has been updated to the proper firmware revision, you can run
the Solaris 8 2/04 software in 64-bit mode.
Capturing Configuration Variable Settings
While the Solaris operating environment is still running, capture the NVRAM
configuration variable settings before you install the Solaris 8 2/04 operating
environment or begin the flash PROM update process. This will enable you to
restore customized settings if there is a problem during the flash PROM upgrade.
▼ To Capture the Configuration Variable Settings
1. Using the eeprom utility, capture the system’s configuration variable settings in a
file. The filename is any file name you choose.
% eeprom > filename
Note – If you have custom values installed in oem-logo or keymap, those values
cannot be displayed or printed properly by the eeprom utility because the contents
contain binary information. If it is necessary to restore these values after a power
loss, you should determine the original method by which these values were placed
into NVRAM and use that method to restore the values.
2. Print out the values captured by the eeprom command. Type the following:
lp filename
You must have a printed copy of the configuration values before you install the
Solaris 8 2/04 operating environment and begin to update the flash PROM.
▼ To Install the Solaris 8 2/04 Operating Environment
1. Install the Solaris 8 2/04 operating environment on your system.
Refer to the Solaris 8 Advanced Installation Guide shipped in your Solaris 8 2/04 media
kit. As the Solaris 8 2/04 operating environment is installed, you will be notified
whether the flash PROM in your system needs updating. Installing this Solaris
release will provide the software that can upgrade your system’s flash PROM to the
required level.
44
Solaris 8 2/04 Sun Hardware Platform Guide • February 2004
Making the Flash PROM Write-Enabled
Before you update the OpenBoot firmware contained in the flash PROM, you must
set a jumper to the write-enable position (Sun Ultra 1 and Ultra 2 systems) or set the
front panel keyswitch to the proper position (Sun Enterprise 450 system and the Sun
Ultra 450 workstation).
The Sun Ultra 1 and Ultra 2 systems, which do not have a front panel keyswitch, are
equipped with jumpers on their motherboards that allow the flash PROM to be
either write-protected or write-enabled. The default position is for the flash PROM
to be write-protected. To update the flash PROM, you must change the jumper to the
write-enable position.
▼ Sun Ultra 1 and Ultra 2 Systems: To Change the Jumper to
the Write-Enable Position
1. Shut down the system. Type the following:
% su
Type your superuser password
# init 0
System shutdown messages
2. Power off the system unit.
Refer to the installation guide or service manual for your system.
3. Remove the system access cover.
Refer to the installation guide or service manual for your system for this procedure.
4. Use proper grounding procedures such as wearing a wrist strap to avoid
electrostatically damaging system components.
5. Locate the flash PROM J2003 write-protect/enable jumper on the motherboard in
your system:
■
■
See FIGURE 4-1 if you have a Sun Ultra 1 system.
See FIGURE 4-2 if you have a Sun Ultra 2 system.
Note – You may have to remove a plug-in card if the card is covering the flash
PROM jumper. Refer to the service manual for your system to remove the card.
Chapter 4
Updating the Flash PROM on the Ultra 1, Ultra 2, Ultra 450, and Sun Enterprise 450 Systems
45
J2003 write
protect/enable jumper
Back panel
Front panel
FIGURE 4-1
Sun Ultra 1 Series Write-Protect/Enable Jumper Location on Motherboard
J2003 write
protect/enable jumper
FIGURE 4-2
46
Back panel
Sun Ultra 2 System Write-Protect/Enable Jumper Location on Motherboard
Solaris 8 2/04 Sun Hardware Platform Guide • February 2004
6. Set the J2003 write-protect/enable jumper to pins 2 and 3 (write enabled) using
needlenose pliers (see FIGURE 4-3). Pin 1 is noted by an asterisk (*).
*
*
1 2 3
Write
protected
1 2 3
Write
enabled
FIGURE 4-3
Setting the Write-Protect/Enable Jumper to the Write-Enable Position
TABLE 4-4
Jumper Setting
Jumper
Pins 1 + 2 Jumpered
Pins 2 + 3 Jumpered
Default Jumper on Pins
Name
J2003
Write-protect
Write-enable
1+2
Writeprotect/enable
7. If you removed a plug-in card from the system before changing the jumper,
replace the card now.
8. Remove your wrist strap and replace the system access cover.
9. Go to “Before Updating the Flash PROM” on page 48.
Sun Enterprise 450 System and the Sun Ultra 450
Workstation: Disabling Write Protection
For the Sun Enterprise 450 system and the Sun Ultra 450 workstation you do not
have to change jumper pins. Instead, you move the keyswitch to allow the flash
PROM to be write-enabled.
When the switch is set to the Locked position (FIGURE 4-4), the flash PROM is writeprotected. When the switch is set to the On or Diagnostics position, the flash PROM
is write-enabled.
▼ To Write Enable the Flash PROM on the Sun Enterprise 450
System and the Sun Ultra 450 Workstation
1. Turn the keyswitch to the On or Diagnostics position (FIGURE 4-4) before updating
the flash PROM.
Chapter 4
Updating the Flash PROM on the Ultra 1, Ultra 2, Ultra 450, and Sun Enterprise 450 Systems
47
Note – Disabling write-protection the Sun Enterprise 450 system or the Ultra 450
workstation assumes that the write-protect/enable jumper was set in the default
position (enabled). If you previously changed the write-protect/enable jumper to be
write protected, perform the steps to make the flash PROM write enabled in
“Location of Flash PROM Jumpers in Sun Enterprise 450 System and the Ultra 450
Workstation” on page 59. You must change the jumper to be write enabled before
continuing with the flash PROM update procedure.
On
Standby
Diagnostics
Locked
FIGURE 4-4
Sun Enterprise 450 and Sun Ultra 450 Keyswitch Location
Before Updating the Flash PROM
Before you begin updating the flash PROM, please note the following.
Note – Do not interrupt power during flash PROM updating. When you are using
the update routine, do not remove or insert system boards.
48
Solaris 8 2/04 Sun Hardware Platform Guide • February 2004
Note – If power is interrupted during flash PROM updating, follow the power
interruption recovery procedures covered later in this chapter.
▼ To Update the Flash PROM
1. If you shut down your system to set the write-enable jumper (Ultra 1, Ultra 2
systems), turn the system on so it can boot.
2. Bring the system down to single user mode. Type the following:
% su
Type your superuser password
# init S
3. Execute the flash PROM update script by typing the following:
/bin/sh /usr/platform/sun4u/lib/prom/‘/usr/bin/uname -i‘
4. When the flash update process begins, it displays the current, available OpenBoot
firmware revisions.
Type yes to the question about updating the firmware in the system flash PROM.
Chapter 4
Updating the Flash PROM on the Ultra 1, Ultra 2, Ultra 450, and Sun Enterprise 450 Systems
49
Note – If the NVRAM configuration variable use-nvramrc? is set to true, the
update script resets use-nvramrc? to false. You will only see the message about the
use-nvramrc? variable if use-nvramrc? is set to true. This is rarely the case.
Current System Flash PROM Revision:
----------------------------------OBP 3.5.2 1997/01/06 17:40
Available System Flash PROM Revision:
------------------------------------OBP 3.11.1 1997/12/03 15:44
NOTE: The system will be rebooted (reset) after the firmware has
been updated.
Do you wish to update the firmware in the system Flash PROM?
yes/no :yes
The NVRAM variable ’use-nvramrc?’ was ’true’. This program will
reset it to the default value ’false’. This is being done because
the contents of the NVRAM variable ’nvramrc’ may or may not be
appropriate for use with the new firmware. Do not change the value
of ’use-nvramrc?’ until you evaluate the contents of ’nvramrc’.
50
Solaris 8 2/04 Sun Hardware Platform Guide • February 2004
5. Next, the update script asks you if you want to continue. Type yes.
Are you sure that you wish to continue? yes/no :yes
**IMPORTANT** If the power fails during the firmware update that
is about to take place, it is possible that the customized values
in the NVRAM configuration variables will revert back to their
*default values* once the system power is restored. *If* this
event occurs then it could have a significant effect on the
behavior of the system after power is restored. Following is a
list of the system’s NVRAM configuration variables which have
default values and have been customized. You may wish to write
this information down so that the values may be restored after
recovery from a power loss.
Name: sbus-probe-list
Default: 01
Current: 10
Name: nvramrc
Default: <null>
Current: ." This is a sample message which indicates that nvramrc
has been modified." cr
If any of the NVRAM configuration variables have been customized, the update
displays both the default value and the current value.
Chapter 4
Updating the Flash PROM on the Ultra 1, Ultra 2, Ultra 450, and Sun Enterprise 450 Systems
51
Note – After the update, you may want to evaluate if the customized values
displayed on the previous screen need to be modified.
The script automatically boots the machine and displays the following message:
Erasing the top half of the Flash PROM.
Programming OBP into the top half of the Flash PROM.
Verifying OBP in the top half of the Flash PROM.
Erasing the bottom half of the Flash PROM.
Programming OBP into the bottom half of Flash PROM.
Verifying OBP in the bottom half of the Flash PROM.
Erasing the top half of the Flash PROM.
Programming POST into the top half of Flash PROM.
Verifying POST in the top half of the Flash PROM.
The system's Flash PROM firmware has been updated.
Please wait while the system is rebooted . . .
The system’s reboot messages are displayed.
........................................................
NOTICE: 64-bit OS installed, but the 32-bit OS is the default for
the processor on this system.
See boot(1M) for more information.
Booting the 32-bit OS/
6. Become root and change the default kernel from 32-bit to 64-bit by editing the
/platform/platform-name/boot.conf file.
# cd /platform/sun4u/
# ls
boot.conf cprboot
cprbooter
# vi boot.conf
kadb
kernel
ufsboot
Uncomment the line ALLOW_64BIT_KERNEL_ON_UltraSPARC_1_CPU=true.
7. If you have a Sun Ultra 1 or Ultra 2 system, change the jumper back to the writeprotect position.
a. Allow the system to boot so you can become superuser.
b. Halt the system by typing init 0 at the superuser prompt.
52
Solaris 8 2/04 Sun Hardware Platform Guide • February 2004
c. Power off the system.
d. Open the system unit (refer to the installation or service manual for your
system).
e. Attach a wrist strap properly (refer to the installation or service manual for
your system).
f. Reset the J2003 write-enable/protect jumper to the write-protect position. In the
write-protect position pins 1 and 2 are jumpered (see FIGURE 4-1, FIGURE 4-2,
FIGURE 4-5, and TABLE 4-4). You may need to remove a plug-in card from the
system before resetting the jumper if the card is covering the jumper. Pin 1 is
noted by an asterisk (*).
*
*
1 2 3
1 2 3
Write
enabled
Write
protected
FIGURE 4-5
Moving the Write-Protect/Enable Jumper Back to the Write-Protect Position
g. If you removed a plug-in card from the system before changing the jumper,
replace the card now.
h. Remove your wrist strap and replace the system access cover.
i. Turn the power on to the system.
8. If you have a Sun Enterprise 450 system or a Sun Ultra 450 workstation, turn the
keyswitch to the Standby position, wait a few seconds, and then power on again.
This power-cycling flushes any old firmware code out of system memory.
Recovering From a Power Failure
During the Flash PROM Update
If the power was lost during the flash PROM update, complete the power
interruption recovery procedure for your system.
Chapter 4
Updating the Flash PROM on the Ultra 1, Ultra 2, Ultra 450, and Sun Enterprise 450 Systems
53
Sun Ultra 1 and Ultra 2 Systems, Sun Enterprise
450 System, Sun Ultra 450 Workstation
If power to your system was interrupted during updating of the flash PROM,
complete the following steps:
1. Turn the power switch to the Standby position to prevent power surge to the
system when power is restored.
2. After power is restored to the system location, return the power switch to the On
position.
After power is restored, one of the following two recovery scenarios should happen
on your system. Follow the instructions described for the appropriate scenario.
Scenario 1—System Recovers After Power Restoration
If your system attempts to autoboot after power is restored, you must complete the
flash PROM updating process.
Scenario 2—System Does Not Recover After Power
Restoration
If your system does not boot, run diagnostics, or return to the PROM monitor’s ok
prompt after power is restored, complete the following steps:
1. If the update was being run via a serial port and the system also has a frame
buffer and keyboard installed, or if the system has a keyboard and more than one
frame buffer installed:
a. Connect a monitor to each frame buffer.
b. Confirm that output has been redirected to one of the frame buffers.
54
■
The NVRAM configuration variables might have been modified because of the
firmware update just before power was lost. If this happened, then the system
output was possibly redirected to a device other than the one originally used to
display it. This could only have happened if a keyboard was connected to the
system.
■
If there is no keyboard connected to the system and the NVRAM configuration
variables are set to their default values, then system input and output are directed
to serial port A.
Solaris 8 2/04 Sun Hardware Platform Guide • February 2004
2. If output cannot be found on any of the installed frame buffers or serial port A,
set the boot control jumper to boot from the half of the PROM that is not
currently selected. See FIGURE 4-1 on page 46, FIGURE 4-2, FIGURE 4-6, and FIGURE 4-7.
An asterisk (*) on the main logic board notes the location of pin 1.
■
If the jumper is set for high-half booting, move it to low-half booting (pins 2 and
3 jumpered). See FIGURE 4-6.
■
If the jumper is set for low-half booting, move it to high-half booting (pins 1 and
2 jumpered). See FIGURE 4-6.
TABLE 4-5
Boot Control Jumper
System
Jumper
Pins 1 + 2 Jumpered
Pins 2 + 3 Jumpered
Default Jumper on
Pins
Name
Ultra 1, 2
J2204
High-half booting
Low-half booting
2+3
Boot control
Sun Enterprise
450 or Sun Ultra
450 workstation
J5501
High-half booting
Low-half booting
2+3
Boot control
*
*
1 2 3
1 2 3
High-half
booting
Low-half
booting
FIGURE 4-6
Setting the Boot Control Jumper to Low-Half Booting or High-Half Booting
3. Power on the system unit.
■
If the system recovers, complete the programming process by rebooting.
■
If the system does not recover, repeat Step 1 and Step 2 a second time.
4. If the system still does not recover, contact your Sun service provider or local Sun
service Authorized Service Provider.
Chapter 4
Updating the Flash PROM on the Ultra 1, Ultra 2, Ultra 450, and Sun Enterprise 450 Systems
55
Restoring NVRAM Configuration
Variables
If for any reason, the flash PROM update process did not complete successfully, for
example if you lost power, you may have to restore diag-switch? to its default
value of false and restore any customized values to the other NVRAM configuration
variables.
Note – Use the steps in this section only if for any reason your NVRAM
configuration variables were not reset to their customized values or if diagswitch? was not set to its proper value.
1. Reboot the system by typing reboot at the prompt.
If diag-switch? was set to true and the system is power cycled, diagnostics will be
run. Running diagnostics could take several minutes. Also, the system will attempt
to boot from the network once the diagnostics have completed running.
Note – Other NVRAM variables may be reset to their default values, which could
affect the system in other ways. For example, if you ran the flash PROM update
through the serial port and the system still has its keyboard plugged in, you will no
longer get any response from the serial port connection. The firmware will be
waiting for input from the keyboard.
2. As the system boots, go to the ok prompt by one of the following methods.
a. Press Stop-a from the keyboard.
b. If you are running on a terminal and connected to serial port A of the system,
press the Break key.
c. If you are connected to serial port A via telnet connection send a Break
sequence by pressing the Control and ] keys simultaneously. This returns you
to the telnet command line. Type send brk at the telnet command line.
d. If you are connected to serial port A via a tip connection, send a Break
sequence by typing the characters ~# in quick succession.
56
Solaris 8 2/04 Sun Hardware Platform Guide • February 2004
3. Reset the configuration variables default value to the current value (see the values
you captured with the eeprom command in “To Capture the Configuration
Variable Settings” on page 44 and the values you wrote down earlier in this
procedure in Step 1). At the ok prompt, type the following for each configuration
variable:
ok setenv variablename currentvalue
For example:
ok setenv auto-boot? false
The setenv command resets each configuration variable you entered to the current
value.
4. If the OpenBoot diag-switch? variable was set to true (false is the default).
and the system is power cycled, diagnostics will run. Also, when you boot the
system, the system will attempt to boot from the network. Unless you had diagswitch? set to true before the flash PROM update, set diag-switch? to false,
the default value:
ok setenv diag-switch? false
5. If the use-nvramrc? configuration variable was set to true before the flash
PROM update, as part of the update the use-nvramrc? variable was set to false
because the contents of the NVRAM configuration variable nvramrc may or may
not be appropriate for use with the new firmware. If you want to change the usenvramrc? variable back to true, evaluate the contents of nvramrc first with
printenv nvramrc then change the use-nvramrc? configuration variable back
to true with the setenv use-nvramrc? true command.
6. Make sure that other configuration variables are set properly.
a. Use the printenv OpenBoot command to display the NVRAM configuration
variables and their settings.
b. At the PROM monitor’s ok prompt, you can use OpenBoot commands to restore
the values of the configuration variables. Refer to the OpenBoot 3.x Command
Reference Manual. You can also use the eeprom utility as superuser in the
Solaris operating environment. See the eeprom man page description for more
information.
Chapter 4
Updating the Flash PROM on the Ultra 1, Ultra 2, Ultra 450, and Sun Enterprise 450 Systems
57
7. If you have a Sun Enterprise 450 or an Ultra 450, turn the keyswitch to the
Standby position, wait a few seconds, and then power on again. If you have an
Ultra 1 or Ultra 2 system, type reset-all.
If you set the auto-boot? NVRAM configuration variable to true, and the bootdevice variable contains the device or device alias where the Solaris 8 2/04
operating environment was installed, then the system will boot the Solaris 8 2/04
operating environment.
Error Messages
Most of the error messages were documented within the flash PROM update
procedure. This section contains error messages that were not part of the flash
PROM update procedure.
Retained Page/mmap Failure
If you see an error message similar to the following, just after the flash update
program logs on Flash Update 2.0: Program and system
initialization in progress... eeprom:(attach) No retained page
found in device tree then the update will fail with the following message if
the Flash PROM Update is attempted:
Do you wish to update the firmware in the system Flash PROM? yes/no
: yes
eeprom:(mmap) on retained page failed: no retained page found
Flash Update: MMAP call failed.
: No such device or address
If this error occurs, issue a reboot command at the superuser prompt and allow the
system to return to the Flash PROM Update inquiry WITHOUT INTERRUPTION.
Attempt the flash PROM Update once again by completing the steps in the section
“To Update the Flash PROM” on page 49. If the reboot was uninterrupted and the
flash PROM Update fails a second time for the same reason, contact your
Authorized Service Provider.
58
Solaris 8 2/04 Sun Hardware Platform Guide • February 2004
Location of Flash PROM Jumpers in Sun
Enterprise 450 System and the Ultra 450
Workstation
The flash PROM update procedure for the Sun Enterprise 450 and the Ultra 450
systems assumes that the write-protect/enable jumper was set in the default
position (enabled). In order to update the flash PROM, you must move the writeprotect/enable jumper to the write-enable position.
Three jumpers on the main logic board affect flash PROM operation. FIGURE 4-7
shows the jumper locations, and TABLE 4-6 describes their functions.
Chapter 4
Updating the Flash PROM on the Ultra 1, Ultra 2, Ultra 450, and Sun Enterprise 450 Systems
59
J2701
J3304 J3303
Flash PROM
jumpers
J3102
J5501
J3103
FIGURE 4-7
Flash PROM Jumpers on the Sun Enterprise 450 System and the Sun Ultra 450
Workstation
TABLE 4-6
Sun Enterprose 450 and Ultra 450 Flash PROM Jumper Settings
Jumper
Pins 1 + 2 Jumpered
Pins 2 + 3 Jumpered
Default on
Pins
Signal Controlled
J3102
Flash PROM
Not to be used
1+2
FLASH PROM SEL
J3103
Write-protect
Write-enable
2+3
FLASH PROM PROG
ENABLE
J5501
High-half booting
Low-half booting
2+3
XOR LOGIC SET
Make sure that the write-protect/write-enable jumper is set to the write-enable
position, pins 2 and 3 jumpered (see FIGURE 4-8). Pin 1 is noted by an asterisk (*).
60
Solaris 8 2/04 Sun Hardware Platform Guide • February 2004
*
1 2 3
Write
protected
FIGURE 4-8
Chapter 4
*
1 2 3
Write
enabled
Setting the J3103 Write Protect/Enable Jumper on the Sun Enterprise 450 or
Ultra 450
Updating the Flash PROM on the Ultra 1, Ultra 2, Ultra 450, and Sun Enterprise 450 Systems
61
62
Solaris 8 2/04 Sun Hardware Platform Guide • February 2004
CHAPTER
5
Updating the Flash PROM on the
Sun Enterprise 3x00, 4x00, 5x00, and
6x00 Systems
The steps in this chapter describe how to update the flash PROMs in your Sun
Enterprise 3x00, 4x00, 5x00, or 6x00 system.
Some systems require higher level of OpenBoot™ firmware in the flash PROM to
run the 64-bit mode of the Solaris™ 8 operating environment. The OpenBoot
firmware is contained in several PROMs that are located on several different boards.
The flash PROM devices, which contain OpenBoot, are electrically erasable and
writable devices. This means that the firmware can be updated without removing
the flash PROM from the system board. This Solaris 8 2/04 kit includes the routines
and instructions you need to update the flash PROM in your system.
Determining If the Flash PROM Needs
Updating
Note – If your system is an Ultra™ Enterprise™ 10000, you do not need to do this
update because the Ultra Enterprise 10000 does not have a flash PROM.
Only sun4u systems that can run the 64-bit mode of the Solaris 8 2/04 operating
environment might need the flash PROM update. Systems that can only run the 32bit mode (such as those in the sun4c, sun4d, and sun4m platform groups) do not
require updated firmware to run Solaris 8 2/04 software.
63
Note – If the Solaris 8 2/04 operating environment notified you that the flash PROM
in your system needs updating, skip the steps in the procedure “To Determine If
Your System Requires a Flash PROM Update” on page 64 and go directly to
“Updating the Flash PROM” on page 65.
▼
To Determine If Your System Requires a Flash
PROM Update
1. Determine the architecture type of your system.
% uname -m
TABLE 5-1
Determining the System Architecture
If your system architecture type is . . .
Then . . .
• sun4u
Go to Step 2.
• sun4c, sun4d, sun4m
You do not need a flash PROM update. Do not proceed
further.
2. Determine the system type of your system.
% uname -i
TABLE 5-2
64
Determining the System Type
If your system type is one of the
following systems. . .
Then . . .
SUNW, Ultra-1
SUNW, Ultra-2
SUNW, Ultra-4
Go to Chapter 4 “Updating the Flash PROM on the
Ultra 1, Ultra 2, Ultra 450, and Sun Enterprise 450
Systems”
SUNW, Ultra-Enterprise
Go to Step 3.
Not in the above list
You do not need a flash PROM update. Do not proceed
further.
Solaris 8 2/04 Sun Hardware Platform Guide • February 2004
3. Determine the version level of the firmware in your system. Type prtconf -V
(upper case V).
% prtconf -V
TABLE 5-3
Firmware Versions
If your system type is . . .
And you see a number
lower than . . .
Then . . .
Otherwise . . .
SUNW, Ultra-Enterprise
3.2.24
Proceed to “Updating the
Flash PROM” on page 65.
You do not need a flash
PROM update. Do not
proceed further.
SUNW, Ultra-1
3.11.1
Proceed to Chapter 4.
You do not need a flash
PROM update. Do not
proceed further.
SUNW, Ultra-2
3.11.2
Proceed to Chapter 4.
You do not need a flash
PROM update. Do not
proceed further.
SUNW, Ultra-4
3.7.107
Proceed to Chapter 4.
You do not need a flash
PROM update. Do not
proceed further.
Updating the Flash PROM
This section describes the following:
■
■
■
■
■
Flash PROM update process
Capturing NVRAM configuration variable settings
Making the flash PROM write-enabled
Steps to perform before updating the flash PROM
Updating the flash PROM
Flash PROM Update Process
Note – For step-by-step instructions, follow the procedures beginning with
“Capturing Configuration Variable Settings” on page 66.
Chapter 5
Updating the Flash PROM on the Sun Enterprise 3x00, 4x00, 5x00, and 6x00 Systems
65
After installing the Solaris 8 2/04 operating environment, make sure that the
external front panel keyswitch is set to the On or Diagnostics position.
Take note of screen messages, during the flash PROM update, that report
configuration variables that may be reset to their default values. When the update is
complete and after you either reset the system or power cycle the system, revise the
configuration variables as needed to restore your preferences.
Refer to the recovery procedure covered later in this chapter if there is a power
interruption during the update process.
When your system has been updated to the proper firmware revision, you can run
Solaris 8 2/04 software in 64-bit mode.
Capturing Configuration Variable Settings
While the Solaris operating environment is still running, capture the NVRAM
configuration variable settings before you install the Solaris 8 2/04 operating
environment or begin the flash PROM update process.
As part of the flash PROM update, your NVRAM configuration variables might
change to the default values. To ensure that you can change the default values back
to the values you customized, you need to save the current state of the NVRAM
configuration variables using the eeprom command.
▼ To Capture the Configuration Variable Settings
1. Using the eeprom utility, capture the system’s configuration variable settings in a
file. Type eeprom > filename. The filename is any file name you choose.
% eeprom > filename
Note – If you have custom values installed in oem-logo or keymap, those values
cannot be displayed or printed properly by the eeprom utility because the contents
contain binary information. If it is necessary to restore these values after a power
loss, you should determine the original method by which these values were placed
into NVRAM and use that method to restore the values.
66
Solaris 8 2/04 Sun Hardware Platform Guide • February 2004
2. Print out the values captured by the eeprom command. You must have a printed
copy of the configuration values before you install the Solaris 8 2/04 operating
environment and begin to update the flash PROM. Type the following:
lp filename
▼ To Install the Solaris 8 2/04 Operating Environment
1. Install the Solaris 8 2/04 operating environment on your system.
Refer to the Solaris 8 Advanced Installation Guide which is in your Solaris 8 2/04
media kit. As the Solaris 8 2/04 operating environment is installed, you will be
notified whether the flash PROM in your system needs updating. Installing this
Solaris release will provide the software that can upgrade your system’s flash PROM
to the required level.
Making the Flash PROM Write-Enabled
Before you update the OpenBoot firmware, which is contained in the flash PROM,
you must set the front panel keyswitch to the proper position to allow the flash
PROM to be write-enabled.
When the switch is set to the Locked position (FIGURE 5-1), the flash PROM is writeprotected. When the switch is set to the On position or to the Diagnostics position,
the flash PROM is write-enabled.
FIGURE 5-1 shows the keyswitch positions on a 16-slot Sun Enterprise 6000 system.
The server systems described in this section have the same keyswitch positions.
▼ To Write Enable the Flash PROM
1. Turn the keyswitch to the On or Diagnostics position (FIGURE 5-1) before updating
the flash PROM.
Note – Disabling write-protection on servers assumes that the system’s writeprotect/enable jumpers were set in the default position (enabled). If you previously
removed the write-protect/enable jumper, perform the steps to make the flash
PROM write enabled in “Location of Flash PROM Jumpers in Sun Enterprise Server
Systems” on page 77.
Chapter 5
Updating the Flash PROM on the Sun Enterprise 3x00, 4x00, 5x00, and 6x00 Systems
67
On
Standby
Diagnostics
Locked
Front view
FIGURE 5-1
Sun Enterprise 6x00, 5x00, 4x00, 3x00 Keyswitch Locations
Before Updating the Flash PROM
Before you begin updating the flash PROM, please note the following cautions.
Note – Do not interrupt power during flash PROM updating. When you are using
the update routine, do not remove or insert system boards.
Note – The flash update may cause default NVRAM values to overwrite customized
NVRAM variables. Be sure to record the custom and default values displayed so that
you can restore them after you perform the flash PROM update.
Note – If power is interrupted during flash PROM updating, follow the power
interruption recovery procedures covered later in this chapter.
68
Solaris 8 2/04 Sun Hardware Platform Guide • February 2004
Running the Flash PROM Update Script Manually
The flash PROM update script is typically run at bootup. You can also run the flash
PROM update script manually by doing the following:
1. Bring the system down to single user mode. Type the following:
% su
Type your superuser password
# init S
2. Execute the flash PROM update script by typing the following:
/bin/sh /usr/platform/sun4u/lib/prom/‘/usr/bin/uname -i‘
Follow the step-by-step instructions when running the script in the section “To
Update the Flash PROM”. Begin with Step 2 (do not execute the reboot command).
▼ To Update the Flash PROM
1. Reboot your system. Type reboot at the superuser prompt.
# reboot
Chapter 5
Updating the Flash PROM on the Sun Enterprise 3x00, 4x00, 5x00, and 6x00 Systems
69
2. If your flash PROM needs to be updated, the flash PROM update script displays
the following message:
This system has older firmware. Although the current firmware is
fully capable of running the 32-bit packages, you will not be able
to run the 64-bit packages installed on this system until you
update the system flash PROM.
This system ships with flash PROM write-protect jumpers in the
"write enabled" position. Unless the jumpers on this system have
been changed, there is no need to change them in order to run the
system flash PROM update.
The front panel keyswitch on this system must NOT be in the
"SECURE" position while the system flash PROM update is running.
Please check the keyswitch position before answering the next
question.
See the Hardware Platform Guide for more information.
Please answer the next question within 90 seconds, or press the
ENTER key to disable the timer.
Would you like to run the system flash PROM update now?
(By default the system flash PROM update will not be run now.)
yes or no? [y,n] y
Extracting files
Loading flashprom driver
70
Solaris 8 2/04 Sun Hardware Platform Guide • February 2004
3. When the flash update process begins, it displays the current and available system
board PROM revisions.
Current System Board PROM Revisions:
----------------------------------Board 0: CPU/Memory OBP
3.2.16 1998/06/08
Board 2: CPU/Memory OBP
3.2.16 1998/06/08
Board 4: CPU/Memory OBP
3.2.16 1998/06/08
Board 6: CPU/Memory OBP
3.2.16 1998/06/08
Board 1: I/O Type 2 FCODE 1.8.3 1997/11/14
Board 3: I/O Type 5 FCODE 1.8.7 1997/12/08
Board 7: I/O Type 5 FCODE 1.8.7 1997/12/08
Available ‘Update’ Revisions:
----------------------------------CPU/Memory OBP
3.2.16 1998/06/08 16:58
I/O Type 1 FCODE 1.8.3 1997/11/14 12:41
I/O Type 2 FCODE 1.8.3 1997/11/14 12:41
I/O Type 3 FCODE 1.8.7 1997/05/09 11:18
I/O Type 4 FCODE 1.8.7 1997/12/08 15:39
I/O Type 5 FCODE 1.8.7 1997/12/08 15:39
Chapter 5
16:58
16:58
16:58
16:58
12:41
15:39
15:39
POST
iPOST
iPOST
iPOST
iPOST
iPOST
POST
POST
POST
POST
iPOST
iPOST
iPOST
3.9.4
3.4.6
3.4.6
3.0.2
3.4.6
3.4.6
3.9.4
3.9.4
3.9.4
3.9.4
3.4.6
3.4.6
3.4.6
1998/06/09
1998/06/09
1998/06/09
1998/06/09
1998/04/16
1998/04/16
1998/04/16
1998/06/09
1998/04/16
1998/04/16
1997/05/01
1998/04/16
1998/04/16
16:25
16:25
16:25
16:25
14:22
14:22
14:22
16:25
14:22
14:22
10:56
14:22
14:22
Updating the Flash PROM on the Sun Enterprise 3x00, 4x00, 5x00, and 6x00 Systems
71
4. If any of the NVRAM configuration variables have been customized, the update
displays both the default value and the customized (current) value.
Verifying Checksums: Okay
Do you wish to flash update your firmware? y/[n] : y
**IMPORTANT** As a consequence of the firmware upgrade that is
about to take place, it is very possible that the customized
values in the configuration variables will revert to their
*default values* upon the next system power-cycle or soft-reset.
If this happens, it could have a significant effect on the
behavior of the system after the power-cycle or soft-reset.
Following is a list of the system's NVRAM configuration variables
which have been customized (i.e. they are different than the
default values).
You may wish to write down the values of the indicated
configuration variables so that they may be restored (if
necessary) after the next power-cycle or soft-reset.
Name: auto-boot?
Default: true
Current: false
Name: boot-file
Default: <null>
Current: kadb -d
5. Take note of the variables and values for current settings.
Either write down the current values or mark up the eeprom output you captured in
“To Capture the Configuration Variable Settings” on page 66 so that you know
which NVRAM configuration variables will need to be changed from their default
values after the flash PROM update.
6. If the keyswitch is set to the locked position, you will see the following error
message..
FPROM Write Protected: Check Write Enable Jumper or Front Panel
Key Switch.
Make the flash PROM write-enabled by turning the keyswitch to the On or
Diagnostics position then type reboot at the # prompt
72
Solaris 8 2/04 Sun Hardware Platform Guide • February 2004
7. The update then prompts you if you want to continue. Make sure that you have
turned the keyswitch to the On or Diagnostics position then type y. The flash
PROMs are updated.
Are you sure that you wish to continue? y/[n] : y
Updating Board 0: Type ’cpu’ (PromID=1a4)
1 Erasing
................................
1 Verifying Erase
................................
1 Programming
................................
1 Verifying Program ................................
Done.
Done.
Done.
Done.
Updating Board 1: Type ’upa-sbus’ (PromID=1a4)
1 Erasing
................................
1 Verifying Erase
................................
1 Programming
................................
1 Verifying Program ................................
Done.
Done.
Done.
Done.
Updating Board 4: Type ’dual-pci’ (PromID=1a4)
1 Erasing
................................
1 Verifying Erase
................................
1 Programming
................................
1 Verifying Program ................................
Done.
Done.
Done.
Done.
Updating Board 6: Type ’dual-pci’ (PromID=1a4)
1 Erasing
................................
1 Verifying Erase
................................
1 Programming
................................
1 Verifying Program ................................
Done.
Done.
Done.
Done.
Unloading flashprom driver
The new firmware will not take effect until the system is powercycled.
8. After the flash PROMs are updated, the system asks if you would like to halt the
system. Type yes.
Do you wish to halt the system now? yes or no? yes
The system’s shutdown messages are displayed.
Program terminated
ok
Chapter 5
Updating the Flash PROM on the Sun Enterprise 3x00, 4x00, 5x00, and 6x00 Systems
73
Note – If you answered no to the question on halting the system, the installation
will continue but the updated firmware will not become effective until the next
system reboot. The NVRAM configuration variables are changed to default values at
the next system reboot. If you customized NVRAM configuration variables you must
change the values back to their customized settings.
9. Turn the keyswitch to the Standby position.
10. Turn the power on to the system. As the system boots, diagnostics will be run at
boot up because the OpenBoot diag-switch? was set to true in the flash
PROM update procedure. Running diagnostics could take several minutes.
Note – Other NVRAM variables may be reset to their default values, which could
affect the system in other ways. For example, if you ran the flash PROM update
through the serial port and the system still has its keyboard plugged in, you will no
longer get any response from the serial port connection. The firmware will be
waiting for input from the keyboard.
TABLE 5-4, which follows, describes the workarounds for NVRAM settings.
11. As the system boots, go to the ok prompt by one of the following methods.
a. Press Stop-a from the keyboard.
b. If you are running on a terminal and connected to serial port A of the system,
press the Break key.
c. If you are connected to serial port A via telnet connection send a Break
sequence by pressing the Control and ] keys simultaneously. This returns you
to the telnet command line. Type send brk at the telnet command line.
d. If you are connected to serial port A via a tip connection, send a Break
sequence by typing the characters ~# in quick succession.
74
Solaris 8 2/04 Sun Hardware Platform Guide • February 2004
12. Reset the configuration variables default value to the current value (see the values
you captured with the eeprom command in “To Capture the Configuration
Variable Settings” on page 66 and the values you wrote down earlier in this
procedure in Step 1). At the ok prompt, type the following for each configuration
variable:
ok setenv variablename currentvalue
For example:
ok setenv auto-boot? false
The setenv command resets each configuration variable you entered to the current
value.
13. When you updated the flash PROM, the OpenBoot diag-switch? variable was
also set to true. With diag-switch? set to true, diagnostics will run when you
reboot the system. If you don’t want diagnostics to be run at boot up, set diagswitch? to false with the setenv diag-switch? false command.
14. Make sure that other configuration variables are set properly. TABLE 5-4 describes
what might occur if you did not have the default NVRAM configuration variables
set before the flash PROM update.
a. Use the printenv OpenBoot command to display the NVRAM configuration
variables and their settings.
b. Use the setenv OpenBoot command to restore the NVRAM configuration
variables to the customized values except for the nvramrc configuration
variable.
Chapter 5
Updating the Flash PROM on the Sun Enterprise 3x00, 4x00, 5x00, and 6x00 Systems
75
c. For the nvramrc configuration variable refer to TABLE 5-4 for how to restore the
configuration variable to the customized settings. For additional information on
the NVRAM configuration variables, refer to the OpenBoot 3.x Command
Reference Manual.
TABLE 5-4
Variable Default Values
Variable Name
Default Value
Description
output-device
screen
If output-device is not set to the default value before the
flash PROM update, then it is possible that the output device
may be other than what you anticipate.
input-device
keyboard
If input-device is not set to the default value before the flash
PROM update, then it is possible that the input device may be
other than what you anticipate.
ttyb-mode
9600,8,n,1,-
If you are running anything from the serial ports A or B with
port settings other than what is default (baud rate, number of
bits, parity, number of stop bits, handshake), then those
communications lines may not function after the flash PROM
update.
ttya-mode
9600,8,n,1,-
If you are running anything from the serial ports A or B with
port settings other than what is default (baud rate, number of
bits, parity, number of stop bits, handshake), then those
communications lines may not function after the flash PROM
update.
boot-command
boot
If there are any custom flags to boot, then the system may not
boot as anticipated after the flash PROM update.
auto-boot?
true
The system may attempt to autoboot after the first reset or
power cycle following the flash PROM update. With autoboot? set to false, the system will not autoboot.
diag-switch?
true
After you reboot or power cycle the system after the flash
PROM update, the diag-switch? may be set to true. With
diag-switch? set to true, diagnostics will be run at boot up.
Also, the system may attempt to boot from a different device
than was booted prior to the flash PROM update.
diag-device
disk
If you had diag-switch? set to true before the update then
this is the device that would probably have been booted. This
device might not be the boot device after the flash PROM
update.
diag-file
Empty string
If you were booting a customized kernel file before the update,
and diag-switch? was set to true after the flash PROM
update, the customized kernel file might not be booted after the
flash PROM update.
76
Solaris 8 2/04 Sun Hardware Platform Guide • February 2004
TABLE 5-4
(Continued)Variable Default Values
Variable Name
Default Value
Description
boot-file
Empty string
If you were booting a customized kernel file before the flash
PROM update, and diag-switch? was false (default), the
customized kernel file might not be booted after the flash PROM
update.
boot-device
disk net
If you had a different sequence of boot-devices specified, after
the flash PROM update an incorrect device might be booted.
use-nvramrc?
false
If you had customized commands in the nvramrc, and usenvramrc? was set to true, then those customized commands
might not be used after the flash PROM update.
nvramrc
Empty
If you had customized commands in the nvramrc, then those
customized commands might be lost after the flash PROM
update. Do not use setenv to change the nvramrc variable.
Instead use nvedit and nvstore. If you know that the
nvramrc variable contains a firmware patch which is no longer
compatible with the newly programmed firmware, do not
change the nvramrc variable to its previously customized
value.
oem-logo?
false
If oem-logo? was true before the flash PROM update, the oemlogo might be lost after the update, and oem-logo? might be
set to false.
oem-banner?
false
If oem-banner? was true before the flash PROM update, the
oem-banner might be lost after the flash PROM update, and
oem-banner? might be set to false.
15. Turn the keyswitch to the Standby position, wait a few seconds, and then power
on again.
This power-cycling flushes any old firmware code out of system memory.
If you set the auto-boot? NVRAM configuration variable to true, and the bootdevice variable contains the device or device alias where the Solaris 8 2/04
operating environment was installed, then the system will boot the Solaris 8 2/04
operating environment. This concludes the flash PROM update procedure.
Location of Flash PROM Jumpers in Sun
Enterprise Server Systems
If you previously removed the write-protect/enable jumper, you must reinstall it in
order to successfully perform the flash PROM update procedure.
Chapter 5
Updating the Flash PROM on the Sun Enterprise 3x00, 4x00, 5x00, and 6x00 Systems
77
Sun Enterprise 3x00, 4x00, 5x00, and 6x000 systems have a jumper on the clock
board, P0601, which controls if the flash PROM can or cannot be updated.
■
With the jumper P0601 installed, all the flash PROM can be updated.
■
With the jumper P0601 removed, all the flash PROM cannot be updated.
If you previously removed jumper P0601, you must reinstall it before you can
complete the flash PROM update procedure.
Note – The clock board is not hot-pluggable. Do not remove the clock board until
the system has been halted and powered off.
Installing the P0601 Jumper
To install the P0601 jumper, follow these steps:
1. Halt the system, then turn the keyswitch to the Standby position.
2. Remove the clock board from the system (see FIGURE 5-2).
78
Solaris 8 2/04 Sun Hardware Platform Guide • February 2004
Clock board
FIGURE 5-2
Note –
Rear View of the Sun Enterprise 6000 System
FIGURE 5-2 shows a 16-slot system. Systems also come in 4-, 5-, and 8-slot
configurations.
3. Locate the P0601 jumper location (FIGURE 5-3) on the clock board.
Chapter 5
Updating the Flash PROM on the Sun Enterprise 3x00, 4x00, 5x00, and 6x00 Systems
79
P0601
FIGURE 5-3
Clock Board and Jumper P0601 Jumper Location
4. Insert the P0601 jumper on the clock board.
5. Replace the clock board in the system.
Refer to Chapter 6 in your reference manual for the detailed procedure.
6. Turn the keyswitch to the On or Diagnostics position.
Recovering From a Power Failure
During the Flash PROM Update
If the power was lost during the flash PROM update, complete the power
interruption recovery procedure for your system.
Sun Enterprise 3x00, 4x00, 5x00, and 6x00 Systems
There are three scenarios for the Sun Enterprise 3x00, 4x00, 5x00, and 6x00 systems:
80
Solaris 8 2/04 Sun Hardware Platform Guide • February 2004
■
■
■
Completing the update of the flash PROM
Recovering a one-board system after power interruption
Recovering a multi-board system after power interruption
▼ To Complete the Update of the Flash PROM
If power was interrupted during the flash PROM update procedure, it is possible
that one or more system boards were not updated successfully. You must become
superuser and complete the flash PROM update.
1. At the # prompt, type the following:
# /bin/sh /usr/platform/sun4u/lib/prom/‘uname -i‘
▼ To Recover a One-Board System After Power Interruption
1. Call your Sun service provider or local Sun service Authorized Service Provider.
▼ To Recover a Multi-Board System After Power Interruption
Only one board is updated at any given time in the flash PROM updating process. If
there is a power interruption to the system while the flash PROMs are being
updated, only one board will have its flash PROMs in an inconsistent state.
Note – Power interruption during updating of the flash PROMs aborts the updating
at the point of the power interruption. Turn the keyswitch to the Standby position
(FIGURE 5-1 on page 68) to prevent power surge to the system when power is
restored.
The following recovery procedure requires another board of the same type with an
uncorrupted PROM image (if you are updating an “I/O Type 1” board, you must
use another “I/O Type 1” board). In the following code examples, the flash PROM
on board 3 recovers by copying the flash PROM image from board 0.
1. Connect a null modem cable to port A and to either a terminal or a Sun™
Workstation™.
2. Set the serial port at 9600 bps, 8-bit word, no parity, and 1 stop bit.
3. Remove the board that was being programmed when the power went out.
4. Turn the keyswitch to the On position (FIGURE 5-1 on page 68).
Chapter 5
Updating the Flash PROM on the Sun Enterprise 3x00, 4x00, 5x00, and 6x00 Systems
81
The system responds with the message:
Hardware Power ON
1. Wait 15 seconds and type s on the keyboard terminal or the tip window connected
to the serial port.
The system responds:
0,0>
*** Toggle Stop POST Flag = 1 ***
This message shows that POST (power-on self-test) has recorded your request to
stop after testing is completed.
When POST stops, it will display the following options menu:
0,0>Extended POST Menus
0,0>Select one of the following functions
0,0>
’0’
Return
0,0>
’1’
Reset
0,0>
’2’
Peek/Poke device
0,0>
’3’
Environmental Status
0,0>
’4’
Test Menus
0,0>
’5’
State Dump
0,0>
’6’
Frequency Margining
0,0>
’7’
Display System Summary
0,0>
’8’
Display Fatal Reset Info
0,0>
’9’
Scan System Board Ring
0,0>
’a’
Set Memory Test Megs
0,0>
’b’
Print SIMM Info
0,0>
’c’
Focus CPU
0,0>
’d’
CPU State
0,0>
’f’
fcopy
0,0>
’g’
System Power Off
0,0>
’h’
Bounce Patterns
0,0>
’i’
Focus I/O Board
0,0>
82
Solaris 8 2/04 Sun Hardware Platform Guide • February 2004
1. Type f to select fcopy.
Command ==> f
0,0>Flash PROM Copy Menu
0,0>Select one of the following functions
0,0>
’0’
Return
0,0>
’1’
Copy
0,0>
’2’
Verify
0,0>
’3’
Display Version
0,0>
’4’
Activate System Board
0,0>
Command ==>
2. Without powering off the system, plug in the board with the corrupted flash
PROM. Be sure its power LED is lit.
3. Type 4 to select Activate System Board.
The system prompts you to enter the board number in hexadecimal notation from 0
through 9 and “a” through “f”. In the example below, board 3 is entered as the board
to be activated.
Command ==> 4
0,0>Input board number in hex (‘0’ thru ‘9’ and ‘a’ thru ‘f’)
?3
0,0>
0,0>Flash PROM Copy Menu
0,0>
’0’
Return
0,0>
’1’
Copy
0,0>
’2’
Verify
0,0>
’3’
Display Version
0,0>
’4’
Activate System Board
0,0>
Command ==>
Chapter 5
Updating the Flash PROM on the Sun Enterprise 3x00, 4x00, 5x00, and 6x00 Systems
83
4. Type 1 to select Copy. Respond to the prompts for source (where to copy from)
and destination (where to copy to) board numbers in hexadecimal notation.
In the example below, board 0 is entered as the source and board 3 is entered as the
destination:
Command ==> 1
0,0>Input board number in hex (‘0’ thru ‘9’ and ‘a’ thru ‘f’)
0,0>
from board? 0
to board? 3
0,0>
Mfg code 04, Dev code a4
0,0>Erasing prom at 000001cc.f8000000
0,0>Copy prom at 000001c0.f8000000 to prom at 000001cc.f8000000
0,0>................................
0
5. Type 3 to select Display Version.
The system responds by showing all PROM versions in the system.
Command ==> 3
0,0>Slot 0 CPU/Memory
1996/3/11 18:38
0,0>Slot 1 IO Type 1
1996/3/05 04:06
OBP
3.2.1 1996/3/11 09:57 POST
3.0.1
FCODE
1.6.0 1996/1/23 13:44 iPOST
1.1.4
6. Turn the keyswitch to the Standby position (FIGURE 5-1). Wait 15 seconds.
7. Complete the procedure “To Update the Flash PROM” on page 69 to reattempt the
flash PROM update process.
84
Solaris 8 2/04 Sun Hardware Platform Guide • February 2004
CHAPTER
6
Power Management on
Sun Hardware
The United States Environmental Protection Agency has the Energy Star® guidelines
for computer products to encourage the use of energy-efficient computer systems
and to reduce air pollution associated with energy generation.
To meet these guidelines, Sun Microsystems, Inc. designs hardware to use power
efficiently; also, it provides Power Management™ software with which to configure
the power management settings. In order to reduce power consumption, your Sun
workstation and devices are capable of entering a lower-power state when they have
been inactive for a period of time.
This section supplements the Using Power Management manual in the Solaris 8 User
Collection.
Supported Platforms and System
Distinctions
Power Management software supports the sun4m and sun4u platform groups.
Software features and defaults may vary between the two platform groups. Refer to
Using Power Management in the Solaris 8 User AnswerBook set for more information
when you identify the platform group that applies to your system.
85
Note – Power Management does not support the sun4c and sun4d platform groups.
TABLE 6-1
86
Platform Names and Groups Supported by Power Management
Sun System Name
Platform Name
Platform Group
SPARCstation 4
SUNW, SPARCstation-4
sun4m
SPARCstation 5
SUNW, SPARCstation-5
sun4m
SPARCstation 10
SUNW, SPARCstation-10
sun4m
SPARCstation 10SX
SUNW, SPARCstation-10, SX
sun4m
SPARCstation 20
SUNW, SPARCstation-20
sun4m
SPARCstation LX
SUNW, SPARCstation-LX
sun4m
SPARCstation LX+
SUNW, SPARCstation-LX+
sun4m
SPARCclassic
SUNW, SPARCclassic
sun4m
SPARCclassic X
SUNW, SPARCclassic-X
sun4m
Ultra 1 (all models)
SUNW, Ultra-1
sun4u
Ultra 5
SUNW, Ultra-5
sun4u
Ultra 10
SUNW, Ultra-10
sun4u
Ultra 30
SUNW, Ultra-30
sun4u
Ultra 60
SUNW, Ultra-60
sun4u
Ultra 450
SUNW, Ultra-4
sun4u
Ultra 2 Creator (all models)
SUNW, Ultra-2
sun4u
Sun Enterprise 1 Model 140
SUNW, Ultra-1
sun4u
Sun Enterprise 1 Model 170
SUNW, Ultra-1
sun4u
Sun Enterprise 1 Model 170E
SUNW, Ultra-1
sun4u
Sun Enterprise 2 Model 1300
SUNW, Ultra-2
sun4u
Sun Enterprise 2 Model 2300
SUNW, Ultra-2
sun4u
Sun Blade 100
SUNW,Sun-Blade-100
sun4u
Sun Blade 150
SUNW,Sun-Blade-100
sun4u
Sun Blade 1000
SUNW,Sun-Blade-1000
sun4u
Sun Blade 1500
SUNW,Sun-Blade-1500
sun4u
Sun Blade 2000
SUNW,Sun-Blade-1000
sun4u
Sun Blade 2500
SUNW,Sun-Blade-2500
sun4u
Solaris 8 2/04 Sun Hardware Platform Guide • February 2004
Note – The SPARCstation™ Voyager is a sun4m-architecture system, but it is not
supported in this Solaris release.
System Architecture Distinctions
and Default Settings
The SPARC architecture of a workstation determines which Power Management
features are available. To determine your system’s architecture, see TABLE 6-1. The
default behavior in Power Management functions varies on systems, as described in
TABLE 6-2.
TABLE 6-2
Power Management Features in Different SPARC Architectures
Power Management Features
sun4m
sun4u
(Energy Star 2.0)
sun4u
(Energy Star 3.0)
Servers
Display PM Available
Yes
Yes
Yes
Yes
Display PM by Default
Yes
Yes
Yes
Yes
Device PM Available
No
No
Yes
No
Device PM by Default
N/A
N/A
Yes
N/A
Suspend-Resume Available
Yes
Yes
Yes
No
Suspend-Resume by Default
No
Yes
No
N/A
AutoShutDown Available
No
Yes
Yes
No
AutoWakeup by Default
N/A
Yes
No
N/A
SPARCstation 4 Issues
This section describes a workaround to a limitation of the SPARCstation 4 when
used with Power Management.
The AC accessory outlet on the SPARCstation 4 system is an unswitched outlet. The
AC power switch does not control power flowing through the accessory outlet. If
you connect a monitor to the accessory outlet, you cannot turn it off using the
system unit power switch. Similarly, if you use Power Management software, the
software cannot turn off the monitor automatically. To conserve energy, consider
using an Energy Star-compliant monitor. Sun offers a variety of Energy Star-
Chapter 6
Power Management on Sun Hardware
87
compliant monitors in its standard SPARCstation 4 system configurations. This
information does not apply to SPARCserver 4 configurations. The SPARCserver 4
includes a switched accessory outlet.
88
Solaris 8 2/04 Sun Hardware Platform Guide • February 2004
CHAPTER
7
Alternate Pathing 2.3.1 on the Sun
Enterprise Servers
This chapter contains initial installation and upgrade instructions for Alternate
Pathing (AP) 2.3.1. With the introduction of AP 2.3.1, both the initial install
instructions and the upgrade instructions now apply to the Sun Enterprise™ 3x00,
4x00, 5x00, 6x00 and 10000 Servers.
Preparing to Install or Upgrade
The AP packages require approximately 2.7 megabytes of disk space on the server.
The following table lists the total size of the AP software by file system.
TABLE 7-1
AP Software Approximate File System Sizes
File System
Size
/usr
317 Kbytes
/
1.3 Mbytes
/etc
13 Kbytes
/kernel
1528 Kbytes
/sbin
1481 Kbytes
AP requires that an entire disk partition with at least 300 Kbytes be dedicated to
each database copy. For more detailed information on partitioning for the AP
databases, see Chapter 2, “Alternate Pathing Database” in the Alternate Pathing 2.3.1
User Guide.
89
The installation instructions in this section assume that your system is running the
Solaris 2.6, Solaris 7 or Solaris 8 operating environment. AP 2.3.1 will not run under
software releases earlier than Solaris 2.6 environment.
▼
To Install or Upgrade From the Web
1. Using your web browser, go to http://www.sun.com/servers/sw/
2. Click the Enterprise Alternate Pathing (AP) link.
3. Click the Click here to download link.
The file that is then downloaded is named ap_2_3_1_sparc.zip.
4. Log in as superuser.
5. Change directory to the location where you downloaded the software:
# cd /download_directory
6. Extract the downloaded file by typing:
# unzip -v ap2_3_1_sparc.zip
The AP 2.3.1 packages are located in
/download_directory/ap_2_3_1_sparc/Product and the install and upgrade
scripts are located in
/download_directory/ap_2_3_1_sparc/Tools.
7. Proceed to “Performing an Initial Installation of AP” on page 92 or “Before
Performing an Upgrade of AP” on page 103.
▼
To Install or Upgrade From a CD-ROM
1. Insert the “Software Supplement for the Solaris 8 Operating Environment” CDROM into the CD-ROM drive.
Allow time for the volume manager to mount the CD-ROM.
90
Solaris 8 2/04 Sun Hardware Platform Guide • February 2004
Note – If your CD-ROM is not local to your system (for example, on a Sun
Enterprise 10000) and you are not familiar with remote installation using a CDROM, see “To Mount a CD-ROM over NFS™” on page 91 or refer to your Solaris
System Administration Guide.
The AP 2.3.1 packages are located in:
/cdrom/cdrom0/Alternate_Pathing_2.3.1/Product
The install and upgrade scripts are located in:
/cdrom/cdrom0/Alternate_Pathing_2.3.1/Tools
2. Become superuser and cd to the Product installation directory:
# cd /cdrom/cdrom0/Alternate_Pathing_2.3.1/Product
3. Proceed to “Performing an Initial Installation of AP” on page 92 or “Before
Performing an Upgrade of AP” on page 103.
▼
To Mount a CD-ROM over NFS™
1. Log in as superuser and verify that the volume manager is running on your
machine:
# ps -ef | grep vold
2. If you see an entry containing /usr/sbin/vold, volume manager is running on
your system.
■
■
If volume manager is running, skip to Step 3.
If volume manager is not running on your system, type:
# /etc/init.d/volmgt start
3. Check to see if NFS is running on your system:
# ps -ef | grep nfsd
Chapter 7
Alternate Pathing 2.3.1 on the Sun Enterprise Servers
91
■
If you see an entry containing /usr/lib/nfs/nfsd then nfsd is running on
your system. Type:
# share -F nfs -o ro /cdrom/cdrom0/Alternate_Pathing_2.3.1
■
If nfsd is not running, type:
# /etc/init.d/nfs.server start
# share -F nfs -o ro /cdrom/cdrom0/Alternate_Pathing_2.3.1
4. Log in to target machine as superuser and cd to the source machine:
# cd /net/source_machine/cdrom/cdrom0/Alternate_Pathing_2.3.1
If you cannot change to that directory and you do not have automounter on your
network, create a mount point on the target machine and mount the Product
directory:
# mkdir /remote_products
# /usr/sbin/mount -F nfs -r
source_machine:/cdrom/cdrom0/Alternate_Pathing_2.3.1 /remote_products
# cd /remote_products
5. At this point you may proceed with the install, “Performing an Initial Installation
of AP” on page 92 or “Before Performing an Upgrade of AP” on page 103.
Once you have completed installation you can umount the CD-ROM using:
# umount source_machine/cdrom
Performing an Initial Installation of AP
The initial installation instructions in this section are for environments where AP is
not currently installed and configured. If any version of AP is currently installed and
configured, you can use the instructions in “Before Performing an Upgrade of AP”
on page 103 to install AP 2.3.1. That procedure uses scripts that save your current
AP configuration, and then restores that configuration after you install the AP 2.3.1
packages.
92
Solaris 8 2/04 Sun Hardware Platform Guide • February 2004
The installation instructions in this section assume that your system is running the
Solaris 2.6, Solaris 7 or Solaris 8 operating environment. AP 2.3.1 will not run under
software releases earlier than the Solaris 2.6 environment.
Note – AP 2.3.1 software installation is based on your operating environment. If, at
a later date, you upgrade your Solaris operating environment, you must re-install
AP 2.3.1 following the AP 2.3.1 upgrade procedure. See “Before Performing an
Upgrade of AP” on page 103. For information on performing a simultaneous
upgrade, see “Simultaneously Upgrading AP and Solaris Software” on page 105.
ssd Patch
AP 2.3.1 requires an ssd(7D) patch. AP 2.3.1 installation checks for the presence of
this patch. If the patch is not present then, depending on your configuration, the
following message maybe displayed:
Alternate Pathing Subsystem Drivers
(sparc) 2.3.1,REV=2000.05.09.11.28
Copyright 2000 Sun Microsystems, Inc. All rights reserved.
## Executing checkinstall script.
Determining patch requirements...
Verifying required patches are installed...
Required patches not installed: 109524-01
###
### Patch verification failed.
### Alternate Pathing 2.3.1 requires this package.
### You MUST apply the required patches before
### proceeding.
###
### PACKAGE INSTALLATION FAILED.
###
checkinstall script suspends
Installation of <SUNWapdv> was suspended (administration).
No changes were made to the system.
The required patches are as follows:
■
■
■
Patch 105356-15 for Solaris 2.6,
Patch 107458-09 for Solaris 7
Patch 109524-01 for Solaris 8
You can obtain these patches from SunSolve at: http://sunsolve.sun.com.
Chapter 7
Alternate Pathing 2.3.1 on the Sun Enterprise Servers
93
You can use Web Start to install the AP 2.3.1 software and optionally the AP 2.3.1
AnswerBook2 collection or you can manually install the AP and AnswerBook
packages using pkgadd.
To manually install AP 2.3.1 proceed to “To Manually Install AP 2.3.1” on page 95.
To manually install the AP 2.3.1 AnswerBook see “To Install the AP 2.3.1
AnswerBook2 Collection” on page 102.
If you have a third party volume manager installed on your system, you must
deconfigure it, according to your vendor’s instructions, before installing AP 2.3.1.
Once you have finished deconfiguring or if you do not have a volume manager
installed, proceed to “To Install AP 2.3.1 Using Web Start” on page 94 for the Web
Start procedure or “To Manually Install AP 2.3.1” on page 95 for the manual
procedure.
▼ To Install AP 2.3.1 Using Web Start
You can use Web Start to perform a fresh install from CD-ROM or from files you
have downloaded from the Web.
1. Log in as superuser.
2. Set the DISPLAY environment variable.
For sh(1) or ksh(1), type:
# DISPLAY=hostname:0
# export DISPLAY
Where hostname is the host name of the machine used to graphically display Web
Start.
3. Change directory to the location of the AP 2.3.1 package:
■
If you downloaded software from the Web:
# cd /download_directory/ap_2_3_1_sparc/Product
■
If you are installing the upgrade from the CD-ROM:
# cd /cdrom/cdrom0/Alternate_Pathing_2.3.1/Product
4. Begin Web Start by typing:
# ./installer
94
Solaris 8 2/04 Sun Hardware Platform Guide • February 2004
5. Select Custom Install, then select the Alternate Pathing 2.3.1 software and
optionally the Alternate Pathing 2.3.1 AnswerBook2 product.
With custom installation, only the products that you select are installed.
Note – You can install the packages in any order you wish but you must install
them all. Package installation depends on the ssd patch being present. See “ssd
Patch” on page 93 for more information
6. Verify that you have sufficient disk space to cover the requirements displayed on
the Ready to Install dialog.
7. Click the Install Now button.
Wait until the installation is complete and the Installation Summary dialog is
displayed.
Note – If your Sun Enterprise server is not configured to support a particular
feature or device that is supported by Alternate Pathing, simply adding AP to your
server will not enable it to use that feature or device.
8. Configure AP.
For an example of the steps you need to follow, see “To Configure AP” on page 10.
Also see the Alternate Pathing 2.3.1 User Guide.
Note – If you are using IPv6, your /etc/hostname files will have the name
/etc/hostname6.xxx. While the content of the IPv6 files is different than IPv4, as
far as AP installation is concerned, the /etc/hostname6.xxx files can be treated in
exactly the same manner as the /etc/hostname.xxx files. For more information on
IPv6 refer to System Administration Guide, Volume 3.
▼ To Manually Install AP 2.3.1
1. Log in as superuser.
2. Change directory to the location of the AP 2.3.1 package:
■
If you downloaded software from the Web:
# cd /download_directory/ap_2_3_1_sparc/Product
Chapter 7
Alternate Pathing 2.3.1 on the Sun Enterprise Servers
95
■
If you are installing the upgrade from the CD-ROM:
# cd /cdrom/cdrom0/Alternate_Pathing_2.3.1/Product
3. Install the AP 2.3.1 domain packages on the server:
# pkgadd -d . SUNWapdoc SUNWapdv SUNWapr SUNWapu
Note – You can install the packages in any order you wish but you must install
them all. Package installation depends on the ssd patch being present. See “ssd
Patch” on page 93 for more information
The software briefly displays copyright, trademark, and license information for each
package, then displays messages about pkgadd(1M) actions taken to install the
package, including a list of the files and directories being installed. Depending on
your configuration, the following messages may be displayed:
This package contains scripts which will be executed
with superuser permission during the process of installing this
package.
Do you want to continue with the installation of this
package [y,n,?]
Type y at each successive prompt to continue.
When this portion of the installation is complete, the AP 2.3.1 packages have been
installed and the superuser prompt is displayed.
Note – If your Sun Enterprise server is not configured to support a particular
feature or device that is supported by Alternate Pathing, simply adding AP to your
server will not enable it to use that feature or device.
4. Remove the Sun Computer Systems Supplement CD from the CD-ROM drive, if
applicable:
# cd /
# eject cdrom
96
Solaris 8 2/04 Sun Hardware Platform Guide • February 2004
5. Configure AP.
For an example of the steps you need to follow, see “To Configure AP” on page 97.
Also see the Alternate Pathing 2.3.1 User Guide.
Note – If you are using IPv6, your /etc/hostname files will have the name
/etc/hostname6.xxx. While the content of the IPv6 files is different than IPv4, as
far as AP installation is concerned, the /etc/hostname6.xxx files can be treated in
exactly the same manner as the /etc/hostname.xxx files. For more information on
IPv6 refer to System Administration Guide, Volume 3.
▼ To Configure AP
1. Create three to five AP databases:
# apdb -c raw_disk_slice
Note – See the Alternate Pathing 2.3.1 User Guide for information on disk partitions
for the AP database.
2. Create the AP metadisks.
You must know the configuration of the host hardware so that you know which two
ports are connected to the same disk array. The following steps use sf ports. Your
ports may vary, depending on the configuration of the host.
a. Display all of the ports and their disk device nodes:
# apinst
sf:0
/dev/dsk/c1t0d0
/dev/dsk/c1t1d0
/dev/dsk/c1t2d0
/dev/dsk/c1t3d0
/dev/dsk/c1t4d0
/dev/dsk/c1t5d0
sf:1
/dev/dsk/c2t0d0
/dev/dsk/c2t1d0
/dev/dsk/c2t2d0
/dev/dsk/c2t3d0
/dev/dsk/c2t4d0
/dev/dsk/c2t5d0
Chapter 7
Alternate Pathing 2.3.1 on the Sun Enterprise Servers
97
b. Create an uncommitted disk pathgroup:
# apdisk -c -p sf:0 -a sf:1
# apconfig -S -u
where:
-c causes the pathgroup to be created
-p designates the primary path
-a designates the alternate path
You can verify the results by using apconfig(1M) as shown above.
c. Commit the database entries:
# apdb -C
As shown, you can verify the results of that command by using apconfig -S.
d. If you are placing the boot disk under AP control, use apboot(1M) to define
the new AP boot device:
# apboot metadisk_name
The apboot(1M) command modifies the /etc/vfstab file and the
/etc/system file. The metadisk_name must be in the form: mcxtxdx.
e. Modify any references that use a physical device node (that is, a path that
begins with /dev/dsk or /dev/rdsk) to use the corresponding metadisk
device node (that is, a path that begins with /dev/ap/dsk or /dev/ap/rdsk).
If a partition is mounted under a physical path, unmount and remount it under
the metadisk path using umount and mount respectively.
Examine /etc/vfstab for any physical devices that should be changed to AP
metadevices. If necessary, edit /etc/vfstab to make the necessary
modifications.
Note – You must be a knowledgeable system administrator to edit /etc/vfstab. If
you do not configure your file systems properly in /etc/vfstab, it is possible that
you can lose data and/or leave the server unbootable.
3. Create AP metanetworks (for nonprimary networks).
98
Solaris 8 2/04 Sun Hardware Platform Guide • February 2004
Note – The following steps should be applied to all networks that you want to
alternately path except the primary network.
a. Create the network pathgroup:
# apnet -c -a network_interface -a network_interface
# apconfig -N -u
...
As shown, you can verify the results of the apnet(1M) command by using
apconfig(1M).
b. Commit the network pathgroup entries in the database.
# apdb -C
You can verify the results of the apdb(1M) command by using the
apconfig(1M) command with the -N option.
c. Remove all direct usage of both members of the network pathgroups.
If the physical interface is currently plumbed, and it is not the interface that you
will be using as you run commands to configure the metanetwork, you can
unplumb the physical interface by using the ifconfig(1M) command.
d. Create an /etc/hostname.metherx (for example,hostname.mether0) file for
any metanetworks that you want to configure when the server is rebooted.
Note – If you are using IPv6, your /etc/hostname files will have the name
/etc/hostname6.xxx. While the content of the IPv6 files is different than IPv4, as
far as AP installation is concerned, the /etc/hostname6.xxx files can be treated in
exactly the same manner as the /etc/hostname.xxx files. For more information on
IPv6 refer to System Administration Guide, Volume 3.
4. Create the AP metanetwork for the primary network.
a. View the contents of the /etc/nodename and /etc/hostname.xxxxx files (for
example, hostname.hme0) to verify that the interface name is the same.
Chapter 7
Alternate Pathing 2.3.1 on the Sun Enterprise Servers
99
Note – If you are using IPv6, your /etc/hostname files will have the name
/etc/hostname6.xxx. While the content of the IPv6 files is different than IPv4, as
far as AP installation is concerned, the /etc/hostname6.xxx files can be treated in
exactly the same manner as the /etc/hostname.xxx files. For more information on
IPv6 refer to System Administration Guide, Volume 3.
b. Create the primary network pathgroup:
# apnet -c -a network_interface1 -a network_interface2
where:
-c creates the new primary network pathgroup
-a designates the first alternate network path
-a designates the second alternate network path
c. Commit the network pathgroup entry in the database:
# apdb -C
# apconfig -N
As shown, you can verify the results of the apdb(1M) command by using
apconfig(1M).
d. Rename the /etc/hostname.xxxx file to /etc/hostname.metherx to
configure the network when you reboot the server.
For example:
# mv hostname.hme0 hostname.mether0
5. If you plan to use a volume manager, such as Solstice DiskSuite™ (SDS) or
VERITAS Volume Manager™ (VxVM) configure the volume manager according to
the vendor’s instructions.
Note – Make sure that your volume manager is supported under your version of
the Solaris operating environment (either version 2.6, version 7, or version 8).
■
100
SDS Issues
Solaris 8 2/04 Sun Hardware Platform Guide • February 2004
If you want to build your SDS volumes on top of AP, configure your volumes
using AP metadisk paths rather than physical paths. SDS recognizes and properly
installs on existing AP metadevices with no special action required.
■
VxVM Issues
If you want to build your VxVM volumes on top of AP, configure your volumes
using AP metadisk paths rather than physical paths. VxVM recognizes and
properly installs on existing AP metadevices with no special action required.
VxVM can encapsulate both nonboot disks and boot disks that are configured as
AP metadevices. VxVM can encapsulate AP databases without any impact on AP.
Note, however, that the standard VxVM requirements for encapsulation apply:
■
■
■
There must be an s2 slice that represents the entire disk.
There must be two free partitions. The partition requirement may necessitate
giving up an AP database, which is often placed in slice s4.
There must be a "small amount" of free disk space at the beginning or end of
the disk.
Software installation of VxDMP and AP are mutually exclusive. You can only
install one or the other. VxDMP does not work with DR.
6. Reboot the server (if necessary).
If you just rebooted the server after configuring a volume manager, this step is
unnecessary.
Installing the AP 2.3.1 AnswerBook2
Collection
This section explains how to manually install the AP 2.3.1 AnswerBook2 document
collection using the standard installation utility, pkgadd.
AP 2.3.1 AnswerBook2 Collection
Before you can install the AP 2.3.1 AnswerBook2 document collection, you must
have the AnswerBook2 server software installed. For instructions on installing the
AnswerBook2 server software, see “Installing and Administering an AnswerBook2
Server” in the AnswerBook2 Help Collection on docs.sun.com. The server
software can be obtained from the following sources:
■
■
The Documentation CD for Solaris 7 and Solaris 8 environments
The Web ( http://www.sun.com/software/ab2/index.html)
Chapter 7
Alternate Pathing 2.3.1 on the Sun Enterprise Servers
101
▼ To Install the AP 2.3.1 AnswerBook2 Collection
1. Log in as superuser on the machine where the AP 2.3.1 AnswerBook2 collection is
to be installed.
2. If you have a previous version of the SUNWabap package installed, remove it using
the pkgrm command:
# pkgrm SUNWabap
3. Change directory to the location of the AP 2.3.1 AnswerBook package:
■
If you downloaded software from the Web:
# cd /download_directory/ap_2_3_1_sparc/Product
■
If you are installing the upgrade from the CD-ROM:
# cd /cdrom/cdrom0/Alternate_Pathing_2.3.1/Product
4. Add the SUNWabap package by typing:
# pkgadd -d . SUNWabap
5. When you are requested to select an installation option, type 2 (heavy
installation):
Select an installation option: 2
6. When you are asked to specify the parent path for the AnswerBook2 collection,
type the path to the directory in which you want to put the AP 2.3.1 AnswerBook2.
It is suggested that you install the AP AnswerBook2 Collection in /opt.
Specify the parent path of this AnswerBook2 Collection directory: /opt
102
Solaris 8 2/04 Sun Hardware Platform Guide • February 2004
7. Type y at the following prompt:
This package contains scripts which will be executed with super-user
permission during the process of installing this package.
Do you want to continue with the installation of <SUNWabap> [y,n,?] y
A message indicates that the SUNWabap package was successfully installed.
For instructions on launching the AnswerBook2 viewer and viewing document
collections, see “Viewing Online Documentation Using the AnswerBook2 System” in
the AnswerBook2 Help Collection on docs.sun.com.
Before Performing an Upgrade of AP
This section provides information and recommendations concerning an upgrade to
AP 2.3.1 on the Sun Enterprise servers.
AP 2.0, 2.0.1, 2.1 and 2.2 are not supported under the Solaris 8 2/04 operating
environment.
The upgrade process involves:
■
■
■
■
■
Saving your current configuration
Deconfiguring AP
Removing the earlier version of AP
Installing a set of core AP packages
Restoring your AP configuration
Scripts are provided to simplify this process in
/download_directory/ap_2_3_1_sparc/Tools from the web or on CD-ROM in
/cdrom/cdrom0/Alternate_Pathing_2.3.1/Tools.
Note – If you are upgrading to AP 2.3.1 on all Sun Enterprise 10000 domains, then
you can safely remove the SUNWapssp package software from the SSP workstation
using pkgrm. If, however, any domain will remain at an earlier version of AP, then
you must not remove the AP software on the SSP workstation. In either case, leaving
AP software on SSP workstations will have no effect on AP 2.3.1.
Chapter 7
Alternate Pathing 2.3.1 on the Sun Enterprise Servers
103
Installation of the packages requires approximately 2.7 megabytes of disk space. The
following table lists the total size of the AP software by file system.
TABLE 7-2
AP Software File System Sizes
File System
Size
/usr
317 Kbytes
/
1.3 Mbytes
/etc
13 Kbytes
/kernel
1528 Kbytes
/sbin
1481 Kbytes
Note – When partitioning the hard drive during the Solaris software installation,
you must dedicate an entire disk partition with at least 300 Kbytes to each database
copy. For more detailed information on partitioning for the AP databases, see
Chapter 2, “Alternate Pathing Database” in the Alternate Pathing 2.3.1 User Guide.
Backing Up Your Server
Always back up an existing server before you upgrade any software. The safest
backup to perform is a level 0 dump (ufsdump(1M)) of the file systems connected to
the server being upgraded. If you do not have an established backup procedure, see
the System Administration Guide.
You do not need to back out installed patches before you perform the upgrade.
Note – If you wish to add or remove any hardware included in an AP path group,
do so either before you begin the upgrade process or after you have completed it. In
general, avoid changing your hardware in ways that result in controller
renumbering.
Uncommitted AP Database Entries
Before you run ap_upgrade_begin, commit any uncommitted entries in the AP
database. Any metadevices that were created but not committed are not preserved
during the upgrade. Similarly, any metadevices that were deleted but not committed
will continue to exist after the upgrade.
104
Solaris 8 2/04 Sun Hardware Platform Guide • February 2004
Checking Other Software Documentation
Check the documentation of other software you are running, such as disk volume
managers, before you use the upgrade option in the suninstall utility. There may
be additional instructions you need to follow to preserve existing configurations.
Also, be sure to check the release notes for AP and any volume managers you are
using.
Simultaneously Upgrading AP and Solaris
Software
The AP upgrade procedures in this section use two scripts, ap_upgrade_begin and
ap_upgrade_finish. The first script saves your current AP configuration. The
second script restores that exact configuration after you install the AP 2.3.1
packages. It is possible that you will upgrade the Solaris software at the same time
you upgrade to AP 2.3.1, since AP 2.3.1 supports Solaris 2.6, Solaris 7, and Solaris 8.
Because the AP configuration is restored exactly as it was before you upgraded the
Solaris operating environment, you need to be aware of the issues described in the
following sections.
AP Database Partitions
The AP upgrade scripts attempt to recreate the AP databases in the same partitions
that they occupied before the upgrade of the Solaris operating environment. Note,
however, that Solaris 7 and Solaris 8 require more disk space than earlier versions of
the Solaris operating environment. Because of this, you can choose to modify the
boot disk partitioning scheme during suninstall. Do not modify the AP database
partitions. If you are upgrading from Solaris 7 to Solaris 8 operating environment
this will not be an issue. If, however, you are upgrading from an earlier version of
Solaris and you place file systems in all partitions that were previously used for AP
databases, ap_upgrade_finish is not able to recreate any databases and the
upgrade process fails.
Note – If you place a file system in any partition that was previously used for an AP
database, and if for some reason that file system is not mounted at the time you run
ap_upgrade_finish, that file system is overwritten by a copy of the AP database.
Chapter 7
Alternate Pathing 2.3.1 on the Sun Enterprise Servers
105
Root Disk Partitions
The AP upgrade facility assumes that the partitioning of the root disk (the disk
containing the / (root) partition) is not modified during the upgrade. Solaris 7 and
Solaris 8 software require more disk space than earlier versions. One way to acquire
the additional space is to repartition the original disk or to split the root disk into
two disks using standard commands prior to the Solaris upgrade. If you need to
repartition the root disk, do so before performing the AP 2.3.1 upgrade procedure.
If there is insufficient space when you run suninstall, you have the option to
modify the disk partitioning layout to acquire more space. However, during
suninstall, you must not relocate the / (root) or /usr partitions to another disk
as this will cause the AP upgrade script to fail.
ssd Patch
AP 2.3.1 requires an ssd(7D) patch. AP 2.3.1 installation checks for the presence of
this patch.
The required patches are as follows:
■
■
■
Patch 105356-15 for Solaris 2.6,
Patch 107458-09 for Solaris 7
Patch 109524-01 for Solaris 8
You can obtain these patches from SunSolve at: http://sunsolve.sun.com.
Performing an Upgrade of AP
The upgrade installation instructions in this section are for environments where AP
is currently installed and configured.
Note – If your Sun Enterprise server is not configured to support a particular
feature or device that is supported by Alternate Pathing, simply adding AP to your
server will not enable it to use that feature or device.
The installation instructions in this section assume that your system is running the
Solaris 2.6, Solaris 7 or Solaris 8 operating environment. AP 2.3.1 will not run under
software releases earlier than Solaris 2.6 environment.
106
Solaris 8 2/04 Sun Hardware Platform Guide • February 2004
Note – AP 2.3.1 software installation is based on your operating environment. If, at
a later date, you upgrade your Solaris operating environment, you must re-install
AP 2.3.1 following this AP 2.3.1 upgrade procedure. See “Before Performing an
Upgrade of AP” on page 103. For information on simultaneous upgrade, see
“Simultaneously Upgrading AP and Solaris Software” on page 105.
▼
To Upgrade to AP 2.3.1
1. If necessary, log in as superuser and commit any uncommitted entries in the AP
database:
# apdb -C
2. Terminate any processes that directly or indirectly access AP metadevices.
If you have a third party volume manager installed on your system, deconfigure it
now using the documentation provided by the specific vendor.
With regard to AP, no additional steps need to be taken to do this other than those
recommended by the manufacturer to deconfigure the volume manager.
Note – Once the volume manager has been deconfigured, if you are instructed to
install the new OS, stop at that point and remove your previous version of AP. Do
not install Solaris 8 software at this time.
You do not need to be concerned if your mounted ufs file systems or TCP/IP
networks are using AP metadevices.
The ap_upgrade_begin script, which you will run later in this procedure, and the
subsequent reboot will cause the ufs file systems and any swap devices
configured in /etc/vfstab to use physical paths rather than AP metadevices.
Likewise, ap_upgrade_begin will also take care of renaming any TCP/IP network
interfaces (/etc/hostname.xxxx) that may be using AP metadevices.
Note – This is true for any ufs file system configured in vfstab or any network
configured with /etc/hostname.xxxx files.
3. Remove the current AP configuration.
Chapter 7
Alternate Pathing 2.3.1 on the Sun Enterprise Servers
107
a. Log in to the server as superuser and run the following script to deconfigure AP
(and save the AP configuration so that it can be restored later):
# /path/Alternate_Pathing_2.3.1/Tools/ap_upgrade_begin
...
ap_upgrade_begin complete. (State saved in /var/tmp/apstate.) Now
you can safely remove the old AP packages, upgrade Solaris if
necessary, and install new AP packages. Run the ap_upgrade_finish
script when you’re done to restore the AP configuration. Please
read the upgrade directions in the Sun Enterprise Server Alternate
Pathing 2.3 Installation and Release Notes for specific details.
This script saves the current AP configuration information in the file
/var/tmp/apstate. You may examine the /var/tmp/apstate file if you wish,
but do not modify or remove it. Doing so can compromise the upgrade
procedure.
b. Remove the packages SUNWapdoc, SUNWapr, SUNWapu, SUNWabap and
SUNWapdv (if applicable) by using the pkgrm(1M) command.
c. If you are not upgrading your Solaris operating environment, reboot before
proceeding to Step 6.
4. Upgrade the Solaris operating environment (if applicable) now.
Note – You must upgrade the Solaris operating environment if you are running a
version prior to Solaris 2.6.
Note – Make sure you upgrade the correct slice. If you were previously using a
volume manager to mirror the boot disk, and if you were also using AP to
alternately path each boot disk mirror, then there are four physical paths that were
previously potential paths to the boot disk (two alternate paths for each boot disk
mirror). Now that both AP and the volume manager have been deconfigured,
examine /etc/vfstab to determine the physical path that corresponds to the root
(/) file system. When you run suninstall, specify that path as the disk to upgrade.
Later, when you restore your volume manager, be sure to designate that disk as the
primary mirror. See your volume manager documentation for information on
determining which physical slice is used when booting.
108
Solaris 8 2/04 Sun Hardware Platform Guide • February 2004
Note – When partitioning the hard drive during the Solaris software installation,
you must dedicate an entire disk partition that has at least 300 Kbytes to each
database copy. For more detailed information on partitioning for the AP databases,
see Chapter 2, “Alternate Pathing Database” in the Alternate Pathing 2.3.1 User Guide.
See “Upgrading a System” in Solaris 8 Advanced Installation Guide. Note that you
must choose the upgrade option to perform an upgrade of the Solaris operating
environment.
5. When the Solaris software upgrade process is completely finished, install the
correct ssd patch.
Note – If you have not upgraded the Solaris operating environment or you did not
reboot as part of the upgrade or Step 3, do so now.
AP 2.3.1 installation checks for the presence of an ssd patch. If the patch is not
present then, depending on your configuration, the following message maybe
displayed:
Alternate Pathing Subsystem Drivers
(sparc) 2.3.1,REV=2000.05.09.11.28
Copyright 2000 Sun Microsystems, Inc. All rights reserved.
## Executing checkinstall script.
Determining patch requirements...
Verifying required patches are installed...
Required patches not installed: 109524-01
###
### Patch verification failed.
### Alternate Pathing 2.3.1 requires this package.
### You MUST apply the required patches before
### proceeding.
###
### PACKAGE INSTALLATION FAILED.
###
checkinstall script suspends
Installation of <SUNWapdv> was suspended (administration).
No changes were made to the system.
See Section “ssd Patch” on page 793 for the required patches if you have not already
done so.
6. Upgrade to AP 2.3.1
a. Log in as superuser and type:
Chapter 7
Alternate Pathing 2.3.1 on the Sun Enterprise Servers
109
■
If you downloaded software from the web:
# cd /download_directory/ap_2_3_1_sparc/Tools
■
If you are installing the upgrade from the CD-ROM:
# cd /cdrom/cdrom0/Alternate_Pathing_2.3.1/Tools
b. Install the required AP 2.3.1 packages:
# pkgadd -d . SUNWapdoc SUNWapdv SUNWapr SUNWapu
Note – You can install the packages in any order you wish but you must install
them all. Package installation depends on the ssd(7D) patch being present. See “ssd
Patch” on page 93 for more information.
c. Run the following script to restore the original AP configuration:
Note – Be sure to read “Simultaneously Upgrading AP and Solaris Software” on
page 105 before performing the following command.
# /path/Alternate_Pathing_2.3.1.1/Tools/ap_upgrade_finish
...
ap_upgrade_finish complete. (State saved in /var/tmp/apstate.) Now
you can upgrade and configure any volume managers or other
software to use AP metadevices. Please read the upgrade directions
in the Sun Enterprise Server Alternate Pathing 2.3 Installation
and Release Notes for specific details.
d. Reboot.
7. If you have a third party volume manager, install and configure it according to
manufacturer’s instructions now.
Note – If your boot disk is mirrored, make sure you specify the upgraded disk as
the primary mirror.
Upgrade is now complete.
110
Solaris 8 2/04 Sun Hardware Platform Guide • February 2004
CHAPTER
8
OpenBoot Emergency Procedures
The introduction of USB keyboards with the newest Sun desktop systems has made
it necessary to change some of the OpenBoot™ emergency procedures. Specifically,
the Stop-N, Stop-D, and Stop-F commands that are available on systems with
standard (non-USB) keyboards are not supported on systems that have USB
keyboards. The following sections describe the OpenBoot emergency procedures for
systems with standard keyboards and for newer systems with USB keyboards.
OpenBoot Emergency Procedures for
Systems with Standard (non-USB)
Keyboards
When issuing any of these commands, press the keys immediately after turning on
the power to your system, and hold the keys down for a few seconds until the
keyboard LEDs flash.
Command
Description
Stop
Bypass POST. This command does not depend on security mode.
(Note: Some systems bypass POST as a default. In such cases, use
Stop-D to start POST).
Stop-A
Abort.
Stop-D
Enter the diagnostic mode (set diag-switch? to true).
Stop-F
Enter Forth on TTYA instead of probing. Use fexit to continue
with the initialization sequence. Useful if hardware is broken.
Stop-N
Reset NVRAM contents to default values.
111
OpenBoot Emergency Procedures for
Systems with USB Keyboards
The following paragraphs describe how to perform the functions of the Stop
commands on systems that have USB keyboards.
Stop-A
Stop-A (Abort) works the same as it does on systems with standard keyboards,
except that it does not work during the first few seconds after the machine is reset.
Stop-N Equivalent
1. After turning on the power to your system, wait until the front panel power
button LED begins to blink and you hear an audible beep.
2. Quickly press the front panel power button twice (similar to the way you would
double-click a mouse).
A screen similar to the following is displayed to indicate that you have successfully
reset the NVRAM contents to the default values:
Sun Blade 1000 (2 X UltraSPARC-III) , Keyboard Present
OpenBoot 4.0, 256 MB memory installed, Serial #12134241.
Ethernet address 8:0:20:b9:27:61, Host ID: 80b92761.
Safe NVRAM mode, the following nvram configuration variables have
been overridden:
‘diag-switch?’ is true
112
Solaris 8 2/04 Sun Hardware Platform Guide • February 2004
‘use-nvramrc?’ is false
‘input-device’, ‘output-device’ are defaulted
‘ttya-mode’, ‘ttyb-mode’ are defaulted
These changes are temporary and the original values will be
restored
after the next hardware or software reset.
ok
Note that some NVRAM configuration parameters are reset to their defaults. They
include parameters that are more likely to cause problems, such as TTYA settings.
These NVRAM settings are only reset to the defaults for this power cycle. If you do
nothing other than reset the machine at this point, the values are not permanently
changed. Only settings that you change manually at this point become permanent.
All other customized NVRAM settings are retained.
Typing set-defaults discards any customized NVRAM values and permanently
restores the default settings for all NVRAM configuration parameters.
Note – Once the power button LED stops blinking and stays lit, pressing the power
button again will power off the system.
Stop-F Functionality
The Stop-F functionality is not available in systems with USB keyboards.
Chapter 8
OpenBoot Emergency Procedures
113
Stop-D Functionality
The Stop-D (diags) key sequence is not supported on systems with USB keyboards,
however, the Stop-D functionality can be closely emulated by using the power
button double-tap (see Stop-N Functionality), since this temporarily sets diagswitch? to true. If you want the diagnostic mode turned on permanently, type:
ok setenv diag-switch? true
114
Solaris 8 2/04 Sun Hardware Platform Guide • February 2004
APPENDIX
A
Localized Packages on the
Supplement CD
115
Japanese Localized Packages
TABLE A-1
Japanese Localized Packages
Software Product
Package Name
Description
SunForum
SUNWjadat
Japanese (ja-EUC) SunForum
SUNWjpdat
Japanese (ja-PCK) SunForum
SUNWjaap
Japanese localization for Alternate
Pathing
SUNWjabap
Japanese AnswerBook for Alternate
Pathing
SUNWjeapd
Japanese manual pages for Alternate
Pathing
SUNWjpapd
Japanese (PCK) manual pages for
Alternate Pathing
SUNWjuapd
Japanese (UTF-8) manual pages for
Alternate Pathing
SUNWjersc
Japanese (EUC) Remote System
Control
SUNWjrscd
Japanese (EUC) Remote System
Control User Guide
SUNWjrscj
Japanese (EUC) Remote System
Control GUI
SUNWjenfm
Japanese (EUC) SunFDDI SBus Man
Pages
SUNWjepfm
Japanese (EUC) SunFDDI PCI Man
Pages
SUNWjpnfm
Japanese (PCK) SunFDDI SBus Man
Pages
SUNWjppfm
Japanese (PCK) SunFDDI PCI Man
Pages
SUNWjunfm
Japanese (UTF-8) SunFDDI SBus Man
Pages
SUNWjupfm
Japanese (UTF-8) SunFDDI PCI Man
Pages
SUNWjpvtm
Japanese (PCK) SunVTS Man Pages
Alternate Pathing
Remote System Control
SunFDDI
SunVTS
116
Solaris 8 2/04 Sun Hardware Platform Guide • February 2004
TABLE A-1
Japanese Localized Packages (Continued)
Software Product
Package Name
Description
SUNWjuvtm
Japanese (UTF-8) SunVTS Man Pages
SUNWjvtsm
Japanese (EUC) SunVTS Man Pages
AnswerBook
SUNWahwja
Solaris 8 on Sun Hardware Collection Japanese
Capacity on Demand
SUNWjcodb
Japanese AnswerBook for Capacity on
Demand
Sun Enterprise 10000 SSP
SUNWjassp
Japanese AnswerBook for Sun
Enterprise 10000 SSP
CDRW
SUNWjcdrw
Japanese (EUC) Manual Page and
Message for CDRW
Netra ct
SUNWjecte
Japanese (EUC) manual pages and
messages for Netra ct Platform
Software
Lights Out Management
(LOM)
SUNWjlomu
Japanese localization (EUC) for
LOMlite utilities
Sun Fire B10n
SUNWjeclbut
Japanese (EUC) Manual Pages for Sun
Fire B10n
SUNWjpclbut
Japanese (PCK) Manual Pages for Sun
Fire B10n
SUNWjuclbut
Japanese (UTF-8) Manual Pages for
Sun Fire B10n
Appendix A
Localized Packages on the Supplement CD
117
German Localized Packages
TABLE A-2
German Localized Packages
Software Product
Package Name
Description
SunForum
SUNWdedat
German SunForum
Remote System Control
SUNWdersc
German Remote System Control
SUNWdrscd
German Remote System Control User
Guide
SUNWdrscj
German Remote System Control GUI
AnswerBook
SUNWAhwde
Solaris 8 on Sun Hardware Collection German
Netra ct
SUNWdecte
German (EUC) localization for Netra ct
CDRW
SUNWdcdrw
German (EUC) localization for CDRW
utility
Lights Out Management
(LOM)
SUNWdlomu
German localization for LOMlite utilities
Italian Localized Packages
TABLE A-3
Italian Localized Packages
Software Product
Package Name
Description
SunForum
SUNWitdat
Italian SunForum
Remote System Control
SUNWitrsc
Italian Remote System Control
SUNWirscd
Italian Remote System Control User
Guide
SUNWirscj
Italian Remote System Control GUI
SUNWAhwit
Solaris 8 on Sun Hardware Collection Italian
AnswerBook
118
Solaris 8 2/04 Sun Hardware Platform Guide • February 2004
TABLE A-3
Italian Localized Packages (Continued)
Software Product
Package Name
Description
Netra ct
SUNWitcte
Italian (EUC) localization for Netra ct
CDRW
SUNWicdrw
Italian localization for CDRW utility
Lights Out Management
(LOM)
SUNWilomu
Italian localization for LOMlite utilities
Appendix A
Localized Packages on the Supplement CD
119
French Localized Packages
TABLE A-4
French Localized Packages
Software Product
Package Name
Description
SunForum
SUNWfrdat
French SunForum
Remote System Control
SUNWfrrsc
French Remote System Control
SUNWfrscd
French Remote System Control User Guide
SUNWfrscj
French Remote System Control GUI
AnswerBook
SUNWAhwfr
Solaris 8 on Sun Hardware Collection French
Netra ct
SUNWfrcte
French (EUC) localization for Netra ct
CDRW
SUNWfcdrw
French localization for CDRW utility
Alternate Pathing
SUNWfabap
French Alternate Pathing collection
Lights Out
Management (LOM)
SUNWflomu
French localization for LOMlite utilities
Spanish Localized Packages
TABLE A-5
Spanish Localized Packages
Software Product
Package Name
Description
SunForum
SUNWesdat
Spanish SunForum
Remote System
Control
SUNWesrsc
Spanish Remote System Control
SUNWerscd
Spanish Remote System Control User Guide
SUNWerscj
Spanish Remote System Control GUI
SUNWAhwes
Solaris 8 on Sun Hardware Collection Spanish
AnswerBook
120
Solaris 8 2/04 Sun Hardware Platform Guide • February 2004
TABLE A-5
Spanish Localized Packages (Continued)
Software Product
Package Name
Description
Netra ct
SUNWescte
Spanish (EUC) localization for Netra ct
CDRW
SUNWecdrw
Spanish localization for CDRW utility
Lights Out
Management (LOM)
SUNWelomu
Spanish localization for LOMlite utilities
Appendix A
Localized Packages on the Supplement CD
121
Swedish Localized Packages
TABLE A-6
Swedish Localized Packages
Software Product
Package Name
Description
SunForum
SUNWsvdat
Swedish SunForum
Remote System Control
SUNWsvrsc
Swedish Remote System Control
SUNWsrscd
Swedish Remote System Control User Guide
SUNWsrscj
Swedish Remote System Control GUI
AnswerBook
SUNWAhwsv
Solaris 8 on Sun Hardware Collection Swedish
Netra ct
SUNWsvcte
Swedish (EUC) localization for Netra ct
CDRW
SUNWscdrw
Swedish localization for CDRW utility
Lights Out
Management (LOM)
SUNWslomu
Swedish localization for LOMlite utilities
Traditional Chinese Localized Packages
TABLE A-7
Traditional Chinese Localized Packages
Software Product
Package Name
Description
SunForum
SUNW5dat
Traditional Chinese (zh_TW-BIG5) SunForum
SUNWhdat
Traditional Chinese (zh_TW-EUC) SunForum
SUNWhrsc
Traditional Chinese (EUC) Remote System
Control
SUNWhrscd
Traditional Chinese (EUC) Remote System
Control User Guide
SUNWhrscj
Traditional Chinese (EUC) Remote System
Control GUI
Remote System
Control
122
Solaris 8 2/04 Sun Hardware Platform Guide • February 2004
TABLE A-7
Traditional Chinese Localized Packages (Continued)
Software Product
Package Name
Description
Netra ct
SUNWhcte
Traditional Chinese (EUC) localization for Netra
ct
CDRW
SUNWhcdrw
Traditional Chinese (EUC) localization for CDRW
utility
Lights Out
Management (LOM)
SUNWhlomu
Traditional Cninese localization (EUC) for
LOMlite utilities
Appendix A
Localized Packages on the Supplement CD
123
Simplified Chinese Localized Packages
TABLE A-8
Simplified Chinese Localized Packages
Software Products
Packaage Name
Description
SunForum
SUNWcdat
Simplified Chinese (zh-EUC) SunForum
Remote System
Control
SUNWcrsc
Simplified Chinese (EUC) Remote System
Control
SUNWcrscd
Simplified Chinese (EUC) Remote System
Control User Guide
SUNWcrscj
Simplified Chinese (EUC) Remote System
Control GUI
Netra ct
SUNWccte
Simplified Chinese (EUC) localization for
Netra ct
CDRW
SUNWccdrw
Simplified Chinese (EUC) localization for
CDRW utility
Lights Out
Management (LOM)
SUNWclomu
Simplified Chinese localization (EUC) for
LOMlite utilities
Korean Localized Packages
TABLE A-9
124
Korean Localized Packages
Software Product
Package Name
Description
SunForum
SUNWkodat
Korean SunForum
Remote System Control
SUNWkrsc
Korean (EUC) Remote System Control
SUNWkrscd
Korean (EUC) Remote System Control User
Guide
SUNWkrscj
Korean (EUC) Remote System Control GUI
Netra ct
SUNWkocte
Korean (EUC) localization for Netra ct
CDRW
SUNWkcdrw
Korean (EUC) localization for CDRW utility
Lights Out
Management (LOM)
SUNWklomu
Korean localization (EUC) for LOMlite utilities
Solaris 8 2/04 Sun Hardware Platform Guide • February 2004
Index
A
E
AnswerBook, 33
hardware
manuals, 33
Updates CD
installation, xii
AnswerBook2
installing the SSP document collection, 101
server software, 101
AutoShutdown
availability, 87
AutoWakeup
availability, 87
Energy Star Computers program, 85
C
Chinese packages
Simplified Chinese, 124
Traditional Chinese, 122
configuring VLANs, 26
F
flash PROM
reprogramming, 59
flash PROM jumper settings
Sun Enterprise 450 system, 59
Ultra 1 system, 46
Ultra 2 system, 46
flash PROM P0601 jumper
Ultra Enterprise 3000-6000 systems, 78
flash PROM upgrade
cautions, 48, 68
determining, 41, 63
overview, 43, 65
step-by-step procedure, 44, 66
French packages, 120
fresh install
from CD-ROM, 90
D
database
database size, recommended, 89, 104, 109
default Power Management settings, 87
device Power Management availability, 87
display Power Management availability, 87
G
German packages, 118
I
ifconfig -a, 28
install
125
from CD-ROM, 90
installation
Solaris CD, xii
Web Start process, 94
Italian packages, 118
where to find information, xii
pkgadd, 12
installing update software, 12
power interruption recovery procedure, 53, 80
products
new
where to find information, xii
J
Japanese packages, 116
Java 3D, 28
jumper
write enabled setting, 45, 60, 67
jumpers
flash PROM, 45, 59
R
recovery procedure
power interruption, 53, 80
Remote System Control, 23
reprogamming, flash PROM, 44, 66
K
S
keyswitch
diagnostics mode, 47, 67
power-on mode, 47, 67
Korean packages, 124
Solaris 7 operating environment
installing, 44, 67
Solaris Webstart 2.0, 11
Spanish packages, 120
SPARC architectures, 87
SPARCstation 20
platform notes, 35
SSP
installation, 94
Sun Enterprise 450 system
flash PROM jumper settings, 59
sun4u UltraSPARC III (Energy Star, v3), 87
SunATM, 25
SunFDDI PCI Driver, 25
SunFDDI SBus Driver, 25
SunForum, 24
SunHSI PCI Driver, 25
SunHSI SBus Driver, 25
SunVTS, 16
Swedish packages, 122
system
architecture
determining, 2
system architecture distinctions, 87
sun4m, 87
sun4u (pre Energy Star 3.0), 87
sun4u (pre Energy Star, v3), 87
L
latest news
where to find information, xii
N
new products
where to find information, xii
news
latest
where to find information, xii
O
OpenGL, 18
P
peripherals
126
Solaris 8 2/04 Sun Hardware Platform Guide • February 2004
U
U.S. Environmental Protection Agency, 85
Updates CD
contents, 34, 37
installation, xii
installing
pkgadd, 12
upgrade
from CD-ROM, 90
upgrade, flash PROM
performing, 44, 66
V
validation test suite, 16
virtual device, 28
VLAN ID, 26
VLAN naming format, 27
W
Web Start, 94
write enable jumper
setting, 45, 59
write enabling the system, 45, 67
servers, 47
Index
127
128
Solaris 8 2/04 Sun Hardware Platform Guide • February 2004