1
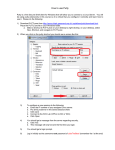
Checking out EM1000 communication
with and without “WinWedge Pro” TAL Technologies Inc.
Configuration of the Dumb Terminal to communicate with the EM1000 console port:
1. Select a free com port and set 9600 8-N-1 with no flow control.
2. See Terminal emulation tip on page 18 of the user’s manual
3. Please note the current terminal emulation provided in Windows can sometimes be slow to
accept new settings and may require you to save the profile then close and re-open it.
Minimum configuration of the EM1000:
1. Obtain the following from your network administrator:
a. A static IP address(es) for the EM1000(s)
b. Gateway to be used by the EM1000
c. Netmask to be used by the EM1000
2. Connect cable to console and power to the unit per the instructions on pages 16 - 17 of the
user’s manual.
3. If the terminal emulation program is not open, please do so at this time.
4. The two key files to be modified are “DWN.EM” and “WATTCP.CFG”
(which are located on EM 1000’s non-volatile memory).
5. Reset the unit by holding the reset button for 5 seconds then releasing it.
a. If this is the first time using the unit you will receive a terminal prompt indicating
you need to configure the WATTCP.CFG file
1. Type “edit WATTCP.CFG” and hit enter.
2. Type “i” and hit enter
3. Type “my_ip=”(insert static ip provided by network administrator) and hit enter.
4. Type “gateway=”(insert gateway provided by network administrator) and hit
enter.
5. Type “netmask=”(insert netmask provided by network administrator) and hit
enter.
6. Hold control & tap “z” to exit edit mode
7. Type “s” and hit enter to save file
8. Record the IP Address, Gateway & Netmask as you will need it again.
b. The quickest way to establish an initial “DWN.EM” file is to type “copy listen.em
dwn.em” and hit enter
c. Your EM1000 now has the minimum configuration it requires.
d. Reset the unit and inspect the settings.
e. Once you are satisfied with the settings presented upon reset, hook up all necessary
networking cables and hub configuration as needed.
f. Go to the “Windows” DOS Shell (not to be confused the the EM1000 DOS prompt)
and to confirm basic network connectivity by typing the following:
“ping (insert static ip provided by network administrator)” and hit enter.
g. You are finished with the console and can now remove the cable from the setup.
Note: If you are using just a PC, cables & hub in your networking setup, please
be sure to assign the same gateway & netmask to the PC as the EM 1000 has.
You must also assign the PC an IP address that is different from the EM 1000.
Using the Windows Telnet program to spy on data sent over the data port:
1. Click start then run. In the dialog box type “telnet” and click OK to open the telnet program
2. In the menu bar click “Terminal” then “Preferences”
3. I recommend setting the buffer size to 250, Emulation to VT-100/ANSI and selecting blinking cursor. Set the font to Fixedsys and click OK.
4. From the menu bar select “Connect” then “Remote System”. In the “Host Name” dialog box
insert the static ip provided by the network administrator. Leave the “Port” as telnet and
“Term Type” as vt100. Click “Connect” to establish connection.
5. At the arrow prompt (sent by the EM1000) type “spy=on” to enable spying on the data sent
through the data port.
6. You can type “show” to examine all the settings of the EM1000 to confirm the setting from
step 5 and all others.
7. Leave your telnet session running at this point and configure the dumb terminal for data
transmissions.
Configuration of the Dumb Terminal to communicate with the EM1000 Com1 data port:
1. Connect a communication cable (preferably from the EM1000 Development Kit) from an
appropriate com port on the PC to Com1/RS232 of the EM 1000.
2. Select a free com port and set 19200 8-N-1 with no flow control
(Note this is a different baud rate).
3. See Terminal emulation tip on page 18 of the user’s manual
4. Set ASCII parameters (under settings tab) to include line feeds and echo if you like.
5. Please note the current terminal emulation provided in Windows can sometimes be slow to
accept new settings and may require you to save the profile then close and re-open it.
6. You should now be able to type data or messages into the terminal set up for data communication and see it appear on the telnet screen (which is spying on the RS 232 port).
7. At this point the only thing left to do is configure “WinWedge Pro” to grab the data going
through the EM1000.
Basic use of “WinWedge Pro” to capture the data sent through the data port/ethernet:
1. This technical note will only address the most basic configuration of the “WinWedge Pro” to
interface with the EM1000. “WinWedge Pro” configuration questions not addressed in this
technical note should be forwarded to TAL Technical Inc. (www.taltech.com). It assumed
you have already installed the “WinWedge Pro” software to your PC.
2. Open up the “WinWedge” and in turn “TCP Wedge” from standard Windows’ menus.
3. Once TCP Wedge is open click “Mode” then “Send Keystrokes TO” to begin setting up a
communications profile.
a. In the top block enter the name of the application you want to ship the data to.
b. In the lower block enter the full path (including the executable) of the application to
capture data.
c. Click OK
4. Now click “Port” and “Settings” and select “This PC will act as TCP client”
a. In the Remote Host IP Address block enter the IP Address of the EM1000 you will
capture data from.
b. In the Remote Port block enter the data port of the EM1000 (default is 8888).
c. Click OK
5. Next click “Activate” then “Normal Mode”. You should be prompted to save the profile
name. Give it any unique name you desire. I recommend using standard DOS naming conventions. 6. Go back to you data transmission dumb terminal and enter something to see
it come up in the application you specified in “WinWedge Pro”.