1
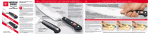
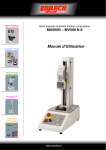
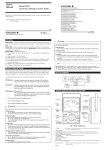
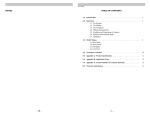
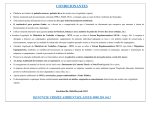
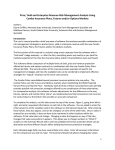
Fruit Removal Force (FRF, Pull Force): Why and How to Measure It
Researchers:
• Effects of PGRs (plant growth regulators) or nutrition on fruit quality
• Effects of chemical loosening agents for mechanical harvest
• Compare application methods for abscission agents and efficacy of fruit/nut/vegetable removal
• Selection of cultivars for breeding by tendency to loosen readily
• Abscission responses, including effects of PGRs, stresses, other factors on preharvest drop
Growers, PCAs, processors:
• Same as above!
• Plan your harvest by Brix, firmness, and FRF
• Track changes in your fruit’s tendency to drop by your own management practices
• The same instrument that tests FRF can also be used to test firmness of many fruits
• Why spend $$$ per acre on chemical applications without understanding the impact on your
fruit? Spending a little on simple technology may save you $$$ in the long run
Kitren Glozer
Associate Project Scientist
Dept. of Plant Sciences
University of California, Davis
July 2008
Contents
•
•
•
•
•
•
•
•
•
•
Look for $ symbol – attention to
additional value for hardware and
software presented in this guide to
use in other ways
Introduction and what you need to get started
Vendors and pricing
Hardware
– Digital gauge
– data entry hardware
– attachments for the gauge
– examples for use
– mechanical gauge option
Software: What it is, how it works, how to install it and configure for your use
Preparing your samples, standardizing fruit maturity/quality
Cautions about use of the gauge
Working with data in Excel
Other uses for the gauge and software
2 measurements simultaneously requires different setup
Trouble-shooting and support
ACKNOWLEDGEMENTS
Preparation of this guide was made possible with the aid of the following…
Technical support by:
Imada.com
Itinscales.com
TalTech.com
How to Measure FRF, a Guide using:
• an Imada Digital Gauge (DS2- model number depends on force range to be
measured)
• data acquisition software
• a Data Acquisition System (data button & RS232 serial cables)
This guide is not designed to suggest an Imada gauge is the only
option. Other digital force gauges can be found online, for example, at
http://www.force-gauge.net/digital_force_gauges.htm
What You Need to Get Started
Essentials:
• An attachment to hold the
fruit or the stem – type
depends on fruit size, stem
length, and ease of use
• Imada DS2 digital gauge
(model DS2-11 measures up to 11 lb, DS2-44 up
to 44 lb, range of weights available)
Mechanical gauges are also available,
cheaper, but don’t automate data entry
Optionals: to automate the job, and make it more accurate; purchase from Imada, Inc. or their licensed
distributers
• PC with serial port (or
USB with additional
serial port adapter)
• DB9 serial cable to run
from button to PC, comes
with button
• SW-1 software configured for
the gauge, running with
WinWedge software
• DB-1 data
entry button
Online Vendors for Equipment & Prices (current as of July, 2008)
•
•
•
•
•
•
Imada
Checkline
Itinscales
Scalesgalore
Valuescale
Prices typically identical among sites
NOTE THAT THE SW1-XV SOFTWARE IS NOW
THE DEFAULT, REGARDLESS OF WHAT ELSE
YOU MAY SEE! It includes WinWedge and runs
on all versions of Windows, including Vista.
Click on the DB-1 Data button link to order the CB203 cable
The Gauge
• Select model based on range of fruit removal force:
(11 lb works for stone fruit; higher force may be
required for pome fruits)
• Can be used for compression (firmness)
measurements also. A test stand with distance meter
makes this more accurate (see vendors for more info)
• Measures in lb, kg, or Newtons
Support for the Imada hardware
User manual for the DS2 Gauge comes with gauge and is also available by download from
www.itinscales.com/imada_ds2_force_gauge.htm
www.checkline.com/products/126098/ds2-manual-1.pdf
Gauge specs in pdf file from http://www.forcegauge.net/catalog/products/specification/ds2-e.pdf
Includes physical dimensions and mounting holes for attaching to a mount, whether Imada
mount or other
Data Acquisition Hardware:
DB-1 DATA BUTTON –collects either force or tension data (if you want to use a motorized test
stand with distance measurement, you will need the DB-2X to collect 2 measurements
simultaneously). The DB-1 data button manual is here
Author’s note: You can also send the data directly to a PC using just the CB203 cable
without the button and the ‘Send’ button on the face of the gauge, but then you have to
manually zero each reading after ‘Send’.
• Standard RS232C cable for
sending data to a serial port
(comes with the button)
Types of ports on a PC (this shows a desktop; some of these
ports may not be found on a particular laptop)
Your laptop doesn’t have a serial (COM) port?
•
If your computer doesn’t have a serial port, you will need a USB to male DB9 Serial
RS232 adapter cable
•
Manufacturers include Belkin, Sabrant and Startech, and prices are typically $15 to
$35 for the cable and driver. Purchase online (CompUSA, B&B Electronics, for
instance) or at retail electronics stores such as Fry’s.
•
If you plug the cable into a USB port, you may have to test whether the USB port is
Com 1, 2, 3, or 4 when you start the gauge and the software (instructions in the
manual and in ‘Troubleshooting’ section at the end of this guide).
Attachments
• Standard attachments
(included)
Y-Hook can work well with a
homemade modification, for fruits
like olives, cherries or grapes
• Special attachments
The Wedge Grip holds thin long stems, however, you may find other attachments or selfmade modifications to work for you.
Older style
grip shown in some photos
Runs on battery power or adapter
Standard attachments: hook, cone, wedgeshape, chisel-end, rounded-head, extension
Old Wedge Grip, modified Y hook and custom made holder for fruit. Y-Hook can work well
with a homemade modification, for fruits like olives, cherries or grapes. For big fruit, you
may have to come up with your own modifications.
Y hook modified with sheet metal to hold small fruit
Gauge with all standard parts
Cable from
button to PC
Data button
RS232 cable
(part CB-203)
Serial-USB
adapter cable
Examples of use, setup, attachments
Mechanical Gauge Option: Cost-saving alternative; data
must be hand-entered into computer
Typical price, currently
Mechanical Gauge Specs
Data Acquisition, the Software: What it is, How it works
• SW-1 (Imada software) is the custom configuration file made to go with the Imada digital
gauge to put force data measurements into a spreadsheet with summary statistics included.
• It works with a ‘wedge’ type of software that ‘wedges’ data in the form of ASCII files, usually,
into spreadsheets, databases and text documents).
• There are other ‘wedge’ software packages available from other dealers, but Imada has
customized this software for its gauge. When you purchase SW-1 you get it packaged with
WinWedge (below).
$
• WinWedge (Standard) RS232 Data Acquisition Software
By TalTech
This package inputs serial data directly into any PC
application. Collect data from any RS232 instrument (that
is, a serial device producing RS232 type data). This package
inputs real-time data directly into EXCEL.
Similar software for collecting data from RS232 devices can be used
if you already have it, but this guide doesn’t cover that option. Others
include ‘Collect’ http://www.labtronics.com/DI/RS232_Software.htm
and ‘Windmill’ by http://www.windmill.co.uk/rs232.html
$
RS232 Data Acquisition software can be used with many
instruments (balances, pH meter, colorimeter, calipers, barcode
scanners, etc)
This software
information is not
up-to-date on
most websites,
including
Imada.com
Your data goes into the customized spreadsheet with summary statistics. The
software comes with complete ‘how-to’ manual.
Example of the
spreadsheet
INSTRUCTIONS FOR INSTALLING WINWEDGE AND IMADA SW-1 SOFTWARE
Step 1: Install WinWedge on your PC
•
Place WinWedge Installation disk into your CD drive, run SETUP.EXE and follow the instructions
presented on screen to completely install WinWedge.
Step 2: Copy SWIX.XLS and configuration files to your WinWedge directory (usually it will be
C:\WINWEDGE)
•
Place the IMADA spreadsheet disk into CD drive. Using Windows Explorer, move all files from the
IMADA spreadsheet disk to the directory where you installed WinWedge.
IMPORTANT: SW1X.XLS will not work correctly if the configuration files (Imada1a.sw3, Imada2a.sw3,
Imada3a.sw3, Imada4a.sw3) are not copied to the same directory where you installed WinWedge.
These are needed for the gauge to communicate with the correct COM port.
INSTRUCTIONS FOR INSTALLING WINWEDGE AND IMADA SW-1 SOFTWARE
You can copy the ‘start up file’ to your desktop as an icon for quick-starting the program.
Step 3: Connect you Force Gauge to your PC
•
Connect your force gauge to an available COM port on the back of your PC and note which port
the instrument is connected to (ie.COM1, COM2, etc.). If you have connected the gauge to a
serial port, this will usually be COM1. If you are using a USB port, it may be COM 1, 2, 3, or 4. If
you are using the DB-1 Data Button, you will have the gauge, RS232 cable (part CB-203), DB-1
Data Button and the serial cable from button to computer for this connection. Otherwise, connect
the RS232 cable (part CB-203) cable to the gauge and then to the computer.
Step 4:
Launch Excel, and open the sw1x.xls spreadsheet located in the WinWedge directory.
–
You may get a security warning, saying ‘Macros may contain viruses….’ In that case, you
should select the button that says ‘Enable Macros’.
–
This may occur if the security level in Excel is set to high. Select the Tools menu in Excel
and then select Macro/Security. In the dialog window, set the security level to Medium.
INSTRUCTIONS FOR INSTALLING WINWEDGE AND IMADA SW-1 SOFTWARE
•
Select the COM port that your measuring instrument is connected to and the directory where
WinWedge is installed in your PC. Click on the ‘OK’ button only once.
If you get this message, see the Troubleshooting section
at the end of this guide.
DB-1 DATA BUTTON OPERATING MANUAL
Because the Data Button must be configured with the software to ‘send’ the data to the
PC, it will be explained next.
DB-1 is a simple, compact, one channel interface that enables the user to send measurement
data to a PC running SW-1 IMADA data acquisition software. The LED lamp will light up for
both single data and automatic acquisition modes when data is being sent to the computer. If
needed, a foot switch or other type of remote switch with a 3.5mm plug can be connected to the
external toggle input. No external power supply is needed as power is supplied through the PC.
Connect DB-1 data button to IMADA gauge with CB-203 (for DPS) cable and also to the PC
with a provided serial cable.
Single data mode (w/ automatic zero)
Open the IMADA SW-1 spreadsheet, click the DB-1 setup button and select the single data
sampling or the single data sampling + zero reset. Simplifies peak measuring tests when
automatic zero reset is selected, as it “zeros” the gauge after sending the data to the computer,
thus eliminating the need to reset manually for each test. Each time you press the DB-1 button it
will collect a single data sample from the gauge.
Automatic acquisition mode
Go to the IMADA SW-1 spreadsheet, click the DB-1 setup button and select the interval timer.
Enter an acquisition rate in the range of 0.1 to 999.9 seconds or select “fast acquisitions” for a
fixed 20-data/second-acquisition rate. Press the DB-1 button to start the acquisition timer and
press it again to stop the acquisition timer.
Setup your data collection: Data button setup, typical
choices for FRF
Select the test type and unit of measure (Measuring Options)
•
After the spreadsheet opens units of measure (kg, N, lb), type of force measured (compression or
tension) and other test parameters can be selected in the spreadsheet or on the gauge, using the
buttons.
When you have taken a number of pull force
readings from your gauge, your spreadsheet
will look like this, showing how many fruit you
have sampled with summary statistics.
Because ‘pull force’ is actually ‘tension’, or a
negative force, unlike pressure, all the
readings will be negative. Since ‘kg’ has been
selected as the unit of measure, these
readings are in kg/cm2.
Save your data file using the File menu,
naming it after the samples and in a directory
you can find easily later.
To start a new data file, press ‘Clear All Data’
and you are ready to start on a new sample.
Preparing for Testing: Organizing your samples
--Select the fruit that may give you the information you need (such as the
ripest fruit), realizing that fruit of uniform maturity and size will minimize
meaningless data
--Organize your fruit by treatment, variety, or other factor that may affect
the results
--Sample trays (called ‘liners’) to hold small fruits cherries to be tested,
can be purchased from:
The California Dried Fruit Association (209-544-1414)
--The fruit shown are organized by maturity (color—see the color cards)
and are also ready for sizing (by ‘rowsize’ using a standard reference)
Fruit must be collected using marketable colors,
depending on the variety and the commercial standards
Shown here are an example of color
standards (CTIFL color cards from
France), California Cherry Advisory
Board color standard card and
standard row sizer that shows
minimum red color for ‘Bing’.
Fruit must be separated by marketable
colors for comparisons: minimum red
must be compared only to minimum
red and dark red to dark red. Maturity
affects fruit removal force!
Samples must be separated by
‘treatment’ or other identifiers of
interest.
Fruit sizing for
quality can be
done manually or
automated with
other equipment
Caution about how to handle the fruit with the gauge
•
Set the gauge to ‘Peak’ measurement and
the reading will stop at the maximum tension.
Otherwise, it resets as soon as the stem is
released, and you lose the data.
•
Do not yank the fruit or the stem. A quick
jerk will produce poor, inconsistent data. Pull
steadily.
•
If you wish to use the ‘hook’ standard
attachment to put over the fruit while it is still
attached to the tree, instead of one of the
special attachments, you can, but you
probably are also measuring some shear
force that changes the FRF to shear + pull.
This may be ok for comparisons, but not for
the clearest data.
•
Take enough readings from any given group
of fruit to be certain of the results. More is
better than too few, to trust the data.
Working with Your FRF Data
Simple use: You may use this data and the statistics as shown by the Imada program ‘as is’. If you
view the previous example, you will see that for the 50 fruit sampled, simple summary statistics were
performed, including minimum and maximum values, mean (average), etc.
You can chart your results in Excel.
18 0 0
g re e n
16 0 0
s tr aw
14 0 0
c o lo r br e ak / pi n k
P ul l f or ce ( g
12 0 0
l ig h t r ed
d a rk r ed
10 0 0
800
600
400
200
0
Typical applications of a simple sort include:
•
•
•
•
•
•
A p ri l 16
A p ri l 2 3
A p ri l 3 0
M ay 6
M ay 14
d a t e of m e a su re (h a rv e st M a y 2 5 )
Variety A tends to have higher FRF than Variety B at same maturity
Fruit this year have higher FRF than last year
Why are my fruit dropping/losing stems? Low FRF
Do applications of ethephon loosen my fruit?
What is the change over time due to fruit maturity?
Does Product A that I am paying a lot of money for, appear to give me better/worse/same FRF?
M ay 21
Working with Your FRF Data
Comparing more than one treatment, maturity, variety, etc:
If you wish to compare values from different groups, you must use statistical programs (like
those found in Excel). For that, you will need to use the data as Excel files, or some other
form that can be used by a statisctical program. Here is one way to do that, starting with
the file created in Excel by the program. We are assuming you have at least some
knowledge of working with a spreadsheet program like Excel.
Because ‘pull force’ is actually ‘tension’, or a negative force, unlike pressure, all the
readings will be negative. Since ‘kg’ has been selected as the unit of measure, these
readings are in kg/cm2. Usually FRF (pull force, or FRM = fruit removal force) is expressed
in g/cm2 and without a negative value, as a matter of convention.
Open your data file. You can use Excel to convert the negative kg values by placing the
formula
=A1*-1
in cell B1 and then ‘Enter’
Now highlight B1 and all the cells below down to where your data stops, and use ‘Ctrl’ + “D”
keys pressed together to copy the formula down, converting your data for convenience. If
you paste this data, you must always use ‘Paste Special’, followed by ‘Values’ to get these
values to use for statistical analysis.
Statistical analysis of data is beyond the scope of this ‘how to guide’.
$
Other uses for this ‘expensive’ tool?
Measure firmness more accurately than a hand-held penetrometer
Best if you want to test the force to break the skin. If you want to test flesh
firmness, this is not as simple.
Greatest accuracy for flesh firmness will require a way to press the fruit for the
same distance each time—Imada has expensive mounts that control ‘travel’
(movement over distance) of the gauge. You can also make a mark on the
shaft of one of the standard attachments that can be used to press into the
flesh just to that distance. There are other ways to do this also, be
inventive!
Information is power—
be the gatekeeper of your own fruit quality!
Small piece of tape used to
mark a set distance
Additional information for those who want to use the Imada gauge for
Compression and Tension measurements – 2 types of data buttons
2-Channel data, showing compression over distance (=displacement); since 2 kinds of
data are taken for each time interval, this requires a 2-channel data button and a test
stand with a distance meter); not covered in this guide
Troubleshooting and Support
COM port won’t configure so I can’t use the Imada software SW-1
• Some of the CDs may ship with one or more configuration files that you need for the COM port
communication missing. Contact Imada at 800-373-9989 for help if you cannot configure your COM port.
• Alternatively, you can create the missing file. Look in your C:\WinWedge folder and see if you have all 4
of the ImadaXa.sw3 files. If one is missing (some CDs shipped without Imada1a.sw3) do the following:
a. Close Excel. Start the WinWedge program
Wedge.exe
b.
Go to ‘File’ dropdown menu and choose
‘Open’ and
‘Imada2a.sw3’
c.
Go to the ‘Port’ dropdown menu and
choose ‘Settings’
Change any options to look like this picture
e.
Choose ‘Ok” then go to ‘File’ dropdown
menu and choose ‘Save as’ and name the
file ‘Imada1a.sw3’
g.
You have now created the missing
configuration file.
h.
Reopen Excel, sw1.xls and choose your
COM port.
See next page
Troubleshooting and Support
You may wish to test your COM port configuration to be sure it is working right.
• From the WinWedge program,
• Go to the ‘Port’ dropdown menu and choose ‘Analyze’
• Send some data to your computer by pushing or pulling on the gauge
• If the reading on the gauge’s window looks like the reading in the ‘Input Data’ window
on the computer screen (even with some extra symbols), the COM port is correctly
chosen and configured and you are ready to collect data
TalTech:
TalTech:
More help for understanding your computer’s ports
…and serial communications (next page)