1
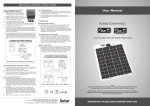
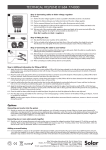
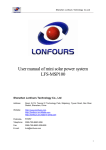
User Manual
FLEXIBLE SOLAR PANELS
10wp/20wp/30wp/40wp/60wp/80wp
Models:
SFP010/SFPRT010/SFP020/SFP020MA/SFPRT020/SFP030/SFP030MA/
SFPRT030/SFP040/SFP040S/SFP040MA/SFP040SMA/SFPRT040/SFPRT040S/
SFP060/SFPP060/SFP060MA/SFPP060MA/SFPRT060/SFPPRT060/SFP080/
SFPP080/SFP080MA/SFPP080MA/SFPRT080/SFPPRT080
IMPORTANT: PLEASE READ BEFORE FIRST USE
FLEXI HELPLINE
PV KIT CONTENTS
TECHNICAL
01684 774000
(Letters after item descriptions refer to the picture opposite)
SFP010 - 10wp Solar Kit
SFP040 - 40wp Solar Kit
1 x 10wp Flexi PV Panel (a)
1 x 4m Single Extension cable with crocodile clips (c)
6 x Terminals (e)
2 x 20wp Flexi PV Panel (b)
1 x 4m Multi-gang Extension Cable (c)
1 x Fuse (d)
6 x Terminals (e)
SFPRT010 - 10wp Complete
Solar Roof / Deck Top Kit
1 x 10wp Flexi PV Panel (a)
1 x 4m Single Extension cable with crocodile clips (c)
1 x Fuse (d)
6 x Terminals (e)
1 x SIKA Flex 291 – 300ml (g)
1 x Waterproof cable feed gland (h)
4 x Stainless steel fixing screws (i)
6 x Nylon self adhesive base and cable ties (j)
1 x Solar Test Meter (k)
SFP020 - 20wp Solar Kit
1 x 20wp Flexi PV Panel (b)
1 x 4m Single Extension cable (c)
1 x Fuse (d)
6 x Terminals (e)
SFP020MA - 20wp Solar Kit
including Charge Controller
1 x 20wp Flexi PV Panel (b)
1 x 4m Single Extension cable (c)
1 x Fuse (d)
6 x Terminals (e)
1 x 8Ah Charge controller (f)
SFPRT020 - 20wp Complete
Solar Roof / Deck Top Kit
1 x 20wp Flexi PV Panel (b)
1 x 4m Single Extension cable (c)
1 x Fuse (d)
6 x Terminals (e)
1 x 8Ah Charge controller (f)
1 x SIKA Flex 291 – 300ml (g)
1 x Waterproof cable feed gland (h)
4 x Stainless steel fixing screws (i)
6 x Nylon self adhesive base and cable ties (j)
1 x Solar Test Meter (k)
SFP030 - 30wp Solar Kit
1 x 10wp Flexi PV Panel (a)
1 x 20wp Flexi PV Panel (b)
1 x 4m Multi-gang Extension Cable (c)
1 x Fuse (d)
6 x Terminals (e)
SFP030MA - Solar Kit including
Charge Controller
1 x 10wp Flexi PV Panel (a)
1 x 20wp Flexi PV Panel (b)
1 x 4m Multi-gang Extension Cable (c)
1 x Fuse (d)
6 x Terminals (e)
1 x 8Ah Charge controller (f)
SFPRT030 - 30wp Complete
Solar Roof / Deck Top Kit
1 x 10wp Flexi PV Panel (a)
1 x 20wp Flexi PV Panel (b)
1 x 4m Multi-gang Extension Cable (c)
1 x Fuse (d)
6 x Terminals (e)
1 x 8Ah Charge controller (f)
1 x SIKA Flex 291 – 300ml (g)
1 x Waterproof cable feed gland (h)
8 x Stainless steel fixing screws (i)
6 x Nylon self adhesive base and cable ties (j)
1 x Solar Test Meter (k)
SFP040S - 40wp Solar Kit
1 x 40wp Single Flexi PV Panel (not shown)
1 x 4m Multi-gang Extension Cable (c)
1 x Fuse (d)
6 x Terminals (e)
SFPP060MA - Premium 60wp Solar
Kit including Charge Controller
1 x 60wp Flexi Premium Panel; 5m pre-wired cable (a)
1 x Fuse (d)
6 x Terminals (e)
1 x 8Ah Charge Controller (f)
SFPRT060 - 60wp Complete
Solar Roof / Deck Top Kit
2 x 20wp Flexi PV Panel (b)
1 x 4m Multi-gang Extension Cable (c)
1 x Fuse (d)
6 x Terminals (e)
1 x 8Ah Charge controller (f)
3 x 20wp Flexi PV Panel (b)
1 x 4m Multi-gang Extension Cable (c)
1 x Fuse (d)
6 x Terminals (e)
1 x 8Ah Charge controller (f)
1 x SIKA Flex 291 – 300ml (g)
1 x Waterproof cable feed gland (h)
12 x Stainless steel fixing screws (i)
6 x Nylon self adhesive base and cable ties (j)
1 x Solar Test Meter (k)
SFP040SMA - 40wp Solar Kit
including Charge Controller
SFPPRT060 - Premium 60wp
Complete Solar Roof / Deck Top Kit
SFP040MA - 40wp Solar Kit
including Charge Controller
1 x 40wp Single Flexi PV Panel (not shown)
1 x 4m Multi-gang Extension Cable (c)
1 x Fuse (d)
6 x Terminals (e)
1 x 8Ah Charge controller (f)
SFPRT040 - 40wp Complete
Solar Roof / Deck Top Kit
2 x 20wp Flexi PV Panel (b)
1 x 4m Multi-gang Extension Cable (c)
1 x Fuse (d)
6 x Terminals (e)
1 x 8Ah Charge controller (f)
1 x SIKA Flex 291 – 300ml (g)
1 x Waterproof cable feed gland (h)
8 x Stainless steel fixing screws (i)
6 x Nylon self adhesive base and cable ties (j)
1 x Solar Test Meter (k)
SFPRT040S - 40wp Complete
Solar Roof / Deck Top Kit
1 x 40wp Single Flexi PV Panel (not shown)
1 x 4m Multi-gang Extension Cable (c)
1 x Fuse (d)
6 x Terminals (e)
1 x 8Ah Charge controller (f)
1 x SIKA Flex 291 – 300ml (g)
1 x Waterproof cable feed gland (h)
8 x Stainless steel fixing screws (i)
6 x Nylon self adhesive base and cable ties (j)
1 x Solar Test Meter (k)
SFP060 - 60wp Solar Kit
3 x 20wp Flexi PV Panel (b)
1 x 4m Multi-gang Extension Cable (c)
1 x Fuse (d)
6 x Terminals (e)
SFPP060 - Premium 60wp Solar Kit
1 x 60wp Flexi Premium Panel; 5m pre-wired cable (a)
1 x Fuse (d)
6 x Terminals (e)
SFP060MA - 60wp Solar Kit
including Charge Controller
3 x 20wp Flexi PV Panel (b)
1 x 4m Multi-gang Extension Cable (c)
1 x Fuse (d)
6 x Terminals (e)
1 x 8Ah Charge controller (f)
1 x 60wp Flexi Premium Panel; 5m pre-wired cable (a)
1 x Fuse (d)
6 x Terminals (e)
1 x 8Ah Charge Controller (f)
1 x Sika 291 – 300ml (g)
1 x Waterproof cable feed gland (h)
1 x Solar Test Meter (k)
SFP080 - 80wp Solar Kit
4 x 20wp Flexi PV Panel (b)
1 x 4m Multi-gang Extension Cable (c)
1 x Fuse (d)
6 x Terminals (e)
SFPP080 - Premium 80wp Solar Kit
1 x 80wp Flexi Premium Panel; 5m pre-wired cable (a)
1 x Fuse (d)
6 x Terminals (e)
SFP080MA - 80wp Solar Kit
including Charge Controller
4 x 20wp Flexi PV Panel (b)
1 x 4m Multi-gang Extension Cable (c)
1 x Fuse (d)
6 x Terminals (e)
1 x 8Ah Charge controller (f)
SFPP080MA - Premium 80wp Solar Kit
1 x 80wp Flexi Premium Panel; 5m pre-wired cable (a)
1 x Fuse (d)
6 x Terminals (e)
1 x 8Ah Charge Controller (f)
SFPRT080 - 80wp Complete
Solar Roof / Deck Top Kit
4 x 20wp Flexi PV Panel (b)
1 x 4m Multi-gang Extension Cable (c)
1 x Fuse (d)
6 x Terminals (e)
1 x 8Ah Charge controller (f)
1 x SIKA Flex 291 – 300ml (g)
1 x Waterproof cable feed gland (h)
4 x Stainless steel fixing screws (i)
1 x Solar Test Meter (k)
SFPPRT080 - Premium 80wp
Complete Solar Roof / Deck Top Kit
1 x 80wp Flexi Premium Panel; 5m pre-wired cable (a)
1 x Fuse (d)
6 x Terminals (e)
1 x 8Ah Charge Controller (f)
1 x Sika 291 – 300ml (g)
1 x Waterproof cable feed gland (h)
1 x Solar Test Meter (k)
TECHNICAL HELPLINE 01684 774000
k
g
f
d
a
c
h
b
i
e
j
Kit shown: SFPRT030
PLEASE READ ALL INSTRUCTIONS CAREFULLY BEFORE WORK BEGINS
Please refer to circuit diagram, please at all times observe correct polarity; POSITIVE = RED cable; NEGATIVE = BLACK cable
Note – we recommend a Solar Technology 4Ah or 8Ah Charge Controller is added to any system (if not included in this kit), if the Flexi PV panel
is to be connected to a battery with a capacity smaller than 70Ah if using the SFP010 panel, or a capacity smaller than 140Ah if using the SFP020
and larger panels. A blocking diode is fitted in the junction box of all panels to prevent reverse battery drain.
Step 1: Positioning the Flexi PV Panel/s
1.1 Select a location that is generally free from shade, has a solid
surface and is within 4m of the Charge Controller and/or battery.
If the Roof Top Kit has been selected please also refer to Step 3.1.
1.2 If the panel is to be free standing, go to Step 2.
1.3 Ensure all panels can be sited close to one another (if a multi
panel system has been selected), and that the connecting cable
can be correctly positioned.
Special Note - If either Flexi Premium has been selected,
both come with pre-wired cable and will generally be used
as a single panel.
1.4 If fixing the panel using screws through the panel’s mounting
grommets, ensure the fixings penetrate deep enough to ensure
the Flexi PV is help securely.
1.5 If fixing using SIKA Flex bonding agent or similar, mark the area
with a pencil line where the panel(s) are to be fixed (SIKA Flex
is very strong and instantly bonds, so there is only one chance
to get the location correct). Clean the area well and ensure any
grease or other film is removed. Now apply a thin line (approx
6mm wide) of SIKA bonding agent or other to the outside edge
of the underside (not the solar cell side) of each panel. Carefully
place the side with the bonding agent within the positioning
pencil lines drawn earlier. Firmly press down on the panel so that
the bonding agent squeezes near or on the edge of the panel.
(it does not matter if the agent squeezes further but it is not as
neat). Repeat this process until all panels are fixed. SIKA Flex 291
generally takes 24 hours to cure. Please check the manufacturers
recommended curing time if using another agent.
1.6 In some cases it may be desirable to both bond and screw the
Flexi PV in position. If this method is selected, ensure the holes are
pre drilled before bonding the panel(s) and ensure a liberal blob
of bonding agent is applied to each hole, ensuring that once the
screws are fixed the hole will be sealed (Note – once the bonding
agent is applied to the holes, time is limited before it “sets off”).
2.2 If the Roof Top Kit has been selected, this cable can now be
secured using the nylon base and cable ties supplied. Once
the cable run has been determined, remove the cover from the
sticky pad on the underside of the nylon base and fix it to a clean
dry surface underneath the cable run – spacing one base every
30cm. Now secure the cable to the base using the cable ties
provided.
Step 3: Fix the Cable Feed Gland
(only if the Roof Top Kit has been selected)
3.1 The Cable Feed Gland is
a completely waterproof unit
designed to cover a hole that
has been drilled to channel
the Flexi PV cable from the
outside to inside. The location
of the Flexi PV panels (as
discussed in 1.1) will have
been determined, to a certain
extent, by the desired location
of the cable feed hole. The
cable entry point should allow
the cable to be easily routed
to the Charge Controller (if
used) and the battery.
3.2 Now slacken the feed
grommet on the Cable Feed
Gland to allow the cable to be
easily threaded through it and
now allow the cable to pass
through the drilled hole.
(Note – if the 10wp kit has
been selected, you will need
to cut the crocodile clips from
the extension cable first.)
Step 2: Connect and Secure the Extension Cable
SPECIAL NOTE - FLEXI PREMIUM
2.1 The Flexi PV is supplied with a single extension cable (if a single
panel has been selected), or a multi gang extension cable
(spider) if a multi panel system has been selected.
Join the trailing cable from the solar panel(s) to the extension
cable using the plug/socket fitted to the cable.
Both Flexi Premium 60wp & 80wp panels have cables
pre attached, therefore there is no necessity for the
‘spider cables’ used on the standard Flexi PV panel.
TECHNICAL HELPLINE 01684 774000
3.3 Mark the area around where the gland is to be fixed and squeeze
a 6mm line of SIKA Flex on the underside of the gland ensuring
there are no gaps. Now fix the gland onto the dry, clean surface.
SIKA Flex will take 24 hours to cure. Ensure this process is
completed at roughly the same time as step 1.5.
3.4 Now push the cable from the solar panel(s) through the gland
grommet so that it is reasonably taught. The threaded grommet
can now be tightened ensuring a perfect seal is made around the
cable itself.
6.3 When connecting to a battery always observe correct polarity.
Step 7: Testing the System
CONNECTING THE CHARGE CONTROLLER
TO A BATTERY AND A SINGLE SOLAR PANEL
7.1 If the selected Flexi PV kit has been supplied with a Charge
Controller, this product comes with its own instructions and
LED indicators will confirm the system is working correctly.
CHARGE
CONTROLLER
Solar Panel
connections
6.2 Alternatively, for a more permanent connection to the battery,
strip the red and black insulation (6cm) from the inner cable
ends, twist the bare wire, wrap around the battery terminals
and fix into position using your battery clamps. Some clamps
have connection screws fitted, in which case, if the supplied
ring terminals have been crimped onto the wire ends, simply
attach using the battery clamp screws.
7.2 If a Roof/Decktop Kit has been selected that includes a
Solar Test Meter, the performance of the panel and the
Charge Controller can be accurately checked.
Battery
connections
OPTIONS
Auxilliary connections
Expanding the Flexi PV System
8.1 Any Flexi PV panel can be expanded by up to three panels (if
a single Flexi PV panel was selected in the first instance). To do
this purchase the required kit plus an additional multi gang
cable (spider) – see your local retailer or www.solartechnology.
co.uk for more information. In all cases the 8Ah Charge
Controller (if originally supplied) will accept up to 4 panels
(80W combined).
MALE AND FEMALE
CONNECTORS
NOTE: RED = POSITIVE (+) BLACK = NEGATIVE (–)
Step 4: Connecting the Flexi PV Cable to Charge
Controller (if supplied)
CONNECTING THE CHARGE CONTROLLER
TO A BATTERY AND MULTIPLE SOLAR PANELS
4.1 A Charge Controller will be necessary
for SFP020 and above and if using the
SFP010 on a battery smaller in capacity
that 70Ah.
CHARGE
CONTROLLER
4.2 Position the Charge Controller as close
as possible to the battery (must be a dry
location).
4.3 Measure the distance between your
battery terminals and the Charge
Controller.
4.4 Cut the extension cable so that there
is sufficient cable to reach the Charge
Controller and then to reach the battery.
Solar Panel
connections
G
H
Auxilliary
connections
I
4.5 Strip back 20mm of the black outer sheath of the cable end to be
connected to the Charge Controller.
Battery
connections
MALE AND FEMALE
CONNECTORS
4.6 Strip back 20mm of the black and red inner sheaths to reveal the
bare cable. Twist both ends and connect to the terminals G of the
Charge Controller, ensuring the positive and negative polarity is
observed (either wrap the cable around each terminal G or crimp
2 ring terminals to the cable end).
4.7 Using the cut section of cable as described in 4.4, attach one end
to the terminals H in the same way as described in 4.6.
NOTE: RED = POSITIVE (+) BLACK = NEGATIVE (–)
Step 5: Fitting the Fuse (not necessary for SFP010)
5.1 Strip back the black outer insulation of the cable 20cm.
5.2 Cut the red cable at the halfway point and strip 5mm of the red
insulation from both the cut ends. Twist the bare wire ends tightly.
Fit into the screw terminals on each of the fuse holder pieces.
Step 6: Connecting to the Battery
6.1 If the SFP010 has been selected, the crocodile clips can be
fixed directly to the terminals of a 12v battery (greater in capacity
than 70Ah) ensuring that the correct polarity is observed. If
a smaller battery is to be used, either cut the crocodile clips,
purchase a Charge Controller and follow Step 4, or self regulate
the Flexi PV. This entails checking the battery at regular intervals
with a digital voltmeter and when the battery is showing a volt
reading of 14v or above, disconnecting the Flexi PV until the
battery level has reduced.
NOTE: RED = POSITIVE (+) BLACK = NEGATIVE (–)
Connecting an inverter into the system
9.1 Should you require your solar system to power 240V
appliances, you will need to connect an inverter. Select an
inverter power (measured in watts) that is most appropriate
for the power of your appliances (also measured in watts).
The inverter will be ideally positioned reasonably close to the
battery. Most inverters come with pre-fixed cable so fix the
loose end directly onto the battery terminals (positive to positive
/ negative to negative) – contact 01684 774000 for more
information.
Adding a second battery
10.1 If a second battery is used, it can be connected to the Charge
Controller, using terminals I, by means of an additional piece
of 2-core, 1mm cable (not supplied). As in step 4.6 above,
attach the other cable to the second battery, not forgetting to
add a fuse on the positive line as descibed in step 5 above.
Power from the Charge Controller will be diverted to the
second battery only when the primary battery is fully charged.
Solar Technology International Ltd. Units 4-6, Station Drive,
Bredon, Nr. Tewkesbury, Gloucestershire GL20 7HH, United Kingdom
Telephone: 01684 774000 Fax: 01684 773974
E-mail: [email protected] Online: www.solartechnology.co.uk
Solar
TECHNOLOGY INTERNATIONAL