1
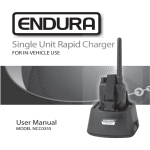
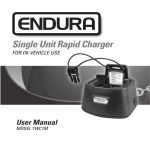
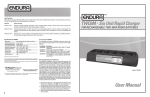
2
1
Introduction
Important
Thank you for purchasing this single unit vehicular charger from 49er Communications. It’s a high quality product designed for rapid charging two-way
radio batteries in a vehicle. With the appropriate charging pod installed, it
can charge these battery chemistries: lithium ion (Li-Ion), lithium polymer
(LiPo), nickel-metal hydride (NiMH), or nickel cadmium (NiCd).
1.Read all Caution statements below and this User Manual before attempting to
charge a battery.
2.Always charge new batteries completely before initial use. Recycle batteries
when they can no longer be used. Do not discard unwanted batteries in the
trash or incinerate. Batteries exposed to fire or excessive heat may explode.
3.For best battery performance, charge NiCd and NiMH batteries when they are
fully discharged.
For a complete list of charging pods available for this charger, contact our
customer service department at 800-552-0707 x101.
Charger Features
1.Mounting bracket.
2.Adjustable tie-down strap.
3.Charge status LED.
4.Charge status LED reference
chart.
5.Removable charging pod.
6.Vehicle power adapter –
supplies power from a 12V –
24V outlet in your
vehicle.
2
3
4
5
6
Caution
1.Never charge alkaline or dry cell batteries with this charger. Do not charge Li-Ion, LiPo, NiMH, or NiCd batteries unless they are designed with over
charge protection.
2.Use charger inside a vehicle only. Do not expose the charger to rain, any liquids, or excessive moisture.
3.Do not attempt to charge a battery without first installing the appropriate
charging pod. Only use charging pods designed for this charger and supplied
by 49er Communications. Disconnect charger from power before installing, adjusting, or removing the charging pod.
4.Make sure contacts in charging pod and battery are clean. Do not allow wire
or metal objects to touch contacts in charging pod or any internal part of the
charger.
5.Do not remove the charger’s housing or make any modification to the charger.
6.Use only the vehicle power adapter supplied with this charger. If a replacement
is required, contact 49er Communications. Use of other vehicle power adapters may damage the charger or batteries you may be attempting to charge.
1
3
4
Installing The Charger
Replacing A Charging Pod
1.Install the charger in an area of the vehicle that is in close proximity to a
12V or 24V outlet. The location selected should allow the vehicle power
adapter to be connected without excessive stretching of the cable.
The charging pod is made from quality materials and designed to provide
years of service when properly used. In most cases, the charging pod will
only be replaced when you want to use the charger with a different battery.
2.Select a flat vertical surface in the vehicle for attaching the mounting
bracket. Use the 4 sheet metal screws provided to fasten the smaller section of the bracket to the vehicle. Install the mounting bracket securely
and in a manner that allows the larger section of the bracket to be level.
(Width of smaller section is about 2.6” and width of larger section is 4.2”).
3.After the mounting bracket is installed, fasten the charger to the bracket
using the 4 brass thumb screws provided. If required, install the charging
pod before attaching the charger to the mounting bracket. See section
Replacing A Charging Pod for details.
4.An elastic type tie-down strap is included with the charger. The strap is
adjustable to hold radios of different heights securely in the charger.
5.To adjust the tie-down strap, place the radio in the charger, bring the strap
over the top of the radio, and insert the plastic clip into the metal clip holder on the front of the charger. A clicking sound confirms the clip is properly connected. At the back of the charger, compress the black retaining
clip and pull the end of the tie-down strap through the retaining clip until it
is snug over the radio. Note: It may be easier to adjust the tie-down strap
before the charger is installed on the mounting bracket.
6.To remove a radio secured with the tie-down strap, press the sides of
the plastic clip with your thumb and forefinger and lift the tie-down strap.
Follow these steps to change the charging pod:
1.Obtain a charging pod made specifically for the charger. Confirm that the
charging pod is compatible with the battery you want to charge.
2.Unplug the vehicle power adaptor (DC power supply) from the charger
and remove the radio from the charging pod.
3.Turn the locking screw on the bottom of the charging pod counter-clockwise until it no longer holds the pod. Lift the charging pod from the
charging base.
4.Insert the replacement charging pod into the charging base and secure
with the locking screw. Do not over tighten the screw.
5.Inspect the charging contacts to ensure they are clean and unobstructed.
6.Connect the vehicle power adapter to the charger. You are now ready to
charge a battery compatible with the charging pod.
6
5
Charging A Battery
Fault Conditions
Before charging a battery confirm that the pod installed in the charger and the
battery you want to charge are compatible.
When the charge status LED flashes RED, a fault condition exists. There are
three different flash patterns, each indicating a specific type of fault. The
flash patterns and fault conditions are as follows:
1.Connect the large plug end of the vehicle power adapter to the 12V or 24V DC
outlet in your vehicle and the small end to the connection point on the right
side of the charger.
2.Place battery to be charged in the charging pod. The battery may also be
charged while attached to the radio.
3.When a battery is placed in the charging pod, the charge status LED will illuminate ORANGE for a short period while the charger performs a battery diagnostic. If the LED does not illuminate, check to make sure the power outlet
is receiving power. The charge status LED will change from ORANGE to RED
once the battery diagnostic is complete.
4.While a battery is charging, the charge status LED will illuminate RED with no
flashing. If the charge status LED is RED and flashes, a fault has been detected. The flash pattern represents a specific fault condition. See section Fault
Conditions for details.
5.When the battery is charged to 80% of capacity, the charge status LED will
change to GREEN and flash. It is recommended that the battery be charged to
at least 80% capacity before use. The charge status LED will illuminate GREEN
with no flashing when the battery is fully charged.
6.After removing a fully charged battery, the charge status LED may remain illuminated for a few seconds. Allow the charge status LED to go off before
placing another battery in the charging pod.
7.The charger is designed to operate at room temperatures between 15°C and
30°C, (59°F – 86°F). Do not charge batteries below 0°C (32°F) or above 45°C
(113°F).
Flash Pattern Fault Type
Flashes 1
Time
Indicates charging complete, but battery is under charged.
Battery voltage is below minimum level required. This warning is provided after the rapid charging stage is complete.
Flashes 2
Times
Indicates battery contact is “open” and current is not
passing through the (+) and (-) contacts on the battery.
This warning is provided after the initial diagnostic stage
is complete. Check charging pod to confirm compatibility
with battery.
Flashes 3
Times
Indicates over-current condition caused by battery short
circuit. Have the battery checked by a qualified technician.
Do not attempt charging the battery if a short circuit exists.
Specifications For Vehicular Charger
Dimensions
Weight (Charger Only)
Compatible Chemistries
Operating Temperature
Storage Temperature
Power Input
Charge Rate
116 x 98 x 106 mm / 4.6 x 3.9 x 4.3 inches
320 g / .7 lbs.
NiCd / NiMH / Li-Ion / LiPo
15° C – 30° C
0° C – 65° C
12V – 24V DC (1A minimum)
700 mA (10.6V – 13.5V)
Specifications subject to change without notice.
7
Available Accessories
CHBA1433
Metal bracket for mounting charger on a floor or other horizontal
surface.
PABA1423
Standard vehicle power adapter. Supplies power to charger from
12V or 24V outlet.
PABA1422
Heavy duty vehicle power adapter. Supplies power to vehicular
charger or six-unit charger from 12V or 24V outlet.
CHBA1414
Hardwire kit for vehicular or six-unit charger. Supplies power to
charger from a vehicle battery or other power connection point.
Warranty And Service During Warranty
This single unit vehicular charger is made from high quality materials and designed to provide years of
reliable service. The following warranty applies:
49er Communications, Inc. warrants this product to be free from defects in workmanship and materials
for one-year from date of purchase by the end user. This warranty applies to the original purchaser and
is void if the product has been altered, misused, damaged, neglected, or if repair is required because of
normal wear and tear. This is the only warranty made by 49er Communications, Inc. In no event will 49er
Communications, Inc., its affiliates, subsidiaries, related entities, or their respective directors, officers,
or employees, be liable for any damages beyond repair or replacement as described above, including
without limitation, indirect, incidental, or consequential damages. For service under warranty, return the
product along with dated proof of purchase to the reseller where purchased or to 49er Communications.
If returning directly to 49er Communications follow these instructions:
1. Call 800-552-0707 x101 to obtain a return authorization number. Returns will not be accepted without
this number.
2. Send to 49er Communications - Warranty Service Department, 361 Railroad Avenue, Nevada City, CA
95959. For your protection, we recommend you obtain proof of delivery for your shipment.
3. Include with your charger, dated proof of purchase, your name and daytime telephone number, and
return address (street address only; return shipments cannot be made to a P.O. Box).
4. All items sent become the property of 49er Communications and will not be returned.
49er Communications, Inc.
361 Railroad Avenue
Nevada City, CA 95959
www.49erCommunications.com
800-552-0707 Toll Free
530-477-2590 Telephone
530-478-9188 Fax
©2015 49er Communications, Inc. 49er Communications is a registered trademark of 49er Communications, Inc.
All rights reserved.
RAPID RATE TRI-CHEMISTRY
VEHICULAR CHARGER
Model: PABA1418
FOR RECHARGEABLE TWO-WAY
RADIO BATTERIES
USER MANUAL