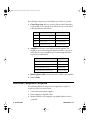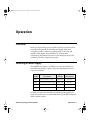
1
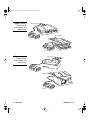
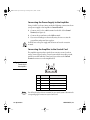
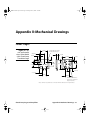
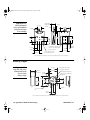
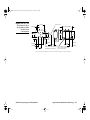
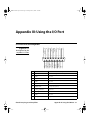
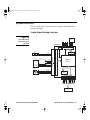
810x Closed Loop rev B.fm Page 1 Friday, June 21, 2002 2:51 PM
USER’S GUIDE
Closed-Loop Stages
and Amplifiers
Models 8101, 8102, 8103, & 8104
U.S. Patent #5,991,249, #5,453,653, #5,714,833,
#5,696,421, #5,616,980, #5,682,076
Voltages of up to 260 V are accessible inside the driver chassis,
mounts, and motor. While protection circuits are included, DO
NOT operate the units with the driver or mount covers removed.
If the cable of a mount or motor is frayed or otherwise damaged,
discontinue use and return it for repair.
5215 Hellyer Ave. • San Jose, CA 95138-1001 • USA
phone: (408) 284–6808 • fax: (408) 284–4824
e-mail: [email protected] • www.newfocus.com
810x Closed Loop rev B.fm Page 2 Friday, June 21, 2002 2:51 PM
Warranty
New Focus, Inc. guarantees its products to be free of defects for one year from the date of
shipment. This is in lieu of all other guarantees, expressed or implied, and does not cover
incidental or consequential loss.
Products described in this document are covered by the following U.S. patents: #5,991,249,
#5,453,653, #5,714,833, #5,696,421, #5,616,980, #5,682,076.
Information in this document is subject to change without notice.
Copyright 2002, 2001–1998, New Focus, Inc. All rights reserved.
The
and
NEW FOCUS, Inc.
Document Number 810105 Rev. B
logos and NEW FOCUS, Inc. are registered trademarks of
810x Closed Loop rev B.fm Page 3 Friday, June 21, 2002 2:51 PM
Contents
Introduction
5
Overview . . . . . . . . . . . . . . . . . . . . . . . . . . . . . . . . . . . . . . . . . 5
Unpacking the System. . . . . . . . . . . . . . . . . . . . . . . . . . . . . 5
Additional Components Required . . . . . . . . . . . . . . . . . 6
User Safety. . . . . . . . . . . . . . . . . . . . . . . . . . . . . . . . . . . . . . . . 7
Operation
9
Overview . . . . . . . . . . . . . . . . . . . . . . . . . . . . . . . . . . . . . . . . . 9
Selecting a Power Supply . . . . . . . . . . . . . . . . . . . . . . . . . . 9
Selecting a Motion Controller . . . . . . . . . . . . . . . . . . . . . 10
Mounting the Stage . . . . . . . . . . . . . . . . . . . . . . . . . . . . . . 10
Connecting the Components . . . . . . . . . . . . . . . . . . . . . 11
Software Settings. . . . . . . . . . . . . . . . . . . . . . . . . . . . . . . . . 17
Principles of Operation
19
Closed-Loop Stages . . . . . . . . . . . . . . . . . . . . . . . . . . . . . . 19
Amplifier . . . . . . . . . . . . . . . . . . . . . . . . . . . . . . . . . . . . . . . . 20
Troubleshooting
23
Correcting the Motion Direction . . . . . . . . . . . . . . . . . . 23
Amplifier Front-Panel Indicators . . . . . . . . . . . . . . . . . . 24
Improper Encoder Alignment. . . . . . . . . . . . . . . . . . . . . 24
Customer Service
25
Technical Support. . . . . . . . . . . . . . . . . . . . . . . . . . . . . . . . 25
Service. . . . . . . . . . . . . . . . . . . . . . . . . . . . . . . . . . . . . . . . . . . 25
Closed-Loop Stages and Amplifiers
Contents • 3
810x Closed Loop rev B.fm Page 4 Friday, June 21, 2002 2:51 PM
Appendix I: Specifications
27
Stage with Amplifier Characteristics. . . . . . . . . . . . . . . 27
Amplifier Characteristics . . . . . . . . . . . . . . . . . . . . . . . . . 29
Motor Port Pin Descriptions . . . . . . . . . . . . . . . . . . . . . . 30
CE Compliance . . . . . . . . . . . . . . . . . . . . . . . . . . . . . . . . . . 31
Appendix II: Mechanical Drawings
33
Linear Stages . . . . . . . . . . . . . . . . . . . . . . . . . . . . . . . . . . . . . 33
Rotary Stages . . . . . . . . . . . . . . . . . . . . . . . . . . . . . . . . . . . . 34
Amplifier Box. . . . . . . . . . . . . . . . . . . . . . . . . . . . . . . . . . . . 36
Appendix III: Using the I/O Port
37
I/O Port Pin Description . . . . . . . . . . . . . . . . . . . . . . . . . . 37
Analog Input Specifications . . . . . . . . . . . . . . . . . . . . . . 39
System Interfaces . . . . . . . . . . . . . . . . . . . . . . . . . . . . . . . . 41
4 • Contents
NEW FOCUS, Inc.
810x Closed Loop rev B.fm Page 5 Friday, June 21, 2002 2:51 PM
Introduction
Overview
The New Focus closed-loop translation stages can provide closed-loop
operation at resolutions of 100 nanometers or less using the built-in
optical encoder. Model 8101 is a linear stage with 44 mm of travel that
can move up to 100 mm per second. Model 8102 is a linear “Z-wedge”
that can lift more than six pounds. Model 8103 is a rotary stage that can
move a full 360 degrees at speeds of 30 RPM or more. Model 8104 is a
goniometric stage that can tip or tilt ±10 degrees. All four models use
piezo-friction motor technology and high-resolution encoders to
provide fast, highly accurate positioning of your parts.
Unpacking the System
Unpack the stage components with care. Compare the contents against
the packing slip and inspect them for signs of damage. If parts are
missing or you notice signs of damage, such as dented or scratched
covers, please contact New Focus immediately. Save all packing
materials in the event products need to be shipped elsewhere.
Closed-Loop Stages and Amplifiers
Introduction • 5
810x Closed Loop rev B.fm Page 6 Friday, June 21, 2002 2:51 PM
The following components are included in your New Focus system:
1. Closed-loop stage with one encoder cable attached. Depending
on the model you’ve ordered, there will also be two or four motor
cables attached (see table below).
Model
Description
Motor Configuration
8101
Linear Translation Stage
Two Motors
8102
Z-Axis Wedge
Four Motors
8103
Rotary Stage
Four Small Motors
8104
Goniometer Stage
Two Small Motors
2. Amplifier: Each stage comes with a matched amplifier. The
amplifiers are not interchangeable between models, so be sure to
verify that the correct amplifier type has been shipped with the
stage unit (see table below).
Stage
Amplifier
Model 8101 Linear Translation Stage
AB1A-2A-HR-E2
Model 8102 Z-Axis Wedge
AB1A-2A-HR-E4
Model 8103 Rotary Stage
AB1A-4-STM
Model 8104 Goniometer Stage
AB1A-2A-HR-E2
3. Motor-Splitter Cable: connects the motor cables to the amplifier.
4. User’s Guide
Additional Components Required
The following additional components are required to complete a
closed-loop motion control system:
1. 5-volt and 48-volt power supplies
2. Power-supply-to-amplifier cable
3. Motion control card, computer, or peripheral device such as
a joystick
6 • Introduction
NEW FOCUS, Inc.
810x Closed Loop rev B.fm Page 7 Friday, June 21, 2002 2:51 PM
4. Motion-controller-to-encoder interface cable
5. Motion-controller-to-amplifier interface cable
Note:
Information on selecting a power supply and a motion controller can be found in
the “Operation” chapter beginning on page 9.
User Safety
Care must be taken when connecting the amplifier to a motion
controller and power supply. If you are unfamiliar with any of the stage
components, please read the entire User’s Guide before attempting
connection of the stages.
Voltages of up to 260 V are accessible inside the driver chassis, mounts, and
motors. Although protection circuits are included, do not operate the units with
the driver or mount covers removed. If the wire of a mount or motor is frayed or
otherwise damaged, discontinue use and contact New Focus for information on
how to return it for repair.
Closed-Loop Stages and Amplifiers
Introduction • 7
810x Closed Loop rev B.fm Page 8 Friday, June 21, 2002 2:51 PM
8 • Introduction
NEW FOCUS, Inc.
810x Closed Loop rev B.fm Page 9 Friday, June 21, 2002 2:51 PM
Operation
Overview
Before you begin setting up your closed-loop motion control system,
you will need to provide an external power supply and motion
controller, as well as cables for connecting them to the stage and
amplifier. This chapter offers guidelines for selecting these
components, followed by instructions on mounting the stages and
connecting all of the components together.
Selecting a Power Supply
The amplifier box requires +48 VDC/125 mA and ground from an
external power supply to operate. The power requirements for the
stages are as follows:
Model
Description
Supply
Voltage
Current
Consumption
8101
Linear Translation Stage
+48 V ±5%
325 mA
8102
Z-Wedge Translation Stage
+48 V ±5%
525 mA
8103
Rotary Stage
+48 V ±5%
525 mA
8104
Goniometer Stage
+48 V ±5%
325 mA
22 AWG (or lower) wires should be used for the power supplies. In
noisy environments, it is recommended that the ground line and power
line be twisted together.
Closed-Loop Stages and Amplifiers
Operation • 9
810x Closed Loop rev B.fm Page 10 Friday, June 21, 2002 2:51 PM
Selecting a Motion Controller
The New Focus motion system looks and acts somewhat like a DCservo motor and can be controlled using several methods, including
motion-control cards, joysticks, or other peripheral devices, or even
directly through the RS-232 port of a computer. To create a closedloop system, however, you will need to use a motion-control card with
dynamic proportional integral derivative (PID) parameter switching
and stiction compensation. The supplied motion system's amplifier
electronics require that the card have a minimum servo update rate of
2 kHz and the ability to position and hold to 1 encoder count.
New Focus recommends the following motion-control system:
• Galil DMC-1800 series motion-control card
• Galil CABLE-100 series cable
• Galil ICM1900 Breakout box
• Galil WSDK Servo Tuning Software
• Galil Ceramic Firmware Special
The remainder of this chapter will focus on setting up a closed-loop
system using a motion control card and software. For information on
setting up the system with other control methods, please refer to
“Appendix III: Using the I/O Port” on page 37.
Mounting the Stage
For optimal performance, the stage should be mounted to a flat surface.
New Focus recommends that the surface be flat to 0.0003 inches
(8 microns).
There are four 8-32 (M4) counter-bored holes in the base of the stage.
Use 8-32 (M4) socket-head cap screws tightened to 250 in-oz
(18 kgf-cm) to bolt the stage to the table.
Note:
10 • Operation
See “Appendix II: Mechanical Drawings” on page 33 to locate the mounting holes
for the different stage models.
NEW FOCUS, Inc.
810x Closed Loop rev B.fm Page 11 Friday, June 21, 2002 2:51 PM
Mounting Stages Together
The 810X stages are fully modular: they can be stacked to get any
combination from one to six degrees of freedom.
Use the 8-32 UNC- 2B X .18 deep-threaded mounting holes on the top
of the stages to mount the units to one another. Torques should not
exceed 250 in-oz (18 kgf-cm).
Connecting the Components
The following section takes you through the steps needed to connect
the closed-loop stage components together, including:
1. Connecting the closed-loop stage motor cables to the amplifier
2. Connecting your 48-volt power supply to the amplifier
3. Connecting the amplifier to your motion control card
4. Connecting the encoder cable to your motion control card
5. Making the appropriate software settings
Before you begin setting up, you may wish to familiarize yourself with
the New Focus components. Figures 1 and 2 show the 810X stages and
the cables you will need to connect. The amplifier’s front-panel
connections are defined in Figure 3.
Closed-Loop Stages and Amplifiers
Operation • 11
810x Closed Loop rev B.fm Page 12 Friday, June 21, 2002 2:51 PM
Figure 1: Models
8101 and 8102
with encoder and
motor cables
Motor Cables
Motor Cables
Encoder
Encoder
Figure 2: Models
8103 and 8104
with encoder and
motor cables
Motor Cables
Encoder
Motor Cables
Encoder
12 • Operation
NEW FOCUS, Inc.
810x Closed Loop rev B.fm Page 13 Friday, June 21, 2002 2:51 PM
Figure 3: Front
panel of the
amplifier box
AMPLIFIER BOX
ALARM 1
I/O PORT
MOTOR OUT
ALARM 2
Control
Terminal
Connector
Description
Control Terminal
5-pin connector—Accepts input from an external
+48-VDC power supply (6.5 A max)
Provides direct control of the motor ENABLE signal*
I/O Port
D-type 25-pin connector female—Interfaces to the
control source (joystick or controller)
Motor Out
D-type 9-pin connector male—Interfaces to the motor
* To operate, the motor requires the following minimum control signals
applied to the Control Terminal: +48V, GND, +VIN, -VIN, and ENABLE.
The primary voltage (+48V) is supplied from an external source.
Connecting the Stage to the Amplifier
Use the supplied cables to connect the stage’s motor cables to the
amplifier.
1. Connect the motor-splitter cable to the amplifier connector labeled
Motor Out.
2. Connect each of the motor cables to any of the splitter cable ends.
For the 8101 and 8104 stage models there should be two motor
cables; the 8102 and 8103 models have four motor cables.
Note:
If you are experiencing trouble with the motion direction when you begin to
use your system, these motor cable connections may need to be reversed. See
“Correcting the Motion Direction” on page 23 for details.
Closed-Loop Stages and Amplifiers
Operation • 13
810x Closed Loop rev B.fm Page 14 Friday, June 21, 2002 2:51 PM
Connecting the Power Supply to the Amplifier
Using 22 AWG (or lower) wires, make the following connections from
your power supply to the amplifier’s Control Terminal:
1. Connect +48 V to the +48 V terminal on the left of the Control
Terminal (see Figure 4).
2. Connect the ground wire to the GND terminal.
3. If your surroundings are electrically noisy, be sure to twist the
ground line and power line together.
Do NOT turn on the power supply until all motor and encoder connections
are made.
Connecting the Amplifier to the Control Card
The amplifier requires three signals from a motion control card: an
analog control signal, analog control return which is usually ground,
and motor enable which is active low. Figure 4 shows the Control
Terminal connectors on the amplifier box.
ENABLE
-Vin
+Vin
GND
+48V
6.5A max
Figure 4: Control
Terminal pin
descriptions
Pin
Note:
14 • Operation
Name
Description
1
+48 V
+ 48 Volts Input
2
GND
Ground
3
+Vin
Analog Drive Voltage Input
4
-Vin
Analog Drive Return
5
ENABLE
Active Low Enable Input
You will need to refer to the user’s manual for your control system to determine the
corresponding signal connectors on your control card.
NEW FOCUS, Inc.
810x Closed Loop rev B.fm Page 15 Friday, June 21, 2002 2:51 PM
Using a high-quality, shielded 4-conductor cable, make the following
connections from your control card to the amplifier:
1. Connect a ±10 V analog output signal to +VIN on the Control
Terminal.
2. Connect an analog return signal to the -VIN terminal. On some
control cards, this signal will be the same as ground.
3. If your control card’s analog return signal is not ground, you will
need to run a separate ground wire to the GND terminal.
You will need to insert the 48-V power supply ground connection together
with the control-card ground to ensure proper grounding of the amplifier box.
4. Make the motor-enable signal connection to the ENABLE terminal.
Note:
If you are using a controller other than a control card, refer to “Appendix III: Using
the I/O Port” on page 37 for connection information.
Connecting the Encoder to the Control Card
B–
B+
Pin
Closed-Loop Stages and Amplifiers
A+
A–
Rx
Tx
Reserved
4
3
2
1
9
10
12
+5 VDC
Reserved
Reserved
Reserved
Future Use 11
13
GND
15
14
I+
6
7
8
I–
Figure 5:
Pin descriptions for
the encoder’s
15-pin high density
‘D’ connector
5
A high density 15-pin male connector is provided for making the
necessary connections from the control card to the encoder. The pin
descriptors for this connector are shown in Figure 5.
Function
1
Reserved
2
Serial I/F—Tx
3
Serial I/F—Rx
4
A- quadrature
5
A+ quadrature
6
Reserved
Operation • 15
810x Closed Loop rev B.fm Page 16 Friday, June 21, 2002 2:51 PM
Pin
Note:
Function
7
Reserved
8
Reserved
9
B- quadrature
10
B+ quadrature
11
Future Use
12
+5 VDC
13
Ground
14
I+ Index
15
I- Index
You will need to refer to the user’s manual for your control system to determine the
corresponding signal connectors on your control card.
Depending on the control card you are using, the following
connections may need to be made:
1. A+, A-, B+, B- (A/B Quadrature): Most, if not all, controllers
accept A+, A-, B+ and B- differential signals from all of the standard
encoders out there, including the one in the 810X models. The
encoder’s four A/B quadrature signals will need be connected to
the controller’s corresponding inputs (A+ to A+, A- to A-, etc.).
Note:
If you are experiencing trouble with the motion direction when you begin to
use your system, these cables may need to be reversed. See “Correcting the
Motion Direction” on page 23 for details.
2. I+, I- (Index Pulse Signals): The index pulse (differential signal via
I+ and I-) is also a standard signal, although this signal is not used
in all applications. It is recommended that this signal be connected
if the controller accepts it.
3. +5 VDC, Ground (Power Supply): The +5 VDC In and Ground
are required to power the encoder electronics. Otherwise, the
encoder will read zero no matter how much vibration or
shock occurs.
4. Tx, Rx (Serial Interface): The Tx and Rx signals are for a
computer interface that allows New Focus to program the
16 • Operation
NEW FOCUS, Inc.
810x Closed Loop rev B.fm Page 17 Friday, June 21, 2002 2:51 PM
resolution and output frequency. Normally, the Tx and Rx signals
will not be needed. If you would like to access these features for
some custom application, please contact New Focus technical
support for more information.
Note:
There are four indicator LEDs on the side of the encoder connector. If any of these
LEDs glow yellow or red, there is a problem with the encoder alignment. See
“Improper Encoder Alignment” on page 24 for more information.
Software Settings
When setting up your motion control system to control the stage and
amplifier, we recommend that you follow the motion-controller
manufacturer’s recommended procedure as defined in their user
manual. However, these are some tips to keep in mind:
• This motion system looks and acts somewhat like a DC-servo
motor. The amplifier takes a ±10-VDC proportional signal, where
supplied voltage is directly proportional to velocity of the stage.
• PID parameters should generally be set to low values as compared
to typical DC-servo motors.
Closed-Loop Stages and Amplifiers
Operation • 17
810x Closed Loop rev B.fm Page 18 Friday, June 21, 2002 2:51 PM
18 • Operation
NEW FOCUS, Inc.
810x Closed Loop rev B.fm Page 19 Friday, June 21, 2002 2:51 PM
Principles of Operation
Closed-Loop Stages
The piezo-friction motors have a shaped geometry that allows the
piezo elements to move a friction strip against the top portion of the
motor. The piezo element expands and contracts in both horizontal
and vertical directions to move the friction strip. In all closed-loop
stages, more than one motor element must work in concert to move
the piezo-friction strip simultaneously and achieve maximum force
and velocity.
The amplifier causes the motor to be excited at, or very near, the
resonant frequency of the piezo elements. This generates the
maximum force and moves the piezo elements their maximum
distance, allowing maximum speed to be achieved.
Embedded into each stage is an optical-encoder read head and
diffraction grating that work together with encoder interface
electronics to achieve less than 100-nanometer resolution. In order
to protect the optical encoder, New Focus has embedded the entire
optical encoder into the stage rather than bolting it to the outside of
the unit.
Closed-Loop Stages and Amplifiers
Principles of Operation • 19
810x Closed Loop rev B.fm Page 20 Friday, June 21, 2002 2:51 PM
Amplifier
The amplifier box is a single-axis amplifier box designed to drive up to
32 motor elements in parallel.
The amplifier box may be operated in one of two modes: velocity mode
in which the motor is driven continuously, or step mode in which the
driver output is turned off and on at set intervals in order to drive the
motor in discrete steps.
Step-mode operation is illustrated in Figure 6, where the output is ON
for 1/16 second at 0.5 second intervals. The amplitude of the output
corresponds to the analog input value and thus determines the speed of
the motor.
Figure 6:
Amplifier output
in step mode
output [on/off]
1/16 sec
T [sec]
0.5 sec
The amplifier box features:
• High-precision (11 bits) control of the output-power stage
• Step mode operation
• Interfaces to an analog command
• Indicator LEDs
• Output short-circuit protection
• Minimized sensitivity to cable length
20 • Principles of Operation
NEW FOCUS, Inc.
810x Closed Loop rev B.fm Page 21 Friday, June 21, 2002 2:51 PM
Operating Principles
The amplifier box contains the amplifier card and an LC card. The
amplifier card converts the analog input command signal into a
corresponding PWM square-wave output signal that is fed to the LC
card. The LC card filters the signal to produce the output voltage that
drives the motor.
The LC card type corresponds to the number of motor elements to be
used, and it is integrated into the amplifier box.
The required DC voltages are supplied by an internal DC-to-DC
converter that is fed from an external +48-V power supply.
Figure 7 shows a typical application.
Figure 7: Amplifier
block diagram
Power Supply
+48VDC
Command
Source
Amplifier Box
Amplifier
Card
DC/DC
Converter
PWM Output Signal
+5V, +12V
+3.3V
LC Card
Amplifier
Circuit
High Voltage
Closed-Loop
Stage
The motor is a three-terminal component: Up, Down, and Common.
Voltage applied between the Up and the Common terminals causes the
motor to move in one direction, while voltage applied between the
Down and the Common terminals causes the motor to move in the
opposite direction.
Figure 8 is a schematic drawing of the output stage.
Closed-Loop Stages and Amplifiers
Principles of Operation • 21
810x Closed Loop rev B.fm Page 22 Friday, June 21, 2002 2:51 PM
Figure 8:
Schematic of the
output stage with
an internal LC card
Amplifier Box
- Square wave on
the amplifier output
+48v
H-BRIDGE
AC output that drives
the motor
LC Card
“Common”
“Phase”
“Up”
UP
COMMON
“Down”
DOWN
DIRECTION
CONTROL
STAGE
MOTOR
22 • Principles of Operation
NEW FOCUS, Inc.
810x Closed Loop rev B.fm Page 23 Friday, June 21, 2002 2:51 PM
Troubleshooting
Correcting the Motion Direction
If you find that the stage holds when the motors are enabled and then
runs away when it is disturbed (touched, pushed, etc.), then the encoder
signal is probably reporting negative position.
To correct this problem, you will need to change the direction of the
encoder signal. There are three ways to do this:
• Use software: Most modern controllers provide a mechanism to
change the direction of the encoder via software, or to change the
polarity of the motor drive signal.
• Change the encoder connections: You can change the direction
of the A/B quadrature by swapping either the A+ and A- signals or
the B+ and B- signals, but not both. (See Figure 5 for encoder pin
descriptions.)
• Change the motor connections: Swap two of the motor
connections to the splitter cable.
Closed-Loop Stages and Amplifiers
Troubleshooting • 23
810x Closed Loop rev B.fm Page 24 Friday, June 21, 2002 2:51 PM
Amplifier Front-Panel Indicators
The Alarm 1 and Alarm 2 LEDs on the front panel of the amplifier box
light to green, orange, or red depending on the status of the system.
The table below defines the various status indicators.
Condition
Alarm 1
Alarm 2
VCC < 4.6V
Off
Off
Motor Disconnected
Orange
Off
Motor Disabled
Off
Orange
OK (Motor connected and enabled)
Green
Off
Over-current Protection
Red
Red
Improper Encoder Alignment
The encoder interface box has four LEDs on the side of it: the On/Index
indicator and three signal and alignment indicators (see Figure 9).
Figure 9: Encoder
interface box
Proper/Optimal Alignment
indicator (green/bright green)
Improved Alignment
indicator (yellow)
improper Alignment
Indicator (red)
15-pin HD connector
On/Index indicator
The Proper/Optimal Alignment indicator should glow green or bright
green when the encoder is properly aligned and installed as it was in
the factory. If the Improper Alignment indicator glows red or the
Improved Alignment indicator glows yellow, then there is an alignment
problem with the encoder head in the stage. You will need to return the
unit to New Focus for repair. See “Customer Service” on page 25 for
more information.
24 • Troubleshooting
NEW FOCUS, Inc.
810x Closed Loop rev B.fm Page 25 Friday, June 21, 2002 2:51 PM
Customer Service
Technical Support
Information and advice about the operation of any New Focus product
is available from our applications engineers. For quickest response, ask
for “Technical Support” and know the model and serial numbers for
your product.
Hours: 8:00–5:00 PST, Monday through Friday (excluding
holidays).
Toll Free: 1-866-NUFOCUS (1-866-683-6287)
(from the USA & Canada only)
Phone: (408) 284-6808
Support is also available by fax and email:
Fax: (408) 980-8883
Email: [email protected]
We typically respond to faxes and email within one business day.
Service
In the event that the closed-loop stage or amplifier malfunctions or
becomes damaged, please contact New Focus for a return
authorization number and instructions on shipping the unit back for
evaluation and repair.
Closed-Loop Stages and Amplifiers
Customer Service • 25
810x Closed Loop rev B.fm Page 26 Friday, June 21, 2002 2:51 PM
26 • Customer Service
NEW FOCUS, Inc.
810x Closed Loop rev B.fm Page 27 Friday, June 21, 2002 2:51 PM
Appendix I: Specifications
Stage with Amplifier Characteristics
Linear Stages
Specification
Model 8101
Model 8102
Accuracy
±3 um
±3 um
Bi-Directional Repeatability
±150 nm
±150 nm
Min. Incremental Motion
100 nm
100 nm
Straightness
4 um
—
Flatness
6 um
—
Operating Temperature
0–50˚ C
0–50˚ C
Maximum Velocity
100 mm/sec
15 mm/sec
Holding Force
5N
25 N
MTBF*
20,000 hours
20,000 hours
Travel Range
44 mm
6 mm
Encoder Resolution
50 nm
50 nm
Normal Load Capacity
18 N
26 N
Dimensions
3.14 x 3.74 x 0.76 in.
(80 x 95 x 19.4 mm)
4.76 x 3.74 x 1.51 in.
(121 x 95 x 38.4 mm)
Encoder Output
AB Quadrature
and Sine/Cosine
AB Quadrature
and Sine/Cosine
Motor Cord Length
3 meters
3 meters
Encoder Cord Length
2 meters
2 meters
* @ 75% rated load, continuous operation, maximum speed, over the
operating temperature range
Closed-Loop Stages and Amplifiers
Appendix I: Specifications • 27
810x Closed Loop rev B.fm Page 28 Friday, June 21, 2002 2:51 PM
Rotary and Goniometer Stages
Specification
Model 8103
Model 8104
Accuracy
±0.6 mrad
±0.6 mrad
Bi-Directional Repeatability
±9 urad
±9 urad
Min. Incremental Motion
6 urad
6 urad
Operating Temperature
0–50˚ C
0–50˚ C
Maximum Velocity
180 degrees /sec
10 degrees/sec
Holding Torque
9 N-cm
38 N-cm
MTBF*
20,000 hours
20,000 hours
Travel Range
360 degrees
continuous
±9 degrees
Encoder Resolution
3 urad
3 urad
Maximum On-Center Load
18 N
18 N
Dimensions
3.15 x 3.15 x 1.18 in
(80 x 80 x 30 mm)
3.15 x 4.84 x 1.50 in.
(80 x 123 x 38)
Encoder Output
AB Quadrature
and Sine/Cosine
AB Quadrature
and Sine/Cosine
Motor Cord Length
3 meters
3 meters
Encoder Cord Length
2 meters
2 meters
* @ 75% rated load, continuous operation, maximum speed, over the
operating temperature range
28 • Appendix I: Specifications
NEW FOCUS, Inc.
810x Closed Loop rev B.fm Page 29 Friday, June 21, 2002 2:51 PM
Amplifier Characteristics
Specifications
Amplifier Box
Power Input
+48 VDC ±5%
Maximum Motor Output
250–290 Vrms
Power Consumption
without Load
+48 VDC/0.125 A
Power Consumption
with Maximum Load
+48 VDC/6.5 A max
Dimensions (W x D x H)
5.87 x 4.67 x 1.61 in.
(149 x 118.5 x 41 mm)
(without mounting bracket)
Weight
450 gr.
Mounting options
Desktop/Wall Mount
Operating Temperature
0 to 50°C
Storage Temperature
–40 to 70°C
Operating Humidity
Up to 80%
Closed-Loop Stages and Amplifiers
Appendix I: Specifications • 29
810x Closed Loop rev B.fm Page 30 Friday, June 21, 2002 2:51 PM
Motor Port Pin Descriptions
GND
Motor Connected 6
1
Motor_Phase
7
GND
2
8
N.C.
3
9
N.C.
5
4 Motor Common
Motor Down
Figure 10:
Pin descriptions for
the amplifier’s
motor port
Motor_Up
We recommend that you use the supplied splitter cable to connect the
stage motor cables to the amplifier. For your reference, the motor port
pins are described in Figure 10.
Pin
Signal Name
Function
Description
1
GND
Power supply ground
Shorted to shield
2
Motor_Phase
High voltage output
Not connected
3
Motor_Up
High voltage output
Connected to the motor
‘UP’ terminal
4
Motor Common
High voltage output
Connected to the motor
‘COMMON’ terminal
5
Motor_Down
High voltage output
Connected to the motor
down terminal
6
Motor Connected
Opto-coupled
Safety input, connected to
ground via shortage on the
motor connector to enable
motor operation
7
GND
Power supply ground
Shorted to shield
8
N.C.
NOT IN USE
9
N.C
NOT INUSE
30 • Appendix I: Specifications
NEW FOCUS, Inc.
810x Closed Loop rev B.fm Page 31 Friday, June 21, 2002 2:51 PM
CE Compliance
The closed-loop amplifier box and stages comply with the following
European council directives:
• EMC: Council directive 89/336/EEC:
• Emissions Standard: EN 50081-2:1993/EN 55011:1991
• Conducted Emission class A
• Radiated Emission class A
• Immunity Standard: EN 50082-2:95
• Electro-Static Discharge (ESD) Standard: EN 61000-4-2:95
• Radiated Immunity Standard: EN 61000-4-3:96/ENV 50204:95
• EFT (Electrical Fast Transients) Standard: EN 61000-4-4:95
• Conducted Immunity Standard: EN 61000-4-6:96
• Surges Standard: EN 61000-4-5:95
• Voltage Variations Standard: EN 61000-4-11:94
• SAFETY: council directive 73/23/EEC
• Safety: IEC 61010-1:1990
Closed-Loop Stages and Amplifiers
Appendix I: Specifications • 31
810x Closed Loop rev B.fm Page 32 Friday, June 21, 2002 2:51 PM
32 • Appendix I: Specifications
NEW FOCUS, Inc.
810x Closed Loop rev B.fm Page 33 Friday, June 21, 2002 2:51 PM
Appendix II: Mechanical Drawings
Linear Stages
Figure 11: Top,
side, and bottom
views of the Model
8101 Closed-Loop
Translation Stage
2.56 (65)
11X 8-32 UNC-2B X .18 Deep
Threading Mounting Holes
1.87 (47.5)
.76 (19.4)
.59 (15)
3.74 (95)
.70 (17.8)
.30 (7.5)
.82 (21)
1.57 (40)
1.50 (38.1)
1.75 (44.5)
2.56 (65)
3.15 (80)
.99 (25.3)
1.12 (28.5)
1.50 (38.1)
1.75 (44.5)
4X Counterbored Clearance
Holes for 8-32 or M4 Socket
Cap Screw (Farside)
Unless otherwise noted, dimensions are in inches with metric dimensions in mm in parentheses.
Closed-Loop Stages and Amplifiers
Appendix II: Mechanical Drawings • 33
810x Closed Loop rev B.fm Page 34 Friday, June 21, 2002 2:51 PM
Figure 12: Top,
side, and bottom
views of the Model
8102 Closed-Loop
Z-Axis Wedge
1.39 (35.4) Min
1.63 (41.4) Max
.35 (8.9)
1.51 (38.3)
.99 (25.1)
3.74 (95)
1.12 (28.4)
4.76 (121)
1.50 (38.1)
1.75 (44.5)
2.56 (65)
1.79 (45.5)
.92 (23.3)
1.04 (26.5)
.30 (7.5)
4X Counterbored Clearance
Holes for 8-32 or M4 Socket
Cap Screw (Farside)
1.12 (28.5)
1.50 (38.1)
11X 8-32 UNC-2B X .18 Deep
Threading Mounting Holes
1.87 (47.5)
.99 (25.3)
1.75 (44.5)
Unless otherwise noted, dimensions are in inches with metric dimensions in mm in parentheses.
Rotary Stages
Figure 13: Side,
top, and side views
of the Model 8103
Closed-Loop
Rotary Stage
3.15 (80)
1.74 (44.2)
1.50 (38.1)
8X 8-32 UNC-2B X .18 Deep
Threading Mounting Holes
2.56 (65)
4X Counterbored Clearance
Holes for 8-32 or M4 Socket
Cap Screw
.30 (7.5)
.70 (17.8)
3.15 (80)
1.75 (44.5)
2.66 (67.5)
1.50 (38.1)
.75 (19.1)
0.25 (6.4) Through Hole
.75 (19.1)
1.50 (38.1)
Unless otherwise noted, dimensions are in inches with metric dimensions in mm in parentheses.
34 • Appendix II: Mechanical Drawings
NEW FOCUS, Inc.
810x Closed Loop rev B.fm Page 35 Friday, June 21, 2002 2:51 PM
Figure 14: Top, side
and bottom views
of the Model 8104
Closed-Loop
Goniometer
Rotation Axis
2.56 (65)
3.41 (86.7) 3.44 Max
.43 (10.9)
1.50 (38.1)
1.75 (44.5)
3.15 (80)
2.56 (65)
1.58 (40)
.70 (17.8)
1.787
(45.4)
.83 (21)
1.50 (38.1)
1.47 (37)
.30 (7.5)
1.75
(44.5)
.83 (21.1)
.96 (24.3)
1.71
(43.4)
11X 8-32 UNC-2B X .18 Deep
Threading Mounting Holes
4X Counterbored Clearance
Holes for 8-32 or M4 Socket
Cap Screw (Farside)
Unless otherwise noted, dimensions are in inches with metric dimensions in mm in parentheses.
Closed-Loop Stages and Amplifiers
Appendix II: Mechanical Drawings • 35
810x Closed Loop rev B.fm Page 36 Friday, June 21, 2002 2:51 PM
Amplifier Box
AMPLIFIER BOX
ALARM 1
I/O PORT
MOTOR OUT
41
Figure 15:
Front, top, and rear
views of the
Amplifier Box
ALARM 2
111.2
149
26
4.5
TYPx2
19
TYPx2
72
2 Slots
for Mounting
(M4 DIN 7985)
36 • Appendix II: Mechanical Drawings
NEW FOCUS, Inc.
810x Closed Loop rev B.fm Page 37 Friday, June 21, 2002 2:51 PM
Appendix III: Using the I/O Port
Pin
GND
VIN+
16
15
14
STEP_MODE
GND
VIN–
2
17
RESET_IN
1
GND
FAULT
18
Not in use
3
Not in Use
19
Not in use
4
DIRECTION
5
–HEAT_SENSOR
20
+HEAT_SENS
7
21
SYNC_IN
6
GND
SYNC_OUT
22
RIGHT_LIMIT
9
23
+12 V
8
LEFT_LIMIT
10
24
ENABLE_IN
11
25
+5 V
13
12 EMERGENCY_STOP
USER_VOLTAGE
Figure 16: Pin
descriptions for the
amplifier’s I/O Port
–12 V
I/O Port Pin Description
Name
Description
1
VIN+
Positive analog command input
2
GND
Ground
3
FAULT
Open collector output
4
GND
Ground
5
Not in Use
—
6
DIRECTION1
TTL input (option)
7
-HEAT_SENSOR
Optional
8
SYNC_OUT
Optional
9
GND
Ground
10
LEFT_LIMIT1
Digital Input For Left Limit Switch—Active Low
Closed-Loop Stages and Amplifiers
Appendix III: Using the I/O Port • 37
810x Closed Loop rev B.fm Page 38 Friday, June 21, 2002 2:51 PM
Pin
Name
Description
11
-12V1
-12v Power Supply For External Device
12
EMERGENCY_STOP1
Protection Input—Active Low
13
USER_VOLTAGE1
External power supply opto-isolated type inputs.
14
VIN-
Negative analog command input
15
GND
Ground
16
STEP_MODE1
Mode Selection
17
RESET_IN
System initialization
18
Not in Use
—
19
Not in Use
—
20
+ HEAT_SENSOR
Optional
21
SYNC_IN
Optional
22
RIGHT_LIMIT1
Digital Input For Left Limit Switch—Active Low
23
+12 V1
+12 V Power Supply For External Device
24
ENABLE_IN1
Digital Input—Active Low
25
+5V1
+5 V Power Supply For External Device
1. Further explanations for some of these signals are given in the “Signal
Descriptions” section below.
2. +VIN, -VIN and ENABLE_IN are identical to the +VIN, -VIN and
ENABLE_IN signals in Control Terminal block.
Signal Descriptions
Signal
Description
Limit Switches
The amplifier has two opto-isolated limit switch inputs
(‘Left_Limit’ and ‘Right_Limit’). These inputs turn the motor
off when the mechanical element driven by the motor
reaches the end motion.
When the limit switch is active (shorted to ground), the
motion in the corresponding direction is disabled, and only
motion in the other direction is possible.
Step_Mode
Determines the amplifier’s mode of operation (Velocity or
Step Mode).
38 • Appendix III: Using the I/O Port
NEW FOCUS, Inc.
810x Closed Loop rev B.fm Page 39 Friday, June 21, 2002 2:51 PM
Signal
Description
Emergency_Stop
Safety input. This opto-isolated input disables the card output when activated.
Enable_In
Control input. Enables operation when shorted to ground.
-12V
Accessory voltage used for powering external component
Max. 700mW. Ground is at the GND pin.
+12V
Accessory voltage use for powering external component
max 700 mW. Ground is at the GND pin.
+5V
Accessory voltage used for powering external component
Max. 7.5 W. Ground is at the GND pin.
DIRECTION
TTL input signal—determines the motor direction when
using the amplifier box with a specific external controller
Analog Input Specifications
Analog Input Specifications
•
•
•
•
Signal type: Differential or Single Ended
Input voltage range: ±10 V
Input impedance: 500 kW
Input low-pass filter: Specific frequencies between 0.8 KHz to
10 KHz, according to configuration
Differential Connection
A differential analog input provides noise immunity. Figure 17 shows
how the connection is made.
Figure 17:
Differential analog
input connection
Closed-Loop Stages and Amplifiers
Amplifier Box
Vin +
From
controller
Vin -
Appendix III: Using the I/O Port • 39
810x Closed Loop rev B.fm Page 40 Friday, June 21, 2002 2:51 PM
Single-Ended Connection
Figure 18 shows a single-ended analog input connection.
Figure 18:
Single-ended
analog input
connection.
Amplifier Box
Vin +
From
controller
Vin -
Gnd
Opto-Isolated Inputs
The following I/O Port input interfaces are opto-isolated and are
activated by shorting them to ground:
• Emergency Stop (ES): Disables the AMPLIFIER output.
• Enable: Should be enabled before the motor is activated.
• In Mode: Enables Step Mode operation when activated.
• Left Limit: When activated, it disables motor motion to the left.
• Right Limit: When activated, it disables motor motion to the right.
Fault Outputs
The Fault is an open collector output that is active (shorted to ground)
under the following conditions:
• The card is disabled by the Over Current Protection circuit.
• The motor is not connected; the Motor Disconnect signal is floating.
Note:
The Fault output is capable of sinking a maximum of 20mA, and is not protected
from over current.
Cabling Connections
•
•
•
Analog Command: a twisted shielded cable is recommended.
Discrete Inputs: These signals are not sensitive to noise and can be
grouped together in the same harness with any of the other groups.
Shielding: Since the high motor voltage is induced placed on the
cable shield, it is required to make a good ground connection to the
shield on both sides. The driver card and the motor should be
grounded to the infrastructure earth.
40 • Appendix III: Using the I/O Port
NEW FOCUS, Inc.
810x Closed Loop rev B.fm Page 41 Friday, June 21, 2002 2:51 PM
System Interfaces
This section describes the pin interfaces for single-ended, differential,
and joystick inputs.
Single-Ended Analog Interface
Figure 19:
Non-differential
(common) input
interface
DC
POWER
SUPPLY
Amplifier Box
5
4
3
2
BLOCK TERMINAL MALE
2 x LEDS
MODE
Vout +
Vout Shield
STATUS
ENABLE
16
Twisted and shielded cable
Vin +
Vin GND
GND
1
14
2
9
FAULT
ENABLE
3
24
Emergency Stop
Right Limit
Left Limit
GND
12
22
10
4
25 PIN D-TYPE FEMALE
CONTROLLER
DC /DC
15
25 PIN D-TYPE MALE
GND
InMode
1
Amplifier
Circuit
PLANT
LC
CIRCUIT
9 PIN D-TYPE MALE
9 PIN D-TYPE FEMALE
3
4
5
1
6
2
7
Stage
Motor
Closed-Loop Stages and Amplifiers
Appendix III: Using the I/O Port • 41
810x Closed Loop rev B.fm Page 42 Friday, June 21, 2002 2:51 PM
Differential Analog Interface
Figure 20:
Differential
interface
DC
POWER
SUPPLY
Amplifier Box
5
4
3
2
MODE
Vout +
Vout -
16
Vin +
1
Twisted and shielded cable
Vin - 14
Shield
STATUS
ENABLE
FAULT
ENABLE
3
24
Emergency Stop
Right Limit
Left Limit
GND
12
22
10
4
25 PIN D-TYPE FEMALE
CONTROLLER
DC /DC
15
25 PIN D-TYPE MALE
GND
InMode
1
BLOCK TERMINAL MALE
2 x LEDS
Amplifier
Circuit
PLANT
LC
CIRCUIT
9 PIN D-TYPE MALE
9 PIN D-TYPE FEMALE
3
4
5
1
6
2
7
Stage
Motor
42 • Appendix III: Using the I/O Port
NEW FOCUS, Inc.
810x Closed Loop rev B.fm Page 43 Friday, June 21, 2002 2:51 PM
Joystick Interface
Figure 21: Joystick
Interface
DC
POWER
SUPPLY
Amplifier Box
5
4
3
2
1
BLOCK TERMINAL MALE
2 x LEDS
MODE
16
JOYSTICK
POTENSIOMETER
Twisted and shielded Cable
Vout +
+12 V 23
Vin +
1
-12 V 11
Shield
GND
9
Vin - 14
GND
2
PLANT
Status
Fault
3
Enable
Emergency Stop
Right Limit
Left Limit
GND
24
12
22
10
4
DC /DC
25 PIN D-TYPE FEMALE
15
25 PIN D-TYPE MALE
GND
InMode
Amplifier
Circuit
LC
CIRCUIT
9 PIN D-TYPE MALE
9 PIN D-TYPE FEMALE
3
4
5
1
6
2
7
Stage
Motor
Closed-Loop Stages and Amplifiers
Appendix III: Using the I/O Port • 43
810x Closed Loop rev B.fm Page 44 Friday, June 21, 2002 2:51 PM
44 • Appendix III: Using the I/O Port
NEW FOCUS, Inc.