1
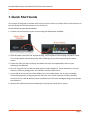
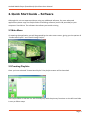
Android Media Player (Standalone) Quick Start User Manual Manual Version PPHD5.1q Android Media Player (Standalone) Quick Start User Manual Safety Instructions • Please keep the display away from any heat sources. Place the display in a stable and well-ventilated place. • Please handle with care as product contains glass. • The holes or openings on the display are designed for ventilation. Do not cover or block the ventilation holes or openings with any objects. • Shut off the power supply before cleaning. • You may use a glass cleaner to clean the product as required. However, never spray the cleaner directly onto the display surface. • Do not attempt to repair this product yourself! Improper disassembly of the product may invalidate the warranty and lead to possible danger • If you have a problem that cannot be solved using the "Troubleshooting" guidelines, please contact your supplier. Page 1 Android Media Player (Standalone) Quick Start User Manual Contents: 1. Quick Start Guide ........................................................................................................................ 3 2. Quick Start Guide – Software ..................................................................................................... 4 2.1 Main Menu ...................................................................................................................... 4 2.2 Creating Playlists ............................................................................................................. 4 2.2.1 Add Schedule............................................................................................................ 5 2.2.2 Add Selected Items................................................................................................... 5 2.2.3 Saving ....................................................................................................................... 8 2.3 2.3.1 3. Editing Playlists ................................................................................................................ 9 Deleting Items .......................................................................................................... 9 F.A.Qs and Troubleshooting Guide ........................................................................................... 10 3.1 How do I play PowerPoint presentations on my display? ............................................. 10 3.2 My media file does not fit properly on the screen ....................................................... 10 3.3 My moving GIF files will not move. ............................................................................... 10 Page 2 Android Media Player (Standalone) Quick Start User Manual 1. Quick Start Guide This section of the guide is to allow swift set up and use of the unit. Please refer to the main part of the User Guide for full information on use of the unit. Please follow the steps detailed below: 1 Unpack unit and connect to your screen using the HDMI cable provided: 2 Take the power lead from the accessories bag, connect power lead and plug into mains outlet. The unit will power ON automatically. After powering up you will be greeted by the home screen. 3 Collect the files you wish to display and make sure they are supported by the unit (see Hardware User Manual) 4 On a PC copy the files you want to play onto an empty USB drive. These should be in the root directory (without putting them into a folder). Remove USB from PC. 5 Insert USB drive into the one of the USB ports on the media player. An on screen message should indicate that it is copying the files onto the unit. Please note that all files previously stored in the unit will be deleted. Once completed, you will see a message asking you to remove the USB drive. 6 Remove the USB drive and the media player will play the stored files in a loop. Page 3 Android Media Player (Standalone) Quick Start User Manual 2. Quick Start Guide – Software Although this unit can operate without using any additional software, for more advanced applications please copy the Playlist Editor scheduling software (on the CD provided) to your computers’ hard drive. The software also allows you to edit existing 2.1 Main Menu On opening the application you will be greeted by the main menu screen, giving you the options of “Create New Playlist” and “Load Existing Playlist”. 2.2 Creating Playlists Once you have selected “Create New Playlist” the playlist creator will be launched. The Playlist Editor is laid out in a user friendly way with the primary functions on the left hand side in easy to follow steps. Page 4 Android Media Player (Standalone) Quick Start User Manual 2.2.1 Add Schedule The schedule functions as a timer for the playlists, so you can have between one and eight playlists scheduled to start and end at different times of the day, with up to 50 files in each playlist. Note: If you enter more than one schedule ensure that the consecutive schedule times do not overlap. Click on the “Add Schedule” Button > Type a Schedule name > Select preferred start time > Select preferred end time > Click “OK” > Schedule will appear in the playlist. To add more schedules simply follow the whole process again for the preferred number of schedules, ensuring you select unique schedule names and times. 2.2.2 Add Selected Items Note: For compatible file formats please refer to 2.2 Supported Media Files. Adding Images Note: Before adding image files please ensure that it has a file name of 11 characters or less and contain no special characters (!”£$%^&* etc.) only . Click the “Add Image” button > Select appropriate Schedule > Click “Browse” and locate and select files > Enter a duration time Page 5 Android Media Player (Standalone) Quick Start User Manual > Select Image switch mode > Click “OK” > Image appears in Schedule. You can select multiple image files at once to add to a schedule, you can also move each item up or down in the playlist by using the arrow buttons on the right hand side. Adding Audio Note: Before adding audio files please ensure that it has a file name of 11 characters or less and contain no special characters (!”£$%^&* etc.). Click the “Add MP3” button > Select Schedule > Click “Browse” and select MP3 file > Enter volume level > Click “OK” > MP3 Appears in Schedule. Note: You must add audio files after all image files. Adding Video Page 6 Android Media Player (Standalone) Quick Start User Manual Note: Before adding video files please ensure that it has a file name of 11 characters or less and contain no special characters (!”£$%^&* etc.). Click the “Add Video” button > Select Schedule > Click “Browse” and locate Video file > Enter preferred repeat > Enter preferred volume > Click “OK” > Video appears in playlist. Note: You cannot add Videos and MP3 audio files in the same schedule. Adding Scrolling Text Note: you must ensure that the scrolling text function is activated on your display, you can do this by accessing the System Settings of the Main Menu (see 1.5.1 System Settings) Click the “Add Scroll Message” button >Enter the message you would like to run across the bottom of the screen Or if you have a pre-existing .txt document containing your message: >Highlight the “Import from file” checkbox and click “Browse” >Locate .txt file and highlight >Click “OK” >Message appears at the bottom of the playlist. Page 7 Android Media Player (Standalone) Quick Start User Manual 2.2.3 Saving Note: Before saving please ensure location drive is empty. Click “Save to Disk” > Click “Browse” and select the top level of the USB drive as the location of the playlist and files > Click “Save”. Page 8 Android Media Player (Standalone) Quick Start User Manual 2.3 Editing Playlists From the main menu click “Load Existing Playlist” > Locate and select playlist to edit > Playlist appears in playlist creator > Select item to edit and click “Edit” button located on the top right hand side of the application. Note: You can also add items to the playlist and add further schedules. 2.3.1 Deleting Items To delete items within a playlist, select the item and click “Delete” - located on the right hand side of the application. The item will be removed from the playlist. Page 9 Android Media Player (Standalone) Quick Start User Manual 3. F.A.Qs and Troubleshooting Guide 3.1 How do I play PowerPoint presentations on my display? You can save the PowerPoint presentation as a JPEG File Interchange Format (.JPG). Microsoft PowerPoint software allows the user to do this 1) Create or open a PowerPoint presentation. 2) Click File >Save As 3) Enter a File name 4) Click on “Save as type” scroll down and find the file extension “JPEG file interchange format”, as shown in the image below. 5) Click Save. 6) A message will appear asking if you would like to save all slides as JPEG’s 7) Once you have selected your option, The JPEG images will be saved and are ready to use within a playlist or to upload to a storage device. NOTE: For the best portrait resolution, you can use this PowerPoint Page Setup: Width 42.6cm; Height 24cm (16:9 Ratio) 3.2 My media file does not fit properly on the screen This has happened because the file does not have a 16:9 aspect ratio (1920x1080). Please resize file to 1920x1080 pixels and try uploading the media onto the display once again. 3.3 My moving GIF files will not move. As the screen recognises any .gif file as an image it will display the first frame of a moving gif for the allocated image display time. Page 10