1
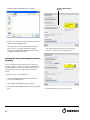
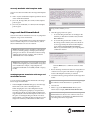
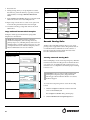
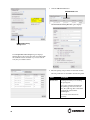
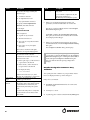
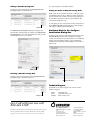
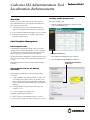
Technical Brief
Codonics SLS Administration Tool
Localization Enhancements
Overview
Installing a Label Template Pack
Version 1.4.0 software for Codonics Safe Label System™
(SLS) Administration Tool (AT) includes enhancements to
the localization functionality:
To install a template pack:
◆
Label template packs can be loaded and managed to
support local requirements for label sizes and formats
◆
Large and small format label templates are now available
◆
Barcode parsing rules can be created to support local
barcode encoding formats
1. Click the Configure Locale button at the bottom left
corner of the Formulary tab.
Label Template Management
Label Template Packs
Label template management is based on the use of Label
Template Packs, which are Zip files that contain a complete
set of templates as well as the information required for the
template pack to be installed and operated in the AT.
The drug classification templates in a template pack have the
same size and are used to address the label requirements for
a locale.
Label template packs are only developed and released by
Codonics.
Configure Locale button
The Configure Localization dialog box displays.
2. Click the Add New Label Template Pack button.
Add New Label Template
Pack button
Label Template Pack Zip File Naming
Convention
Label template pack Zip files use the following naming
convention:
◆
A region identifier. This will typically be a country code
(for example, JP for Japan), but can also be other codes
such as STD (for the SLS standard template pack based
on the ASTM 4774 standard) and DIVI (for German DIVI
templates).
◆
A unique identifier for packs in the same region (for
example, -1 or -2).
◆
A version number (for example, v01).
Examples of template pack names are:
◆
STD-1-v01.zip, for the standard SLS pack 1, version 1
◆
JP-L1-v01.zip, for Japanese large format pack 1, version 1
®
The Choose File to Upload dialog box displays.
Active Label Template
Pack list
3. Navigate to and select the Label Template Pack file to be
added and click the Open button.
The template pack is imported into the AT. When the
import process is complete, it will be included for
selection in the Active Label Template Pack list in the
Configure Localization dialog box.
The sample label template image in the dialog box
updates to reflect the selected template pack.
Selecting the Active Label Template Pack for a
Formulary
You can select which Label Template Pack to use for the
formulary. When you create the formulary update package,
the label templates from the active template pack will be
included in the package for deployment to SLS 500i™
devices.
To select the active Label Template Pack:
1. Click the Configure Locale button at the bottom left
corner of the Formulary tab.
The Configure Localization dialog box displays.
2. In the Active Label Template Pack list, select the template
pack.
3. Click the Save button to save your selection.
®
2
Currently Available Label Template Packs
Version 1.4.0 software includes the following Label Template
Packs:
◆
STD-1-v01, the standard SLS template pack that is based
on the ASTM 4774 standard
◆
JP-L1-v01, the large label (30 x 80 mm) format template
pack for Japan
◆
JP-S1-v01, the small label (17 x 48 mm) format template
pack for Japan
Large and Small Format Labels
Version 1.4.0 software includes two new sets of syringe label
templates: a large and a small format.
For examples of the medium format syringe label templates
that are available with previous software releases, refer to
the SLS Administration Tool User’s Manual.
NOTE: The template pack is selected for each formulary.
Create a formulary package and deploy the formulary
package to SLS devices. For information about creating
and deploying formulary packages, refer to the SLS
Administration Tool User’s Manual.
NOTE: Make sure that the correct size labels are loaded
on 500i for the template pack selected. If the wrong label
size is installed (for example, a large template was
selected but small labels are installed, ink will overspray
in 500i).
Creating Separate Formularies with Large and
Small Label Formats
To create separate formularies that include the same drugs
but use large and small labels:
1. In the Configure Localization dialog box, select the large
label format as the active Label Template Pack.
When changing the active Label Template Pack, the
following warning message displays. It explains that
some drug classifications in the formulary might not be
supported by the selected Label Template Pack. You have
the option of resetting the drug classification for those
drugs to None, or resetting the drug classifications for all
drugs in the formulary to Miscellaneous White Label.
NOTE: This message is displayed whether there are
drugs in the formulary or not.
2. Select the appropriate reset option:
a.
To reset the drug classification for all drugs in the
formulary to Miscellaneous White Label, click the
Reset All button.
b.
To reset the drug classification to None for only
those drugs in the formulary whose classifications
are not supported by the selected Label Template
Pack, click the Reset Only Missing Templates
button. If you click this button, you are prompted to
confirm this selection.
Click the OK button to confirm the selection of this
option.
3. Review the drug classifications that were changed based
on the chosen reset option and set them as appropriate
for the Label Template Pack that you selected.
4. Create the formulary package that will use the large label
format.
NOTE: You can assign a name to the formulary package
that indicates what label format was specified for it.
5. Close the AT.
6. Make a copy of the AdminTool-Data directory and
rename it (for example, AdminTool-Data-Small-Label).
NOTE: You create unique formularies when using
different label sizes because it is common for the set of
drugs that will use small labels to be different than the
set of drugs that will use large labels.
®
3
7. Restart the AT.
Small Format Syringe Label Examples
8. During startup, when you are prompted to locate the
data directory, select the directory copy that you made
and renamed (for example, AdminTool-Data-SmallLabel).
Anticholinergic
Agents
9. In the Configure Localization dialog box, select the small
label format as the active Label Template Pack.
10. Repeat steps 2 and 3 above to select a reset option and
review the drug classifications that were changed.
11. Create the formulary package that will use the small
label format.
Large and Small Format Label Examples
Epinephrine
Hypotensive Agents
Narcotic Tranquilizer
Combinations
Protamine
Examples of the large and small format syringe label
templates are shown below.
NOTE: The syringe label properties of the drug
classification templates, such as background color,
primary stripe color, and label pattern, are the same for
all label formats, regardless of the format size. For a list
of sample labels for each of the label templates, refer to
the SLS Administration Tool User’s Manual.
Large Format Syringe Label Examples
Miscellaneous White
Combination Label
Heparin
Narcotic Antagonists
Barcode Parsing Rules
The Barcode Parsing Rule function allows you to create
parsing rules to support barcode encoding formats that are
not included in the standard release of the software. A
barcode parsing rule specifies which characters in the
barcode constitute the Container ID.
Creating a Barcode Parsing Rule
Before attempting to create a barcode parsing rule, obtain the
information about the encoding format for the barcode that
you want to use. To simplify the rule creation process, you
should also have a sample barcode with the proper encoding
format to scan.
CAUTION: Until you are thoroughly familiar with
entering barcode parsing rules, only perform the
following procedure under the direction of Codonics
Technical Support.
Narcotics
To create a barcode parsing rule for a barcode encoding
format:
Succinylcholine
1. Click the Configure Locale button at the bottom left
corner of the Formulary tab.
The Configure Localization dialog box displays.
2. Click the Edit Barcode Parsing Settings button.
®
4
3. Click the Add New Rule button.
Add New Rule button
The New Barcode Parsing Rule dialog box displays.
Edit Barcode Parsing
Settings button
The Configure Barcode Parsing dialog box displays.
Initially, the barcode parsing rules that are included with
the standard software are listed. As you create custom
rules, they are added to the list.
4. Enter the parsing rule parameters in the fields and lists.
The rule parameters are described in the following table.
Field
Description
Original
Barcode Data
Scan a sample barcode that uses the
encoding for which you are creating
this parsing rule.
The code is entered in this field with
the symbology characters removed.
Also, the symbology that is detected is
automatically selected in the
Symbology list.
You can also enter the barcode
manually.
®
5
Field
Description
Field
Description
Match
For each character in the code, enter
one of the following to identify the
character type:
Symbology
Enter the barcode symbology that is
being used.
#
If you scanned a sample barcode, the
appropriate symbology is
automatically selected by the system.
A numeric character
@ An alphabetic character
?
Any alphanumeric character
To specify a literal alphanumeric
character, enter that character.
5. When you are finished entering the parsing rule
parameters, click the Create button to save the rule.
For example:
The rule is saved and added to the list in the Configure
Barcode Parsing dialog box.
?2-###-###-@@@@
This example has:
Transfer
◆
A prefix of any character
◆
The literal character 2
◆
Two sections of any three numeric
characters
◆
One section of any four alpha
characters
In the Rule column in the Configure Barcode Parsing
dialog box, the characters that constitute the Container
ID are displayed in bold type.
6. When you are finished configuring barcode parsings,
click the Close button in the Configure Barcode Parsing
dialog box.
The Configure Localization dialog box displays.
The sections of numeric and alpha
characters are separated by hyphens.
This entry serves as a mask to identify
the characters in the code that
constitute the Container ID. For each
character in the code:
◆
Enter a plus sign (+) if the character
is part of the Container ID
◆
Enter a dash (-) if the character is
not part of the Container ID
For example, the entry:
NOTE: Your barcode parsing configuration changes are
saved when you click the Closed button in the Configure
Barcode Parsing dialog box. Clicking the Cancel button
in the subsequent Configure Localization dialog box
does not undo the barcode parsing configuration
changes.
Barcode Parsing Rule Parameters Entry
Validation
--++--++++++++
Check Digit
Type
Container ID
Result
indicates that characters 3, 4, and 7
through 14 constitute the Container ID.
Select the check digit type for the
symbology from the list.
When you have entered enough
information in the other fields and lists
to determine the Container ID, it is
automatically entered by the system
here.
Use the result entry here to verify that
you have made correct entries in the
other fields.
The system performs validation of your parameter entries.
Errors are displayed at the top of the dialog box.
Entry errors can include:
◆
The Match and Transfer field entries are not the same
character length.
◆
An entry is too short.
◆
A symbology has not been selected in the Symbology list.
®
6
Editing a Barcode Parsing Rule
You are prompted to confirm the deletion.
To edit a barcode parsing rule, in the Configure Barcode
Parsing dialog box, click the Edit icon.
Setting the Order of Barcode Parsing Rules
When a barcode is scanned from the AT or 500i, the system
first identifies the barcode’s symbology. It then applies the
barcode parsing rules in their order of priority looking for a
match. When a match is found, the system identifies the
Container ID within the code.
Edit icon
The Edit Barcode Parsing Rule dialog box displays. The
functionality of this dialog box is similar to the Edit Barcode
Parsing Rule dialog box; the only difference is that you click
the Save button to save your entries.
To change the priority order of the barcode parsing rules, in
the Configure Barcode Parsing dialog box, click and drag a
rule entry to a different position in the list.
Database Mode in the Configure
Localization Dialog Box
In Version 1.4.0 software for the AT, the functionality of the
Database Mode list selection has changed. It no longer
controls how barcodes are parsed, which is now handled by
the Barcode Parsing Rules function. Now it determines
whether the Master Drug Database (MDD) is in US NDC or
Other mode.
Save button
Deleting a Barcode Parsing Rule
To delete a barcode parsing rule, in the Configure Barcode
Parsing dialog box, click the Delete icon.
Database Mode list
Technical Support
If problems occur when using the AT, contact Codonics
Technical Support.
Delete icon
Get it all with just one call
800.444.1198
All registered and unregistered trademarks are the property of their respective
owners. Specifications subject to change without notice. Patents pending.
Copyright © 2012 Codonics, Inc. Printed in the U.S.A. Part No. 901-261-001.02.
Phone:
Email:
Website:
+1.440.243.1198
[email protected]
www.codonics.com
®
17991 Englewood Drive
Middleburg Heights, OH 44130
USA
+1.440.243.1198
+1.440.243.1334 Fax
Email [email protected]
www.codonics.com
Codonics Limited KK
New Shibaura Bldg. F1
1-3-11, Shibaura
Minato-ku, Tokyo, 105-0023
JAPAN
Phone: 81-3-5730-2297
Fax: 81-3-5730-2295