1
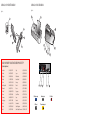
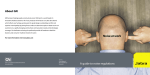
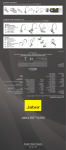
NEED MORE HELP?
europe
Belgique/Belgium +49 (0)8031 2651 72
Czech Republic 800 522 722
Danmark
+45 45 75 99 99
Deutschland
+49 (0)8031 2651 72
España +34 916 398 064
France +33 (0) 130 589 075
Italia +39 02 5832 8253
Luxembourg +49 (0)8031 2651 72,
Nederland +49 (0)8031 2651 72
Norge +47 32 22 74 70
Österreich +49 (0)8031 2651 72
Poland 0-801-800-550;
+48 12 254-40-15
Russia [email protected]
[email protected]
Suomi +358 9 396 811
Sverige +46 (0)8 693 09 00
United Kingdom 01784 220172
+01784 220140
ASIA
Australia 1800636086 - local distributor CS/1800-083-140 - GN APAC CS
China +86-21-5836 5067
Hong Kong 800-968-265 (Toll free)
India 000-800-852-1185 (Toll free)
Indonesia 001-803-852-7664
Japan +81-3-5297-7976
Malaysia 1800-812-160 (Toll free)
New Zealand 0800-447-982 (Toll free)
Philippines
+63-2-2424806
Singapore 800-860-0019 (Toll free)
Taiwan 0080-186-3013 (Toll free)
Jabra® GO™ 6470
For further languages please refer to the manuals on
the enclosed CD.
Europe:
EN/FR/DE/IT/NL/ES/DA/SE/NO/FI/PT/RU/TR/CZ/HU
USA & Canada:
US/FR/ES/PT
Asia:
EN/CHt
USA & CANADA
Canada 1-800-489-4199
USA 1-800-826-4656
?
GN Netcom A/S • Lautrupbjerg 7 • 2750 Ballerup •
Denmark
Made in China
Type: GO 6400 BS/HS
Patents and design registration pending international
Register your Jabra at jabra.com/Register – for news, support and competitions
www.jabra.com
81-02862 E
© 2009 GN Netcom A/S. All rights reserved. Jabra® is a registered
trademark of GN Netcom A/S. All other trademarks included
herein are the property of their respective owners. The Bluetooth®
word mark and logos are owned by the Bluetooth SIG, Inc. and any
use of such marks by GN Netcom A/S is under license. (Design
and specifications subject to change without notice).
Quick start guide
www.jabra.com
Jabra GO 6470 Headset Diagram
Jabra GO 6470 Base Diagram
Figure 1:
Figure 2:
1
1
2
8
4
2
5
3
3
6
4
7
9
5
6
7
dial-in Number for Automatic deskphone setup
(Jabra Setup Server)
Australia
Austria
Belgium
Canada
China
Czech Republic
Denmark
Finland
France
Germany
Hong Kong
India
Ireland
Israel
(+61) 390015714
(+43) 720881373
(+32) 28081988
(+1) 5146670459
(+86) 2131001806
(+42) 0246019050
(+45) 69121700
(+35) 8942415766
(+33) 975180988
(+49) 8922061142
(+852) 317-09541
000-800-100-7140
(+353) 766060801
(+972) 37219694
Italy
Japan
Netherlands
New Zealand
Norway
Poland
Russia
Singapore
South Africa
Spain
Sweden
Switzerland
United Kingdom
United States of America
(+39) 199241498
(+81) 345209655
(+31) 858880322
(+64) 99853540
(+47) 85449926
(+48) 223988168
(+7) 812-3092605
(+65) 31031365
(+27) 114613389
(+34) 901667428
(+46) 101992532
(+41) 435002588
(+44) 8708200018
(+1) 202 446 0321
3
4
5
3 Telephone port
4 Handset port
6 USB port
7 Power adapter port
6
7
5 AUX port
US
IMPORTANT
This guide will help you connect and configure your headset solution. It is important that
you follow the instructions in each section in the order in which they are given.
Please note that the touchscreen base has a built-in setup wizard, which guides you through
all of the required connections and settings, automating many of the tasks. It launches the
first time you apply power to the base.
Basic headset operation is also introduced here. See the full user manual on the supplied
CD-ROM for complete details about how to use your Jabra® GO™ headset.
This product contains font software programs which generate human readable typeface designs (“Font Software”)
on base display. The Font Software family is Frutiger® Next licensed to GN Netcom by Linotype®.
Jabra GO 6470
Headset Diagram
1Multifunction button (answer/end call, among
other functions)
2Touch panel for volume and mute control
3 Dual noise-blackout microphone
4 Activity and status indicator (multicolor LED)
5Earbud (with speaker)
6Mount for ear-hook wearing-style attachment
7Recharge contact
Figure 1: Jabra GO 6470 headset as seen from the outer
and inner sides, respectively
Jabra GO 6470 Base Diagram
1 Headset cradle
2Touchscreen
3Telephone port
4 Handset port
5 AUX port
6USB port
7Power adapter port
8Security slot and
(recessed) cradle-release button
9Speaker for ring tones and touchscreen audio
feedback
Figure 2: Jabra GO 6470 base, seen from the front and
back, respectively
US
Installation and Setup
Step 1: Attach/adjust a headset wearing-style
Included in the standard package are the headband
and ear hook wearing styles. The headset is delivered
already attached to the ear hook, shown below. Slide
the attachment up or down until the headset fits most
comfortably to your ear.
You can instead attach the headset to the supplied
headband, shown below. To do this, first detach
the ear hook and then press the headset into the
headband’s attachment socket. Once assembled,
you can rotate the headset for use on either ear.
For further details on attaching/detaching wearing
styles, refer to the procedures in the full user manual
on the CD-ROM supplied with your headset.
Step 2: Apply power to the base
Connect the mains power adapter to the base’s power
port (marked with
), then plug it into a mains
power socket.
A setup wizard automatically launches on the
touchscreen.
English
Italian
SETUP
DESK PHONE
Congratulations on your
new jabra GO 6400!
This guide will help you
assemble and configure
your headset solution.
Connect to a desk
phone
Norwegian
Yes
No
3 Sec.
Step 3: Connect the base to your desk phone
Let the wizard guide you through the task of
connecting your desk phone to the base.
The way in which you connect the two devices will
vary according to whether the phone has a headset
port and whether it has an electronic hook-switch or
remote handset lifter (such as the GN1000).
You need to determine this yourself. For example, you
might already have an electronic hook-switch (EHS)
installed or you might have ordered a remote handset
lifter (such as the GN1000) together with your headset
package. You can use the wizard to configure your EHS
connection (if any).
Note: Connection to a phone which includes an
electronic hook-switch requires a model-specific
adapter from Jabra. See the user manual for more.
US
Step 4: Configure the base for your desk phone
Once the base has established a connection to the
desk phone, the optimal clear dial-tone switch and
microphone level settings need to be determined.
The wizard will prompt you to call your local
Jabra setup server — see the cover of this
quick start guide for a list of numbers. This
enables the Jabra GO base to test its clear
dial-tone switch and mic.-level settings by
exchanging signals with the setup server.
1. Connect the small connector (mini USB) of the
supplied USB cable to the port marked
on the
Jabra GO base.
2. Connect the other end of the USB cable to any free
USB port on your computer.
Step 6: Enable your softphone interface
1. Insert the CD-ROM included with your headset into
your PC and install the Jabra PC Suite software.
The softphone part of the setup wizard will prompt
you to do this.
Note: If the base is unable to contact the server,
you can choose to configure the desk phone
manually. See the user manual for more.
To set the clear dial-tone switch position and mic.level:
1. The touchscreen wizard prompts you to call
the Jabra setup server. Follow the on-screen
instructions.
There is no clear dial-tone switch accessible to the
user on the base — stepping through positions
A – G to find the best one occurs automatically.
Equally, the base will determine the optimal
microphone level automatically.
Step 5: Connect the base to your softphone (PC)
To use Jabra GO with a softphone, you must first
connect the Jabra GO base to your PC via a USB cable.
The softphone part of the setup wizard will prompt
you to do this.
The installation includes the supported softphone
drivers necessary to enable the softphone interface.
If you have any questions as you work through the
setup wizard, or if you would like to learn more
on how to use the many advanced features of
your headset solution, please refer to the full user
manual. This is included on the CD-ROM in PDF
format.
2. Right-click on the Jabra icon in the Windows
Notification Area and select Open Device Service.
The Jabra Device Service window opens. This
shows the list of softphone drivers installed on your
PC. Use the online help available in this window to
learn more.
3. Select the softphone you want to use (target
softphone) from those available in the Select
softphone for outgoing calls drop-down list.
US
4. Run the Jabra Control Center — click on the
Windows Start button and select All Programs >
Jabra > Jabra PC Suite > Jabra Control Center.
5. Select the Softphone tab for your Jabra GO device.
6. In Target softphone for outgoing calls, select
either Microsoft Office Communicator or
Softphones supported by Jabra PC Suite.
Configure other parameters, as required.
This establishes the default softphone target type.
Use the online help available in this window to
learn more.
Step 7: Connect to your mobile phone
The setup wizard asks whether you want to connect
to a mobile phone and guides you through the
procedure:
1. You must ensure that Bluetooth is active on your
phone and then put it in pairing mode.
Your phone looks to see if any nearby Bluetooth
devices are advertising themselves for pairing.
2. Use your phone’s controls to identify and select the
“Jabra GO 6400” device. Your phone might also ask
for the headset’s pass code. The pass code for all
Jabra devices is 0000 (four zeros).
Your phone tries to pair with and connect to the
base.
Touchscreen Controls
During normal operation, the touchscreen displays
information about your headset, shows the current
target phone for outgoing calls and indicates its
status. From here, you can answer an incoming call,
end the current call, access your base settings, choose
a target phone and open an audio link to the current
target phone.
1
2
4
3
5
Touchscreen controls for standard, everyday operation
1 Settings icon: touch here to go to the settings
menu for your base and headset.
2Battery indicator: indicates the current charge
level of your headset.
3 Current target phone: shows the current target
phone and indicates its status (ringing, online, etc.).
This is the phone to which you will connect if you
tap the headset multifunction button or touch the
activate-audio-link icon.
4Other phones: touch the appropriate icon here
to change the current target phone—or press the
headset multifunction button when no call is active
to cycle through available phones (press and hold
for about two seconds).
5 Activate audio link: touch here to answer an
incoming call or activate the audio link to the current
target phone—or tap the headset multifunction
button when no call is active.
Please see the user manual for complete details.
US
Daily Use
Storing and charging the headset:
Whenever you are not using your headset, keep it in
its recharge cradle as shown below. It is held firmly in
place by a magnet.
2. Open the audio channel from your headset to your
desk phone by doing one of the following:
- Touch the open-connection icon on the
touchscreen.
- Tap the multifunction button at the back of your
headset.
Note:
- charging occurs automatically, as soon as you
dock the headset in the cradle
- the headset is still in operation even while it is
charging
Wearing the headset:
- Always wear the headset with the microphone
positioned as close to your mouth as possible.
3. Open the connection from your desk phone to the
phone network by doing one of the following:
- If your desk phone has a headset button, then press
the headset button.
- If you do not have an electronic hook-switch,
handset lifter or headset button, then lift the
handset of your desk phone and place it next to
the phone.
To place or answer a call over your desk phone:
1. Touch the desk-phone icon on the touchscreen
to make the desk phone the current target. (If
necessary—the largest of the phone icons on the
screen indicates the current target.)
Note: If your desk phone has an electronic
hook-switch or GN1000 Remote Handset Lifter,
then the connection opens automatically.
US
If you are answering a call, then begin talking. If you
are making a call, then dial the number on your desk
phone.
4. When you are done talking, close the connection
from your desk phone to the phone network by
doing one of the following:
- If your desk phone has a headset button, then press
the headset button.
- If you do not have an electronic hook-switch,
handset lifter or headset button, then hang up the
handset on your desk phone.
5. Close the audio channel from your headset to your
desk phone by doing one of the following:
- Touch the end-call icon on the touchscreen.
- Tap the multifunction button at the back of your
headset.
- Remove the headset and place it in its cradle on the
base.
To place a call over a mobile phone or softphone:
1. Put on your headset.
Note: If your desk phone has an electronic
hookswitch or GN1000 Remote Handset Lifter,
then the connection closes automatically.
2. Dial your mobile / softphone and press the call
button as usual. The base detects that you have
placed a call and opens the connection to your
headset automatically.
US
- Touch the open-connection icon on the
touchscreen.
- Tap the multifunction button at the back of your
headset.
- Lift the headset from its cradle on the base and put
it on.
3. When you are done talking, do one of the following
to hang up:
- Press the end-call button on your mobile /
softphone.
- Touch the end-call icon on the touchscreen.
- Tap the multifunction button at the back of your
headset.
- Remove the headset and place it in its cradle on the
base.
To answer a call over a mobile phone or softphone:
1. The base automatically detects that a mobile /
softphone is ringing. It makes that phone the
current target and shows the incoming-call
animation. Answer the call by doing one of the
following:
2. When you are done talking, do one of the following
to hang up:
- Press the end-call button on your mobile /
softphone.
- Touch the end-call icon on the touchscreen.
- Tap the multifunction button at the back of your
headset.
- Remove the headset and place it in its cradle on the
base.
US
During a call:
- To adjust the volume you hear, slide your finger up
or down the touch-sensitive panel.
- To mute or un-mute the microphone, double-tap
on the touch-sensitive panel. A soft tone sounds
every now and then to remind you when the
microphone is muted.
2x
Dispose of the product according to local
standards and regulations.
www.jabra.com/weee