1
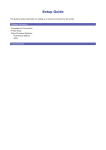
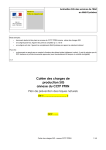
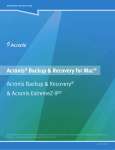
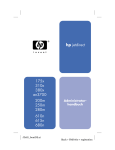
ExtremeZ-IP Print Quick Start Guide
This Quick Start Guide walks you through the three steps needed to start using IP Print.
• Install the ExtremeZ-IP® Print Server software
• Create ExtremeZ-IP Print Queues
• Build ExtremeZ-IP Printers on your Macintosh® Clients
Before installing, read these notes.
• Installing the ExtremeZ-IP Print Server as a trial Do not install a trial version of ExtremeZ-IP Print Server on an existing production
ExtremeZ-IP File Server. If you do, the installation causes the ExtremeZ-IP File Server to become a demo version. Instead, install a trial or demo
version on a different machine. When installing the trial, select the options to install both the File Server and Print Server components as a trial.
This option provides an unlimited license for both File Sharing and Printing. If you choose to install the ExtremeZ-IP Print Server without selecting the File Server option, you are limited to a three (3) client File Sharing license.
• Installing Print Server over an existing production license of ExtremeZ-IP File Server To add Print Server on an existing production File
Server, select the options to install both the File Server and Print Server components. During the installation, you are asked to provide both your
File Server license and Print Server license keys. If you install the Print Server without selecting the File Server option, your File Server reverts to
a three (3) client File Sharing license.
• Reinstalling or upgrading the Print Server The ExtremeZ-IP installer stops the ExtremeZ-IP Service to perform a new install. This disconnects
any Macintosh Clients. When the service is brought back online your Macintosh Clients are able to reconnect and Print again. In some cases the
installation fails because the ExtremeZ-IP Service cannot be stopped. Some instances of failure include infrequent but possible service errors,
conflicts with other running processes, or conflicts caused by installing while the Services Control Panel is open. If you experience installation
failures, stop the ExtremeZ-IP Service manually from the Services Control Panel.
INSTALLING THE EXTREMEZ-IP PRINT SERVER
You must be logged into Windows® with Administrator privileges to install the ExtremeZ-IP Print Server. Place the ExtremeZ-IP Installer.exe on
your desktop. If you have other programs running, shut them down.
1.
Double-click ExtremeZ-IP Installer.exe to run the installer.
2.
Select Release or Trial (trial version is valid for 21 days) and agree to the Software License Agreement.
The Select Components dialog appears.
3.
Select the Components you wish to install. Place a check in the appropriate checkbox or checkboxes using steps a, b, or c, then,
click Next.
a.
Select both File Server and Print Server is you are installing the trial version.
b.
Select both File Server and Print Server if you are installing over an existing File Server.
This requires both File and Print Server serial numbers.
c.
Select only Print Server if you have a Print Server serial number but not a File Server serial number.
4.
Enter your Name, Company and Serial Number, then, click Next.
File Server serial numbers start with ZR4X; Print Server numbers start with PR4X.
5.
Choose a destination for the ExtremeZ-IP files, then, click Next.
It is recommended that you choose the default, C:Program Files. If you are running a previous trial or release version of ExtremeZ-IP, a
dialog box appears asking if you would like to disable the old version.
6.
If you have a previous version of Extremez-IP installed, you are asked to disable the previous version. Choose Yes when asked if
you want to disable this older version.
Your settings migrate to the new installation automatically.
7.
Click Yes to start ExtremeZ-IP automatically when Windows starts up, then, click Next.
Macintosh file-sharing clients are disconnected until the service restarts after the installation is completed. ExtremeZ-IP installs and
gives you the option of launching ExtremeZ-IP Administrator program immediately after the Setup Wizard completes its job.
8.
Select Yes if you are asked to create a share for ExtremeZ-IP Print Support.
9.
Select Yes if asked to start the Service and Launch the Administrator.
Any setting from an existing installation are preserved.
Firewall Considerations on Windows XP® and 2003®
You must create a firewall exception for the application ExtremeZ-IP.exe. Even if your firewall is turned off, we recommend that you create
this exception in the event someone accidentally turns the firewall on (some Windows updates turn your firewall on automatically). To create
the firewall exception, follow these steps.
1.
From the Control Panel, open the firewall (Security Center in XP).
2.
On the General Tab, make sure “Don’t Allow Exceptions” is not selected
ExtremeZ-IP Print Quick Start Guide 2
3.
Click the Exceptions Tab, click the Add Program button, then, select ExtremeZ-IP.exe.
You may have to browse to C:\Program Files\Group Logic\ExtremeZ-IP\ExtremeZ-IP.exe.
4.
Select OK and close the Firewall configuration window.
Setting up Print Queues
A print queue is a virtual printer that Macintosh users can use. When Macintosh users print files to one of your printers, the resulting print job
is delivered to your server and can be tracked and processed there. This section explains how to create the three main types of print queues.
• Windows
• LPR
• Directory (Hot Folder)
CREATING A WINDOWS PRINT QUEUE
Launch the ExtremeZ-IP Administrator, then follow these steps.
1.
From the ExtremeZ-IP Administrator, click the Print Queues button.
The Print Queues dialog box appears.
2.
Click Create to display the Print Queue Properties window.
3.
From the Processing pull down menu, select Send to Windows Print Queue..
There are two ways to select a windows printer;
4.
Select a Windows Printer Queue use one of two methods (a) select a printer from the list of Available Windows Print Queues, or
(b) provide a UNC Path to any Windows Print Queue on your network.
a.
Select a printer from the list of Available Windows Print Queues, then, click OK.
Printers are listed here if they have been defined within Windows previously. If you need to define a printer, see the Appendix A
“Using the Windows Print Wizard to Define a Windows Printer” for instructions.
ExtremeZ-IP Print Quick Start Guide 3
-ORb.
Provide a UNC path to any Windows Print Queue on your network, then click OK.
In the example below, mainserver001 is the name of the computer, Main Office is the name of the printer, and the UNC path is
\ \\mainserver001\Main Office. See Appendix B “Using UNC Paths —Security consideration” for more information about UNC
paths.
Once you select a printer and click OK, you are returned to the Print Queue Properties window.
5.
From the Print Queue Properties window, type a user-friendly name for the print queue you are setting up.
Queue names must be unique; you cannot have two queues with the same name.
ExtremeZ-IP Print Quick Start Guide 4
6.
If you wish, check the Require Client to Use Specified PPD checkbox.
This forces Macintosh clients to download and configure the printer using the PPD you specify with the PPD File textbox.
7.
Click OK to finish.
The Print Queue is listed in the Print Queue window and its status is “waiting to receive jobs from clients.”
CREATING AN LPR PRINTER QUEUE
Launch the ExtremeZ-IP Administrator, then follow these steps.
1.
From the ExtremeZ-IP Administrator, click the Print Queues button.
2.
Click the Create button to display the Print Queue Properties window.
3.
From the Processing pull down menu, select Send to LPR Print Queue.
ExtremeZ-IP Print Quick Start Guide 5
4.
For Host, type the IP address or fully qualified host name.
5.
For Queue, type the queue name, then click OK.
Note that some Hewlett-Packard® printers require BINPS as the queue name.
6.
From the Print Queue Properties window, type a user-friendly name for the print queue you are setting up.
Queue names must be unique; you cannot have two queues with the same name.
7.
If you wish, check the Require client to Use Specified PPD checkbox.
This forces Macintosh clients to download and configure the printer using the PPD you specify with the PPD File textbox.
8.
Click OK to finish.
The Print Queue is listed in the Print Queue window and its status is “waiting to receive jobs from clients.”
ExtremeZ-IP Print Quick Start Guide 6
CREATING A SPECIFIED DIRECTORY
You can create a print queue which sends files to a specified directory or hot folder. Choose a folder which is local or on the network. For
network locations you may map the network drive or use a UNC Path. Launch the ExtremeZ-IP Administrator and follow these steps.
1.
From the ExtremeZ-IP Administrators dialog box, click the Print Queues button.
2.
Click the Create button to display the Print Queue Properties window.
3.
From the Processing pull down menu, select Send to Specified Directory.
4.
For Folder, you have two options. (a) browse for the folder or (b) choose to supply the UNC path.
(a). Browse to select the folder where you want your print jobs to land.
—OR—
(b). Supply the UNC path.
See Appendix B “Using UNC Paths—Security Considerations.”
5.
From the Print Queue Properties window, type a user-friendly name for the print queue you are setting up.
Queue names must be unique; you cannot have two queues with the same name.
ExtremeZ-IP Print Quick Start Guide 7
6.
Click OK to return to the Print Queue Properties dialog box. If you wish, check the Require Client to Use Specified PPD checkbox.
This forces Macintosh clients to download and configure the printer using the PPD you specify with the PPD File textbox.
7.
Click OK to finish.
The Print Queue is listed in the Print Queue window and its status is “waiting to receive jobs from clients.”
Printing for Macintosh clients
To use ExtremeZ-IP printing, Macintosh clients follow steps for their operating system. Once you add print queues to the Print Queues dialog
box, Macintosh clients can print to any print queue. Installers for Macintosh clients are copied onto your NTFS disk when you install ExtremeZ-IP Print Server. Macintosh clients copy the one they need to their computers or they can run it off of the server. Apple Remote Desktop
can be used to deploy the installer packages to Macintosh computers.
Mac OS X clients, once they have installed the ExtremeZ-IP Printer program, can find the print queues by choosing ExtremeZ-IP Printers on the
Print Center Print List pop-up. You must have selected Bonjour and/or AppleTalk as a Print Server Connection Option when you set up the ExtremeZ-IP Administrator (see page 69) and it must be routable on your network. If Macintosh clients cannot see the ExtremeZ-IP server using
Bonjour, they can specify it in the IP Address field.
ExtremeZ-IP Print Quick Start Guide 8
After choosing ExtemeZ-IP Printers on the pop-up list, a list of the ExtremeZ-IP Printers on the network appears.
Select the PPD you want to use. If the Server provides a PPD that the Macintosh client must use, the following pop-up is displayed.
Mac OS 9 clients, once they have installed the Choose IP Printer program, find the ExtremeZ-IP printers by using Choose IP Printer on the
Apple menu instead of the Macintosh Chooser to set up desktop printers.
ExtremeZ-IP Print Quick Start Guide 9
To modify a print queue, follow these steps.
1.
To modify a print queue, highlight an item on the Print Queues dialog box and click Modify.
The Print Queue Properties dialog box appears. The dialog box gives the configuration information of the print queue. Use the dialog to
reconfigure the print queue. You cannot change the name.
2.
Click OK to return to the Print Queues dialog box.
To delete an item from the Print Queues list, follow this step.
Highlight an item on the Print Queues dialog box and click Remove.
Setting up Bonjour printers
ExtremeZ-IP Print Server advertises all print queues using Bonjour automatically. Macintosh and Windows clients can set up and print to
Bonjour printers quickly and easily in a single step. Once you select a printer by either method, it is available as an installed printer in the
print dialog. You do not have to setup your Bonjour printer each time you want to print to it. For details on setting up Bonjour print queues
on Windows client computers, refer to the ExtremeZ-IP User Manual.
Setting up Macintosh client printers using Bonjour
On a Macintosh connected to an ExtremeZ-IP network, you can configure a Bonjour printer on Mac OS 10.4, Tiger, from the Print dialog of any
application or from the Printer Setup Utility.
Choosing a Bonjour printer from any application Choose Print from any application on Mac OS 10.4, Tiger. From the Printer dropdown
menu, choose Bonjour Printers, and select the desired printer from the list. The printer is set up automatically and you can print to it immediately.
ExtremeZ-IP Print Quick Start Guide 10
Setting up a Bonjour printer from the Printer Setup Utility Open the Printer Setup Utility in Mac OS 10.4, Tiger, from the Utility folder located in the Applications folder. Choose Add and pick your Bonjour printer from the Printer Browser. All Bonjour printers can be distinguished
by their Connection type, shown in the list. If a PPD was specified in the ExtremeZ-IP print queue configuration on the server, ExtremeZ-IP will
send a printer PPD hint to the client Mac. If the client Mac already contains a valid PPD for the printer type, the Print Using dropdown is set
to the correct printer type automatically. Click the Add button.
Note that from the Printer Setup Utility in Mac OS 10.3 Panther, you must choose the printer type “Rendezvous” in order to view and select
Bonjour printers.
To disable Bonjour printer use
If you wish, you can disable the automatic advertisement of Bonjour printers globally.
1.
From the ExtremeZ-IP Administrator, click the Settings button. On the Settings dialog box, click the Print Server Settings tab.
2.
On the Print Server Settings tab, remove the check from the Register Print Server on TCP/IP with Bonjour checkbox.
ExtremeZ-IP stops advertising Bonjour printers until this option is re-enabled.
ExtremeZ-IP Print Quick Start Guide 11
Appendix A: Using the Windows Print Wizard to Define a Windows Printer
When a printer is located on a network and not physically connected to the Print Server, create a printer definition using the Windows Print
Wizard. Once you create a definition for the printer, ExtremeZ-IP displays it in the Windows Print Queue dialog (see page 3). To use the Windows Print Wizard to define a Windows printer, follow these steps.
1.
From the Windows Start menu, choose Printers and Faxes.
The Printer and Faxes dialog appears.
2.
Click Add A Printer.
The Add Printer Wizard Welcome dialog appears.
ExtremeZ-IP Print Quick Start Guide 12
3.
Click Next.
The Local or Network Printer dialog box appears.
4.
Click the radio button for a network printer, or a printer attached to another computer; then, click Next.
The Select a Printer Port dialog appears.
5.
Click the radio button to create a new port, then choose Standard TCP/IP Port from the drop-down menu. Click Next.
6.
Follow steps one and two as needed before proceeding, then, click Next.
The Add Port dialog box appears.
ExtremeZ-IP Print Quick Start Guide 13
7.
Type the IP address or name of the Printer; type a name for the printer or enter the IP address again. Click Next.
The Install Printer Software dialog box appears.
8.
Choose the manufacturer and model of the printer you are adding. Click Next.
The Name Your Printer dialog appears.
9.
Type a name for the printer, then, click Next.
This is the name that appears in the ExtremeZ-IP Windows Printer Queue and the name the Macintosh Client sees when using the
printer through ExtremeZ-IP.
ExtremeZ-IP Print Quick Start Guide 14
10.
From the Printer Sharing dialog box, choose a sharing option. Choose either option, then click Next.
What you select here does not affect your ability to share the printer through ExtremeZ-IP.
The Print Test Page dialog appears.
11.
Choose to print a test page or not; then click Next.
The Completing the Add Printer Wizard dialog box appears.
12.
Click Finish.
The Printers and Faxes window appears listing the printer you added. The printer also appears in ExtremeZ-IP when you choose to add
a Windows Print Queue printer for your Macintosh Client’s use.
ExtremeZ-IP Print Quick Start Guide 15
Appendix B: Using UNC Paths—Security Considerations
ExtremeZ-IP processes many commands within the context of the local system account. If you define a Windows or Specified Directory (Drop
Folder) Print queue using a UNC path, the following example shows how to configure the necessary security settings when (1) Server_A is the
server where ExtremeZ-IP is installed on and (2) Server_B is the server where the UNC path points.
WINDOWS PRINT QUEUES
For Windows Print Queues defined by UNC Paths, follow these steps.
1.
From Server_B click on Start > Settings > Printers.
2.
Right click the printer and select Properties.
3.
Under the Security Tab, add the Computer Object for Server_A.
4.
Confirm Server_A has rights to Print, Manage Printers, Manage Documents.
SPECIFIED DIRECTORIES
For a Specified Directory (Drop Folder) defined by UNC Paths, follow these steps.
1.
From Server_B open an Explorer window to the location of the Specified Directory.
2.
Right click the folder and select properties.
3.
Under the Security Tab, add the Computer Object for Server_A.
4.
Confirm Server_A has Full Control over this folder.
ExtremeZ-IP Print Quick Start Guide 16