1
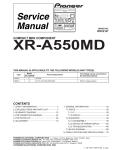
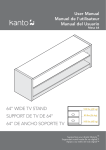
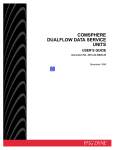
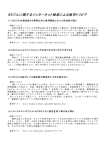
English
User Manual
sub6 Subwoofer
U
SUBWOOFER
Supporting your digital lifestyle™
Table of Contents
Important Safety Precautions . . . . . . . . 2
Introduction / What’s in the Box? . . . . . . 3
Front & Rear Panels . . . . . . . . . . . . . 4
Setting up / Connecting your Subwoofer . . 5
Specifications . . . . . . . . . . . . . . . . . 7
Warranty . . . . . . . . . . . . . . . . . . . 8
Important Safety Precautions
ATTENTION
The exclamation point within an
equilateral triangle is intended to
alert the user of the presence of
important operating and maintenance
(servicing) instructions in the literature
accompanying the apparatus.
•
•
•
•
•
•
•
CAUTION: TO REDUCE THE
RISK OF ELECTRIC SHOCK, DO
NOT REMOVE BACK PANEL.
NO USER SERVICEABLE PARTS
INSIDE. REFER SERVICING
TO QUALIFIED SERVICE
PERSONNEL.
Read these instructions.
Keep these instructions.
Heed all warnings.
Follow all instructions.
Do not use this apparatus near water.
Clean only with a dry cloth.
Do not block any ventilation openings. Install in accordance
with the manufacturer’s instructions.
• Do not install near any heat sources such as radiators, heat
registers, stoves, or other apparatus (including amplifiers)
that produce heat.
• Protect the power-supply cord from being walked on or
pinched, particularly at plugs, convenience receptacles and
the point where they exit from the apparatus.
• Only use attachments / accessories specified by the
manufacturer.
DANGEROUS VOLTAGE
The lightning flash with arrowhead, within an
equilateral triangle, is intended to alert the user
of the presence of non-insulated “dangerous
voltage” within the product’s enclosure that
may be of sufficient magnitude to constitute a
risk of electric shock to persons.
• Unplug this apparatus during lightning storms or when
unused for long periods of time.
• Refer all servicing to qualified service personnel. Servicing
is required when the apparatus has been damaged in any
way, such as power-supply cord or plug is damaged, liquid
has been spilled or objects have fallen into the apparatus,
the apparatus has been exposed to rain or moisture, the
apparatus does not operate normally, or the apparatus has
been dropped.
• Apparatus shall be connected to a MAINS socket outlet with
a protective earthing connection.
• An appliance input coupler is used as the disconnect device
- the disconnect device shall remain readily operable.
• Batteries or battery packs shall not be exposed to excessive
heat such as sunshine, fire or the like.
FCC Warnings
• Changes or modifications not expressly approved by the party responsible for compliance could void the user’s authority to
operate the equipment.
• This equipment has been tested and found to comply with the limits for a Class B digital device, pursuant to Part 15 of the FCC
Rules.
FCC Notice:
• This device complies with part 15 of the FCC Rules. Operation is subject to the following two conditions: (1) This device may
not cause harmful interference, and (2) this device must accept any interference received, including interference that may cause
undesired operation.
Industry Canada Notice:
• Complies with CAN ICES-3(B) / NMB-3(B)
2
Introduction
Thank you for choosing the sub6 powered subwoofer. sub6 was designed to augment the bass
performance of your speakers in a stereo setup or in a home theater installation.
Adding a subwoofer to your system extends the bass response produced by your existing
speakers and improves their midrange clarity. In a home theater application, the subwoofer takes
care of reproducing signals from the low frequency channel. In a stereo system, the subwoofer
helps reduce the low-frequency demands on the main speakers.
We recommend you read all instructions carefully before using the sub6 and keep them for future
reference. Kanto cannot be liable for damage or injury caused by incorrect setup or use of this
product.
This powered subwoofer was carefully tested and inspected during production, and before
packaging and shipping. After unpacking, please check for any damage. It is rare that a unit is
damaged during shipping, but if this happens contact your retailer immediately. You can also
call Kanto directly at 1-888-848-2643 or email [email protected].
What’s In the Box?
Power
Cord
sub6
x3
User
Manuals
3
Supporting your digital lifestyle™
Front & Rear Panels
1
FRONT PANEL
1 6” Paper Cone Driver
2 3
REAR PANEL
2 Volume Knob
3 Low-Pass Filter
Frequency Control
4 Standby Power
5 Phase Switch
5
4
6 Line Level Input
7 ON / OFF Switch
8 AC Input Connection
(100 V - 240 V)
6
7 8
4
Setting up and Connecting your Subwoofer
Ensure that the ON/OFF Switch is in the OFF position before connecting any component.
To some degree, positioning the subwoofer is less critical because it produces only nondirectional low-frequency sounds. However, best results are obtained if the subwoofer is placed
either between the left and right speakers or in the vicinity of either the left channel or right
channel speaker.
As with all speakers, moving the sub6 very close to room boundaries will enhance the bass
frequencies but will tend to muddy the sound. Room characteristics and positioning have a
profound effect on the performance of the subwoofer, so time and effort devoted to achieving
the optimum operating position will be rewarded.
In a typical full range application using one subwoofer like the sub6 thru a single wire
connection, you can connect to either the Left or Right Line Level Input. Connect your stereo
component such as powered speakers with subwoofer output (e.g. YUMI, YU3, SYD6), power
or integrated amplifiers with preamplifier output (e.g. YARO), or multi-channel home theater
receivers with subwoofer output. If your components are equipped with both L/R subwoofer
outputs or L/R preamplifier outputs, we recommend connecting the component to the sub6 by
using both Left and Right Line Level Input channels.
The Low-Pass Filter Control is used to set the upper limit of the frequencies that sub6 will
reproduce, typically within the range of 40Hz-120Hz. Refer to your manufacturer’s information
for the cut-off frequency of your main speakers.
The Phase Switch is normally set to 0°. If the sub6 is positioned significantly farther from the
main speakers or if the subwoofer is used in a stereo setup where the amplifier driving the main
speakers inverts the phase signal, the 180° setting may be desirable. Listen with the switch in
both positions and select the setting that gives the fullest sound. If in doubt, or if there is little
difference, leave the switch set to 0°.
Follow the instructions on the following page to connect your components to sub6. The
examples are not meant to be exhaustive - just examples.
ATTENTION
When connecting audio cables the ON/OFF Switch must be turned OFF. After connecting all cables, the unit can be
turned ON.
5
Supporting your digital lifestyle™
Setting up and Connecting your Subwoofer
Sub Out
Sub Out
Sub
Optical
Aux
Sub
L
R
Power
SUB
WOOFER
R
AUDIO
PRE-OUT
U
L
COMPONENT AUDIO
SURROUND
L
R
VIDEO
SPEAKERS
SUB
WOOFER
R
FRONT
L
CENTER
R
REAR
L
R SURROUND L
HOME THEATER RECEIVER
+
AUX INPUT
-
AMPLIFIER
6
Specifications
sub6 SUBWOOFER
Woofer
Nominal Impedance
Sensitivity 2.83V (/1W/1m)
Amplifier Type
Class D
Power Output
80 Watts
Input Sensitivity
250 mV
Total Harmonic Distortion
< 0.3%
Frequency Range
Frequency Response
Low-Pass Filter
Phase Switch Inputs
Input Voltage / Frequency
6” Paper Cone Driver
4 Ohm
86 dB
30 Hz - 250 Hz
35 Hz - 165 Hz ± 6 dB
40 Hz - 120 Hz
0º and 180º
1 x RCA L/R Line Level
AC 100 V - 240 V 50/60 Hz (auto switching)
Standby Power Consumption
< 0.5 W
Dimensions
W 8.7”x H 8.7” x D 8.7” (220 x 220 x 220 mm)
Net Weight
10.5 lbs (4.8 kg)
Gross Weight
7
13 lbs (5.9 kg)
Supporting your digital lifestyle™
Check out more great products from Kanto!
Kanto Speakers
• Check out our full line of bookshelf and desktop speaker systems
• Available in a stunning array of colors
• Visit kantoaudio.com for more!
BEN
• Full line of Audio and Video Cables
• Attractive white cables and heads
• HDMI, Optical, Mini-jack, RCA, USB
• Switchers, Hubs, Adapters
• Visit kantoliving.com/cable for more!
by
To learn more about all our products, visit www.kantoliving.com
kantoliving
kantoliving
Warranty
Limited Warranty To Original Purchaser
Kanto Distribution Inc. (Kanto) warrants the equipment it manufactures to be free from defects in material
and workmanship for the following limited warranty period of:
24 months parts and labour
If equipment fails because of such defects and Kanto or an authorized dealer is notified within 24 months
from the date of shipment with proof of original invoice. Kanto will, at its option, repair or replace the
equipment, provided that the equipment has not been subjected to mechanical, electrical, or other abuse
or modifications. Equipment that fails under conditions other than those covered will be repaired at the
current price of parts and labor in effect at the repair. Such repairs are warranted for 90 days from the day
of reshipment to the original purchaser. This warranty is in lieu of all other warranties expressed or implied,
including without limitation, any implied warranty or merchantability or fitness for any particular purpose, all
of which are expressly disclaimed.
The information in the owner’s manual has been carefully checked and is believed to be accurate. However,
Kanto assumes no responsibility for any inaccuracies that may be contained in the manual. In no event will
Kanto, be liable for direct, indirect, special, incidental, or consequential damages resulting from any defect
or omission in this manual, even if advised of the possibility of such damages.
13-10
www.kantoliving.com | [email protected]
Tel 888.848.2643