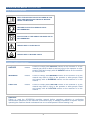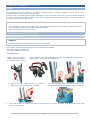
1
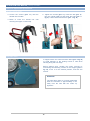
Scorpion by Owner & Operation Manual 1 SCORPION User Manual Foreword This manual contains important information on the safe use and operation of this machine. Failure to read this manual before operating, adjusting or performing maintenance on this machine could cause injury or damage to persons or objects. Anybody operating the machine should understand how to use and operate it before starting it up. Keep this manual for future reference. This manual is a translation of the original version in Italian. For a new manual contact: Kunzle & Tasin S.r.l. REGISTERED HEADQUARTERS Via Circonvallazione est, 2/6 27023 Cassolnovo (PV) - Italy OPERATIONAL HEADQUARTERS Via Cajkovskij, 14 20092 Cinisello Balsamo (MI) - Italy Tel. +39 02 66040930 Fax +39 02 66013445 [email protected] www.kunzletasin.com 2 SCORPION User Manual_February 2013 Edition Contents Key to machine symbols Operator safety instructions Storage Transporting and handling the machine 4 4 5 5 Transport with one person Transport with two people 5 6 Introduction 6 Information on safe use of the machine Correct use Machine data plate 6 6 7 Placing into service 7 Instructions for assembly following transportation Instructions for electrical connection Cables, extensions and plugs Instructions on removing sawdust generated during use 7 8 8 9 Recommendations on prevention measures for users 9 Personal safety measures Compliance with safety measures and warnings Instructions on correct machine use 9 10 11 Machine characteristics Machine warnings 12 13 Prohibited use 13 Starting the machine Machine adjustment procedures 13 15 Adjusting sanding pressure Wheel adjustment (on a surface parallel to the axis of the drum) Adjusting handle height Wall edge castor 15 15 15 16 Abrasive assembly procedures 17 Scorpion Expansion (centrifugal drum) Scorpion EasyFit (with bubble surface) Scorpion Classic 17 17 18 Routine maintenance to be performed 19 Sawdust chamber (for the user) Drums (for the user) Wheels (for the user) Dust bag (for the user) Belt tension Bearings (only for Technical Support Service) 19 19 20 20 21 21 Spare parts Emergency situations (for the user) 21 22 Faults Causes Solutions 22 22 22 Declaration of Conformity Disposal Diagrams Notes 23 24 25 27 3 SCORPION User Manual_February 2013 Edition Key to machine symbols READ THE INSTRUCTIONS CONTAINED IN THIS USER AND MAINTENANCE MANUAL BEFORE USING THE MACHINE HEARING PROTECTION DURING USE IS RECOMMENDED PROTECTION OF THE AIRWAYS DURING USE IS RECOMMENDED HAZARD DUE TO ELECTRICITY HAZARD DUE TO MOVING PARTS Operator safety instructions Failure to comply with HAZARD notices on the machine or in this manual may result in death or serious injury to the operator or other people. Read and comply with all HAZARD notices on the machine or in this manual. HAZARD means WARNING means Failure to comply with WARNING notices on the machine or in this manual may result in injury to the operator or other people. Read and comply with all WARNING notices on the machine or in this manual. CAUTION means Failure to comply with CAUTION notices on the machine or in this manual may result in injury to the operator or other people. Read and comply with all CAUTION notices on the machine or in this manual. HAZARD: Failure to read the SCORPION machine manual before operating, adjusting or performing maintenance operations on the machine could cause injury or damage to persons or objects. Anyone operating the machine should understand how to use and operate it before starting it up. 4 SCORPION User Manual_February 2013 Edition Storage It is advisable to store the machine in its original packaging. Doing so makes it possible to form a column of two packages maximum, with one on top of the other. If the machine is removed from the original packaging and is not used for some time ensure the wheels and drum are not in contact with the ground. In this case use two supports at least 50mm in height to rest the machine on, ensuring contact is with the base frame. ATTENTION This equipment is for dry use only and must not be used or kept outside in wet conditions. Store the machine in a dry building, otherwise the machine could be damaged. Storage temperature from -20°C to 50°C. Transporting and handling the machine Transport with one person WARNING Request assistance to lift the machine due to its heavy weight. The machine can be dismantled into two parts to facilitate transportation: - the suction tube and handle unit - base frame with drum and motor Proceed as follows: 2. After moving the lever forwards (pos. 1 fig. A) lift the tube (pos. 3) and release 1. Ensure the power supply the bar (pos. 4) from the cylinder (pos. 2). cable is disconnected from the mains and the machine. 3. Remove the plug (pos. 6) from the socket (pos. 7) by turning the plug anti-clockwise. 4. Loosen the handle (pos. 5 fig. A) and remove the tube from its housing and bring it to the place of work. 5. Lift the base frame by clasping the hub of the belt guard on the upper part (pos. 1 fig. B) and the base frame itself on the lower part. 5 SCORPION User Manual_February 2013 Edition Transporting and handling the machine 6. Transport with two people When transporting the machine with two people proceed as follows: 1. One operator should clasp the handle grip. 2. The second, holding the hub of the belt guide (pos. 1 fig. B) should lift the machine. A special trolley is available as an accessory (P/N 2999940024). ATTENTION This equipment is not to be used by anyone (children included) with physical or mental disabilities, or anyone without the relevant experience and knowledge, unless they have received instructions on using the equipment and are supervised by a responsible person to ensure their safety. Children must be supervised to ensure that they do not play with the machine. Introduction Information on the safe use of the machine This instruction manual should be read carefully before using the Scorpion wood flooring sander for the first time. The instruction manual contains important information on safety and preventing improper use of the machine, and will resolve any doubts or questions, making it possible to operate the machine safely and with ease. Removing safety features could cause death or physical injury. Familiarise yourself with the machine before using it for the first time. If a situation arises which has not been described in this manual contact your dealer or Kunzle & Tasin s.r.l. Correct use The Scorpion wood flooring sander is suitable for the dry sanding of wood floors. Any other use without the consent of the manufacturer is prohibited. Do not use on wet floors. See also Prohibited Use on page 13. Keep hands and clothing away from moving mechanical parts. The work area is protected via the base frame and the mobile cover on the abrasive drum. 6 SCORPION User Manual_February 2013 Edition Introduction Machine data plate The following information can be found on the machine data plate: 1. 2. 3. 4. 5. 6. 7. 8. Machine model Safety symbols Motor power Frequency Supply voltage Name of manufacturer Country of manufacture Year of manufacture or see serial number 9. Serial number: The serial number is formed as follows: - the first two numbers refer to the year of manufacture (13 =2013) - the second group of three numbers indicates the date the machine was manufactured (029 = 29th January) The last two numbers indicate the progressive number of machines produced on that day of manufacture (16 = sixteenth machine) Placing into service Instructions for assembly following transportation To re-assemble the machine following transportation proceed as follows: 1. Insert the tube into its housing and tighten the handle (pos. 5 fig. A) 2. 7 Insert the bar (pos. 4) into the cylinder (pos. 2) and lower the tube (pos. 3 fig. A) SCORPION User Manual_February 2013 Edition Placing into service Instructions for assembly following transportation 3. Insert the plug (pos. 6) in the socket (pos. 7) HAZARD 4. Lift the drum with the lever (pos. 1 fig. A) Using the machine when not fully assembled may cause injury or damage to people or objects. Do not use the machine when it is not fully assembled. Keep all fittings tightly secured. Maintain machine settings in accordance with the specifications. Instructions on electrical connection CAUTION This machine only operates with the voltage and frequency shown on the machine data plate. Before connecting the cable to the power supply ensure the correct voltage and frequency are available. WARNING Do not expose the machine to rain. This machine is intended for dry use only. Keep the machine in a dry building and do not use it in damp or wet places. WARNING If the machine is not connected correctly to the electricity network death due to electrocution may occur. To prevent electric shocks always use a three wire electrical system connected to earth. For maximum protection against electric shocks use a circuit protected with a differential cut-out switch. WARNING Tampering with the earthing plug in any way may result in death from electrocution. Do not cut, remove or break the earthing plug. If the socket does not match the plug consult a qualified electrician. WARNING Do not use the machine if the switch does not open and close. HAZARD If the machine is used with a damaged plug or power supply cable death may occur from electrocution. If cables or plugs are worn or damaged in any way, have them replaced by the manufacturer or the K & T technical support service or similarly qualified person, in order to prevent risks to safety. Cables, extensions and plugs Only use approved cables. The maximum recommended cable length is 7m; for greater lengths use cables with a larger cross-section. CAUTION Using the machine with unsuitable cable cross-sections and/or excessively long cables may cause injury or damage to people or objects. WARNING The machine must never be moved using its cable and the cable must never be pulled when disconnecting from the socket. WARNING Keep the cable away from sources of heat, oil and sharp edges. 8 SCORPION User Manual_February 2013 Edition Placing into service Cables, extensions and plugs ATTENTION MACHINE WITH 230V 50Hz SINGLE PHASE MOTOR For machines with a 230-240V~50Hz single phase motor (Europe), a HO5VV-3x1.5 mm2 HAR-approved power supply cable must be used along with an approved SCHUKO 2P+T16A 200-250V plug. For non-European versions contact an authorised K&T distributor. Instructions on removing sawdust generated during use HAZARD Sawdust can ignite spontaneously and cause injury or damage. It must be disposed of appropriately. Always empty the sawdust into metal containers which are located outside the building. HAZARD Sawdust can ignite spontaneously and cause injury or damage. Empty the contents of the dust bag when it is 1/3 full. Empty the dust bag at the end of each machine use. Never leave the dust bag unattended when it contains sawdust. Do not empty the contents of the dust bag above a fire. Recommendations on prevention measures for users Personal safety measures WARNING Sawdust can spread through the air and be inhaled when using the sander. Always wear a dust mask when using the sanding equipment. WARNING The eyes and/or body may suffer injury if personal safety clothing is not used. Always wear safety goggles, protective clothing and a dust mask during sanding operations. WARNING Lengthy exposure to noise levels during sanding operations may damage the hearing. Always use ear protectors during sanding operations. CAUTION Never become distracted during sanding operations, check what is happening continually. Use common sense. Do not use the machine when tired. 9 SCORPION User Manual_February 2013 Edition Recommendations on prevention measures for users Compliance with safety measures and warnings HAZARD Using the machine when not fully assembled may cause injury or damage to people or objects. Do not use the machine when it is not fully assembled. Keep all fittings tightly secured. Maintain machine settings in accordance with the specifications. HAZARD Using the sander without the safety guards and covers in position may cause injury or damage. Always ensure that all safety guards and covers are in position and secured well. HAZARD The wood flooring sander may create an explosive environment. Cigarettes, cigars, pipes, lighters, pilot flames, or any other source of fire may create an explosion if lit during sanding operations. No sources of fire must be kept near the work area. HAZARD Poorly ventilated work areas may create an explosive environment when some combustible materials are present in the atmosphere, such as solvents, thinners, alcohol, fuel, some paints, wood dust or other combustible materials. Floor sanding machines may cause various materials and fumes to ignite. Read the manufacturer's instructions for each chemical product used and establish its combustibility. Always keep the work area well-ventilated. HAZARD Striking nails when sanding may generate an explosion or fire. Always ensure all nails are sunk before sanding surfaces. HAZARD Serious damage may occur if the power supply circuit trips repeatedly or is undersized. Have the fuses, safety circuit and power supply line checked by an authorised electrician. HAZARD Performing maintenance and/or repairing the machine when it is not fully disconnected from the power supply may cause death due to electrocution. Disconnect the power supply before carrying out any maintenance and/or repair work. HAZARD The use of this machine on a circuit which is not earthed may cause death due to electrocution. Never disconnect or disable the earthing conductor. Consult an electrician if the earth conductor is missing or it is suspected that the circuit is not suitably earthed. HAZARD The use of this machine with a damaged power supply cable may cause electric shock. Check the power supply cable regularly for damage such as splitting or wear and tear. Do not use the machine if the power supply cable is damaged. Do not use the electric cable to move the machine. HAZARD Injury or damage may occur if the sander runs over the power supply cable damaging it. Keep the cable away from the lower part of the machine to avoid contact with the abrasive. Always keep the power supply cable raised above the machine. HAZARD The moving parts on this machine may cause serious injury and or damage. Keep hands, feet and loose clothing away from all moving parts of the sander. HAZARD Performing maintenance or replacing the dust bag may cause injury to the operator or people nearby if the machine is connected to the power supply. WARNING Failure to comply with instructions on this machine and in this manual may cause serious injury and/or damage. Read and comply with all safety instructions. Ensure that all plates, labels, warnings and instructions are secured to the machine. New plates can be obtained from an authorised K & T dealer. CAUTION Injury or damage may occur if maintenance operations or repairs are carried out by unauthorised personnel. CAUTION The machine may become damaged if it is not kept in a dry building. Keep the machine in a dry building. 10 SCORPION User Manual_February 2013 Edition Recommendations on prevention measures for users Instructions on correct machine use Read this manual carefully and become familiar with the machine. The equipment is suitable for industrial use e.g. in hotels, schools, hospitals, offices, factories and shops. The following information highlights particularly hazardous situations for the operator and/or machine. Understand when these conditions may be present. Removing safety features could cause death or physical injury. Take all steps necessary to instruct personnel who may use the machine. Report any damage on the machine or incorrect operation immediately. 1. Keep hands and clothes away from rotating parts. 2. Keep hands on the handle when the motor is operating. 3. Do not leave the machine unattended when the motor is operating. 4. Always use the machine with the dust bag in the correct position. 5. Do not detach the dust bag with the motor operating. 6. Always disconnect the power supply cable from the machine before performing maintenance. 7. Transport the machine with care due to the heavy weight of the individual parts making up the machine. 8. Always use the machine in well-ventilated areas. 9. Always dispose of the sawdust appropriately. 10. Use the type and amount of abrasive specified in the instruction manual. 11. Always keep the work area well-lit. 12. The use of accessories other than those recommended in this manual may cause injury. 13. The sander is for indoor jobs only. 11 SCORPION User Manual_February 2013 Edition Machine characteristics Abrasive dimensions per drum: Expansion EasyFit Classic 200 x 480 mm (ring) 200 x 470 mm (sheet) 200 x 550 mm (sheet) Drum width: Expansion EasyFit Classic 200 mm 203 mm 200 mm Drum diameter: Expansion EasyFit Classic 150.5 mm 147.5 mm 151.5 mm Drum speed: Expansion EasyFit Classic 3000 revs/min 2500 revs/min 2500 revs/min 230V 50 Hz 1.5 kW Motor: Handles: height adjustable Control lever: grip control Level control: adjustable via base frame screws via “operator presence” control lever motor stops when lever is released Safety motor protection: Wheels: Ø 80 mm replaceable Bearings: lifetime lubricated ball bearings Drum pressure adjustment: infinite adjustment Noise level (IEC 60704 -1) (continuous weighted sound pressure level A, measured at a distance of 0.4 m from the handle and a height of 1.5 m from the ground) 80 dB(A) max Vibration (ISO 5349) (weighted value of the mean square deviation of the acceleration) 1.45 m m/s Machine dimensions 2 320 x 810 x 1070 mm Net weight 45 kg Gross weight Cardboard packages 2 items machine unit 660 x 370 x 640 mm handle unit 340 x 220 x 880 mm Gross weight Cardboard packaging 56 kg Standard equipment Dust bag Start-up keys User and maintenance manual 12 SCORPION User Manual_February 2013 Edition Machine warnings Prohibited use WARNING This equipment is not to be used by anyone (children included) with physical or mental disabilities, or anyone without the relevant experience and knowledge, unless they have received instructions on using the equipment and are supervised by a responsible person to ensure their safety. ATTENTION This equipment is not suitable for collecting hazardous dust. CAUTION Using the machine to move objects or moving on an incline may cause injury or damage. The machine must only be used to sand dry wooden floors which are level or have a maximum incline of 2%. Do not use the machine to sand furniture. Do not sit astride the machine when it is operating. CAUTION Work surfaces may be seriously damaged if the machine is left turning on one point while the tool is in contact with the surface. To avoid damaging the surface approach the cutting line carefully. Do not stop when lowering and raising the equipment, keep moving at constant speed. Starting the machine To start the machine proceed as follows: 1. Become familiar with the machine and read all instructions and safety notices. Ensure that all operators have read this manual. 2. Arrange the dust bag on the curved handle by securing the rope to the bag clip. 3. Locate the power supply. The socket must be compatible with the plug. To avoid electrical hazards the socket must be earth protected with a 20 A fuse. 4. Keep the cable away from the pathway of the machine. 5. Turn the belt cover upwards (fig. B pos. 2) 6. Fit the abrasive according to the ABRASIVE ASSEMBLY PROCEDURES (pg. 17) depending on the type of drum installed on the machine. 13 SCORPION User Manual_February 2013 Edition Starting the machine 7. Ensure the lever is engaged (pos. 1 8. Close the abrasive cover (pos. 2 fig. B) fig. A) and the drum is raised off the floor. 9. Put the plug in the socket. 10. Release the safety lever (pos. 8 fig. A) and press the start handle (pos. 9 fig. A) until the handle underneath is clasped (the motor will start). Keeping the start handle pressed release the knob (pos. 10 fig. A) and push the drum control lever forwards (pos. 1 fig. A). Commence sanding operations. 11. To stop the machine engage the drum control lever and release the start handle, which will immediately return to its initial position. 14 SCORPION User Manual_February 2013 Edition Machine adjustment procedures Adjusting sanding pressure To vary drum pressure on the floor, use the adjustment knob (pos. 3 fig. B) and proceed as follows: 1. Turn the adjustment knob clockwise to decrease drum pressure on the floor. 2. Turn the adjustment knob anticlockwise to increase drum pressure on the floor. Wheel adjustment (on a surface parallel to the axis of the drum) To adjust wheel position proceed as follows: 1. Loosen the locking nut (pos. 4 fig. B) 2. By turning the screws (pos. 5 fig. B) clockwise the end of the side drum cover raises off the floor. 3. By turning the screws (pos. 5 fig. B) anti-clockwise the end of the side drum cover lowers towards the floor. 4. Once the desired position has been reached secure the locking nut (pos. 4 fig. B) Adjusting handle height To adjust handle height proceed as follows: 1. Ensure the power supply cable is disconnected from the mains and the machine. 2. Move the lever forwards (pos. 1 fig. A), raise the tube (pos. 3), and release the bar (pos.4) from the cylinder (pos. 2). 15 SCORPION User Manual_February 2013 Edition Machine adjustment procedures Adjusting handle height 3. Loosen the screws (pos. 11) until the handle unit is mobile. 5. Tighten the screws (pos. 11), insert the bar (pos. 4) into the cylinder (pos. 2) and lower the tube (pos. 3 fig. A). Lift the drum with the lever (pos. 1 fig. A) 4. Raise or lower the handle unit until reaching the upper or lower stop. Wall edge castor A support with a free castor has been fitted (pos. 6 fig. B) to avoid damage to the skirting board or wall when sanding along the wall edge. Before starting work, position the castor correctly by unscrewing the fastening screws on the support (pos. 7 fig. B), move it to the desired position, and lock the screws. WARNING The wall edge castor is correctly positioned when the machine is approximately 8 mm away from the wall with the castor up against it. 16 SCORPION User Manual_February 2013 Edition Abrasive assembly procedures Scorpion Expansion (centrifugal drum) Fit the abrasive disc (pos. 2 fig. C) to the drum (pos.1) ensuring that the abrasive protrudes approximately 1.5 mm from the drum itself. BEWARE Do not start the machine without the abrasive inserted, otherwise the drum will be damaged and must be replaced. WARNING The abrasive is in the correct position when it protrudes approximately 1.5 mm from the sander drum. HAZARD Using a damaged abrasive which could then tear while sanding may damage the machine or floor. Scorpion EasyFit (drum with bubble mat surface) Loosen the fastening screws (pos. 1 fig. D) on the paper press (pos. 2 fig. D) on the drum with the correct screwdriver, being careful not to remove the screws and paper press from the drum . Insert one end of the abrasive (pos. 3 fig. D) under the paper press. Turn the drum so the abrasive winds around the drum itself. Insert the other end (pos. 4 fig. D) of the abrasive under the paper press. Centre the abrasive on the drum and smooth out any creases. Tighten the paper press screws carefully. If unsure loosen the paper press screws and repeat the procedure. HAZARD An abrasive which is not stretched correctly or is damaged could tear while sanding and damage the machine or floor. 17 SCORPION User Manual_February 2013 Edition Abrasive assembly procedures Scorpion Classic (drum with slot) The abrasive must be prepared according to the dimensions shown in fig. E, and cut offset as shown in the figure alongside. Using the Allen keys turn the two tensioning shafts (pos. 1 and 2 fig. F) until the two plates on the shafts are facing. Insert one edge of the abrasive to approximately 2/3 of the depth of the drum slot and turn the drum, ensuring that the abrasive adheres to the rubber. Once the slot is reached insert the other edge until it is stretched evenly. Then extract the two edges of the abrasive evenly for approximately 5 mm, as shown in fig. F. Turn the shafts in opposite directions until the correct, uniform tension is obtained. Once the operation has been completed the plates P will be situated approximately as shown in fig. G. If the abrasive is not stretched uniformly after performing the above operations, repeat the procedure suitably adjusting the insertion of the abrasive until the correct distribution of tension is obtained. 18 SCORPION User Manual_February 2013 Edition Machine adjustment procedures Scorpion Classic (drum with slot) The aforementioned procedure is suited to fitting large grain abrasive (20-24). For medium and fine grain abrasive (36-60-80 etc.) one or more strips of abrasive must be placed between the two edges, which are as wide as the drum and approximately 30 mm in length, to compensate for the difference in thickness between the large grain and medium/fine grain abrasive. WARNING The abrasive is in the correct position when it protrudes approximately 1.5 mm from the sander drum. HAZARD An abrasive which is not stretched correctly or is damaged could tear while sanding and damage the machine or floor. Routine maintenance to be performed To keep the machine in good working condition the following items must be checked and serviced regularly: Sawdust chamber (for the user) Hoover the sawdust chamber regularly. Drums (for the user) Check the outer surface of the drum regularly. Remove any dirt. 19 SCORPION User Manual_February 2013 Edition Routine maintenance to be performed Wheels (for the user) Remove dirt from the machine unit and wheels regularly. Dirt may cause uneven sanding. Dust bag (for the user) Remove the bag and shake it well to remove sawdust. Turn the bag inside out and wash it in the machine in cold water to prevent blockage of the pores and a decrease in dust collection ability. As an alternative to the fabric bag the following may be used: a) Disposable paper bags, available in packs of 3 (P/N 2900030142). The limit for use is 1/3 of the total capacity. b) Remote control industrial vacuum cleaner with tube with maximum length of 10 metres. 20 SCORPION User Manual_February 2013 Edition Belt tension (for the user) Check the belt tension every 500 hours of operation by removing the belt cover (pos. 8 fig. B) after removing the two screws and loosening the 4 motor fastening screws (pos. 1 fig. H) Belt tension can be adjusted using the screws (pos. 2 fig. H) After adjustment lock the motor fastening screws (pos. 1 fig. H) and replace the belt cover. If the belt is excessively worn it must be replaced. CAUTION Excessive belt tension may cause the premature failure of the ball bearings. The belt must have a 10.5 mm stretch with a centre load of 30 ±3 N. Bearings (only for Technical Support Service) Check bearings regularly for wear or damage according to the following timescales: WHEELS: FAN SHAFT: SANDING DRUM: MOTOR SHAFT: after the first after the first after the first after the first 2500 hours 2500 hours 5000 hours 5000 hours Spare parts Always use K & T spare parts. Failure to use K&T spare parts, or repairs/adjustments carried out by unauthorised personnel, will invalidate the guarantee and any resulting liability. The machine must only be repaired by qualified personnel. This electric equipment is compliant with the relevant safety legislation. Repairs must be carried out by qualified personnel using K & T spare parts, otherwise the user may suffer serious injury. 21 SCORPION User Manual_February 2013 Edition Emergency situations (for the user) FAULTS Insufficient cutting Insufficient motor speed CAUSES SOLUTIONS Unsuitable or worn abrasive Replace the abrasive Insufficient drum pressure Increase drum pressure Insufficient belt tension Increase belt tension Worn belt Replace the belt Insufficient tension due to: Excessive cable length or unsuitable Use cables of suitable length and cross section cross section Scratched work surface Insufficient dust collection Motor does not start Scorching on work surface Unstable connections Arrange suitable connections Faulty capacitor Contact an authorised K & T dealer Faulty motor Contact an authorised K & T dealer Faulty abrasive Replace the abrasive Drum surface dirty or faulty Clean/correct/replace the rubbercoated drum. Incorrect wheel adjustment Correct the wheel position Dust bag more than 1/3 full Empty the bag. Dust bag dirty or with blocked pores Shake out the dirt and wash the bag. Vacuum ducts and/or obstructed pipes Clean air ducts Faulty switch Contact an authorised K & T dealer Faulty capacitor Contact an authorised K & T dealer Insufficient voltage for unstable connections Contact an authorised K & T dealer Faulty motor Contact an authorised K & T dealer No power supply voltage Check power supply and connections Worn abrasive Replace the abrasive Excessive pressure on drum Decrease sanding pressure Abrasive too fine Use abrasive with larger grain 22 SCORPION User Manual_February 2013 Edition DECLARATION OF CONFORMITY DECLARATION OF CONFORMITY 2006/95 EC, 2006/42 EC 2004/108 EC, 2002/95 EC 2002/96 EC KUNZLE & TASIN S.r.l. Manufacturer and entity authorised to compile and maintain the technical file Registered headquarters Via Circonvallazione Est. 2/6 27023 Cassolnovo (PV) - Italy Business Management and Production Site Via Cajkovskij, 14 20092 – Cinisello Balsamo (MI) - Italy declare that under our sole responsibility the product: SCORPION DRUM SANDER FOR WOOD FLOORING to which this declaration refers, is compliant with the following Directives: 2006/95 EC (low voltage directive), 2006/42 EC (machine directive), 2004/108 EC (EMV), 2002/95 EC (RoHS), 2002/96 EC (WEEE directive) The product is compliant with the following harmonised standards: Machine safety - basic concepts, general design principles Basic terminology, EN ISO 12100 methodology, Part 1 Machine safety - basic concepts, general design principles Technical principles and EN ISO 12100 specifications, Part 2 Machine safety - electrical machine equipment Part 1: General rules EN 60204-1 Safety of domestic equipment and similar - General rules EN 60 335-1 Particular requirement for floor treatment and floor cleaning machine for industrial and commercial use EN 60 335-2-67 Electromagnetic compatibility (EMC) Limits and methods in measuring the characteristics of radio interference in motorised or thermal domestic appliances and similar, electric tools and similar electric devices - EN 55014-1 Part 3: Limits: Section 2: Limits for the emission of harmonic currents (equipment with input current 16A per phase) - EN 61000-3-2 Part 3: Limits: Section 11: Limit of voltage fluctuations and flicker in low voltage power supply systems for equipment with rated current 16 A - EN 61000-3-11 CASSOLNOVO (PV) – 27/09/2012 (place and date of issue) Michela Caresana - CHIEF EXECUTIVE OFFICER 23 SCORPION User Manual_February 2013 Edition Disposal Smaltimento di apparecchiature da rottamare da parte di privati nell’Unione Europea. Questo simbolo che appare sul prodotto o sulla confezione indica che il prodotto non deve essere smaltito assieme ad altri rifiuti domestici. Gli utenti devono provvedere allo smaltimento delle apparecchiature da rottamare portandole al luogo di raccolta indicato per il riciclaggio delle apparecchiature elettriche ed elettroniche. La raccolta e il riciclaggio separati dalle apparecchiature da rottamare in fase di smaltimento favoriscono la conservazione delle risorse naturali e garantiscono che tali apparecchiature vengano rottamate nel rispetto dell’ambiente e della tutela della salute. Per ulteriori informazioni sui punti di raccolta delle apparecchiature da rottamare, contattare il proprio comune di residenza, il servizio di smaltimento dei rifiuti locale o il negozio presso il quale è stato acquistato il prodotto. Per indicare che questo prodotto comporta requisiti speciali di smaltimento, è stata fissata un’etichetta sul retro del gruppo manico, inoltre essendo presente una fonte di alimentazione esterna, ne è stata fissata un’altra l’etichetta sul retro della scocca della macchina. Disposal of Waste Equipment by Users in Private Households in the European Union. This symbol on the product or packaging indicates that it must not be disposed of with other household waste. It is your responsibility to dispose of your waste by bringing it to a designated collection point that recycles electrical and electronic waste equipment. The separate collection and recycling of waste at the time of disposal helps to conserve natural resources and ensures it is recycled in a manner that safeguards health and the environment. For more information about where to take waste equipment for recycling, please contact your local council office, household waste disposal service or retailer where you purchased the product. To indicate that this product has special disposal requirements a label is attached to the back of the handle unit. If an external power supply is included, attach the small label to the back of the power supply. Entsorgung von Ausschusselektrogeräten durch Benutzer in privaten Haushalten in der EU. Dieses Symbol auf dem Produkt oder dessen Verpackung gibt an, dass das Produkt nicht zusammen mit dem Restmüll entsorgt werden darf. Es obliegt daher Ihrer Verantwortung, das zum Verschrotten bestimmte Gerät an einer für die Entsorgung oder Wiederverwertung von Elektrogeräten aller Art entsprechenden Stelle abzugeben. Die separate Sammlung und das Recycling Ihrer zur Entsorgung bestimmten Elektrogeräte trägt zum Schutz der Umwelt bei und gewährleistet, dass sie auf eine Art und Weise recycelt werden, die keine Gefährdung für die Gesundheit des Menschen und der Umwelt darstellt. Für weitere Informationen darüber, wo Sie alte Elektrogeräte zum Recyceln abgeben können, setzen Sie sich sie mit den örtlichen Behörden, Wertstoffhöfen im Kontakt oder fragen Sie dort, wo Sie das Gerät erworben haben. Um darauf hinzuweisen, dass für dieses Produkt spezielle Entsorgungsrichtlinien gelten, wurde auf der Rückseite der Griffgruppe ein Aufkleber angebracht. Außerdem, da eine externe Versorgung im Lieferumfang enthalten ist, wurde ein anderes Aufkleber an der Rückseite der Kalotte angebracht. Evacuation des équipements usagés par les utilisateurs dans les foyers privés au sein de l’Union européenne. La présence de ce symbole sur le produit on sur son emballage indique que vous ne pouvez pas vous débarrasser de ce produit de la même façon que vos déchets courant. Au contraire, vous êtes responsable de l’évacuation de vos équipements usagés et à cet effet, vous êtes tenu de les remettre à un point de collecte agréé pour le recyclage des équipements électriques et électroniques usagès. Le tri, l’évacuation et le recyclage séparés de vos équipements usagès permettent de préserver les ressources naturelles et de s’assurer que ces équipements sont recycles dans le respect de la santé humaine et de l’environnement. Pour plus d’informations sur les lieux de collecte des équipements usagès, veuillez contracter votre mairie, votre service de traitement des déchets ménagers ou le magasin où vous avez acheté le produit. Fixes la grande étiquette à l’arrière du produit pour signaler qu’il doit être évacué selon une procédure particulière. Lorsqu’une alimentation externe est fournie, fixes la petite étiquette à l’arrière de celle-ci. 24 SCORPION User Manual_February 2013 Edition Diagrams 25 SCORPION User Manual_February 2013 Edition Diagrams 26 SCORPION User Manual_February 2013 Edition Notes _____________________________________________________________________________________ _____________________________________________________________________________________ _____________________________________________________________________________________ _____________________________________________________________________________________ _____________________________________________________________________________________ _____________________________________________________________________________________ _____________________________________________________________________________________ _____________________________________________________________________________________ _____________________________________________________________________________________ _____________________________________________________________________________________ _____________________________________________________________________________________ _____________________________________________________________________________________ _____________________________________________________________________________________ _____________________________________________________________________________________ _____________________________________________________________________________________ _____________________________________________________________________________________ _____________________________________________________________________________________ _____________________________________________________________________________________ _____________________________________________________________________________________ _____________________________________________________________________________________ _____________________________________________________________________________________ _____________________________________________________________________________________ _____________________________________________________________________________________ _____________________________________________________________________________________ _____________________________________________________________________________________ _____________________________________________________________________________________ _____________________________________________________________________________________ _____________________________________________________________________________________ _____________________________________________________________________________________ _____________________________________________________________________________________ _____________________________________________________________________________________ _____________________________________________________________________________________ _____________________________________________________________________________________ _____________________________________________________________________________________ _____________________________________________________________________________________ _____________________________________________________________________________________ 27 February 2013 Edition 28