1
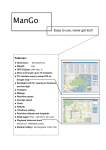
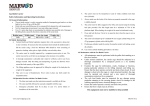
RNS – Rallye Navigation Solutions TripMaster XL² User Manual Button Legend Short Long Long Short Long Short Power On Toggle Select Toggle Toggle Toggle Adjust Wheel Setting Default: 2160 Automatic Calibration (off=blinking) Swap remote buttons (same level = default) Trip B Show/hide (hide=blinking) Clock Show/hide (hide=blinking) RNS – Rallye Navigation Solutions TripMaster XL² User Manual First Time Use To be able to use the TripMaster XL, you must connect a power source to it. In order to do so, you must do either one of the two: - Insert 2x CR2032 batteries or - Connect a suitable external DC power source (range 8-24V) Installing batteries (as backup) Remove the 4 screws that secure the lid then carefully slide the lid away from the rubber grommets. Now, install 2x CR2032 batteries by sliding them into their holders. Remember to securely fix the lid back into its place again. Ideally, you can glue the magnet to your front brake rotor and drill and tap a M8 hole into your brake caliper support to accommodate the wheel sensor. It is important that the circular faces of both the sensor and magnet are no more than 10mm apart from one another. During one complete and slow revolution it is vital that this segment lights up only once! Multiple occurrences mean incorrect mounting of either the sensor or magnet. Connecting an external power source Amongst the accessories of the TripMaster XL, you will find the female connector for the power connection. Again, please pay attention to the correct polarity (one wire is marked RED meaning +, the other is BLACK meaning -). You will notice the LCD illumination turn on if you have correctly connected the external power (range 8-24V). Wheel Sensor Below is an example of how the wheel sensor (green) and magnet (red) should be fixed. This is achieved by switching the TripMaster XL into the speed mode (see guide above). By rotating the front wheel so that magnet is directly facing the sensor, the segment on the bottom left hand corner of the LCD (shown below in red) must light up. When the front wheel is spinning faster than 10km/h, this feature will be hidden. Sensor Test To ensure accurate readings, you must test whether the wheel sensor is operating correctly. RNS – Rallye Navigation Solutions TripMaster XL² User Manual Auto Calibrate Function Included in the software of the TripMaster XL is a special Auto Calibration function. This special feature allows for even more precise trip counting should it be enabled (Auto Calibration is disabled by default). Once enabled, the TripMaster XL will monitor your trip adjustments and accordingly fine-tune your wheel circumference setting by 1mm up or down with every first correction. This feature will then be temporarily deactivated for a period of 20 seconds after which it will return to its operating state again. Adjusting your trip greatly after getting lost will have minor influence on this feature. Example scenario: Trip = 134.78km +++ adjustment (3 clicks up) Trip = 134.81km wheel setting now +1mm . . . Trip = 134.83km + adjustment (1 click up) Trip = 134.84km wheel setting remains (feature still temporarily deactivated, 20s rule) . . . Trip = 142.19km ++ adjustment (2 clicks up) Trip=142.21km wheel setting now +1mm . . . Trip = 148.61km -adjustment (1 click down) Trip = 148.60km Wheel setting now -1mm RNS – Rallye Navigation Solutions TripMaster XL² User Manual