1
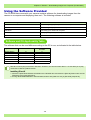
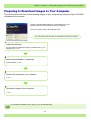
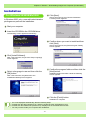
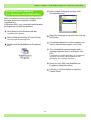
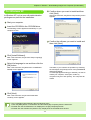
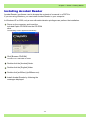
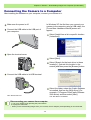
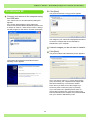
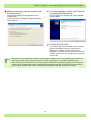
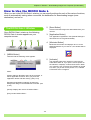
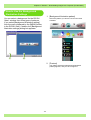
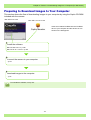
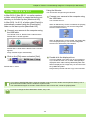
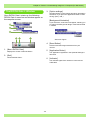
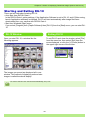
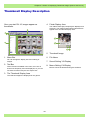
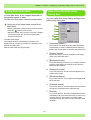
Chapter 2 Playing back Images on a
Computer (Pictures/Movies)
Section 1 Downloading Images to a
Computer (For Windows)
This section explains displaying still images and movies you have
downloaded to your computer.
Please do not connect your camera to the computer before installing the software for
downloading.
If you happened to connect your camera to computer (resulting in the [Add New Hardware Wizard] screen
appearing), simply click [Cancel], and after disconnecting your camera, install the software on your computer.
• For the rest of this explanation, still images and movies will be referred to together as "images".
• When downloading images from your camera, it is recommended you safeguard the power supply by using
the AC Adaptor (sold separately). The explanations provided here assume that the AC Adaptor is being
used.
Chapter 2 / Section 1 Downloading Images to a Computer (For Windows)
Using the Software Provided
The CD-ROM that comes with your camera contains software for downloading images from the
camera to a computer and displaying them on it. The following software is included.
Application Name
Used For
RICOH Gate L for Windows
Downloading images (Except for Windows XP)
WIA driver
Downloading images (For Windows XP)
USB driver
Connecting your camera to computer
DU-10
Displaying images on your computer
Acrobat Reader
Software used to browse the contents of a manual in a PDF file
Software and OS Applicability Table
The software that can be used differs according to the OS in use, as indicated in the table below.
Application Name
RICOH Gate L
DU-10
USB driver
WIA driver
Mounter
Acrobat Reader
Windows XP
Windows 98/98SE/
Me/2000
O
X
O
X
O
O
X
X
X
O
O
O
DirectX is used to play movie files in Windows. However, the versions earlier than 7.1 do not allow you to play
movie files. Install an updated version.
Installing DirectX
1. Insert the Caplio RR30 Software CD-ROM in the CD-ROM drive and select the [DirectX] folder under the CDROM drive using Internet Explorer.
2. If using Windows98/98SE/Me or Windows2000, double-click [DX81xxx.exe] or [Win2000] respectively.
108
Chapter 2 / Section 1 Downloading Images to a Computer (For Windows)
System Requirements
The following environments are necessary for using the provided software. Please check your
computer, or the computer's user manual.
System Requirements
Specification
Compatible computers
Computers with Windows98/98SE/Me/2000/XP pre-installed, with a standard USB
Port, whose operation is guaranteed by the PC manufacturer
CPU
Pentium 2 or higher
Memory
Windows 98/98SE: 32MB or more (96MB or more recommended)
Windows Me: 64MB or more (96MB or more recommended)
Windows 2000: 128MB or more (256MB or more recommended)
Windows XP: 128MB or more (256MB or more recommended)
Hard drive space required for
installation
Windows 98/98SE: 10MB or more
Windows Me: 10MB or more
Windows 2000: 10MB or more
Windows XP: 10MB or more
Display resolution
640 X 480 dots or greater (800 X 600 or greater recommended)
Display colors
256 colors or greater (65000 or greater recommended)
CD-ROM drive
A CD-ROM drive compatible with the above-mentioned computer body
USB port
A USB port compatible with the above-mentioned computer body
•
•
•
•
•
If your computer has an upgraded OS, the USB function may not work normally, so it cannot be supported.
Problems may arise due to changes made to the OS, such as through patches or a service package release.
Connection to a USB port retrofitted using an extended function (PCI bus, etc.) cannot be supported.
If used in conjunction with a hub or other USB devices, the software may not work properly.
When dealing with movies and other large files, a larger memory environment is recommended.
109
Chapter 2 / Section 1 Downloading Images to a Computer (For Windows)
Preparing to Download Images to Your Computer
This section shows the flow of downloading images to your computer by using the Caplio CD-ROM
included with the camera.
Insert the included CD-ROM into the CD-ROM drive of your
computer and the screen shown on the right appears.
The screen shown here is from Windows XP.
You can browse the manuals on CD-ROM by clicking this button.
Install the software.
For all versions of Windows except for Windows XP...p.111
Windows XP...p.113
Install Acrobat Reader, if necessary:
Acrobat Reader...p.115
Connect the camera to your computer.
...p.116
Download images to the computer.
...p.117
To uninstall the software, see p.112 (or p.114 for Windows XP).
110
Chapter 2 / Section 1 Downloading Images to a Computer (For Windows)
Installation
For Windows 98/98SE/Me/2000
Click [Next].
After a few moments, the [Choose Destination
Location] screen appears.
In Windows 2000, only a user with administrative
privileges can perform the installation.
Start your computer.
Insert the CD-ROM in the CD-ROM drive.
The following screen appears automatically.
Confirm where you want to install and then
click [Next].
After a few moments, the [Select Program Folder]
screen appears.
Click [Install Software].
After a few moments, the [Choose Setup Language]
screen appears.
Confirm the program folder and then click the
[Next] button.
Select a language to use and then click the
[OK] button.
Installation begins and after a while the following
screen appears.
After a few moments, the [Welcome to the
InstallShield Wizard] screen appears.
Click the [Finish] button.
Installation is complete.
• If it is not displayed automatically, take the following steps.
1. Double-click the [My Computer] icon, and then double-click the CD-ROM drive icon.
2. Double-click the AutoRun file (Autorun.exe) displayed in the CD-ROM drive window.
• You may need to restart your computer after installation.
111
Chapter 2 / Section 1 Downloading Images to a Computer (For Windows)
Uninstalling the Software
(For Windows 98/98SE/Me/2000)
Select [Caplio Software] and then click
[Change/Remove].
When you want to remove the software, follow
the steps below (this operation is called
uninstallation).
In Windows 2000, only a user with administrative
privileges can uninstall the software.
Click [Start] on the Windows task bar.
The [Start] menu appears.
Select the language to use and then click the
[OK] button.
Select [Settings] and then [Control Panel].
The control panel screen appears.
A message appears to confirm whether you
want to remove the program: click [Yes].
Double-click the [Add/Remove Programs]
icon.
The uninstallation process begins and a
message appears when it is finished: click
[OK].
A message may appear prompting you to restart the
computer. In this case, select restart then click
[Complete]. The computer will restart.
Once you click [OK], the [Add/Remove
Programs] dialog box closes.
Click the [×] (Close) button to close the
Control Panel.
112
Chapter 2 / Section 1 Downloading Images to a Computer (For Windows)
For Windows XP
Confirm where you want to install and then
click [Next].
After a few moments, the [Select Components] screen
appears.
In Windows XP, only a user with administrative
privileges can perform the installation.
Start your computer.
Insert the CD-ROM in the CD-ROM drive.
The following screen appears automatically on your
computer screen.
Confirm the software you want to install and
then click [Next].
Click [Install Software].
After a few moments, the [Choose Setup Language]
screen appears.
Select the language to use and then click the
[OK] button.
Thereafter, if you continue the operation by following
the messages, the [Finish] screen of the [InstallShield
Wizard] will appear.
If a message appears asking you whether you want to
restart your computer, select [Yes, restart my
computer now.] then click [Finish]. The computer will
restart.
After a few moments, the [Welcome to InstallShield
Wizard] screen appears.
Click [Next].
After a few moments, the [Choose Destination
Location] screen appears.
If it is not displayed automatically, take the following steps.
1. Click the [Start] button on the task bar and then select [My Computer] from the start menu.
2. Double-click the CD-ROM drive icon displayed in the [My Computer] window.
3. Double-click the AutoRun file (Autorun.exe) displayed in the CD-ROM drive window.
113
Chapter 2 / Section 1 Downloading Images to a Computer (For Windows)
Uninstalling the Software
(For Windows XP)
Select the language to use and then click the
[OK] button.
A message appears to confirm whether you
want to remove the program: click [OK].
When you want to remove the software, follow
the steps below (this operation is called
uninstallation).
For Windows XP, only a user with administrative
privileges can perform the uninstallation.
The uninstallation process begins and a
message appears when it is finished. Click
[Finish].
If a message appears asking you whether you want to
restart your computer, select [Yes, restart my
computer now.] then click [Finish]. The computer will
restart.
Click [Start] on the Windows task bar.
The [Start] menu appears.
Select [Control Panel] from the [Start] menu.
Once you click [OK], the [Add/Remove
Program] dialog box closes. Click the [×]
(Close) button to close the Control Panel.
The control panel screen appears.
Click the [Add/Remove Programs] icon.
After the uninstallation is complete, please restart
your computer.
Select [Caplio Software] and then click
[Change/Remove].
114
Chapter 1 / Section 1 Getting Started
Installing Acrobat Reader
Acrobat Reader is software used to browse the contents of a manual in a PDF file.
If you are using Windows, you can install Acrobat Reader in your computer.
In Windows XP or 2000, only a user with administrative privileges can perform the installation.
Power on the computer, and insert the
included Caplio CD-ROM into the CD-ROM
drive.
The following screen appears automatically.
Click [Browse CD-ROM].
The files on the CD-ROM are listed.
Double-click the [Acrobat] folder.
Double-click the [English] folder.
Double-click [ar500enu] (ar500enu.exe).
Install Acrobat Reader by following the
messages displayed.
115
Chapter 2 / Section 1 Downloading Images to a Computer (For Windows)
Connecting the Camera to a Computer
After installing the software on your computer, connect your camera to it.
In Windows XP, the first time you connect your
camera to the computer using a USB cable, the
[Found New Hardware Wizard] screen will
appear.
Make sure the power is off.
Connect the USB cable to the USB port of
your computer.
Select [Install from a list or specific location
(Advanced)].
Open the terminal cover.
Select [Next].
Select [Search for the best driver in these
locations.] -[Include this location in the
search] and then press the [Browse] button.
Connect the USB cable to its USB terminal.
Select the folder, where the Caplio Software
is installed, that has the [WIA driver] (For
example, C:\Program Files\Caplio Software
\WIA driver) and then select [Next].
Your camera turns on.
The WIA Driver is installed.
Disconnecting your camera from computer
1. Turn your camera off by pressing the power button.
2. Unplug the USB cable.
• When you are downloading images from your camera, the AC Adaptor (sold separately) is recommended.
116
Chapter 2 / Section 1 Downloading Images to a Computer (For Windows)
Downloading Pictures to Your Computer
After you have connected your camera to the computer, images are downloaded automatically.
Images are downloaded to your computer from the following memory sources.
When an SD Memory Card is loaded
When no memory card is loaded
Downloads from
internal memory
Downloads from SD
Memory Card
For how to change files names when recording, see p.102.
Downloading methods differ (as described in the following table) depending on the environment used.
Follow the steps in the reference pages to download.
For Windows 98/98SE/Me/2000
Downloading using RICOH Gate L.
see p.117
For Windows XP
Downloading using Windows XP functions.
see p.118
For Windows 98/98SE/Me/2000
Connect your camera to the computer using
the USB cable.
The camera turns on, RICOH Gate L starts, and the
RICOH Gate L window appears.
RICOH Gate L automatically creates a folder
called [Caplio] inside your [My Documents]
folder. Downloaded images are saved in folders
with the date of each shot, inside the [Caplio]
folder.
Image transfer begins automatically.
Once download finishes, DU-10 launches, and you
can view the images.
• Before closing RICOH Gate L, if you turn the camera off, or unplug the USB cable, the RICOH Gate L
window is minimized and displayed as an icon on the Windows task bar. If you click the icon, the window will
be displayed again.
• After exiting RICOH Gate L by pressing the [MENU] button and selecting [Close], if you want to restart RICOH
Gate L, follow the steps below.
Select [Program] from the [Start] menu then select Caplio Software then RICOH Gate L.
• You can change the folder for downloading your images (Save Destination).
•
•
•
•
For how to change the Save Destination Folder, see p.121.
For how to start RICOH Gate L, see p.120.
For RICOH Gate L screen, see p.1209.
For when images fail to transfer properly, see p.153.
117
Chapter 2 / Section 1 Downloading Images to a Computer (For Windows)
For Windows XP
Click [Next].
The [Choose Pictures to Copy] screen appears.
Connect your camera to the computer using
the USB cable.
Your camera turns on and the following dialog box
appears.
If the screen below appears, select "Microsoft
Scanner and Camera Wizard Download pictures from
a camera or scanner", check the box next to "Always
use this program for this action" and then press [OK].
The images in your camera are displayed and marked
as checked. Images that are checked will be
transferred to your computer.
Uncheck images you do not want to transfer.
Click [Next].
The [Picture Name and Destination] screen appears.
The scanner and camera wizard starts and the
following screen appears.
Once you enter a name in [1. Type a name for this
group of pictures], the computer saves images with
that name followed by a consecutive number.
Enter where you want to save the images in [2.
Choose a place to save this group of pictures].
If you check the box in [Delete pictures from my
device after copying them], once the images have
been transferred to the computer, they will be deleted
from your camera's SD Memory Card.
118
Chapter 2 / Section 1 Downloading Images to a Computer (For Windows)
Make the necessary settings and then click
the [Next] button.
You are prompted to confirm [Job Finished]
by pressing the [Next] button.
The [Copying Images] screen appears and the
transfer begins.
The [Completing the Scanner and Camera Wizard]
screen appears.
Once the transfer is complete, the [Other Options]
screen appears.
Click the [Finish] button.
The Scanner and Camera Wizard is closed and the
window of the folder to which the images were
transferred is opened, with the images inside
displayed. For details of further operations from here
onwards, please refer to the Windows XP manual or
on-line Help.
• Please refer to the Windows XP manual or on-line help for details on how to use [Publish these pictures to a
Web site] or [Order prints of these pictures from a Web site] displayed on the [Other Options] screen.
• After connecting your camera to the computer using the USB cable, if nothing is displayed on your computer
screen and downloading fails to start, click [Start] on the Windows task bar, and then select [All Programs] [Accessories] - [Scanner and Camera Wizard]. Downloading from the camera should then begin.
119
Chapter 2 / Section 1 Downloading Images to a Computer (For Windows)
How to Use the RICOH Gate L
When you are in the RICOH Gate L window, you can specify settings for each of the various functions,
such as automatically saving when connected, the destination for downloading images (save
destination), and so on.
2. [Save Button]
The RICOH Gate L Window
Click this and the images are downloaded from your
camera.
Once RICOH Gate L starts up, the following
RICOH Gate L window appears on your
computer screen.
3. [Application Button]
The application registered in the Optional Settings is
launched. DU-10 is registered initially.
4. [Minimize Button]
Minimizes the window and displays its icon on the
Windows task bar. If you click on it, the window will be
displayed.
1. [MENU Button]
Click this and the following menu appears.
5. [Indicator]
The indicator lights if the camera is connected via
USB cable. When lit, if you put the mouse pointer on
the Indicator, it displays "Camera Connected." When
your camera is not connected, the Indicator is grayed
out, and if you put the mouse pointer on it, "Camera
Connected" does not appear.
Menu:
[Option settings]: Specifies where to save images, or
which application to launch when you press the
Application button and after saving. (See p.121)
[Background illustration settings]: Changes the
background design in the RICOH Gate L window. (see
p.122)
[About]: Displays the version of RICOH Gate L.
[Exit]: Closes RICOH Gate L.
120
Chapter 2 / Section 1 Downloading Images to a Computer (For Windows)
How to Use the Optional settings
If you select [Option settings] from the menu
displayed on a button in the RICOH Gate L
window, the [Option settings] dialog box
appears.
Item
1.[Automatically save on
connection]
2.[Destination folder]
3.[Create folder]
4.[The same image will not
be saved.]
5.[Application software
settings]
6.[Save and start
application software]
Description
If you check this box, once your camera is connected to the
computer, images are automatically downloaded and
saved.
If you uncheck the box, even when your camera is
connected, your images will not download automatically.
Click the [SAVE] button when you want to download.
Specifies which folder to save your images in. The [Caplio]
folder inside [My Documents] is specified initially; if you
want to change this, click the [Browse] button to display the
dialog box and then specify the folder.
Specifies how to create a folder.
[Not created]
Your downloaded images will all be saved in the folder
specified in item 2.
[For each date photographed]
Creates a new folder assigning the date it was shot as
the folder name, and saves images shot on the same
day in the same folder.
For example, if shot on May 1, 2002: [20020501]
folder
[For each time saved]
Creates a new folder for each time images are saved
and saves the images shot at the same time in the
same folder. If you save several times in one day, they
are saved in separate folders each time.
For example, if you saved twice on May 1, 2002:
[20020501_001] folder,
[20020501_002] folder
You can specify this only when you have selected either
[Do not Create] or [Each Day Shot] in [Create a Folder]
or if in [Create a Folder] you did not check [Do not save
same image when saving].
If you try to save a file to a folder that has an image file of
the same name, it will not be saved.
Specify the name of the program if you want an application
to launch after you save. The [Caplio] folder DU-10.exe
(DU-10 File Name) is specified initially; if you want to
change this, click the [Browse] button to display the dialog
box and then specify which application to use.
If this is checked, an application will be launched after
saving.
If this is unchecked, no application will be launched.
121
Initial Setting
Execute auto save
Each day shot
Do not save same image
After saving. Launch application
Chapter 2 / Section 1 Downloading Images to a Computer (For Windows)
How to Use the Background
Illustration Settings
1. [Background illustration pattern]
You can select a background for the RICOH
Gate L window from three types of patterns.
If you select [Background illustration setting]
from the menu displayed by the [MENU] button
in the RICOH Gate L window, the [Background
illustration settings] dialog box appears.
Select the pattern you wish to use from the three
available.
2. [Preview]
The pattern selected in [Background illustration
pattern] appears, and you can configure it.
122
Chapter 2 / Section 1 Downloading Images to a Computer (For Windows)
For Downloading Images Directly to Your Computer from an SD Memory Card
Downloading images via USB connection between computer and camera was explained previously,
but it is possible to download images from SD Memory Card to computer via a PC Card Slot or Card
Reader.
The FM-SD53 PC Card adaptor (sold separately) is required to load an SD Memory Card into a PC
Card Slot or Card Reader.
Images in a PC Card
Images are stored on SD Memory Card in a
hierarchy, as shown here.
• If the card reader is SD Memory Card compatible, the PC Card Adaptor FM-SD53 (sold separately) is not
required.
Card Reader
This is a device that connects to a computer and can read the contents of cards like the SD Memory Card. In
addition to the PC Card type, there are Card Readers compatible with various types of cards, such as SD
Memory Cards, into which you can directly insert an SD Memory Card.
123
Section 2 Downloading Images to a
Computer (For Macintosh)
This section explains displaying still images and movies you have
downloaded to your computer.
Please do not connect your camera to the computer before installing the software for
downloading.
• For the rest of this explanation, still images and movies will be referred to together as "images".
• When downloading images from your camera, it is recommended you safeguard the power supply by using
the AC Adaptor (sold separately). The steps here are explained on the premise that the AC Adaptor is used.
Chapter 2 / Section 2 Downloading Images to a Computer (For Macintosh)
Using the Software Provided
The CD-ROM that comes with your camera contains software for downloading images from the
camera to a computer and displaying them on it. The following software is included.
Application Name
Used For
Ricoh Gate L for Macintosh
Downloading images
USB driver
Connecting your camera to computer
Mounter
Downloading images
Software and OS Applicability Table
The software that can be used differs according to the OS in use, as indicated in the table below.
Application Name
RICOH Gate L
DU-10
USB driver
WIA driver
Mounter
Acrobat Reader
Mac OS
8.6 to 9.2.2
Mac OS X
10.1.2 to 10.2
X
O
X
O
X
X
O
O
X
O
X
X
• If you are using Mac OS X10.1.2 to 10.2, you can display images using iPhoto.
• You cannot display movie files in iPhoto. Please use QuickTime Player instead.
125
Chapter 2 / Section 2 Downloading Images to a Computer (For Macintosh)
System Requirements
The following environments are necessary for using the provided software. Please check your
computer, or the computer's user manual.
System Requirements
Specification
Operating System
Mac OS 8.6 to 9.2.2/Mac OS X 10.1.2 to 10.2
Macintosh
A USB port standard-equipped Apple Macintosh Series
Internal Memory
Mac OS 8.6 to 9.2.2 96 MB or more (128 MB or more recommended)
Mac OS X 10.1.2 to 10.2 128 MB or more (256 MB or more recommended)
Application allocated Memory
(For Mac OS 8.6 to 9.2.2)
Without using the compression utility, 16MB or more (24 MB or more is
recommended) as Application Memory
Hard Disc Drive Capacity
Mac OS8.6 to 9.2.2 10 MB or more (at installation)
Mac OS X 10.1.2 to 10.2 100 MB or more (at installation)
Display Resolution
640 X 480 dots or greater (800 X 600 or greater recommended)
Display Colors
256 colors or greater (32,000 or greater recommended)
CD-ROM Drive
A CD-ROM drive compatible with the above-mentioned Macintosh machine
USB Port
A USB Port compatible with the above-mentioned Macintosh machine
• Problems may arise due to changes made to the OS.
• Connection to a USB port retrofitted using an extended function (for example, PCI bus) cannot be supported.
• If used in conjunction with a hub or other USB devices, the software may not work properly.
• When dealing with movies and other large files, a larger memory environment is recommended. For Mac OS
8.6 to 9.2.2, use a larger memory environment, as well as allocating extra application memory.
• While the software can be operated at 256 colors or more for the Display Color, it is strongly recommended
that 32,000 or more be used.
• If the computer does not have a USB port, it is possible to download images from SD Memory Card using a
PC card slot or card reader.
For how to download images to your computer when using an SD Memory Card, see p.123.
126
Chapter 2 / Section 2 Downloading Images to a Computer (For Macintosh)
Preparing to Download Images to Your Computer
This section shows the flow of downloading images to your computer by using the Caplio CD-ROM
included with the camera.
Mac OS 8.6 to 9.2.2
Mac OS X 10.1.2 to 10.2
Insert the included CD-ROM into the CD-ROM
drive of your computer and the window or icon
shown on the left appears.
Install the software.
Mac OS 8.6 to 9.2.2...p.128
Mac OS X 10.1.2 to 10.2...p.129
Connect the camera to your computer.
...p.131
Download images to the computer.
...p.132
To uninstall the software, see p.130.
127
Chapter 2 / Section 2 Downloading Images to a Computer (For Macintosh)
Installation
For Mac OS 8.6 to 9.2.2
Click [Install].
If RCD-iMounter 6.0 was previously installed,
remove files in the following manner.
• Delete files that start with RDC that are in the Control
Panel folder.
• Delete files that start with RDC that are in the Function
Extensions folder.
• Delete files that start with RDC that are in the Initial
Settings Folder.
Turn on your Macintosh.
Click [Continue].
Insert the attached CD-ROM in the CD-ROM
drive.
The software is installed and then the Installation
Complete message appears.
The CD-ROM icon is displayed on the desktop.
Double-click the CD-ROM icon, and open the
[MacOS9] folder.
The [Caplio 300G Installer] icon appears.
Double-click the Installer [Caplio 300G
Installer] icon.
Click the [Restart] button.
Your Macintosh restarts.
The Installer starts up and the Start screen appears.
Click [Caplio 300G Software].
When you start your Macintosh, RICOH Gate L
also starts at the same time.
Click the [OK] button.
The Installation screen appears.
128
Chapter 2 / Section 2 Downloading Images to a Computer (For Macintosh)
For Mac OS X 10.1.2 to 10.2
Click the destination volume you want, then
click [Continue].
Turn on your Macintosh.
Insert the CD-ROM provided into the CDROM drive.
Double-click the CD-ROM icon, and then
open the Mac OS X folder.
The [Caplio Mounter.pkg] icon appears.
Double-click the Mounter icon [Caplio
Mounter.pkg].
Click [Install].
The Installer is launched and a screen appears
prompting you for the administrator's password.
Click the key icon.
After the installation has finishes, a message appears
to confirm whether it is necessary to restart your
Macintosh or not.
Click [Continue Installation].
A verification window appears.
Enter the administrator's name and
password, and then click [OK].
The software is installed, and after a while an
Installation Complete message appears.
Click [Restart].
Click [Continue].
Your Macintosh restarts.
The [Select a Destination] screen appears.
129
Chapter 2 / Section 2 Downloading Images to a Computer (For Macintosh)
Uninstalling the Software
(For Mac OS 8.6 to 9.2.2)
To remove (uninstall) the software from your Macintosh, drag and drop the installed file into the Trash.
Please remove the following files from their respective folders.
File Name
Folder Name
RICOH Gate L
System Folder: Control Panels
RICOH Gate L Prefs
System Folder: Preferences
Caplio Mounter
System Folder: Extension
Caplio Mounter Prefs
System Folder: Preferences
Caplio USB Driver
System Folder: Extensions
Uninstalling the Software
(For Mac OS X 10.1.2 to 10.2)
When you want to remove the software, follow
the steps below.
Start [Caplio Mounter] in [Application] folder.
Select [Uninstall] in [File] menu.
The software is uninstalled.
Or drag and drop the installation files into the
Trash.
Please remove the following files from their
respective folders.
File Name
Folder Name
Caplio Mounter
/Application
Caplio Mounter Prefs
Home Directory Library/Preferences
CaplioStartup
Using the Terminal program,
enter 'sudo rm -rf /System/Library/Startupitems/CaplioStartup''
and delete
130
Chapter 2 / Section 2 Downloading Images to a Computer (For Macintosh)
Connecting the Camera to a Computer
After installing the software on your computer, connect your camera to it.
Make sure the power is off.
Connect the USB cable to the USB port of
your computer.
Open the terminal cover.
Connect the USB cable to its USB terminal.
Your camera turns on.
Disconnecting your camera from computer
1. Turn your camera off by pressing the power button.
2. Unplug the USB cable.
• When you are downloading images from your camera, the AC Adaptor (sold separately) is recommended.
131
Chapter 2 / Section 2 Downloading Images to a Computer (For Macintosh)
Downloading Pictures to Your Computer
After you have connected your camera to the computer, images are downloaded automatically.
Images are downloaded to your computer from the following memory sources.
When an SD Memory Card is loaded
When no memory card is loaded
Downloads from
internal memory
Downloads from SD
Memory Card
For how to change files names when recording, see p.102.
Downloading methods differ (as described in the following table) depending on the environment used.
Follow the steps in the reference pages to download.
For Mac OS 8.6 to 9.2.2
Download using RICOH Gate L.
see p.133
For Mac OS X 10.1.2 to 10.2
Download using the Mounter.
see p.134
132
Chapter 2 / Section 2 Downloading Images to a Computer (For Macintosh)
Using the Mounter
For Mac OS 8.6 to 9.2.2
You can transfer images using the Mounter.
In Mac OS 8.6, Mac OS 9.1, or earlier versions,
a folder called [Caplio] is created inside the root
directory on the start-up disc [Macintosh HD].
In Mac OS 9.1 to 9.2.2, a folder called [Caplio] is
automatically created inside the [Documents]
folder on the start-up disc [Macintosh HD].
Connect your camera to the computer using
the USB cable.
Your camera turns on.
When an SD Memory Card is not loaded, the [Caplio]
icon is displayed and you can view the image files
stored in internal memory.
Connect your camera to the computer using
the USB cable.
The camera turns on, RICOH Gate L starts and the
RICOH Gate L window appears.
When an SD Memory Card is loaded, the [Caplio.SD]
icon is displayed and you can view the image files
stored on the SD Memory Card loaded.
RICOH Gate L starts and the RICOH Gate L window
appears.
Image Transfer begins automatically.
Click on the [File] menu and select [Quit].
Double-click the displayed icon.
It can be handled in the same way as a normal drive.
If you double-click the icon, a folder called [DCIM] is
displayed and a folder called [100RICOH] within that
folder is displayed.The image files you shot are inside
the [100RICOH] folder.
RICOH Gate L closes.
Drag and drop the file and then copy to the hard disc.
If you want to start RICOH Gate L when the camera is not connected, double-click the [RICOH Gate L] icon in
the Control Panel folder, which is inside the System Folder.
The downloaded images are saved in folders with the date of each shot, inside the [Caplio] folder.
For how to change the Save Destination Folder, see p.136.
133
Chapter 2 / Section 2 Downloading Images to a Computer (For Macintosh)
For Mac OS X 10.1.2 to 10.2
Double-click the displayed icon.
It can be handled in the same way as a normal drive.
If you double-click the icon, a folder called [DCIM] is
displayed and a folder called [100RICOH] within that
folder is displayed. The image files you shot are inside
the [100RICOH] folder.
Connect your camera to the computer using
the USB cable.
Your camera turns on.
Drag and drop the file and copy to the hard disc.
When an SD Memory Card is not loaded, the [Caplio]
icon is displayed and you can view the image files
stored in internal memory.
When an SD Memory Card is loaded, the [Caplio.SD]
icon is displayed and you can view the image files
stored on the SD Memory Card loaded.
134
Chapter 2 / Section 2 Downloading Images to a Computer (For Macintosh)
The RICOH Gate L Window
3. [Option settings]
Specifies where to save images and which application
will launch if you press the Application button or after
saving. (See p.136.)
Once RICOH Gate L starts up, the following
RICOH Gate L menu bar and window appear on
the computer screen.
[Background illustration]
If you select this, a sub-menu will appear, allowing you
to change the background design of the RICOH Gate
L window.
Sub-menu Figure
4. [Save Button]
Click this and the images download from your
camera.
1. [About RICOH Gate]
5. [Application Button]
Displays the version of RICOH Gate L.
The application registered in the Optional Settings is
launched.
2. [Quit]
Closes RICOH Gate L.
6. [Indicator]
The indicator lights if the camera is connected via
USB cable.
135
Chapter 2 / Section 2 Downloading Images to a Computer (For Macintosh)
How to Use the Optional Settings
If you select [Optional Settings] from the [RICOH
Gate Settings] menu, the [Optional Settings]
dialog box appears.
Item
1.[Automatically save on
connection]
2.[Choose]
3.[Automatically create
folder on saving]
4.[The same image will not
be saved.]
5.[Save and start
application software]
6.[Choose]
Description
If you check this box, once your camera is connected to
computer, the images are automatically downloaded and
saved.
If you uncheck the box, even when your camera is
connected, your images will not be downloaded
automatically. Click the [Save] button when you want to
download.
Specifies which folder to save your images in.
For Mac OS 8.6, Mac OS 9.1, or earlier versions, it is in the
[Caplio] folder of the Root Directory on the Start-up disc
[Macintosh HD].
For Mac OS 9.1 to 9.2.2, it is specified in the [Caplio] folder
inside the [Documents] folder on the Start-up disc
[Macintosh HD], so if you want to change it, click the
[Select] button and in the dialog box that appears, select
the folder you wish to specify.
Specifies how to create a folder.
[Do not Create]
Your downloaded images will all be saved in the folder
specified in item 2.
[For each date photographs]
Creates a new folder assigning the date it was shot as
the folder name, and saves images shot on the same
day in the same folder.
For example, if shot on May 1, 2002: [20020501] folder
[Date Transferred + Number Transferred]
Creates a new folder for each time images are saved
and saves the images shot at the same time in the same
folder.
For example, if saved twice on May 1, 2002:
[20020501_001] folder,
[20020501_002] folder
You can specify this only when you have selected either
[Day Shot] for folder name or if you did not check [Create a
folder automatically when transferring] in [Create a Folder].
If you try to save a file to a folder that has an image file of
the same name, it will not be saved.
If this is checked, an application will be launched after saving. If this is unchecked, no application will be launched.
Specify the name of the application you want to launch after
you save. Click the [Choose] button to display the dialog
box, and then specify which application to use.
136
Initial Setting
Transfer files automatically
Each day shot
Do not save same image
Do not start application
after transfer
Section 3 Displaying Thumbnail Images
(How to Use DU-10)
DU-10 enables you to view downloaded images at a glance–as
well as edit, rotate and resave images.
This section explains how to use DU-10.
• DU-10 can only be used in Windows.
Chapter 2 / Section 3 Displaying Thumbnail Images (How to Use DU-10)
Starting and Exiting DU-10
There are two methods of starting DU-10:
• Auto Start from RICOH Gate L
In the RICOH Gate L option settings, if the Application Software is set to DU-10, and if [After saving,
launch Application software] is checked, DU-10 will start automatically after image files have
downloaded from your camera with RICOH Gate L.
• Start from Windows [Start] menu
If you select [Program] then [Caplio Software] then [DU-10] from the [Start] menu, you can start DU10.
DU-10 Window
Exiting DU-10
Once you start DU-10, a window like the
following appears.
To exit DU-10 and close its window, select [File]
from the menu bar, then select [Exit] from the
menu displayed, or click the [×] (Close) button in
the upper-right corner of the screen.
The images you saved are displayed all in one
window. This method of displaying reduced size
images is called thumbnail display.
For how to set DU-10 to not launch automatically, see p.121.
138
Chapter 2 / Section 3 Displaying Thumbnail Images (How to Use DU-10)
Thumbnail Display Description
Once you start DU-10, images appear as
thumbnails.
4. Folder Display Area
The folders inside [My Computer] are displayed in a
hierarchy. The images inside folders selected here
appear in the Thumbnail Display Area.
5. Thumbnail Image
1. Menu Bar
6. File Name
You can change the display size and ordering of
images.
7. Sound Setting Y/N Display
2. Tool Bar
8. Memo Setting Y/N Display
Of the functions available in the menu, the icons of
those most frequently used are displayed, so you can
use those functions with just one simple click.
Memos cannot be attached using this software.
3. The Thumbnail Display Area
The reduced images are displayed at one glance.
139
Chapter 2 / Section 3 Displaying Thumbnail Images (How to Use DU-10)
Switching the Ordering of Images
Displayed thumbnail images are ordered according to date (descending order).
You can change the ordering method to by file type or by name. You can also choose whether each of
the above is ordered according to ascending or descending order.
To change the ordering of images, use either the
tool bar or [Arrange] from the [View] menu.
1. Name order
Switches to By File Name.
2. Type order
Switches to By File Type (in alphabetical order of the
extension).
3. Date order
Switches to By Date Shot.
4. Ascending / 5. Descending
Menu
Ascending order is going from small to large, the
opposite is descending order. For the alphabet, a,b,c
is ascending order, and z,y,x is descending.
Select which order to use, 1, 2 or 3 and choose either
ascending or descending order.
Tool Bar
• If you order by file type, the files are ordered alphabetically according to the file extension.
140
Chapter 2 / Section 3 Displaying Thumbnail Images (How to Use DU-10)
Changing the Display Size
To change the display size, use either the tool
bar or [Display size] from the [View] menu.
2. Large
3. Medium
4. Medium+
memo
You can change the display size to one of five
sizes available.
1. Extra-large
5. Small
141
Chapter 2 / Section 3 Displaying Thumbnail Images (How to Use DU-10)
Viewing Images in a slide show
You can view images sequentially and automatically in either a slide show (selected images only) or
auto slide show (all images).
The [slide show] dialog box is displayed, so
make the necessary settings.
To View a slide show
You can select one or more images and display
them as a slide show.
To start slide show, follow the steps below.
Select the images you wish to see in slide
show.
If you want to select multiple consecutive images,
after clicking the first image, press and hold the [Shift]
key and click the last image.
To select multiple images that are not consecutive,
press and hold the [Ctrl] while clicking each.
Using one of the steps below, select [slide
show].
• Select [Image] then [slide show] from the menu bar.
• Place the pointer of the mouse on one of the images
you selected, right click and choose [slide show]
from the menu.
Click the [Run] button.
The slide show begins.
TRunning a slide show
Type of slide
show
Key
[AUTO] is
[ESC] Key
selected in step
3
[MANUAL] is
[ESC] Key
selected in step
3
Left-click Mouse
[Space] Key
[Enter] Key
[→] Key
[Backspace] Key
[←] Key
Menu
Shortcut menu displayed with right click
142
Action
Stops the slide
show.
Stops the slide
show.
The next image is
displayed.
The previous
image is
displayed.
Chapter 2 / Section 3 Displaying Thumbnail Image (How to Use DU-10)
Using Auto slide show
How to Use the slide show
Dialog Box
In Auto slide show, all the images displayed as
thumbnails appear in order.
To start Auto slide show, follow the steps below.
You can make slide show display settings in the
[slide show] dialog box.
Using one of the steps below, select [Auto
slide show].
• Select [Image] then [slide show] from the menu bar.
• Click the
button on the tool bar.
• Place the pointer of the mouse on one of the images
you selected, right click and choose [Auto-slide
show] from the menu.
The slide show begins.
The images advance automatically according to the
display interval (number of seconds) you specified in the
[slide show] dialog box.
1. [Operating method]
Select either Auto slide show (the slides are played
automatically, in order) or Manual (switch frames by
clicking the mouse button or pressing the [Enter] key).
Stop the slide show with the [Esc] Key.
2. [Display interval]
Specify how long in seconds to display each image,
when using Auto slide show.
3. [Background color]
Choose a background color for your images. Click the
[Choose Color] button and choose a color from the
dialog box that appears.
4. [Display file name]
If you check this box, the file name will appear in the
bottom of the image.
5. [Maximum display]
If you check this box, your images will be displayed at
full-screen size.
6. [Playback sound]
If you check this box, and the images have associated
sounds, the sounds will also be played back.
7. [Repeat]
If you check this box, the sets of images will be shown
repeatedly, until you press the [Esc] key to stop. If you
uncheck this box, the images in the folder will be
displayed through the cycle once, then the slide show
will finish.
143
Chapter 2 / Section 3 Displaying Thumbnail Images (How to Use DU-10)
Viewing Image Information
You can display image information, such as the
date and time a photo was shot, the size of the
image, and so on.
Using the Shortcut Menu
Right-click on the image in the Thumbnail
Display Area.
The menu appears.
Select [Properties] from the menu.
Information Dialog Box
To display image information, follow one of the
steps below.
Using the File Menu
Click the image in the Thumbnail Display
Area for which you want to see information.
Select [Properties] from the [File] menu.
144
Chapter 2 / Section 3 Displaying Thumbnail Images (How to Use DU-10)
Displaying the Viewer Screen
If you use the Viewer screen, images are not displayed as thumbnails, so you can view them at full
size. To open the Viewer screen, follow one of the steps below.
• Double click the image you want to display from the thumbnail selection.
• Click the image you want to display from the thumbnail display area, then select [Display/Playback]
from the [Image] menu.
Saving under a New File Name:
When you want to create a duplicate,
or after rotating an image and changing
its orientation, if you want to make it
into a different file, you can save it and
attach a new, different file name.
The only file format you can save in is
TIFF.
To save under a new file name, follow
the steps below.
Viewer Screen
Select [Save as...] from the [File]
menu.
Viewer Screen
The [Save As] dialog box appears.
1.Menu Bar
2.Tool Bar
[Save]
Overwrites an image and saves.
[Rotate 90° counter-clockwise]
[Rotate 90° clockwise]
You can rotate your images 90 degrees to the left or right.
You can correct images to their proper vertical/horizontal
orientation.
Specify where to save the new file
[Save in].
[Enlarged display]
Enter the name of the new file in
[File Name].
[Actual size view]
[Reduce display]
[Overall view]
Click [Save].
You can enlarge or reduce the displayed size.
By repeating [Enlarge Display], you can enlarge the view
up to 16 times over original size.
TIFF File
This is read "tiff" file. This is a format used
when saving image data as a file. With RR30,
images (still images) are saved as files in the
small JPEG (jay-peg) file format. TIFF file sizes
are larger than JPEG files, but if you want to
make frequent changes and resave, TIFF files
prevent deterioration.
By repeating [Reduce Display], you can reduce the view
down to 1/16th of original size.
145