1
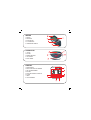
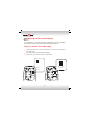
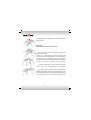
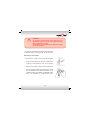
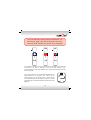
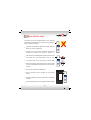
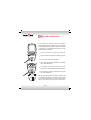
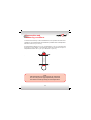
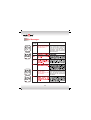
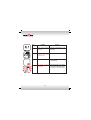
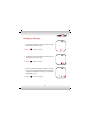
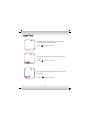
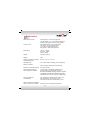
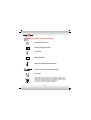
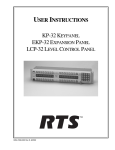
User's Manual In-Vitro-Diagnostic aid for self testing METER 1. DISPLAY 2. NAVIGATOR 3. STRIP HOLDER 4. PC CONNECTION 5. TEMPERATURE SENSOR NAVIGATOR 1. ON/OFF 2. SETTING 3. MEMORY DELETING 4. LEFT ARROW 5. RIGHT ARROW DISPLAY 1. METERS MODE 2. RESULT AND DATA-CHIP NUMBER 3. UNIT OF MEASUREMENT 4. BATTERY 5. DATE AND AVERAGE OF RESULTS 6. ALARM 7. TIMES 8. TEST PARAMETER Table of content Introduction What is multiCare? General information on the multiCare line Turning ON the instrument for the first time 3 3 4 Carrying out the measurement How to insert the data-chip How to obtain a drop of blood How to perform the test 5 5 7 11 The multiCare strips Checking the working of the multiCare 14 15 General Settings 17 Modification of the obligatory settings Setting the average of results Setting the acoustic signal Setting the alarms Deleting the results from the memory Recalling results and the average of the results from the memory How to cancel one value from the memory 1 17 17 18 19 20 21 21 Table of content Enabling data transfer to a computer 22 Care and maintenance 23 Preservation and measuring conditions 24 Error messages 25 Possible error reasons 28 Substituting the batteries 30 Obligatory Settings 31 Information on the conditions of guarantee 34 Symbols used on the packaging 35 Performance 36 2 Introduction Thank you for choosing multiCare. In this manual there are all the information for the correct use of the instrument. It is very important to carefully read them. What is multiCare? multiCare is a system that measures the concentration of glucose, cholesterol and triglycerides in the whole blood. The multiparameter technology allows to measure, using only the multiCare instrument, different parameters by simply changing the type of strips and by using the correct data-chip for each parameter. General information on the multiCare line The multiCare line includes everything that is needed for daily check ups of the desired parameters: multiCare meter multiCare strips lancing device sterile lancets multiCare control solution multiCare data manager software 3 Turning ON the instrument for the first time When you turn on the meter for the first time, check if date, time and unit of measurement are correct before performing the test. When you replace or remove the batteries, it is necessary to set the time, the hour and the date to perform the test (see pag. 31). The instrument requires inserting of date, time and unit of measurement as OBLIGATORY settings. This means that, if these settings are not done, the instrument will require the missing information and it is not able to perform any measurement. It is very important to insert date, time and unit of measurement to have a correct memorization of the results and to have the signal at strips expiring. It is necessary to set winter and summer time as well as the addition of February 29th for leap years. Every time that the batteries are replaced, the Obligatory settings of date, time and unit of measurement should be repeated. 4 Carrying out the measurement It is necessary to insert the data-chip contained in the correspondent strip pack in order to perform the desaired measurement. How to insert the data-chip 4 4 4 Open the back cover of the instrument to uncover the housing of the data-chip. Insert the data-chip following the design. Close the cover and turn ON the instrument. 5 When the instrument is turned ON the display will show: 4 A three digit number that is specific to the lot of strips (data-chip number). 4 The symbol of the parameter (GLC for glucose, CH for cholesterol, TGL for triglycerides). 4 An icon indicating that the data-chip is inserted in the instrument. GLC C H TGL WARNING! Every time a new package of strips of the same parameter is used or of a different parameter, remove the old data-chip and insert the data-chip contained in the new package. If this procedure is not followed, the results will be wrong. 6 When the data-chip is inserted, the display will show three digit number that should correspond to the one printed on the label of the strips vial. If not, it means that you are using the wrong data-chip and the strips that you are using do not belong to that batch number. Check always that the colour of the data-chip and the parameter symbol displayed on the instrument correspond to the parameter that you would measure. GLC CH TGL How to obtain a drop of blood To carry out a measurement with the multiCare instrument, it is necessary to draw a drop of capillary blood from the fingertip following the procedure below: 4 Wash hands with hot water to increase the circulation of the blood in the fingers. This will ease up the procedure. 7 4 Dry hands thoroughly. 4 Make sure that the finger to be pricked is completely dry. 4 Prepare the lancing device contained in the multiCare kit by inserting the sterile needle. Use a new undamaged needle for each blood sample and use the lancing device always on the same person. 4 4 Unscrew the calotte of the lancing device turning it anti-clockwise while holding its body firmly. Insert a new needle until it stops in the support of the lancing device. Before inserting, make sure that the needle and its protecting cover is undamaged. Only an undamaged protecting cover will guarantee that the needle is sterile. 4 After inserting, carefully remove the protection cover from the needle while holding firmly the needle with the index and thumb. 4 Keep the protecion cover so that it can be used to close and safely seal the needle after use. 8 Carefully tighten the calotte of the lancing device on the lancing device. Attention! Avoid touching the tip of the needle! 4 By turning the calotte it is possible to adjust the depth of the needle. Setting on 1 is appropriate for a particularly delicate skin, like childrens, while setting on 5 is more suitable for thick skin. When using the lancing device for the first time select a setting in-between (position 3). After using, it will be possible to find the correct setting. 4 Push the handle of the lancing device backwards until it stops. The lancing device is now loaded. 4 To obtain a drop of blood, place the lancing device delicately against the side of the fingertip and then push the button. If the blood is not enough, squeeze the finger with the other hand to increase the blood flow. 9 WARNING! WARNING! perfrom measurement cholesterol To To perfrom measurement with with the cholesterol or or triglycerides strips is necessary to apply abundant triglycerides strips it isitnecessary to apply an an abundant drop of blood, at least 10µl. drop of blood, at least 10µl. glucose measurement is sufficient to apply ForFor thethe glucose measurement it isit sufficient to apply µl whole of whole blood. 3 µl3 of blood. To avoid that the skin becomes hard, prick the finger in different areas or change finger tip for each test. Removing a used needle: 4 Unscrew the calotte of the lancing device again. 4 Press the lancing device with the needle at the opening of the protection cover of the needle. 4 Remove the needle using the thumb and index. 4 Once the protection has been inserted, the needle can be disposed of with domestic rubbish. If the protecting cover of the needle is not available, make sure it is disposed of in appropriate vials. 10 How to perform the test 4 Take a strip from the vial and then close it immediately to protect the other strips from humidity and light. 4 Insert the strip in the reading device of the instrument from the side showing the printed initials of the parameter at the top and push the strip until a click is heard. GLC GLC GLC GLC GLC GLC 4 If the strip is inserted correctly, a symbol showing a drop of blood appears on the display after about one and a half seconds. Using the lancing device, take a drop of blood from the fingertip following the procedure described at page 10. 4 Do not use the first drop of blood, place the second drop over the circular white area. 11 InIncase of cholesterol andmeasurement, triglycerides, ititisis caseofofmeasurement cholesterol and triglycerides necessary necessary to to apply apply aa big big drop drop of of blood blood (at (at least least 10 10 µl). µl). The The drop drop must must saturate saturate the the reactive reactive area area completely. completely. YES NO It is possible to apply the blood when the strip is inserted in the multiCare instrument or it can be applied on the strip after pulling it out. The measurement will not be affected if the reactive area is briefly touched with the fingertip. The moving segments on the display indicate that the measurement is in progress. The results of the measurements will be shown after a few seconds The measured value can be shown in mg/dl or in mmol/l (to change unit of measurement follow the instructions on page 17). 12 NOTE NOTE If Ifthe theresults resultsobtained obtaineddo donot notcorrespond correspondtotothe thewell well being beingofofthe theuser, user,proceed proceedwith witha acheck checkup upofofthe the multiCare multiCareinstrument instrumentaccording accordingtotothe theprocedure procedureon on page page1818and andcontact contactyour yourphysician. physician. If Ifextreme extremeresults resultsare areobtained, obtained,too toohigh high(Hi) (Hi)orortoo too low low(Lo), (Lo),contact contactyour yourphysician physicianimmediately. immediately. When the measuring is finished, it is possible to turn OFF the multiCare instrument. The instrument will shut down automatically after one minute and half if not used for other operations. The measured value, along with date and time, will be saved in position 1 in the memory of the instrument. The values previously measured will be saved in positions 2, 3 etc. starting from the most recent. How to recall from the memory a measured value and how to erase memorized values is described on page 24 and 23. The strips and other used material (except the instrument) can be disposed of with domestic rubbish. In a laboratory and in a hospital, the procedures of biological safety must be followed when handling potentially infected material. After use, all of this material must be deposited in an appropriate container. To avoid infections clean the instrument regularly and dispose of the used strips in a way that there is no risk of infections for other people. 13 The multiCare strips The correct use of the multiCare strips is very important for obtaining accurate results. Therefore it is important to keep in mind the following: 4 The strips are sensitive to light and humidity: keep the 4 Protect the vial from direct sunlight and keep at a temperature between 10 and 35°C (50-95° F). GLC GLC strips only in their original vial. 4 Use the strips immediately after removing from the vial and close the vial immediately with its cap. strips must not be used after the expiry date. 4 When first opening, write the date on the vial: the strips must be used within 90 days after the vial has been opened. GLC GLC 4 The 4 Do not use strips that are damaged. 4 Tears, results. scratches, colour changes etc. give wrong 4 Carefully read the instructions contained in the package 4 Take measurements only with original multiCare strips. 14 GLC GLC of strips. Checking the working of the multiCare It is possible to check the working of the multiCare instrument using the multiCare control solutions. The control solutions can be obtained as a separate accessory through specialized retailers. The control solution is applied on the strip just like blood. When testing is done with the control solution, the obtained result must be within the interval as shown on the label of the strips vial. In this way, it is possible to learn how to use the multiCare properly and at the same time, check if it is working. Write the date of opening on the vial when the solution is opened for the first time. The control solution must be used within 90 days from first opening, if the expiry date is valid. When to carry out a working check up using the control solutions: 4 When suspecting a possible defect of the multiCare instrument. 4 When suspecting the possibility of a malfunction or wrong measurement. 15 Note Note only multiCare control solutions. 4 Use 4 Use only multiCare control solutions. the expiry date printed on each vial. Do not use the control 4 Check Check the expiry date printed on each vial. Do not use the control 4 solutions if expired. solutions if expired. the control solutions within 90 days after first opening. 4 Use 4 Use the control solutions within 90 days after first opening. the control solutions at room temperature (10-35 °C - 50-95 °F). 4 Keep 4 Keep the control solutions at room temperature (10-35 °C). not use the control solutions to clean the instrument. 4 Do 4 Do not use the control solutions to clean the instrument. not drink the control solutions and keep them away from children. 4 Do 4 Do not drink the control solutions and keep them away from children. results obtained with the control solutions must be deleted in order 4 The The results obtained the control solutions must 21 beon deleted order 4 to avoid alterations of with the results average (see page how toindelete avoidfrom alterations of the results (see page 24 on how to delete atovalue the memory and foraverage the average results). a value from the memory and for the average results). Further instructions can be found in the package of the control solutions. Further instructions can be found in the package of the control solutions. 16 General Settings After turning ON the instrument with key, by pressing S key you will enter in the setting mode and in the upper part of the display will appear the symbol SET and the date will blink. Modification of the obligatory settings It is possible to modify the following settings: date - visualisation of the date - year - time visualisation of the time - unit of measurement as described below: 4 Select the desired setting by pressing the S key. 4 To modify the selected setting, use the left or right arrow. 4 Press the S key to confirm the modification and to select the next setting. key. 4 To exit from the setting mode, press the Setting the average of results The multiCare instrument can show the average of the results over one, two, three or four weeks. This function is important for glucose test to understand if the glucose concentration is under control. 17 4 Turn ON the instrument. 4 Press the S key until 0 starts blinking and the "days AVG" appears on the display. 4 Press the right or left arrows to select 7, 14, 21 or 28 days. 4 Press key to confirm the setting. Setting the acoustic signal The multiCare is set in such a way that an acoustic signal can be heard (beep): 4 When a strip is inserted. 4 When the segments are visualized on the display. 4 When the measured value is displayed. 4 When data-chip is inserted if the instrument is turned on. 4 When an error message is dispalyed. To enable or able the acoustic signal: 4 Turn the instrument ON. 4 Press the S key until BP appears on the display. 4 By pushing one of the arrow keys, select the acoustic signal ON enabled or OFF disabled, then confirm with the key. 18 Setting the alarms It is possible to set up four different alarms to remember when the measurements must be taken during the day. It is possible to set four different alarms for four different times (ex. in the morning before breakfast, after lunch, before bedtime and so on). To set the alarm follow the procedure described below: 4 Press the S key until 0 blinks on the display. 4 Press one of the arrows to select the alarm number to be enabled (0, 1, 2 or 3). 4 Press the S key again to select the hour and minutes. 4 By pressing the S key again, it is possible to set the time of the corresponding alarm. For the other alarms following the procedure described above. By pushing the key we exit the Settings Mode and the settings are confirmed. 19 Deleting the results from the memory It is possible to cancel one result or all of the memorized results. Deleting all of the memorized results: 4 Turn the instrument ON. 4 Press the S key until DEL starts blinking on the display. 4 Press 4 Press key C: 'CLr' appears on the display. key to confirm. To delete only one value please follow the instruction indicated at page 21. Every Everyresult resultobtained obtainedwith withthe thecontrol controlsolutions solutionsmust must be be deleted, deleted, otherwise otherwise itit will will be be included included in in the the calculation calculationfor forthe theaverage. average. 20 Recalling results and the average of the results from the memory The multiCare instrument can memorize 250 results. Each result is memorized with: 4 Time and date 4 Parameter symbol (ex. GLC) 4 Unit of measurement (mg/dl or mmol/l) 4 The MEM symbol on the top of the display To recall the results, just press the right arrow after turning ON the instrument without a strip inserted. Number 1 will be visualized (the last result obtained) and when the arrow is released, the result appears. By pressing the same arrow again, number 2 will be visualized and when it is released the corresponding result appears. If the other arrow is pressed it is possible to see result 1. By keeping one of the arrows pressed, a memorized value will be visualized every second. If the average of the results has been set, when one of the arrows is pressed after turning ON the instrument, the first number visualized will be the average of the results. By pushing the same arrow again, number 1 will be visualized and when it is released the corresponding value. How to cancel one value from the memory To cancel only one value from the memory follow the procedure described below. 4 Turn ON the instrument. 4 Recall result to be deleted from the memory by using the left or right arrow. 4 Press the C key to cancel value. 21 Enabling data transfer to a computer The multiCare system offers the possibility to transfer the measured values memorized in the memory of the instrument to a computer and read them with an analysis software and the aid of a cable. The cable and the software are part of the multiCare Data Manager that can be bought as an accessory through specialized retailers. Procedure: 4 4 Install the software according to its instructions. Insert the serial port of the cable in the computer and the connector to the instrument. 4 Press and release key. PC will appear on the display of the instrument. Install the software to receive information from the instrument. 4 After the data has been transferred, it is possible to 4 key and remove turn OFF the instrument with the the cable from it. Detailed information can be found in the multiCare Data Manager manual. 22 Care and maintenance It is important to carefully clean the multiCare instrument at least once a week. It is also necessary to immediately clean the plastic support of the reader or the optics if contaminated with blood or other material (debris, dust etc.). 4 Use only wet tissue to clean the instrument. 4 Do not soak the instrument in cleaning agents. 4 Do not place under running water. 4 After cleaning the plastic support of the reader, dry without scratching. 4 It is possible to remove the front cover of the instrument to clean the glass surface of the optics. 4 After cleaning, perform a working check up with the control solutions. For taking measurements on different people, like in a hospital for example, clean the instrument after every measurement with a solution 70% alcohol before proceeding with the next measurement. 23 Preservation and measuring conditions To ensure the accuracy of each measurement, it is important to meet some conditions. The measurement with multiCare is possible within a temperature interval of 5 to 45 °C (41-113 °F). At a temperature above 45 °C (113 °F) and below 5 °C (41 °F), error E01 will be shown on the display. The multiCare instrument must not be kept at temperatures below -25 °C (-75 °F) or above 60 °C (140 °F). . Note If the instrument is too cold or too hot (ex. after being in a car at very low or high temperatures), allow it to cool down or to heat up slowly at room temperature. 24 Error Messages Error message Problem Solution The temperature is lower Place the instrument in an area than 5°C (41°F) or higher w i t h t e m p e r a t u r e b e t w e e n than 45°C (113°F). 5°C(41°F) and 45°C (113°F) and wait for the instrument to equilibrate with the external temperature, before performing the measurement. E03 The strip is removed from the meter without applying the drop of blood. 25 Switch off the meter by ON/OFF button. Insert the strip again and apply the blood on the strip without remove the strip from the strip holder Error message Problem Solution LO 26 Error message HI Problem Solution Value is higher than the C o n t a c t i m m e d i a t e l y y o u r limit of reading of that physician and repeat the test in an hospital. parameter. The batteries are almost Get new batteries. flat. It is possible to perform about 30 measurements. The batteries are flat. Replace the batteries before taking a measurement. The result is disco- Check expiry date of the strips ntinuous when the strip and use new strips to perform the measurements. Blinking result is has expired. not saved in the memory. mg/dL 27 Possible error reasons First of all verify the following points: 4 The obligatory settings has been properly followed (see page 5)? 4 The data-chip number shown on the label of the strips vial is corresponding to the one that appears on the display (see page 7)? 4 Is the data-chip of the package corresponding to the parameter under control (see page 7)? 4 The strip has been inserted on the correct side (see page 11)? 4 The drop of blood is enough (see page 11)? 4 The results of the measurement taken with the control solutions are within the reference interval printed on the label of the strips vial (see page 15)? 4 The instrument and the reading plastic support have been cleaned according to the instructions at page (see page 23)? 28 4 The date of the control solutions and of the strips is expired (see page 14)? 4 Have the strips been used over 90 days after the vial has been opened (see page 14)? 4 Are the strips kept in their original vial (see page 14)? 4 The strips have been exposed to extreme temperatures and/or humidity (see page 14)? 4 Is the battery flat (see page 30)? If the instrument after verifying the above points, does not work correctly, contact the multiCare Costumer Service by e-mail [email protected] or phone 0039 0575 984164. Further information on how to use the multiCare System can be found on our site www.biosys.it 29 Substituting the batteries The multiCare instrument houses two lithium batteries 3V (type CR 2032). If the battery icon is blinking, the charge is low and the battery must be replaced before taking a measurement. Note Every time the battery is replaced or simply removed the time and date must be set again. Always insert a new battery and not a used one. Shut down the instrument before removing the battery. Check out the new battery to see if it is of the right type before placing. How to change the battery: 4 Open the back panel of the instrument. 4 Press the lever and remove the cover. 4 Remove the battery by pulling the plastic ribbon. 4 Place the new battery so that the type is readable. The positive side of the battery must be at the top. 4 Close the back cover until a click is heard. Flat batteries can be disposed of trhough recycling centers. 30 Obligatory Settings 4 The blinking line indicates the month. Select the month with the arrow keys left or right. 4 Press 4 The blinking two lines indicate the day. Select the day with the arrow keys left or right. 4 Press 4 The month and day blink together. With the arrow left or right, choose the preferred visualisation of the date configuration MM/DD (month-day) or configuration DD/MM (day-month). 4 Press button to confirm. button to confirm. button to confirm. 31 4 The blinking four lines indicate the year. Select the year with the arrow keys left or right. 4 Press button to confirm. 4 The hour blinks. Select the hour using the arrow left or right. 4 Press button to confirm. 4 The minutes blink. Select the minutes using the arrow left or right. 4 Press button to confirm. 32 4 The complete time blinks and 12h appears on the display. Select the visualisation of the hour 12h or 24h using the arrow keys left or right. 4 Press 4 The unit of measurement mg/dl blinks on the display. Select the unit of measurement mg/dl or mmol/l using the arrow keys left or right. 4 Press button to confirm. button to confirm. After confirmed the selected unit of measurement on the display will blink the symbol of the data-chip : the instrument requires data-chip to perform the measurement. 33 Performance Measurement range: 25-500 mg/dl (1.4-28 mmol/l) glucose 130-400 mg/dl ( 3.3 - 10.2 mmol/l) cholesterol 50-500 mg/dl (0.56-5.6 mmol/l) triglycerides Power source: 2x3V. lithium button cell, type CR 2032. The battery can be used for approx. 1 year with 3 measurements per day (approx. 1000 measurements) Dimensions: 105 mm - length 20,5 mm - height 52 mm - width Weight: 65 g (incl. battery) Display: LCD Climatic operating conditions Temperature limits: 5 to 45 °C (41 °F to 113 °F) Humidity limits: 0% to 90% relative humidity (non-condensing) Memory capacity: 250 measured values with time and date Interface for data processing: Connecting cable Special requirements for electromagnetic radiation: The CE mark on the device indicates that it complies with the requirements of the EC directives 89/336/EEC relating to electro-magnetic compatibility 73/23/EEC for electrical equipment intended for use in areas of specific voltage levels Hint for Healthcare Professionals: The appropriate legal provisions apply or the use of multiCare. The accuracy of the instrument should be checked after 3 years Waste management disposal when the meter is unusable: Please refer to local updated regulation! 34 Symbols used on the packaging Follow instructions In-Vitro-Diagnosticum Use until... Batch number... Store at temperatures between 3V direct current and battery type CE mark Do not dispose the instrument in the urban waste. Perfom a separated collecting specific for Electric and Electronic waste or give the instrument to the distributor when you buy a new one or when you want to sobstitute it. Please refere to local update regulation. 35 Information on the conditions of guarantee Biochemical Systems International Srl grants to the customer that the instrument will be free of material defects and manufacturer handling for 3 years starting from the purchasing date. During such period, Biochemical Systems International Srl should replace the defected instrument with an equivalent version or the same model after verifying the defect. Such warranty is subject to exception and limitation as described below. The warranty is limited to the replacement due to defects in some parts and handling. Instruments that present defects due to damages caused from improper use, alteration, negligence, technical assistance performed from not authorised personnel, accident, abuse or by using strips which are different from multiCare will not be replaced. Biochemical Systems International Srl reserves the right to apply technical modifications to the instrument multiCare without the obligation to insert such specification to those products already introduced in the market. Any other warranty will be granted for this product unless the replacement option described above. Every responsibility for special, indirect or consequential damages is excluded. Customer Service 36 In-Vitro-Diagnostic aid for self checking 50 (2x25) Change your living, choose multicare GLC TG CHOL Customer Service 0039 0575 984164 Arezzo - Italy ED 2006-ENG REV. 002