1
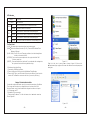
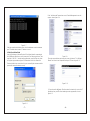
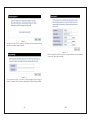
Wireless Router User Guide
please read these instructions carefully
and retain for future reference
Help line
For assistance during normal working hours (9am-5pm, Mon-Fri, New Zealand
local time) call Oriental Pacific International Ltd.
NZ call: 0800 89 85 80
Email: [email protected]
SYMBOLS
The graphic symbols used in this manual or on the back cover of the set mean
the following:
Read this manual in full before use.
Class II Double insulated Appliance
The lightning flash symbol is intended to alert the
user to the enclosures that contain hazardous voltages.
The exclamation symbol is intended to alert the user to the
presence of important operating and maintenance(servicing)
instructions in the literature accompanying the appliance.
IMPORTANT SAFEGUARDS
When using any electrical apparatus always observe safety regulations
and use basic safety precautions to reduce the risk of fire, electric shock
and personal injury, including the following
Read, Keep and Follow these instructions, heeding all Warnings.
WARNING! Do not remove any cover.
WARNING! No objects filled with liquid, such as vases, shall be placed on this
equipment or in any position where liquid may fall into this equipment or any
other electrical apparatus.
WARNING! Do not insert any objects into any openings of this equipment or any
other electrical apparatus.
WARNING! Do not use this apparatus near water. To avoid the risk of fire or electric
shock, do not expose this apparatus to rain or moisture. The apparatus shall not
be exposed to dripping or splashes and is strictly for indoor use only.
WARNING! Do not immerse in any liquid whilst in use or cleaning. Clean only
with a damp cloth, dry with a dry towel. Do not use harsh abrasives as these may
damage the plastic parts.
WARNING! DO NOT block any ventilation openings. Keep away from curtains,
newspapers and restricted areas. Install in accordance with any specific
manufacturer's instructions. Always allow a sufficient gap around the apparatus
to avoid overheating.
WARNING! Do not install near any heat sources such as radiators, gas heaters,
stoves or other apparatus (including amplifiers) that produce heat. Do not leave
in direct sunlight.
WARNING! Do not place any naked flame source, such as lighted candles on
any electrical apparatus.
WARNING! Connect to a suitable 230-240V ~ 50 Hz power supply only.
WARNING! Keep out of reach of young children. This apparatus is not suitable
for use by young children or infirm persons without supervision. Young children
must be supervised to ensure that they do not play with the apparatus. Ensure
young children have enough knowledge to operate the equipment safely if they
do have access to this equipment.
WARNING! Do not abuse or damage a power cord. If any power cord is damaged,
it must be replaced by the manufacturer, its service agent or a similarly qualified
person in order to avoid a hazard. A replaceable cord must be replaced with an
authorised replacement from an authorised service agent only.
WARNING! Only use attachments/accessories specified by the manufacturer.
WARNING! Unplug completely from the power source this apparatus during
lightening storms or when unused for long periods of time.
WARNING! Attention is drawn to the environmental aspects of disposing of any
battery.
WARNING! Refer all servicing to qualified personnel. Servicing is required when
the apparatus has been damaged in any way, such as when the power supply
cord or plug is damaged, liquid has been spilled or objects have fallen into the
apparatus, the apparatus has been exposed to rain or moisture, does not operate
normally, or has been dropped.
WARNING! F o r h o u s e h o l d u s e o n l y , t h i s a p p a r a t u s i s n o t i n t e n d e d f o r
commercial use.
WARNING! If this apparatus is to be used by a third party, please supply these
instructions with it.
WARNING! No liability will be accepted for any personal injury or damage caused
by failure to follow these instructions.
minimum configuration requirements:
200MHz CPU or above
64M memory or above
5.0 internet Browser version or above
Windows 98 or above
Network adapter
54M Wireless Router Quick Installation Guide
Package Contents:
Open the box carefully check the following articles
one wireless broadband Router
one power adapter
one CD
one user manual
Please contact with the franchiser timely if any damage on the product or any
shortage of the accessories.
Product Description:
Thank you for choosing CYBER Wireless Router. As a cost-effective product,
this Wireless Router provides dedicated solution for small office, home and
dormitory. It integrate s a variety of wireless applications, such as wireless
bridge model, AP model etc. It provides a wide range of data securit y protection,
support WEP, WPA Encryption method. It is the best option of surfing on the
wireless Internet and enjoying the fun of the wireless. Internet
In order to better use all functions of this product, please read this guide carefully
before you install the router. W e r e c o m m e n d e d t o i n s t a l l t hi s d e v i ce b y
a professional IT technician.
Features:
Complies with IEEE 802.11g, IEEE 802.11b, IEEE 802.3, IEEE 802.3u standards.
1 10/100M Auto-Negotiation RJ45 WAN port, 4 10/100M Auto-Negotiation RJ45
LAN ports, supporting Auto MDI/MDIX.
Provides WPA, WPA-PSK authentication, TKIP/AES encryption security.
Shares data and Internet access for users, supporting PPPoE, Dynamic IP,
Static IP, L2TP, PPTP, BigPond Cable Internet access.
Supports Virtual Server, Special Application and DMZ host.
Supports UPnP, Dynamic DNS, Static Routing, VPN Pass-through.
Connecting Internet on demand and disconnecting from the Internet when
idle for PPPoE.
Built-in NAT and DHCP server supporting static IP address distributing.
Built-in firewall supporting IP address filtering, Domain Name filtering, and
MAC address filtering.
Supports access control, parents and network administrators can establish
restricted access policies based on time of day for children or staff.
Supports firmware upgrade.
Chapter 1 Hardware Installation
2.1 Description Panel Indicators
-1-
-2-
LED Indicators
Name
Description
POWER
Power indicator
WLAN
WAN
LAN
Off
There is no wireless device linked to the router.
Flashing The Wireless function is enabled.
On
There is a device linked to the corresponding port.
Flashing There is an active device linked to the corresponding port.
On
There is a device linked to the corresponding port.
(1/2/3/4) Flashing The is an active device linked to the corresponding port.
The Rear Panel:
1) ANT Not removable external omni-directional antenna gain.
2)WAN Wide Area Network Interface (RJ-45). Connect xDSL Modem/Cable
Modem or Ethernet.
3)LAN1-LAN4 Four RJ-45 ports, Computer and hubs / switches through these
interfaces connected to LAN.
4)POWER Please use the power adapter which is supplied with the 54M
Wireless router only.
5)RESET Press and hold the reset button for 5 seconds under the working state,
the system will restore the factory default setting.
2.2 Hardware Installation Steps
1.Power on the 54M Wireless Router.
2.Connect the Router's WAN port to the Xdsl Modem/Cable Modem.
3.Connect the PC(s) in your LAN to the LAN port on your Router. (If you have the
wireless NIC and want to use wireless function, you can skip this step.)
Figure 2- 1
Right-click the local connection as shown in figure 2-2.then select
Properties will pop up figure 4-3 shown in the Network connection properties
dialog box.
Chapter 2 Quick Installation Guide
You should configure the Router correctly to ensure the normal use of the Router.
This chapter describes how to configure the basic functions of the 54M
Wireless Router. we will show the detailed configuration in the next chapter.
4.1 Configuring your PC
To Windows XP as an example:
1.Configure the IP address, Click the start menu, select network connect ,
Show in figure 2-1.
Figure 2- 2
-3-
-4-
Double-click Internet Protocol (TCP/IP) will appear IP address page. If you
choose to automatically receive the IP address and the DNS server address,
the computer will be gain the IP address from the router (Show in figure 2-4).Of
course, you can also choose manual-setting as shown in figure 2-5.
2. Connect wireless network
The wireless network will be connected after finished configuring the network
parameter. Select View available wireless connection as show in figure 2-6,
your wireless network card will be in search of available network connection in
current environment. Then the wireless network will be linked successfully by
click link button.
If the network is encrypted, password dialog box will pop up prompting you to
enter key.54M Wireless Router default network name(SSID) is Wifi, select this
network to connect the wireless router(show in figure 2-6).
Figure 2- 6
Now, you can run the Ping command in the command prompt to verify the network
connection
Figure 2- 3
Figure 2- 4
between your PC and the router. If the result is similar to that show in figure 2-7,
the connection between your PC and your router has been established.
Figure 2- 5
-5-
-6-
If the User Name and Password are correct, Router Management screen will
appear, show in figure 2-9:
Figure 2- 7
If the link can not be established, please check the hardware connection between
your PC and the router is normal, IP address is correct.
4.2 Quick Installation Guide
Launch a Web browser (Internet Explorer 5.0 or higher) when the computer and
the 54M Wireless Router are correctly connected, close the proxy browser. Then
input http://192.168.1.1 into the browser address bar, press the Enter key, there
will appear a login window as figure 2-8. Enter admin for the User Name and
Password, both in lower case letters. Also you can modify the user name and the
password to ensure the network security.
Figure 2- 9
The router supports three popular ways to connect to Internet. Click Settings
Wizard You can select one compatible with your ISP. show in figure 2-10
Figure 2- 10
1) If you choose the Dynamic IP , the router will automatically receive the IP
parameters from your ISP without needing to enter any parameter, show in
figure 2-11.
Figure 2- 8
-7-
-8-
Figure 2- 11
2) If you choose the PPPOE, figure 2-12 will appear, please enter the user name
and the password provided by your ISP.
Figure 2- 13
After Click the Finish button. Now you have completed the quick installation and
connection!.Thank you for reading!
Figure 2- 12
3) If you choose the Static IP, the Static IP settings page will appear, show in
figure 2-13,enter the Static IP address, Subnet Mask ,Default Gateway and DNS.
-9-
- 10 -
Warranty Card
This product is guaranteed against faulty materials and workmanship for
a period of one year from the date of purchase with proof of purchase. The
obligation to the purchaser under this warranty is limited to servicing the unit
and replacing defective parts or refund when the product is returned frei ght
prepaid to the retailer with proof of purchase. This warranty becomes void if the
product has been tampered with, damaged by accident, damaged in any other
way by improper use or has been purchased second hand. All production orders
have quality inspections. In the unlikely event of a deficien cy, pleas e contact
the retailer from which this product was purchased.
WARRANTY FOR APPLIANCES USED COMMERCIALLY LIMITED TO 90 DAYS
Type of Appliance: ____________________________________________________
Model No.: ___________________________Purchase Date: __________________
Product Purchased From: ______________________________________________
_____________________________________________________________________
Your Name: __________________________________________________________
Address: ____________________________________________________________
______________________________________ Phone Number: ________________
IMPORTANT!
Please retain this warranty card along with your purchase receipt. Please do not
post to the retailer. If service or a warranty claim is required, both of these
documents are to be returned with the appliance to your retail er, otherwise a fee
may be charged or warranty declined. For technical help contact the helpline.
- 11 -
- 12 -