1
Version
1
TALON COMPUTING
Rule Engine Express
User Manual
Talon Computing
RULE ENGINE
USER MANUAL
Talon Computing
http://www.taloncomputing.com
EXPRESS
Table of Contents
Introduction .................................................................................... 1
Why you should use REX....................................................................... 1
Requirements ......................................................................................... 1
Licensing........................................................................................ 2
Model ...................................................................................................... 2
Redistribution .......................................................................................... 2
Installation Procedure .................................................................... 2
Download ................................................................................................ 2
Purchase License ................................................................................... 2
Unzip and install...................................................................................... 3
Order License Key .................................................................................. 3
Installing Your License............................................................................ 4
Applications ................................................................................... 5
Licensing Authority Client ....................................................................... 6
Rule Builder ............................................................................................ 7
Knowledge Base, rule sets and rules .................................................................7
Rule Engine API .......................................................................... 23
Introduction ........................................................................................... 23
Linking References ............................................................................... 23
Application or web configuration .......................................................... 23
Classes ................................................................................................. 24
Sample Program................................................................................... 26
R U L E
E N G I N E
E X P R E S S
INTRODUCTION
Welcome to the Talon Computing Rule Engine Express (REX) user manual. This
manual will introduce step by step to the engine, from installation to how to use it
effectively.
Why you should use REX
REX is a lightweight software utility that will help you to decouple your business
rules from your application. By making use of an independent tool you are able to
focus your software on providing the engine with a set of inputs and then writing
code to handle very specific outcomes.
The advantage of this is decoupling. Your software focuses less on how decisions
are made for certain business rules and rather concentrates on handling the
desired outcome or decision. This frees the developer from hard coding business
rules into the code. This increases maintainability and productivity in the long run.
If new logic needs to be added or changed it can be done without necessarily
having to make any code changes, thereby reducing defects from being
introduced into the application.
Requirements
Currently the only system requirements that REX needs is Microsoft .NET 4.5.
When you start using REX in your application, you need to simply incorporate the
core Dynamic Link Libraries (DLL’s) into your application. This will be detailed in
later sections.
1
R U L E
E N G I N E
E X P R E S S
LICENSING
Model
Talon Computing licenses REX on an as-required basis; meaning that while you are
busy with the development of your application you may need to build and edit
your rules. If your business rules stay relatively stable there may not be a need to
have a license. In the event that your business rules do change at some point and
you need to maintain or make changes to your business rules, you would only
need to purchase a license for the minimum period you require.
Redistribution
Talon Computing grants you the rights to re-distribute the REX DLL’s with your
application in unmodified form. When redistributing your application, you need to
distribute your license key in your application configuration file also.
INSTALLATION PROCEDURE
In order to use REX, ensure that you have downloaded the latest copy from the
Talon Computing website (http://taloncomputing.com). Also ensure that you have
purchased the correct license as well. Talon Computing uses PayPal as our secure
payment processor.
Download
You
can
download
the
latest
version
of
REX
by
visiting
http://taloncomputing.com/downloads/rex.zip.
Purchase License
Once you have downloaded REX we recommend that you purchase a license key
for the development time period that you require. You won’t be able to execute
the application or use REX without a valid license. If you are only trying out REX
and would like a demo license, complete the next two steps and then follow the
procedure for ordering a demo license.
2
R U L E
E N G I N E
E X P R E S S
Unzip and install
Once you have downloaded REX, unpack it into a temporary folder and proceed
with the installation application. We recommend using all the default settings for
the installation process.
Order License Key
Once you have completed the installation procedure, you need to request a
license key. If you have purchased a license you still need to complete the process
by requesting a key to match your purchase. When your license has expired and
you need to request a new license, use the following application to request a new
license.
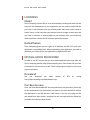
When ordering the license key you need to make use of the application titled:
TalonComputing.DesktopApp.LicensingClient.exe.
Step 1: Select the product, in this case REX.
Step 2: Select the development time period purchased. If you are trying the
product out, select the Demo – 1 month development option.
3
R U L E
E N G I N E
E X P R E S S
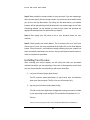
Step 3: Next provide the receipt number of your purchase. If you are requesting a
demo account specify 0 as the receipt number. If you have not purchased a license
yet, click on the Pay Now button. By clicking the Pay Now button, your default
browser will be opened and you will be directed to the product page on the Talon
Computing website. On the website you need to then select and purchase the
appropriate development time period that you require.
Step 4: Next supply your full name as this is your personal license for your
machine.
Step 5: Finally specify your email address. This is necessary for us to email your
license keys to. Once you have completed all the fields click on the Send Request
button. You will receive a confirmation message indicating that your request has
been successfully submitted to our servers, thus you will require internet access in
order to complete the procedure.
Installing Your License
After receiving your license request, we will verify that what you purchased
matches that which you are requesting. If there are no discrepancies we will send
you your license bundle. In the bundle you will receive three files:
1. rex-{your full name}-{expiry date}.license
This file contains textual description of your license keys and indicates
when your license expires. This file is for your information only.
2. app-rex-{your full name}-{expiry date}.config
This file contains the application configuration setting you need to include
in your app.config or web.config file. This should be incorporated as is, i.e.
The key:
<add key="TalonComputing.License.REX" value="D5E26CAF2C5E2B05D57ED7C755B1BBC3" />
4
R U L E
E N G I N E
E X P R E S S
Should be incorporated into your appSettings section in your app.config or
web.config file. This is your redistributable client license.
3. rex--{your full name}-{expiry date}.reg
This file contains your personal development license. This file should be
executed to install the necessary settings in your Windows Registry and
therefore will require administrator privileges.
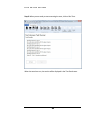
APPLICATIONS
The installation of REX results in two applications being installed and accessible
from the start menu under: Talon Computing/Talon Computing Rule Engine
Express. The applications are the Talon Computing Licensing Client and the Talon
Computing Rule Builder. In addition to these applications, the Rule Engine Core
files are installed to the location (if you used the default installation paths)
C:\Program Files\Talon Computing\Talon Computing Rule Engine Express\Core.
5
R U L E
E N G I N E
E X P R E S S
Licensing Authority Client
Known as:
Launch TalonComputing.DesktopApp.LicensingClient.exe
Menu Location:
Talon Computing / Talon Computing Rule Engine Express
As mentioned in the Order License Key section, the License Authority Client is used
to request a license from Talon Computing. Once we receive the request made by
the application we verify your request with your purchase unless you are
requesting a demonstration license. You will only be entitled to one
demonstration license.
6
R U L E
E N G I N E
E X P R E S S
Rule Builder
Known as:
Launch TalonComputing.DesktopApp.RuleEngine.exe
Menu Location:
Talon Computing / Talon Computing Rule Engine Express
The rule builder application is responsible for creating and maintaining your
knowledge bases.
KNOWLEDGE BASE, RULE SETS AND RULES
A knowledge base consists of a collection of rule sets. A rule set is a collection of
rules. When applying certain rules in your application you will base it off a
particular knowledge base rule set combination, i.e. your application uses the rule
engine to apply rules from a specific rule set from a specific knowledge base.
7
R U L E
E N G I N E
E X P R E S S
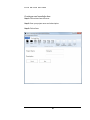
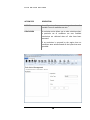
Creating a new knowledge base
Step 1: Click on New from the menu.
Step 2: Enter your project name and a description.
Step 3: Click on Save.
8
R U L E
E N G I N E
E X P R E S S
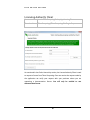
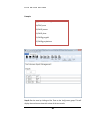
Loading an existing knowledge base
Step 1: Click on Load from the Management menu section.
Step 2: Select the knowledge file and then click Open.
9
R U L E
E N G I N E
E X P R E S S
Saving your knowledge base
Step 1: Once you have created your knowledge base or made changes to it, click
on the Save or Save As button.
Step 2: Specify the filename for the knowledge base.
10
R U L E
E N G I N E
E X P R E S S
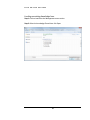
Creating a new rule set
Step 1: Under the Manage Rule Sets menu group, click on Create.
Step 2: Enter the name and description of the rule set in the Properties section.
Step 3: Click Save.
Editing a rule set
Step 1: In the Rule Set Management view, click on an existing rule set.
Step 2: Make changes to the Rule Set Properties.
Step 3: Click Save.
11
R U L E
E N G I N E
E X P R E S S
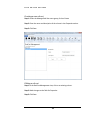
Creating Conditions
Step 1: In the Rule Conditions menu group, click on New Condition.
Step 2: Complete the condition properties.
Step 3: Click Save.
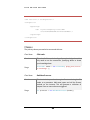
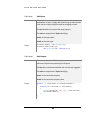
About conditional operators
Operator
IsBetweenExclusive
Description
Determines if a numeric value is between two numeric values
exclusively. The values must be separated by a comma.
Definition
> < 12
R U L E
E N G I N E
Example
E X P R E S S
Variable:
age
Conditional Operator: IsBetweenExclusive
Value:
18,34
Operator
IsBetweenMaxExclusive
Description
Determines if a numeric value is between two numeric values.
The lower bound value is inclusive and the upper bound value is
exclusive. The values must be separated by a comma.
Definition
≥ < Example
Variable:
age
Conditional Operator: IsBetweenMaxExclusive
Value:
18,34
Operator
IsBetweenMinExclusive
Description
Determines if a numeric value is between two numeric values.
The lower bound value is exclusive and the upper bound value is
inclusive. The values must be separated by a comma.
Definition
> ≤ Example
Variable:
age
Conditional Operator: IsBetweenMinExclusive
Value:
18,34
13
R U L E
E N G I N E
E X P R E S S
Operator
IsBetween
Description
Determines if a numeric value is between two numeric values
inclusively. The values must be separated by a comma.
Definition
≥ ≤ Example
Variable:
age
Conditional Operator: IsBetween
Value:
18,34
Operator
IsEqualTo
Description
Determines if a variable is equal to a particular value.
Definition
=
Example
Variable:
age
Conditional Operator: IsEqualTo
Value:
18
Operator
IsFalse
Description
Determines if a Boolean variable is false.
Definition
= Example
Variable:
smokes
Conditional Operator: IsFalse
Value:
14
R U L E
E N G I N E
E X P R E S S
Operator
IsGreaterThan
Description
Determines if a numeric variable is greater than a specific value.
Definition
>
Example
Variable:
age
Conditional Operator: IsGreaterThan
Value:
34
Operator
IsGeaterThanOrEqualTo
Description
Determines if a numeric variable is greater than or equal to a
specific value.
Definition
≥
Example
Variable:
age
Conditional Operator: IsGreaterThanOrEqualTo
Value:
34
Operator
IsIn
Description
Determines if a value is in one of the values specified. The values
must be separated by a comma.
Definition
∈ { , … , }
Example
Variable:
age
Conditional Operator: IsIn
Value:
18,20,22,24,26
15
R U L E
E N G I N E
E X P R E S S
Operator
IsLessThan
Description
Determines if a numeric variable is less than a specific value.
Definition
<
Example
Variable:
age
Conditional Operator: IsLessThan
Value:
18
Operator
IsLessThanOrEqualTo
Description
Determines if a numeric variable is less than or equal to a specific
value.
Definition
≤
Example
Variable:
age
Conditional Operator: IsBetweenLessThanOrEqualTo
Value:
18
Operator
IsNotEqualTo
Description
Determines if a variable is not equal to a particular value.
Definition
≠
Example
Variable:
age
Conditional Operator: IsNotEqualTo
Value:
55
16
R U L E
E N G I N E
E X P R E S S
Operator
IsNot
Description
Evaluates to the opposite of a particular Boolean variable.
Definition
!
Example
Variable:
smokes
Conditional Operator: IsNot
Value:
Operator
IsTrue
Description
Determines if a variable is true.
Definition
= Example
Variable:
smokes
Conditional Operator: IsTrue
Value:
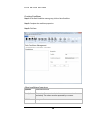
Creating actions
Step 1: Under the Rule Actions menu group, click on New Action.
Step 2: Select the Action Type from the drop down list.
Step 3: Specify the name of the property or variable you want to modify or create
conclusion for.
Step 4: Specify the value that the property should have when the action is
executed.
Step 5: Click on Save.
17
R U L E
E N G I N E
E X P R E S S
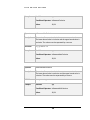
ACTION TYPE
DESCRIPTION
MODIFY
A modify action allows you to change the value of a
variable if a set of conditions are met.
CONCLUSION
A conclusion action allows you to make a decision when
a particular set of conditions are met. Satisfied
conclusions are collected when all rules have been
executed.
If no conclusion is returned by the engine then no
conditions were satisfied based on the inputs that were
provided.
18
R U L E
E N G I N E
E X P R E S S
Rule set verification
Once you have completed the creation of your rule set and rule specifications you
may want to verify that you don’t have conflicting rules or that your rules cover all
scenarios.
REX provides you with a facility to test your rules against specific input values.
Step 1: On the Verify menu section, click on Configure Variables. Configuring the
variables lets you assign types to variables used in your knowledge base. This will
be necessary for the test harness. In the Variables list, a list of your variables are
displayed.
Step 2: Click on a variable.
Step 3: Select the Variable Type from the drop down list in the property section.
Step 4: Click Save.
Step 5: Repeat Step 2-4 for all remaining variables.
19
R U L E
E N G I N E
E X P R E S S
Step 6: Configure the test harness inputs by clicking on Configure Inputs on the
Verify menu section.
Step 7: Click on Load to load the inputs from a Comma-Separated Value (CSV) file.
CSV Format:
The first row is the header and represents the variable names. These names
should be the same as the names identified in the Variable Configuration.
20
R U L E
E N G I N E
E X P R E S S
Example:
age,smokes,activities,product
34,TRUE,,none
29,FALSE,,bronze
31,FALSE,,silver
31,FALSE,gym,gold
25,FALSE,gym,platinum
Step 8: Run the tests by clicking on Run Tests on the Verify menu group. This will
display the test harness view with a view of the test results.
21
R U L E
E N G I N E
E X P R E S S
Step 9: When you are ready to start executing the tests, click on Run Tests.
When the tests have run, the results will be displayed in the Test Results area.
22
R U L E
E N G I N E
E X P R E S S
RULE ENGINE API
Introduction
The rule engine has a very simple and easy to use programming interface. We will
be describing only the classes you require to successfully integrate the rule engine
into your application. We will also illustrate how to use the application
programming interface by means of a coded example.
Linking References
The following references should be added to your project when starting to use the
rule engine API. These references should be located in (if you used the default
installation location) C:\Program Files\Talon Computing\Talon Computing Rule
Engine Express\Core.
Dynamic Link Library
TalonComputing.Licensing.Core.dll
TalonComputing.Licensing.CoreModels.dll
TalonComputing.Licensing.Hardware.dll
TalonComputing.Licensing.Interfaces.dll
TalonComputing.Licensing.Utilities.dll
TalonComputing.RuleEngine.Core.dll
TalonComputing.RuleEngine.Interfaces.dll
TalonComputing.RuleEngine.Models.dll
Application or web configuration
Next configure your application with the client distributable key that was emailed
to you. This is the file that has a .config file extension.
23
R U L E
E N G I N E
E X P R E S S
<?xml version="1.0" encoding="utf-8" ?>
<configuration>
<appSettings>
<add
key="TalonComputing.License.REX"
value="D5E26CAF2C5E2B05D57ED7C755B1BBC3" />
</appSettings>
</configuration>
Classes
The primary classes you need to be concerned with are:
Class Name
FileLoader
Overview
This class facilitates the loading of your knowledge base. You
only need to use the constructor, specifying where to locate
your knowledge base.
Usage
FileLoader loader = new FileLoader( @"App_Data\insuran
ce.knowledge" );
Class Name
RuleBaseProcessor
Overview
This class is the key to the rule engine. Construct it using the file
loader as a parameter. Add some inputs and call the Process
method on the instance. This will generate a collection of
outputs if one or more rules were triggered.
Usage
var processor = new RuleBaseProcessor(loader);
24
R U L E
E N G I N E
E X P R E S S
Class Name
RuleInputs
Overview
This class is a specialized Dictionary that allows you to
add/update an input. Initially add inputs using the add method.
Later you can simply modify the input by changing its value.
The key identifies the name of the input property.
The value is comprised of a Tuple identifying:
Item1: as the input value.
Item2: as the input type.
Usage
processor.Inputs = new RuleInputs();
insurance.Inputs.Add("age",
new ObjectType(25, typeof(int)));
Class Name
RuleOutputs
Overview
This class is specialized Dictionary that allows you to view the
outcome of a particular processing of rule inputs.
The key of the conclusions identifies the rule that was triggered.
The value is comprised of a Tuple identifying:
Item1: as the conclusion property.
Item2: as the conclusion property value.
Usage
foreach( var conclusions in insurance.Outputs )
{
foreach( var conclusion in conclusions )
{
Console.WriteLine( "{0}: {1}", conclusion.Key,
conclusion.Value );
}
}
25
R U L E
E N G I N E
E X P R E S S
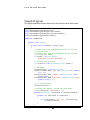
Sample Program
This sample application demonstrates how to use the library with relative ease.
using
using
using
using
using
System;
TalonComputing.RuleEngine.Core;
TalonComputing.RuleEngine.Core.Loaders;
TalonComputing.RuleEngine.Interfaces.Models;
TalonComputing.RuleEngine.Models;
namespace LoanApproval
{
internal class Program
{
private static void Main( string[] args )
{
// specify where our knowledge base file is, the rule
// processor will
// automatically load the knowledge file when it needs
// it using this loader
var loader = new FileLoader(
@"App_Data\insurance.knowledge" );
// create a rule processor
var insurance = new RuleBaseProcessor( loader );
// add inputs
insurance.Inputs = new RuleInputs();
insurance.Inputs.Add( "age", new ObjectType( 25, typeof(
int ) ) );
insurance.Inputs.Add( "smokes", new ObjectType( false,
typeof( bool ) ) );
insurance.Inputs.Add( "activities", new ObjectType("gym",
typeof( string ) ) );
// run the processor
insurance.Process();
// process the outputs / handle the conclusions
Console.WriteLine( "Conclusions: " );
foreach( RuleOutputs conclusions in insurance.Outputs )
{
foreach( var conclusion in conclusions )
{
Console.WriteLine( "{0}: {1}", conclusion.Key,
conclusion.Value );
}
}
26
R U L E
E N G I N E
E X P R E S S
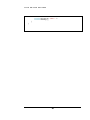
Console.WriteLine( "Done." );
Console.ReadKey();
}
}
}
27