1
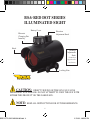
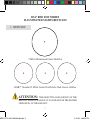
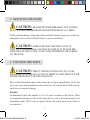
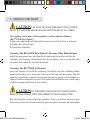
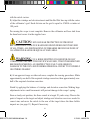
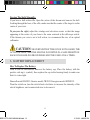
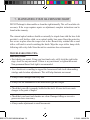
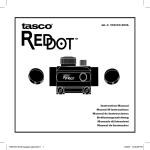
RED DOT SERIES
ILLUMINATED SIGHTS
INSTRUCTION
MANUAL
RED DOTS UNIV MANUAL06.indd 1
2/11/09 4:05:50 PM
PROLOGUE
Rapid target acquisition, pinpoint accuracy and wide field of view
make the BSA® Red Dot series ideal for handguns, rimfire, rifles,
shotguns, pistols, black powders and crossbows. Each Red Dot has
a finger adjustable rheostat for variable reticle brightness control,
anti-reflective coating, and integrated 3/8” and 5/8” mounting
system for optimum performance. Selected models feature a
state-of-the-art RGB™ Red, Green, and Blue dot reticle for allday shooting versatility. All Red Dots feature wide field of view,
unlimited eye relief and multi-coated optics.
The BSA® RD series illuminated sights have a standard 5 MOA
center dot reticle. RGB™ models have an adjustable rheostat
equipped with Red, Green, and Blue dot with 3 intensity settings.
Non-RGB models illuminate in standard red for all light conditions
and their adjustable rheostat has 11 intensity settings and a
standard 5 MOA center dot. The RD30GE and RD30GERGB
models in RD series have a glass etched 5 MOA dot reticle for
increased accuracy and durability.
All models feature a new slanted hood that acts as a built-in
sunshade to minimize unwanted glare and operate on a standard 3
volt lithium battery (included). Replacement battery #CR2032.
It is important to adjust the center dot intensity to the current
shooting light conditions.
RED DOTS UNIV MANUAL06.indd 2
2
2/11/09 4:05:50 PM
TABLE OF CONTENTS:
1.
2.
3.
4.
5.
6.
7.
RETICLES
FUNDAMENTALS OF AN ILLUMINATED SIGHT
MOUNTING THE SIGHT
FOCUSING THE SIGHT
ZEROING THE SIGHT
BATTERY REPLACEMENT
MAINTAINING THE SIGHT
The BSA® Red Dot is a lightweight sight for all types of shooting, especially close
in and quick target acquistion under any light conditions. The intergrated 3/8” and
5/8” mounting system is perfect for rifles, airguns, shotguns, pistols and bow/cross
bows. When you turn the sight on, a small red dot appears in the center of your
scope. You can then adjust the brightness of the dot, depending on the brightness
of your surroundings. Operates on a standard 3 volt lithium battery (included).
Replacement battery #CR2032.
RED DOTS UNIV MANUAL06.indd 3
3
2/11/09 4:05:53 PM
BSA® RED DOT SERIES
ILLUMINATED SIGHT
Battery Cover
Elevation
Adjustment Knob
Rheostat
Changing Dot
Intensity
Hood
Windage
Adjustment
Knob
(located on
opposite side
-not shown.)
Locking Nuts
CAUTION: DIRECT VIEWING OF THE SUN CAN CAUSE
PERMANENT EYE DAMAGE. DO NOT ATTEMPT TO VIEW THE SUN WITH
EITHER THIS PRODUCT OR THE NAKED EYE.
NOTE:
RED DOTS UNIV MANUAL06.indd 4
KEEP ALL INSTRUCTIONS FOR FUTURE REFERENCE.
4
2/11/09 4:05:54 PM
BSA® RED DOT SERIES
ILLUMINATED SIGHTS RETICLES
1. RETICLES
5 MOA Illuminated Center Red Dot
RGB™ Standard 5 MOA Center Dot Reticle: Red, Green, & Blue
ATTENTION:
THE OBJECTIVE LENS (FRONT) OF THE
RED DOT SIGHT IS ANGLED. IT IS ANGLED FOR THE PROPER
OPERATION OF THE RED DOT.
RED DOTS UNIV MANUAL06.indd 5
5
2/11/09 4:05:55 PM
Sights With Illuminated Reticles
The battery switch housing is set on top of the eyebell in alignment with the
elevation turret. BSA offers a standard 11 position rheostat, which uses a lithium
CR2032 3V. battery. The battery is protected against accidental discharge during
shipping by a plastic bag.
On sights with settings from 1 to 11 use setting 1 through 3 for lowest light
conditions, 4 through 6 for dusk and dawn, 7 through 9 for over cast or cloudy
days and 10 through 11 for bright sunny days. Individual scopes may vary and
light conditions will change so for best performance always set the dot at the
lowest setting that it can clearly be seen. If the dot appears to have a halo or be out
of focus the brightness setting should be reduced until it is clear and sharp.
With settings from 1 to 3, use setting 1 at lowest light, 2 cloudy or overcast and 3
for brightest conditions. On scopes with Red, Green and Blue dots use the color
that shows up the best against the background you are looking at, and set the
brightness to match the light conditions.
• Remove the battery compartment cap by turning it counter-clockwise.
• Insert the battery with the positive (+) side facing up.
• Replace the cap by turning it clockwise and tighten to avoid moisture or water
from getting inside.
• The illuminated feature is activated by turning the rheostat switch to number 1.
Each click will increase the instensity, 11 being the maximum.
• To turn the illuminated reticle off, turn the knob to the zero position.
RED DOTS UNIV MANUAL06.indd 6
6
2/11/09 4:05:55 PM
2. FUNDAMENTALS OF AN ILLUMINATED SIGHT
Six Basic Elements Form The System Of An Illuminated Sight:
I. Objective Lens:
Lens responsible for the amount of light that gets inside the scope. In illuminated
sights, the objective lens is angled, this is not a defect. It is angled for the proper
operation of the sight.
II. Image System:
A small metal tube with a 50% to 70% transmission mirror, set in a 15 degree slanted
angle.
III. Windage and Elevation System:
The image system tube is fixed at one end and free at the other closest to the objective
lens, the windage and elevation screws serve as supports for this end while providing
movement or correction to the reticle to adjust the aiming point to the real point of
impact of the bullet.
IV. Reticle:
The reticle replaces the iron sight system that usually comes with rifles. In the case of
Illuminated Sights the reticle is a projection of light forming one or more reticles in
one or more colors, depending on the reticle design.
V. Ocular Lens:
The ocular lens seals the end of the sight closest to the eye, responsible for the final
collimation of the image.
VI. Rheostat Switch:
Next to the on/off function, it regulates the intensity of the LED diode.
RED DOTS UNIV MANUAL06.indd 7
7
2/11/09 4:05:55 PM
3. MOUNTING THE SIGHT
CAUTION: BE SURE THAT THE FIREARM IS NOT LOADED.
PRACTICE SAFE FIREARM HANDLING PROCEDURES AT ALL TIMES.
Set the rail onto the base. Align and set the crossbolts into the cut grooves of the base,
and tighten each crossbolt with the help of a coin or screwdriver.
CAUTION: MAKE SURE THAT THE SIGHT IS NOT IN
CONTACT WITH THE RIFLE, AND THAT NO PART OF IT BLOCKS THE
OPERATION OF THE ACTION. AVOID OVER-TIGHTENING THE SCREWS
ON THE BASE.
4. FOCUSING THE SIGHT
CAUTION: DIRECT VIEWING OF THE SUN CAN CAUSE
PERMANENT EYE DAMAGE. DO NOT ATTEMPT TO VIEW THE SUN WITH
EITHER THISPRODUCT OR THE NAKED EYE.
Most of the illuminated sights in the market do not have magnification. In the last
few years some models appeared on the market in a 3X version, but in both cases the
sight does not require focusing.
Parallax:
In illuminated sights, the parallax is set to 50 yards or meters at the factory. There
is an apparent movement of the reticle when the eye moves from the image axis in
illuminated sights. This is only an optical illusion; the reticle never moves from its
zero position.
RED DOTS UNIV MANUAL06.indd 8
8
2/11/09 4:05:55 PM
5. ZEROING THE SIGHT
CAUTION: BE SURE THAT THE FIREARM IS NOT LOADED.
PRACTICE SAFE FIREARM HANDLING PROCEDURES AT ALL TIMES.
Zero sighting can be done either manually or with an optical collimator
(BSA® BS30 Bore Sighter):
1) Move the sight back and forth until the correct eye relief distance is achieved.
2) Tighten the crossbolt nuts.
3) Attach the collimator.
Attaching The BSA® BS30 Bore Sighter To Firearms Other Than Shotguns:
Select the appropriate bore stud from the kit and insert the notched end into the
collimator stud housing. Hand-tighten the silver locking screw to secure the stud.
Insert the other end of the stud into the muzzle.
Attaching The BSA® BS30 To Shotguns:
Insert the notched end with the adjusting screw/knob into the collimator. Handtighten the locking screw. Insert the other end of the stud into the muzzle. Turn the
adjusting screw/knob counterclockwise until the desired gauge or bore diameter is
achieved and the collimator is secured. The adjustable collimator covers a wide range
of different gauges and black powder caliber.
CAUTION: IF THE BORE STUD DOES NOT INSERT EASILY,
REMOVE AND VERIFY THAT THE CORRECT STUD IS BEING USED.
4) Look though the scope and into the collimator. Inside you will see a reference grid.
If necessary, rotate the collimator until the grid lines match vertically and horizontally
RED DOTS UNIV MANUAL06.indd 9
9
2/11/09 4:05:55 PM
with the reticle vectors.
5) Adjust the windage and elevation turrets until the Red Dot lines up with the center
of the collimator’s grid. Each division on the grid is equal to 4 MOA or inches at
100 yards.
Pre-zeroing the scope is now complete. Remove the collimator and bore stud from
the barrel and secure it in the supplied case.
CAUTION: EYE AND EAR PROTECTION IS STRONGLY
RECOMMENDED. SAFE GUN HANDLING PROCEDURES MUST BE USED
AT ALL TIMES. ALL DISCHARGING OF FIREARMS SHOULD BE DONE AT
AN APPROVED RANGE OR EQUALLY SAFE AREA.
WARNING: IF A BORE SIGHTING COLLIMATOR OR ANY
OTHER BORE OBSTRUCTING DEVICE WAS USED, IT MUST BE REMOVED
BEFORE PROCEEDING. AN OBSTRUCTION CAN CAUSE SERIOUS
DAMAGE TO THE GUN AND POSSIBLE PERSONAL INJURY TO YOURSELF
OR OTHERS NEARBY.
6) At an approved range or other safe area, complete the zeroing procedures. Make
approximately one-half of the required windage correction, then approximately onehalf of the required elevation correction.
Finish by applying the balance of windage and elevation correction. Making large
adjustments in two small increments will prevent damage to the scope’s spring.
From a steady rest position, fire three rounds at a target 50 yards away. Observe the
point of impact on the target and adjust windage and elevation screws as needed to
correct aim, and move the reticle to the area of the target where the three bullets
impacts are (see page 11). Repeat if necessary.
RED DOTS UNIV MANUAL06.indd 10
10
2/11/09 4:05:56 PM
To place the center of the reticle (red)
on the point of impact (orange), turn
the elevation turret counter-clockwise
to raise the point of impact. Then, turn
the windage turret counter-clockwise
to move the point to impact to the left.
NOTE:
Each click of adjustment changes bullet strike at a shooting distance of 100 yards
by the amount indicated on the windage and elevation knobs. To calculate the click
value at distances other than 100 yards, use the following formula:
Divide the distance (number of yards) by 100. The resulting number, when multiplied
by the click value stated on the windage and elevation dial plates, will yield the actual
click value of the scope at the shooting distance.
Distance (yards) / 100 = N
N x Stated Click Value = Actual Click Value
RED DOTS UNIV MANUAL06.indd 11
Once zeroing of the weapon is completed,
replace the windage and elevation caps.
11
2/11/09 4:05:56 PM
Zeroing The Sight Manually:
If you have a bolt action rifle: Open the action of the firearm and remove the bolt.
Looking through the bore of the rifle, make sure that the center of the target is in the
center of your view.
To pre-zero the sight, adjust the windage and elevation screws so that the image
appearing at the center of your bore is the same centered in the riflescope reticle.
If the firearm you own is not a bolt action, we recommend the use of an optical
collimator.
CAUTION: BE CERTAIN THAT THE GUN IS NOT LOADED, THE
ACTION IS OPEN, AND THE MUZZLE IS POINTED IN A SAFE DIRECTION.
SAFE GUN HANDLING PROCEDURES MUST BE USED AT ALL TIMES.
6. BATTERY REPLACEMENT
How To Replace The Battery:
With a coin or screwdriver, unscrew the battery cap. Place the battery with the
positive side up (+ symbol), then replace the cap in the housing firmly to make sure
that it is water-tight.
Duracell model DL2032, Sunrise model CR2032, Energizer model ECR2032.
Turn the switch on, turn the switch knob clockwise to increase the intensity of the
reticle brightness, and counterclockwise to decrease it.
RED DOTS UNIV MANUAL06.indd 12
12
2/11/09 4:05:56 PM
7. MAINTAINING YOUR ILLUMINATED SIGHT
DO NOT attempt to disassemble or clean the sight internally. This will invalidate the
warranty. If the scope requires repairs or adjustment, complete instructions can be
found in the warranty.
The external optical surfaces should occasionally be wiped clean with the lens cloth
provided, a soft lint-free cloth, or an optical quality lens paper. Keep the protective
lens covers in place when the scope is not in use. Remove any external dirt or sand
with a soft brush to avoid scratching the finish. Wipe the scope with a damp cloth,
following with a dry cloth. Store the unit in a moisture-free environment.
TROUBLE SHOOTING TIPS:
Inaccuracy Issues
• First check your mount. Using your bare hands only, softly twist the sight in the
rings, check for any movement. If there is any movement, re-tighten the mount.
Non-permanent thread lock tight is recommended.
• Use a bench rest or sandbag to support the forearm and butt stock when making
windage and elevation adjustments. This will help eliminate movement.
• Always follow through with every shot.
• Always use the ammunition of the same bullet type and weight.
• Check that your rifle is properly bedded in the stock. A loose stock can create
changes to the point of impact.
• Check that your barrel and chamber are clean. Damaged rifling or excessive
grease can cause inaccuracy.
• Always make adjustments in small increments.
RED DOTS UNIV MANUAL06.indd 13
13
2/11/09 4:05:56 PM
COMPARISON CHART:
MODEL
RD30CP
RD30GE
RD30GERGB
HMRGBD30CP
RD42
RD42CP
Magnification
1X
1X
1X
1X
1X
1X
Eye Relief (in)
Unlimited
Unlimited
Unlimited
Unlimited
Unlimited
Unlimited
68
68
68
68
77
77
FOV @ 100 Yds. (ft)
Tube Diameter
30mm
30mm
30mm
30mm
65mm
65mm
Parallax Setting
50 Yards
50 Yards
50 Yards
50 Yards
50 Yards
50 Yards
5.94
5.94
5.94
5.94
7.56
7.56
Adjustment
Graduation (MOA)
1 click = 1/2”
1 click = 1/2”
1 click = 1/2”
1 click = 1/2”
1 click = 1/2”
1 click = 1/2”
Max. Internal WIE
Adjustment (MOA)
45-45
45-45
45-45
45-45
45-45
45-45
Illuminated
5 MOA
5 MOA
5 MOA
5 MOA
5 MOA
5 MOA
Reticle Type
Red Dot
Red Dot
RGB Dot
RGB Dot
Red Dot
Red Dot
Light/Laser
No
No
No
No
No
No
Weight (oz.)
DO NOT open, modify, or service this product, except for changing
the battery. For any service or repair, the product must be returned
to BSA Optics. Please follow return guidelines. No maintenance
required for product to stay in compliance.
RED DOTS UNIV MANUAL06.indd 14
14
2/11/09 4:05:57 PM
For questions on our products and for complete instructions on warranty
and repair, contact BSA Optics Customer Service at (954)581-2144 or
visit bsaoptics.com
FOR RETURNING PRODUCTS
*Return products following the warranty guidelines, a brief description is
included below:
1) Remove any accessories and rings.
2) Include a note with a brief description of the problem, and please include your full
name, address, telephone number, and email address.
3) A $10 check for return shipping and processing fees and proof of purchase.
4) We recommend using a shipping method with a tracking number:
FedEx,UPS ect. BSA optics cannot be held liable for lost or damaged items.
*Please note if your product is not registered you must have proof of original
purchase, or you will be subject to repair fees. (see warranty)
Ship Products To:
BSA Optics, Inc.
1475 S. Sam Houston Blvd.
Houston, MO 65483
RED DOTS UNIV MANUAL06.indd 15
15
2/11/09 4:05:57 PM
RED DOT SERIES
ILLUMINATED SIGHTS
©2009 BSA Optics, Inc.
Ft. Lauderdale, FL 33314 USA
RD021109 • RED DOTS UNIV MANUAL06.indd
Made in China - Printed in China
BSARDM-2009
RED DOTS UNIV MANUAL06.indd 16
bsaoptics.com
2/11/09 4:05:57 PM