1
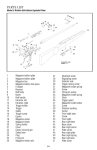
User Manual MTC Viper Connect www.mtcoptics.co.uk *** Email: [email protected] *** Telephone: 01380 859572 Forward Guarantee Registration Thank you for buying this Viper Connect Scope. . The Viper range of scopes are manufactured with the following features: Fully edge to edge multi-coated lenses Fully waterproof, fog-proof , shockproof and nitrogen purged True 10 x zoom magnification ‘click-stop’ indicator. 30mm tube Glass etched reticule Side parallax adjustable Illuminated reticule 10 yard minimum focus Short eye relief scope for use on NON RECOILING rifles only Our range of Viper Connect scopes are manufactured by one of China’s top quality OEM manufacturers, who’s name you will not be familiar with but who’s products you will know by sight. The Connect has been manufactured to our own design and made specifically for low recoil rifles and benefitting from the ultra low eye relief that this allows. Ultra Low Eye Relief is optically far superior to conventional designs, with a massively wider field of view, better depth of field, better balance and user connection to the rifle. When this is coupled to a scope enhancer the effect is simply stunning. Please note : This scope has a standard guarantee for 1 year from date of purchase. However this is increased to 5 years to the original purchaser but subject only to it being registered with MTC Optics within 30 days of original purchase, either by returning this form OR by email via the website www.mtcoptics.com. (A copy of the original receipt to be sent along with the registration form.) Date of Purchase: Dealer Stamp/Details: However: Ultra Low Eye Relief means that your eye is close to the scope, and that means that before trying this scope on a recoiling rifle you should book your taxi to casualty. This scope should NOT be used on any recoiling rifle or serious injury could occur. Dealer Signature It is recommended only for the following calibres: PCP AIR .22 Rimfire .17 HMR .204 C/F .22 Hornet C/F Customer Name: Customer Address: If you have any questions or problems please feel free to contact us via: E-mail: [email protected] Telephone 01380 859572 (local call) Or via our website: www.mtcoptics.com Page 6 Page 1 Care and Maintenance. Before starting The Connect is a precision optical instrument and needs to be treated with care. Clean the outer casing with a damp and soft cloth, then dry. Close the lens protective cover at all times when the scope is not in use to protect the lenses. Please familiarise yourself with the layout of the scope, and terminology used in this description. Please see Fig1 When necessary clean the lenses ONLY with a lens cleaning cloth and lens cleaning fluid suitable for photographic equipment. Store the scope in dry, well-ventilated place. 1.Objective 4a. Elevation 6. Magnification 2.Front Cover 4b. Windage (behind scope) 7.Fast focus 3.Tube 5. Illumination Level 8. Diopter Cup Fig 1 : Controls and adjustments WARNINGS NEVER LOOK DIRECTLY AT THE SUN OR ANY BRIGHT LIGHT ESPECIALLY THROUGH A SCOPE. PERMANENT EYE INJURY OR EVEN BLINDNESS CAN RESULT THIS SCOPE IS DESIGNED ONLY FOR THE CALIBRES SPECIFIED, USING A HEAVIER RECOILING RIFLE COULD RESULT IN SERIOUS INJURY Page 5 Page 2 OPERATION OF THE SCOPE 1. Mounting the scope: Fig1 The scope must be mounted using 30mm diameter rings. These rings should not be overtightened or damage may result. Ensure rings are high enough to allow the scope objective lens to clear the rifle, but not so high as to raise the eyepiece so making sighting difficult. Please do not use poor quality mounts as they will cause misalignment and inaccuracy. Ensure that the horizontal cross hair is parallel to the action. This is best done by placing a level on the action and sighting the vertical cross hair down a vertical edge / plumb line etc. On a low recoil rifle our suggested method is as shown. 2. Eyebell controls: Fig 5. This obtains the sharpest Reticule image, and MUST be carried out first. This adjustment only needs to be carried out once and is unique to each user’s eye. Rotate fast focus ring to get the sharpest possible reticule. Hint: Don’t look at the Reticule for more than a few seconds at a time as your eye will compensate for less than perfect sharpness. Look away and look back again. When not using the supplied rubber scope enhancer, the eye cup should be rotated clockwise to provide a gap for spectacle wearers or anti clockwise to provide an eyeshade for non-spectacle wearers. Magnification is carried out using the magnification ring with a distinct notch being felt at exactly x10 magnification. Fig 1. Suggested mounting Fig 2. Windage & Elevation 3. Focusing: Fig 3. Focus the sight on the target using the side focusing ring. This is called parallax adjustment. Never try to zero without a perfectly clear picture as aiming errors will occur due to parallax error. Fig 3. Focusing adjustment 4. Turret Operation: Fig 2. Fig 4. Illumination Controls Access to the adjustment is gained by removing the covering caps. The adjusters are finger / coin adjustable. The bullet strike is marked with up/ down (top turret) and left/right (side turret). Fig 5. Twist Adjust Eyebell Controls 5. Illumination: Fig4. The illuminated reticule is turned on using the side push button, then the light intensity is set using the rotating knob on the top. Battery fitting (CR2032) is accomplished by removing the coin slot cover on top of the illumination housing. Tip – source of cheap batteries www.7dayshop.com. 6. Zeroing your rifle Remove the turret covers and store in a safe place. Place a suitable target at 15 yards, ensuring a suitable backstop. Ensure trifle is held steadily and take 1 shot. Observe the bullet strike. Use the Elevation Turret to move the point of impact UP (anti-clockwise) or DOWN (clockwise). When point of impact is in the centre of the target this can then be repeated at progressively further ranges until the chosen zero range is reached. When the rifle is almost zeroed start to fire groups of 5 shots before making small adjustments. Remember that wind will affect the bullet flight so zeroing should be carried out in calm conditions. When you are happy that your rifle is zeroed correctly re-fit the turret covers. Page 3 Page 4