1
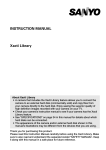
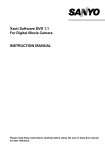
Instruction Manual Digital Movie Camera VPC-HD2/SANYO Software Pack 7.9
For information concerning operating and handling the camera, please see the
back cover.
Please read these instructions carefully before using. Be sure to keep this manual
for later reference.
Ru
It Informazioni sui manuali di istruzioni in file PDF
Vedere le pagine da ii a xi di questo manuale.
Nl Handleidingen in de vorm van PDF-bestanden
Zie pagina ii tot xi van deze handleiding.
Es Acerca de los manuales de instrucciones en formato PDF
Consulte las páginas ii a xi de este manual.
Fr À propos des manuels d’instructions en format PDF
Référez-vous aux pages ii à xi de ce manuel.
De Bedienungsanleitungen im PDF-Dateiformat
Auf die Seiten ii bis xi in dieser Anleitung verwiesen.
En About the PDF-file Instruction Manuals
Please see pages ii to xi in this manual.
INSTRUCTION MANUAL
SANYO Software Pack 7.9
For Digital Movie Camera
INSTRUCTION MANUAL
Digital Movie Camera
VPC-HD2EX
VPC-HD2
VPC-HD2GX
How to read this manual
This instruction manual for your camera is organized into the following
sections.
k SETUP
Before taking pictures with your camera, you will need to
familiarize yourself with a few of its functions and complete a
setup steps.
k BASIC OPERATION
An explanation of the fundamental operation for capturing
images and viewing images.
k SHOOTING
The various settings for taking pictures and how to change
them are explained.
k PLAYBACK
You can control various settings related to viewing the
images.
k OPTION SETTINGS
How to manage the LCD monitor display and operation
sounds, as well as settings related to camera operation.
k OTHER DEVICES AND CONNECTIONS
How to connect your camera to a printer or TV.
k APPENDICES
The answers to any questions you may have about the
camera operation might be explained in the Troubleshooting
section. The camera specifications are also found here.
Important note
This manual explains how to safely operate the VPC-HD2EX, VPC-HD2 and VPC-HD2GX.
Any information regarding only one of these products will be labeled as such.
Please read these instructions carefully before using the camera.
Make sure to read and understand the separate booklet “SAFETY MANUAL”.
Keep this manual in a safe place for later reference.
For information concerning operating and handling the SANYO Software Pack,
please see the back cover.
Printed in Indonesia
1AG6P1P3306-SG113/EX, U, GX (0207CR-SJ)
ATTENTION
To power outlet
Supplied power cord
Supplied AC adaptor
3
2
Supplied cable adaptor
1
Press the still image
shooting button [
].
h The image is captured.
Set the main switch to REC.
Open the monitor unit, and
press the ON/OFF button
for at least 1 second to turn
the camera on.
kStill image
photography
2
Connect the cable adaptor to the camera, and connect the
AC adaptor.
Card slot cover
Card slot
SD Memory Card
3
2
1
Insert the SD Memory Card.
h An SD Memory Card is not included with your camera. Please
purchase a commercially sold card.
h In this manual, the SD Memory Card is referred to as the “card”.
Preparing the camera
1
F3.5
1/30
297
00:20:39
Main switch
ON/OFF
button
Press the video clip
recording button [
].
h Recording begins.
h To stop recording, press
the video clip recording
button again.
Regarding permission to use the CD-ROM
h This CD-ROM may not be reproduced without permission.
h When installing the software in this CD-ROM, permission is granted for
its use only if the user agrees to the terms and conditions that are
displayed at the start of installation.
h Regarding products by other manufacturers that are specified on this
CD-ROM, and for service, please inquire of the respective
manufacturer.
i It is strictly forbidden to copy this manual, wholly or in part, without prior
written permission.
i The contents of this manual are subject to change without prior notice.
i Sanyo Electric shall not be held responsible for any problems resulting
from the use of this product.
i Sanyo Electric declines all responsibility for damages due to improper use
of this product, failure to adhere to the instructions given in this manual, or
repairs or changes done by those other than a technician authorized by the
manufacturer.
i Sanyo Electric shall not be held responsible for any damage caused by
optional devices or consumable items used with this product other than
those supplied with this product or those specified by Sanyo Electric.
i Sanyo Electric shall not be held responsible for any losses or loss of
revenue resulting from the loss of data caused by the malfunction, or the
repairing of a malfunction, of this product.
Set the main switch to REC.
Open the monitor unit, and
press the ON/OFF button
for at least 1 second to turn
the camera on.
Still image shooting
button [
]
Video clip recording
button [
]
kVideo clip recording
Shooting
SHOOT, PLAY BACK AND SAVE
i
English
SG113_soft_EN.book Page ii Thursday, February 1, 2007 2:45 PM
ENGLISH
About the PDF-format Instruction Manuals
Instruction manuals for the Camera and the SANYO Software Pack are stored
as PDF files in the SANYO Software Pack CD-ROM Disc1.
To read the PDF files, you will need Adobe® Acrobat® Reader 4.0 or later. If
one is not installed in your computer, install it from the SANYO Software Pack
CD-ROM Disc1.
An English version of Adobe® Acrobat® Reader is provided on the SANYO
Software Pack CD-ROM Disc1. If you need a version for a different language,
you can download it from the web site given below (Adobe® Reader).
http://www.adobe.com/products/acrobat/readstep.html
k To install Acrobat Reader
For information on how to use Acrobat Reader, read the Help files of Acrobat
Reader.
Installing to a Windows computer
1 Set the CD-ROM (SANYO Software Pack Disc1) in the CD-ROM drive.
h The installation window soon appears.
h If the installation window does not appear, double-click on the
[SanyoDisc1 (D:)] icon in the My Computer window, and double-click on
[Autorun.exe] in the [SanyoDisc1 (D:)] window.
* The drive name (D:) may be different on your computer.
2 In the installation window, click on [Adobe Reader 7.0].
h Installation begins. Follow the messages that appear on your screen to
complete the installation.
h When installation is completed, restart your computer.
Installing to a Macintosh computer
Double-click the installer icon located inside the Acrobat folder that is in the
DOCS folder on the CD-ROM.
h When the installer window opens, follow the instructions given on the
screen and complete the installation of Acrobat Reader.
k How to view the PDF-file Instruction Manuals
1 Insert the CD-ROM (SANYO Software Pack Disc1) in your computer’s CDROM drive.
h The installation window appears.
2 In the installation window, click on [Instruction Manuals (PDF)].
h The list of languages in which the instruction manual is available appears.
3 Click on the language of your choice.
h The folder containing the instruction manual opens.
h Double-click on the icon to view the instruction manual.
English
ii
SG113_soft_EN.book Page iii Thursday, February 1, 2007 2:45 PM
DEUTSCH
Bedienungsanleitungen im PDF-Dateiformat
Die Bedienungsanleitungen für die Kamera und das SANYO Software Pack
befinden sich als PDF-Dateien auf der SANYO Software Pack CD-ROM-Disk 1.
Um sich die PDF-Dateien anzusehen, benötigen Sie Adobe® Acrobat®
Reader 4.0 oder höher. Falls dieses Programm auf Ihrem Computer nicht installiert
ist, können Sie es von der SANYO Software Pack CD-ROM-Disk 1 installieren.
Der Adobe® Acrobat® Reader wird auf der SANYO Software Pack CD-ROM-Disk
1 in englischer Version zur Verfügung gestellt.
Falls Sie das Programm in einer anderen Sprache bevorzugen, können Sie eine
entsprechende Version von der folgenden Homepage herunterladen (Adobe®
Reader).
http://www.adobe.com/products/acrobat/readstep.html
k Installation von Acrobat Reader
Anweisungen zur Anwendung von Acrobat Reader können Sie in den
Hilfedateien von Acrobat Reader finden.
Installation in einem PC
1 Legen Sie die CD-ROM (SANYO Software Pack, Disk 1) in das CD-ROM-Laufwerk ein.
h Nach einer kurzen Verzögerung erscheint das Installationsfenster.
h Erscheint das Installationsfenster nicht, doppelklicken Sie zunächst auf das
Symbol [SanyoDisc1 (D:)] im Fenster “Arbeitsplatz” und dann auf
[Autorun.exe] im Fenster [SanyoDisc1 (D:)].
* Das Laufwerk (D:) wird in Ihrem Computer möglicherweise mit einem
anderen Buchstaben bezeichnet.
2 Klicken Sie im Installationsfenster auf [Adobe Reader 7.0].
h Der Installationsvorgang beginnt. Befolgen Sie die Anweisungen auf dem
Bildschirm, um den Installationsvorgang abzuschließen.
h Nach Abschluss der Installation führen Sie einen Neustart des Computers durch.
Installation in einem Macintosh-Computer
Klicken Sie das Installationssymbol im Acrobat-Ordner unter DOCS der CD-ROM
doppelt an.
h Wenn das Installationsfenster erscheint, führen Sie die auf dem Bildschirm
erscheinenden Anweisungen aus, um die Installation von Acrobat Reader zu
Ende zu führen.
k Anzeigen der Bedienungsanleitungen im PDF-Format
1 Legen Sie die CD-ROM (SANYO Software Pack, Disk 1) in das CD-ROMLaufwerk Ihres Computers ein.
h Sobald das Installationsfenster erscheint, klicken Sie auf [Beenden], um das
Fenster zu schließen.
2 Klicken Sie im Installationsfenster auf [Bedienungsanleitungen (PDF)].
h Die Sprachenliste für die Bedienungsanleitung erscheint.
3 Klicken Sie die gewünschte Sprache an.
h Der die Bedienungsanleitung enthaltende Ordner wird geöffnet.
h Um die Bedienungsanleitung zu lesen, ist das Symbol doppelt anzuklicken.
iii
Deutsch
SG113_soft_EN.book Page iv Thursday, February 1, 2007 2:45 PM
FRANÇAIS
À propos des manuels d’instructions en format PDF
Les manuels d’instructions de l’appareil photo et de l’ensemble de logiciels
SANYO sont enregistrés au format PDF sur le CD-ROM de l’ensemble de
logiciels SANYO (disque 1).
Pour lire les fichiers PDF, vous avez besoin du logiciel Acrobat® Reader 4.0 ou
plus récent de Adobe®. Si une version de ce logiciel n’est pas installée sur
votre ordinateur, installez celle fournie sur le CD-ROM de l’ensemble de
logiciels SANYO (disque 1). Une version anglaise du logiciel Adobe® Acrobat®
Reader est fournie sur le CD-ROM de l’ensemble de logiciels SANYO
(disque 1). Si vous désirez obtenir une version de ce logiciel en une autre
langue, vous pouvez la télécharger du site internet suivant (Adobe® Reader):
http://www.adobe.com/products/acrobat/readstep.html
k Pour installer Acrobat Reader
Pour l’information sur l’utilisation du logiciel Acrobat Reader, veuillez lire les
fichiers d’aide d’Acrobat Reader.
Installation sur un ordinateur Windows
1 Insérez le CD-ROM (Ensemble de Logiciels SANYO, disque 1) dans le lecteur
correspondant.
h La fenêtre d’installation apparaît.
h Si la fenêtre d’installation n’apparaît pas, double-cliquez sur l’icône
[SanyoDisc1 (D:)] dans la fenêtre Poste de travail et sur [Autorun.exe] dans
la fenêtre [SanyoDisc1 (D:)].
* Le nom du lecteur (D:) peut être différent sur votre ordinateur.
2 Dans la fenêtre d’installation, cliquez sur [Adobe Reader 7.0].
h Le processus d’installation commence. Suivez les instructions des
messages qui apparaissent à l’écran pour terminer l’installation.
h Lorsque l’installation est terminée, redémarrez l’ordinateur.
Installation sur un ordinateur Macintosh
Double-cliquez sur l’icône d’installation située dans le dossier Acrobat dans le
dossier DOCS du CD-ROM.
h Lorsque la fenêtre d’installation s’ouvre, suivez les instructions à l’écran afin de
compléter l’installation du logiciel Acrobat Reader.
k Comment afficher le fichier PDF Manuel d’instructions
1 Insérez le CD-ROM (Ensemble de Logiciels SANYO, disque 1) dans le lecteur
de votre ordinateur.
h Si la fenêtre d’installation s’affiche, cliquez sur [Quitter] pour la fermer.
2 Dans la fenêtre d’installation, cliquez sur [Manuels d’instructions (PDF)].
h La liste des langues dans lesquelles le manuel d’instructions est disponible
s’affiche.
3 Cliquez sur la langue de votre choix.
h Le dossier contenant le manuel d’instructions s’ouvre.
h Cliquez deux fois sur l’icône pour visualiser le manuel d’instructions.
Français
iv
SG113_soft_EN.book Page v Thursday, February 1, 2007 2:45 PM
ESPAÑOL
Acerca de los manuales de instrucciones en formato PDF
Los manuales de instrucciones para la cámara y el paquete de software
SANYO están guardados como archivos PDF en el CD-ROM paquete de
software SANYO, disco 1.
Para leer los archivos PDF, necesita el programa Adobe® Acrobat® Reader
4.0 o mayor. Si no hay uno instalado en su ordenador, instálelo desde el CDROM paquete de software SANYO, disco 1.
El CD-ROM paquete de software SANYO, disco 1, incluye una versión en
inglés de Adobe® Acrobat® Reader. Si necesita la versión del programa en
otro idioma, podrá descargarla del sitio en Internet indicado a continuación
http://www.adobe.com/products/acrobat/readstep.html
(Adobe® Reader).
k Para instalar el Acrobat Reader
Por información acerca de como usar el Acrobat Reader, lea los archivos de
ayuda del Acrobat Reader.
Instalación en un ordenador con Windows
1 Inserte el CD-ROM (Paquete de Software SANYO, disco 1) en la unidad
de CD-ROM.
h Al cabo de unos segundos se abrirá la ventana de instalación.
h Si no se abre la ventana de instalación, haga doble clic en el icono
[SanyoDisc1 (D:)], en Mi PC, y, a continuación, haga doble clic en
[Autorun.exe] en la ventana [SanyoDisc1 (D:)].
* Es posible que el nombre de la unidad (D:) sea distinto en su ordenador.
2 En la ventana de instalación, haga clic en [Adobe Reader 7.0].
h Empieza la instalación. Siga las instrucciones que aparecen en la
pantalla para completar la instalación.
h Una vez finalizada la instalación, reinicie el ordenador.
Instalación en un ordenador Macintosh
Haga doble clic en el ícono del instalador ubicado dentro de la carpeta Acrobat
en DOCS dentro del CD-ROM.
h Cuando se abre la ventana de instalación, siga las instrucciones en la pantalla
y complete la instalación del Acrobat Reader.
k Visualización de los manuales de instrucciones en formato PDF
1 Inserte el CD-ROM (Paquete de Software SANYO, disco 1) en la unidad de
CD-ROM del ordenador.
h Si se abre la ventana de instalación, haga clic en [Salir] para cerrarla.
2 En la ventana de instalación, haga clic en [Instruction Manuals (PDF)].
h Aparecerá la lista de idiomas en los que están disponibles los manuales
de instrucciones.
3 Haga clic en el idioma deseado.
h Se abrirá la carpeta que contiene el manual de instrucciones.
h Haga doble clic en el icono para ver el manual de instrucciones.
v
Español
SG113_soft_EN.book Page vi Thursday, February 1, 2007 2:45 PM
NEDERLANDS
Handleidingen in de vorm van PDF-bestanden
De instructiehandleidingen voor de camera en het SANYO Software Pack zijn
als PDF-bestanden opgeslagen op de cd-rom SANYO Software Pack Disc1.
De handleidingen hebben de vorm van een PDF-bestand.
Voor het openen van PDF-bestanden hebt u Adobe® Acrobat® Reader 4.0 of
hoger nodig. Als één hiervan niet is geïnstalleerd op de computer, installeert
u het vanaf de cd-rom SANYO Software Pack Disc1. Een Engelstalige versie
van Adobe® Acrobat® Reader wordt meegeleverd op de cd-rom SANYO
Software Pack Disc1. Als u een andere taal wilt, dan kunt u de gewenste
taalversie downloaden van de volgende website (Adobe® Reader):
http://www.adobe.com/products/acrobat/readstep.html
k Acrobat Reader installeren
Lees de Help-bestanden van Acrobat Reader voor meer informatie over het
gebruik van dit programma.
Installeren op een Windows-computer
1 Plaats de cd-rom (SANYO Software Pack Disc1) in het cd-romstation.
h Het installatievenster verschijnt snel.
h Als het installatievenster niet wordt weergegeven, dubbelklikt u op het
pictogram [SanyoDisc1 (D:)] in het venster “Deze computer” en
dubbelklikt u op [Autorun.exe] in het venster [SanyoDisc1 (D:)].
* Het station (D:) kan op uw computer een andere naam hebben.
2 In het installatievenster, klikt u op [Adobe Reader 7.0].
h Installatie begint. Volg de berichten, die op uw scherm verschijnen, om
de installatie te voltooien.
h Wanneer de installatie is voltooid, herstart u de computer.
Installeren op een Macintosh-computer
Dubbelklik op het pictogram van het installatieprogramma in de map Acrobat
in de map DOCS op de cd-rom.
h Wanneer het installatievenster wordt geopend, volgt u verder de
aanwijzingen op het scherm om Acrobat Reader te installeren.
k De handleidingen in PDF-formaat bekijken
1 Plaats de cd-rom (SANYO Software Pack Disc1) in het cd-romstation van
de computer.
h Als het installatievenster verschijnt, klikt u op [Afsluiten] om het venster
te sluiten.
2 Klik in het installatievenster op [Handleidingen (PDF)].
h Er verschijnt een lijst met talen waarin de handleiding is geschreven.
3 Klik op de gewenste taal.
h De map met de handleiding opent.
h Dubbelklik op de icon om de handleiding te lezen.
Nederlands
vi
SG113_soft_EN.book Page vii Thursday, February 1, 2007 2:45 PM
ITALIANO
Informazioni sui manuali di istruzioni in file PDF
I manuali di istruzioni della fotocamera e del pacchetto software SANYO sono
archiviati come file PDF nel disco 1 del CD-ROM del pacchetto software SANYO.
Per visualizzare i file PDF, è necessario Adobe® Acrobat® Reader 4.0 o versione
successiva. Se sul computer non è già installato questo programma, installarlo
dal disco 1 del CD-ROM del pacchetto software SANYO. Il disco 1 del CD-ROM
del pacchetto software SANYO contiene una versione inglese di Acrobat® Reader
di Adobe®. Se si desidera una versione in una lingua diversa, è possibile
scaricarla dal sito Web riportato di seguito (Adobe® Reader).
http://www.adobe.com/products/acrobat/readstep.html
k Per installare Acrobat Reader
Per informazioni sull fuso di Acrobat Reader, leggere i file della Guida di Acrobat
Reader.
Installazione su un computer Windows
1 Inserire il CD-ROM (disco 1 del Pacchetto Software SANYO) nell’unità CDROM.
h Appare la finestra di installazione.
h Se non dovesse apparire la finestra di installazione, fare doppio clic
sull’icona [SanyoDisc1 (D:)] nella finestra Risorse del computer, quindi
fare doppio clic su [Autorun.exe] nella finestra [SanyoDisc1 (D:)].
* Il nome dell’unità (D:) può essere diverso sul computer utilizzato.
2 Nella finestra di installazione, fare clic su [Adobe Reader 7.0].
h Ha inizio l’installazione. Per completare l’installazione, seguire i
messaggi che appaiono sullo schermo.
h Al termine dell’installazione, riavviare il computer.
Installazione su un computer Macintosh
Fare doppio clic sull’icona del programma di installazione nella cartella
Acrobat all’interno della cartella DOCS del CD-ROM.
h Quando viene visualizzata la finestra del programma di installazione, seguire
le istruzioni visualizzate e completare l’installazione di Acrobat Reader.
k Come visualizzare i manuali di istruzioni su file PDF
1 Inserire il CD-ROM (disco 1 del Pacchetto Software SANYO) nell’unità CDROM del computer.
h Se appare la finestra di installazione, fare clic su [Esci] per chiudere la
finestra.
2 Nella finestra di installazione, fare clic su [Manuali di istruzioni (PDF)].
h Apparirà la lista delle lingue disponibili per il manuale di istruzioni.
3 Fare clic sulla lingua da voi prescelta.
h Verrà aperta la cartella che contiene il manuale di istruzioni.
h Fare doppio clic sull’icona per visionare il manuale di istruzioni.
vii
Italiano
SG113_soft_EN.book Page viii Thursday, February 1, 2007 2:45 PM
РУССКИЙ
О руководствах в формате PDF
Руководства для камеры и программного обеспечения SANYO Software
Pack хранятся в виде файлов PDF на компакт-диске SANYO Software Pack.
Для чтения файлов PDF необходима программа Adobe® Acrobat® Reader
версии 4.0 или более поздней. Если она не установлена, установите ее с
компакт-диска SANYO Software Pack.
На компакт-диске SANYO Software Pack имеется англоязычная версия
Adobe® Acrobat® Reader. Если необходима версия на другом языке, ее
можно загрузить с веб-узла, указанного ниже (Adobe® Reader).
http://www.adobe.com/products/acrobat/readstep.html
k Чтобы установить Acrobat Reader
Об использовании приложения Acrobat Reader смотрите в справке
Acrobat Reader.
Установка на компьютер с ОС Windows
1 Вставьте компакт-диск SANYO Software Pack в устройство чтения
компакт-дисков.
h Через короткое время появляется окно установки.
h Если окно установки не появляется, дважды щелкните значок
[SanyoDisc1 (D:)] в окне Мой компьютер, а затем дважды щелкните
[Autorun.exe] в окне [SanyoDisc1 (D:)].
* Имя дисковода (D:) на вашем компьютере может быть другим.
2 В окне установки щелкните [Adobe Reader 7.0].
h Начинается установка. Для завершения установки следуйте
указаниям, которые появляются на экране.
h По завершении установки перезагрузите компьютер.
Установка на компьютер Macintosh
Дважды щелкните значок программы установки в папке Acrobat, которая
находится в папке DOCS на компакт-диске.
h Когда откроется окно программы установки, следуйте указаниям,
появляющимся на экране, и завершите установку Acrobat Reader.
k Как просматривать руководства в формате PDF
1 Вставьте компакт-диск SANYO Software Pack в устройство чтения
компакт-дисков.
h Если появляется окно установки, щелкните [Выход], чтобы закрыть
его.
2 В окне инсталляции щёлкнуть по [О руководствах в формате (PDF)].
h Появляется список языков, на которых доступна инструкция.
3 Выбрать желаемый язык.
h Открывается папка с инструкцией.
h Для того чтобы ознакомиться с инструкцией, дважды щёлкнуть по
иконке.
Русский
viii
SG113_soft_EN.book Page ix Thursday, February 1, 2007 2:45 PM
ix
SG113_soft_EN.book Page x Thursday, February 1, 2007 2:45 PM
x
SG113_soft_EN.book Page xi Thursday, February 1, 2007 2:45 PM
xi
SG113_soft_EN.book Page xii Thursday, February 1, 2007 2:45 PM
xii
SG113_soft_EN.book Page xiii Thursday, February 1, 2007 2:45 PM
xiii
SG113_soft_EN.book Page xiv Thursday, February 1, 2007 2:45 PM
SG113_soft_EN.book Page 1 Thursday, February 1, 2007 2:45 PM
COPYRIGHTS
This manual and the software are copyrighted materials from Sanyo Electric
Co., Ltd.
PowerPC is a registered trademark of International Business Machines Corp.
(USA).
Mac OS, QuickTime and iTunes are registered trademarks of Apple
Computer Inc. in the USA and other countries.
Microsoft and Windows are registered trademarks of Microsoft Corporation in
the USA and other countries.
In this manual, the Microsoft® Windows® Millennium Edition operating
system, Microsoft® Windows® 2000 operating system, Microsoft® Windows®
XP operating system and Microsoft® Windows® Vista operating system are
collectively referred to as “Windows”.
DirectX is a registered trademark of Microsoft Corporation in the USA and
other countries.
Intel and Pentium are registered trademarks of Intel Corporation (USA).
All other brand or product names mentioned in this manual are trademarks or
registered trademarks of their respective companies.
1
English
SG113_soft_EN.book Page 2 Thursday, February 1, 2007 2:45 PM
CONTENTS
CONTENTS ............................................................................................2
INTRODUCTION ....................................................................................3
About this manual ............................................................................3
The software ....................................................................................4
CD-ROM directory map ...................................................................5
For maximum enjoyment of your camera (about the electronic
manual) .......................................................................................5
OPERATING ENVIRONMENT ...............................................................6
BEFORE MOUNTING YOUR CAMERA .................................................7
Cautions when using the camera as an external drive ....................7
Operating environment ....................................................................7
Data file formats ..............................................................................8
Configuration of directories in the card ............................................9
Setting to the card reader mode ....................................................10
To play back an HD mode video clip .............................................11
For Windows XP/Vista users .........................................................12
For Windows 2000 users ...............................................................13
For Mac OS 9.xx users ..................................................................14
For Mac OS X users ......................................................................14
INSTALLING THE APPLICATION SOFTWARE ..................................15
Windows ........................................................................................16
Macintosh ......................................................................................17
HOW TO USE Photo Explorer ..............................................................18
Set up the environment .................................................................18
Copying image data to a computer ...............................................19
SCREEN CAPTURE .............................................................................21
Setting to the Screen Capture mode .............................................21
Save a computer screen display in your camera ..........................23
USING AS A PC CAMERA ...................................................................24
Before connecting your camera to a computer .............................24
Connect your camera to a computer .............................................25
CONNECTING IN THE MTP MODE ....................................................27
ABOUT MovieFactory ...........................................................................29
Main features .................................................................................29
Additional features .........................................................................30
English
2
SG113_soft_EN.book Page 3 Thursday, February 1, 2007 2:45 PM
INTRODUCTION
This manual describes how to install and operate the SANYO Software Pack.
Please read this manual carefully, in order to use the images and audio
recordings captured with your camera in a wide range of applications.
About this manual
The explanations in this manual conform to the following conventions.
i The examples given in this manual are generally based on a Windows
environment. For Macintosh users, while the menu names and screen
indications may be different, this is no impediment to understanding the
operation. In those places where the operations for Macintosh users and
Windows users differ, specific explanations are provided.
i In this manual, the SD Memory Card is referred to as “card”.
h This manual is designed for users with the following computer skills:
h Knowledge of basic computer operations
h Knowledge of basic mouse operations
h Knowledge of how to open, close, move, minimize and maximize
windows
h Knowledge of how to move from one folder to another folder
Detailed information about the operations listed above can be found in the
printed or online manuals accompanying the computer or operating system
software.
Symbols used in this manual
HINT
Extra information about software or cautionary notes.
CAUTION Points requiring special attention.
(page xx) Refer to the page indicated for detailed information.
3
English
SG113_soft_EN.book Page 4 Thursday, February 1, 2007 2:45 PM
The software
The following software applications are in the SANYO Software Pack.
Please see page 15 for a summary of each software program.
i QuickTime 7.1
In this manual, referred to as QuickTime.
i iTunes 7
In this manual, referred to as iTunes.
i Ulead Photo Explorer 8.5 SE Basic (Windows)
In this manual, referred to as Photo Explorer.
i Ulead DVD MovieFactory 5.0 SE (Windows)
In this manual, referred to as MovieFactory.
i Xacti Screen Capture 1.1 (Windows)
In this manual, referred to as Screen Capture.
* Photo Explorer and MovieFactory both support the MPEG-4 format.
Installing these application software will allow you to view MPEG-4 files.
English
4
SG113_soft_EN.book Page 5 Thursday, February 1, 2007 2:45 PM
CD-ROM directory map
Below is a directory map of the SANYO Software Pack contents.
<Windows>
h Disc1
h Disc2
Sanyo Disc1 (D:)*
Sanyo Disc2 (D:)*
iTunes
Photo Explorer
Screen Capture
DVD MovieFactory
* The drive name (D:) may be different on your computer.
<Macintosh>
h Disc1
Sanyo Disc
iTunes
For maximum enjoyment of your camera (about
the electronic manual)
Be sure to visit our website for great hints on the many ways to enjoy using
your camera every day. You can access the website from the top page of the
SANYO Software Pack (install page).
5
English
SG113_soft_EN.book Page 6 Thursday, February 1, 2007 2:45 PM
OPERATING ENVIRONMENT
The operating environments for the respective application software are as
shown below.
Concerning the operating environment when handling HD mode video clips,
please see page 11.
Windows®
Macintosh®
Software
Photo Explorer,
DVD MovieFactory,
QuickTime 7.1,
iTunes 7.0
Xacti Screen Capture 1.1
QuickTime 7.1,
iTunes 7.0
OS*
Windows® 2000/
Windows® XP/
Windows® Vista
(provided with USB)
Mac OS X 10.3.9 or later
(provided with USB)
CPU
Pentium III 800 MHz or later
Power PC G3 400 MHz or
later
Memory
512 MB or more (1,024 MB or
128 MB or more
more recommended)
Other
Direct X9.0 or above
—
* Limited to models with preinstalled OS.
English
6
SG113_soft_EN.book Page 7 Thursday, February 1, 2007 2:45 PM
BEFORE MOUNTING YOUR CAMERA
The following is an explanation of the format of data recorded by your
camera, as well as the configuration of directories in the card.
Cautions when using the camera as an external
drive
i Do not alter files or folders in your camera in any way. Doing so may result
in your camera not recognizing that data.
If you want to edit files, first copy them to your computer’s hard drive.
i Cards formatted on your computer cannot be used by your camera. Format
all cards to be used by your camera with your camera.
Operating environment
Windows
A computer with a standard-equipped USB port, and preinstalled with
Windows 2000, Me or later is required. Correct operation cannot be
guaranteed for models with upgraded Windows systems.
Macintosh
A model with a standard-equipped USB port, and preinstalled with Mac OS
9.0, 9.1, 9.2, Mac OS X 10.1 or later is required.
7
English
SG113_soft_EN.book Page 8 Thursday, February 1, 2007 2:45 PM
Data file formats
The format of the files saved on the card and the method in which the file
names are determined are explained below.
Type of data
Still image
data
Video clip
data
Audio
recording
data
Data format
File name structure
File name begins with SANY.
JPEG
Extension is “.jpg”.
SANY****.jpg
File name begins with SANY.
MPEG-4
Extension is “.mp4”.
SANY****.mp4*
File name begins with SANY.
MPEG-4 Audio
Extension is “.m4a”.
(AAC compression)
SANY****.m4a*
* Consecutive numbers assigned in the order the data was saved.
English
8
SG113_soft_EN.book Page 9 Thursday, February 1, 2007 2:45 PM
Configuration of directories in the card
ROOT
DCIM
100SANYO
SANY0001.jpg
Folder number
MISC
(Location
of DPOF
files)
SANY0002.jpg
Image
number
SANY0003.mp4
SANY0004.m4a
101SANYO
SANY0001.jpg
SANY0002.jpg
SANY0005.jpg
Image or
audio
recording
number
SANY9999.jpg
102SANYO
SANY0001.jpg
SANY0002.jpg
* Up to 9,999 files can be stored in folder 100SANYO. If more files are made,
a folder named 101SANYO is created, and they will be stored in there. New
folders will then be named in sequence, i.e., 102SANYO, 103SANYO, etc.
HINT
About the volume name
i The volume name will be [XACTI HD2] for a card that was formatted with the
camera, and [Removable disc] for a card that was formatted with a computer.
About video clip data recorded with this camera
i You can use Apple’s QuickTime to play back video clips on a computer.
Playback may also be possible using other software that supports the ISO
standard MPEG-4 (AAC audio). QuickTime 7.1 for Windows is supplied
with the included CD-ROM (SANYO Software Pack).
About audio data recorded with this camera
i If you change the extension (.m4a) of audio data files to “.mp4”, playback
may be possible using software that supports the ISO standard MPEG-4
(AAC audio).
About file names when the card is replaced...
i If the file number reset function is set to off, even when the card is
replaced, consecutive numbering of folder numbers and file names
continues from the previously installed card (see page 151 in the camera’s
instruction manual).
CAUTION
If you intend to view the images on the camera, do not use a computer
to rewrite the card data.
i If the folders, file names, or their configuration is modified using a personal
computer, it will be impossible to play back the data using the camera, and
the camera may not operate properly.
9
English
SG113_soft_EN.book Page 10 Thursday, February 1, 2007 2:45 PM
Setting to the card reader mode
1 Start your computer, and use the supplied USB interface cable to
connect the docking station to the computer.
h Connect the docking station’s USB/AV terminal to the computer’s USB
connector.
2 Press the ON/OFF button to turn the camera on, and set the camera
in the docking station.
h The USB Connection Screen appears on the camera’s monitor.
USB CONNECTION
COMPUTER
PRINTER
CANCEL
CANCEL
OK
USB/AV terminal
To AC adaptor
To USB connector on the computer
Supplied dedicated USB interface cable
i Insert the plug with the [n] mark facing up.
3 Select “COMPUTER”, and press the
SET button.
h The screen to select the computer
connection mode appears.
4 Select “CARD READER”, and press
the SET button.
USB CONNECTION
CARD READER
MTP
SCREEN CAPTURE
PC CAMERA
CANCEL
OK
English
10
SG113_soft_EN.book Page 11 Thursday, February 1, 2007 2:45 PM
CAUTION
Insert and pull out the cable carefully
i When connecting the cables, make sure that the cable plugs are correctly
oriented and that they match the shapes of the terminal sockets on the
devices. Push the plugs in straight when connecting them. If undue force is
used to connect a cable, it may permanently damage the connector pins in
the terminal socket.
i Do not use excessive force when connecting and disconnecting cables.
i Please connect the dedicated USB interface cable to your computer’s USB
connector. Do not connect it to the USB port on your monitor or keyboard,
or to the USB hub. Be especially careful when installing the driver
software. In some instances, it may not be possible to correctly install the
driver software.
Do not exchange data bi-directionally
i While copying data from the camera to the computer in the card reader
mode, do not perform any operation that would copy the computer data to
the camera.
To play back an HD mode video clip
The computer or application software operating environment to play back
video clips recorded in the U or V mode is as shown below.
Windows®
2000/Windows®
Macintosh®
OS*
Windows®
XP
(QuickTime 7.0.1 or later)/
®
Windows Vista (provided with
USB)
Mac OS X 10.3.6 or later
(QuickTime 6.5.2 or later)
(provided with USB)
CPU
Pentium 4, 3.0 GHz or more
Power PC G5 1.6 GHz or
more
Memory
512 MB or more (1,024 MB or
more recommended)
512 MB or more
Video
memory
64 MB or more (256 MB or more
recommended)
64 MB or more
* Limited to models with the operating system pre-installed.
11
English
SG113_soft_EN.book Page 12 Thursday, February 1, 2007 2:45 PM
For Windows XP/Vista users
Mounting your camera
1 Set the camera to the card reader mode (page 10).
h The message [Found New Hardware] appears in the task tray,
showing that the camera is recognized as a drive.
h The card is recognized (mounted) as a disk, and the [XACTI HD2 (E:)]
window opens.
* The drive name (E:) may be different on your computer.
2 Select an action.
h Select the desired procedure from the [XACTI HD2 (E:)] window.
Dismounting the camera
CAUTION
i To disconnect your camera, be sure to follow the procedure below. Failure
to follow this procedure may cause faulty operation of your computer or
loss of card data.
1 Left-click on the icon for safely removing hardware.
h A list appears showing the devices connected to the computer’s USB
connector.
<Windows Vista>
h Close the window.
2 Left-click on the camera drive (E:).
h The camera can now be disconnected.
* The drive name (E:) may be different on your computer.
English
12
SG113_soft_EN.book Page 13 Thursday, February 1, 2007 2:45 PM
For Windows 2000 users
Mounting your camera
1 Set the camera to the card reader mode (page 10).
h If a message appears on the computer monitor instructing you to load
the Windows CD-ROM, follow the instructions and install the driver.
h The camera is recognized as a drive, and [Removable disk (E:)]
appears in the [My Computer] window.
* The drive name (E:) may be different on your computer.
h The card is recognized (mounted) as a disk.
h Double-click on the [Removable disk (E:)] icon in [My Computer], and
you can process the contents of the card installed in your camera
exactly like you would the data in the other computer drives.
Dismounting the camera
CAUTION
i To disconnect your camera, be sure to follow the procedure below. Failure
to follow this procedure may cause faulty operation of your computer or
loss of card data.
1 Left-click on the [Unplug or Eject Hardware] icon on the task tray,
and then right-click on [Unplug or eject hardware] in the submenu.
h The remove hardware dialog box appears.
2 Left-click on [USB Mass Storage Device] in the list of devices, and
then left-click on [Stop].
h The [Stop a Hardware device] dialog box appears.
3 Left-click on [SANYO HD2 USB Device] and then left-click on the
[OK] button.
h The remove hardware dialog box appears.
4 Left-click on the [OK] button.
h You can now disconnect the camera.
13
English
SG113_soft_EN.book Page 14 Thursday, February 1, 2007 2:45 PM
For Mac OS 9.xx users
Mounting your camera
1 Set the camera to the card reader mode (page 10).
h The camera is recognized as a drive and appears as an icon named
[XACTI HD2] on the Desktop.
h Double-click on the [XACTI HD2] icon, and you can process the
contents of the card installed in your camera exactly like you would the
data in the other computer drives.
Dismounting the camera
CAUTION
i To disconnect your camera, be sure to follow the procedure below. Failure
to follow this procedure may cause faulty operation of your computer or
loss of card data.
1 Drag the [XACTI HD2] icon for your camera on the Desktop to the
trashcan.
h The [XACTI HD2] icon disappears from the Desktop.
h You can now disconnect your camera.
For Mac OS X users
Use the same mounting and dismounting procedure as for the Mac OS
9.xx. However, if an application which automatically recognizes camera
images is installed, it will be activated.
CAUTION
When using in a Mac OS X Classic environment
i It is not possible to save or load data directly to or from the card installed in
the camera. The data must first be saved once to your hard disk.
English
14
SG113_soft_EN.book Page 15 Thursday, February 1, 2007 2:45 PM
INSTALLING THE APPLICATION SOFTWARE
The SANYO Software Pack contains the application software indicated below.
Installation of each application will serve to optimize your use of the data
recorded with your camera.
i Photo Explorer*1
Organizing the data recorded with your camera is easy to understand
using the graphic screen.
i MovieFactory*1
Use this integrated tool to store various files–such as video and music files,
photo files, data files, etc.– to disc for processing with your computer.
i iTunes
With this music software, you can use your computer to play and organize
music and other audio files.
i Screen Capture
Save a window of your computer’s screen display as an image file in your
camera.
i QuickTime*2
Play back video clips. The recorded audio is played back at the same time.
Be sure to install this application if you are going to view video clips that
were photographed with your camera (Windows). When installing iTunes,
QuickTime can be installed at the same time.
*1 If Photo Explorer or MovieFactory is installed on your computer, you can
use Windows Media Player to play back video clips (MPEG-4) that were
recorded with your camera.
For information about software updates, please refer to the following
website:
http://www.ulead.com/
*2 By upgrading from QuickTime to QuickTime Pro, you will be able to edit
QuickTime movies, among other features. You can upgrade from Apple
Computer Inc.’s web page at http://www.apple.com.
15
English
SG113_soft_EN.book Page 16 Thursday, February 1, 2007 2:45 PM
Windows
1 Insert the CD-ROM (SANYO Software Pack Disc 1 or 2) in your
computer’s CD-ROM drive.
h The installation window soon appears.
h If the installation window does not appear, double-click on the CDROM icon in the [My Computer] window, and double-click on [Autorun]
or [Autorun.exe] in the CD-ROM window.
2 Click on the name of the application software you wish to install.
h The window for beginning the installation procedure for the specified
application will open.
h When you click on [Let’s shoot more movies!], your computer will
connect to our website, where you’ll find lots of hints for having fun
with your camera.
h The installer program for each application is preset to properly install
the software. If you are unfamiliar with the computer, we recommend
clicking the [Next] button at each screen.
h If a user registration dialog box appears, do not enter anything in the
[Enter your registration information] dialog box, and click on the [Next]
button.
h If a dialog box prompting you to restart your computer appears, restart
your computer.
You can find more information about the respective applications at:
iTunes: http://www.apple.com
Photo Explorer/ MovieFactory: http://www.ulead.com
3 Click on [EXIT].
HINT
About Kodak online service
i When you complete the installation, a dialog box to connect to the website
introducing Kodak’s online service appears. To go to the website, select
the [Tell me more now !] option button. If you do not wish to go to the
website, select on the [No thanks!] option button. Click on the [OK] button.
English
16
SG113_soft_EN.book Page 17 Thursday, February 1, 2007 2:45 PM
Macintosh
1 Insert the CD-ROM (SANYO Software Pack Disc 1) in your
computer’s CD-ROM drive.
h The CD-ROM window will open after a few seconds.
h If the window does not open, double-click on the CD-ROM icon [Sanyo
Disc1] on the Desktop.
2 Install the iTunes.
1 Double-click on [iTunes-1.dmg] in the [iTunes] folder.
h The [iTunes7.0.2] window opens.
2 Double-click on [iTunes.mpkg].
h Installation begins.
h Follow the instructions in the dialog box to complete the
installation.
17
English
SG113_soft_EN.book Page 18 Thursday, February 1, 2007 2:45 PM
HOW TO USE Photo Explorer
To copy data from your camera to your computer, when you open the drive for
your camera from [My Computer], options are shown for copying data to your
computer and for using Photo Explorer to copy data. Explained in this section
is how to use Photo Explorer to copy the camera’s data to your computer. For
a detailed explanation of Photo Explorer, please see the Help menu of Photo
Explorer.
Set up the environment
Specify the source of the data (data location in your camera) to be copied.
1 Set the camera to the card reader mode (page 10).
h Open the [Ulead AutoDetector] dialog box.
h If the window showing the contents of the card installed in the camera
(XACTI HD2 (E:)) is open, click on the [Close] button to close it.
2 In the [Ulead AutoDetector] dialog box, check the box [Always open
with the selected program], and click on the [OK] button.
h The [Copy file to...] dialog box will open.
h If you check the [Always open with the selected program] box, the
[Ulead AutoDetector] dialog box step will be skipped from the next
time.
3 Turn ON the [Open Ulead Photo Explorer to view photos] option
button, and click on the [OK] button.
4 Click on the digital camera wizard icon on the toolbar.
h The [Digital Camera Wizard] dialog box will open.
5 Click on the drive name (A:\) to the right of [Camera drive or card
reader].
h The [Select Image Source] dialog box will open.
6 Turn ON the [Camera drive or memory card reader] option button,
select the camera drive from the [Location] list box, and click on the
[OK] button.
h The drive name to the right of [Camera drive or card reader] is
changed to the drive specified in step 6.
h If you wish to now read the data from the card installed in the camera,
click on the [Start] button. The data from the card will be copied to My
Documents\SANYO_PEX.
h If instead you wish to discontinue after changing the settings, click on
the [Cancel] button.
h The [Digital Camera Wizard] dialog box will close.
English
18
SG113_soft_EN.book Page 19 Thursday, February 1, 2007 2:45 PM
Copying image data to a computer
Copy image files to the computer from the card installed in your camera.
1 Set the camera to the card reader mode (page 10).
2 Run Photo Explorer.
3 Click on the digital camera wizard icon on the toolbar.
h The [Digital Camera Wizard] dialog box will open.
4 Click on the [Start] button.
h Copying begins.
h A folder with the name as indicated below is automatically created, to
which the data is copied.
My Documents\SANYO_PEX
h When copying is completed, the [Done] dialog box will appear.
5 When copying is completed, click on the [OK] button.
h The copied data is shown in a thumbnail window.
19
English
SG113_soft_EN.book Page 20 Thursday, February 1, 2007 2:45 PM
Photo Explorer features
With the Photo Explorer you have visually integrated control over multiple
files, from camera images to DV camcorder video files to audio files (such as
MP3 and WAV files).
k Manage and edit image files
Viewing images
Images can be viewed full-size or full-screen. Use the keyboard controls or
toolbar buttons to select the menu, and you can browse the images or play
them back, for example, in a slideshow.
Organizing and editing images
You can copy and erase image files, as well as change the file names. In
addition, you can rotate and flip images, and save the edited images as
new files.
Adjusting images
You can easily enhance images by clipping and adjusting the contrast,
brightness, color balance, etc. The created images can be used for
wallpaper or screen savers.
k Abundant slideshow features
Slideshows containing combinations of still images and video clips can be
played back.
k Convert the format of video clip data
Video clips (QuickTime format) that were shot with your digital camera can be
converted to other formats, such as AVI and MPEG.
k For questions about Photo Explorer
Further information about Photo Explorer can be found at
http://www.ulead.com
<Where to find the serial number>
i From the Photo Explorer [Help] menu, select “About Ulead Photo
Explorer”. The program version as well as the serial number are shown.
English
20
SG113_soft_EN.book Page 21 Thursday, February 1, 2007 2:45 PM
SCREEN CAPTURE
Save a window of the computer’s screen display as an image file in your
camera.
Setting to the Screen Capture mode
1 Start your computer, and use the supplied USB interface cable to
connect the docking station to the computer.
h Connect the docking station’s USB/AV terminal to the computer’s USB
connector.
2 Press the ON/OFF button to turn the camera on, and set the camera
in the docking station.
h The USB Connection Screen appears on the camera’s monitor.
USB CONNECTION
COMPUTER
PRINTER
CANCEL
CANCEL
OK
USB/AV terminal
To AC adaptor
To USB connector on the computer
Supplied dedicated USB interface cable
i Insert the plug with the [n] mark facing up.
21
English
SG113_soft_EN.book Page 22 Thursday, February 1, 2007 2:45 PM
3 Select “COMPUTER”, and press the
SET button.
h The screen to select the computer
connection mode appears.
4 Select “SCREEN CAPTURE”, and
press the SET button.
USB CONNECTION
CARD READER
MTP
SCREEN CAPTURE
PC CAMERA
CANCEL
OK
CAUTION
Insert and pull out the cable carefully
i When connecting the cables, make sure that the cable plugs are correctly
oriented and that they match the shapes of the terminal sockets on the
devices. Push the plugs in straight when connecting them. If undue force is
used to connect a cable, it may permanently damage the connector pins in
the terminal socket.
i Do not use excessive force when connecting and disconnecting cables.
i Please connect the dedicated USB interface cable to your computer’s USB
connector. Do not connect it to the USB port on your monitor or keyboard,
or to the USB hub. Be especially careful when installing the driver
software. In some instances, it may not be possible to correctly install the
driver software.
English
22
SG113_soft_EN.book Page 23 Thursday, February 1, 2007 2:45 PM
Save a computer screen display in your camera
1 Run Screen Capture.
h Screen Capture starts automatically when you start your computer.
<To exit Screen Capture>
h Right-click on [Xacti Screen Capture 1.1] in the task tray, then left-click
on [Exit]. The screen to confirm the program exit appears; left click on
[Yes].
h To run Screen Capture again, select [Start]→[Programs]→[Xacti
Screen Capture 1.1].
2 On the computer’s monitor, display the window you wish to save in
your camera.
h Make sure the window is selected, so that it is the active window.
3 Press the still image shooting button.
h The active window is saved as a bitmap image in your camera.
h When there is no active window, the entire screen display is saved.
h The saved data is stored in camera drive: \DCIM\***SANYO folder. To
view the image.
h To end the Screen Capture session, exit the Screen Capture program.
HINT
i Please connect only one camera when using the Screen Capture
application.
i The maximum file size for one screen display is 10 MB.
i Do not turn off the camera or remove the card during Screen Capture
operation. Doing so may corrupt the image data.
In addition, do not use a computer to manage data that is stored in the
card installed in the camera. Doing so may cause abnormal operation.
23
English
SG113_soft_EN.book Page 24 Thursday, February 1, 2007 2:45 PM
USING AS A PC CAMERA
If running Windows XP, you can connect the camera to a computer and use it
as a PC camera. Before using your camera as a PC camera, please install
Windows XP SP2.
The PC camera functions can be used with Windows Messenger 5.0 or later
version, or MSN Messenger 7.0 or later version.
Before connecting your camera to a computer
Please perform the following upgrades before connecting the camera to a
computer.
i Upgrade Windows XP to SP2.
Install Windows XP SP2.
i Install Windows Messenger 5.0 or later version.
Download Windows Messenger 5.0 or later version, and install it.
i If using MSN Messenger, please install MSN Messenger 7.0 or later
version.
CAUTION
i The PC camera function can be used only with computers in which
Windows XP was preinstalled. Correct operation cannot be guaranteed for
models that have been upgraded to Windows XP.
i The zoom cannot be used with the PC camera function. Moreover, only
images can be recorded; audio data cannot be recorded.
i Although your camera can shoot at a maximum rate of 15 frames per
second, the rate at which you can broadcast in the PC camera mode may
be less than this depending on the speed of your Internet connection.
English
24
SG113_soft_EN.book Page 25 Thursday, February 1, 2007 2:45 PM
Connect your camera to a computer
1 Start your computer, and use the supplied USB interface cable to
connect the docking station to the computer.
h Connect the docking station’s USB/AV terminal to the computer’s USB
connector.
2 Press the ON/OFF button to turn the camera on, and set the camera
in the docking station.
h The USB Connection Screen appears on the camera’s monitor.
USB CONNECTION
COMPUTER
PRINTER
CANCEL
CANCEL
OK
USB/AV terminal
To AC adaptor
To USB connector on the computer
Supplied dedicated USB interface cable
i Insert the plug with the [n] mark facing up.
3 Select “COMPUTER”, and press the
SET button.
h The screen to select the computer
connection mode appears.
4 Select “PC CAMERA”, and press the
SET button.
25
English
USB CONNECTION
CARD READER
MTP
SCREEN CAPTURE
PC CAMERA
CANCEL
OK
SG113_soft_EN.book Page 26 Thursday, February 1, 2007 2:45 PM
CAUTION
Insert and pull out the cable carefully
i When connecting the cables, make sure that the cable plugs are correctly
oriented and that they match the shapes of the terminal sockets on the
devices. Push the plugs in straight when connecting them. If undue force is
used to connect a cable, it may permanently damage the connector pins in
the terminal socket.
i Do not use excessive force when connecting and disconnecting cables.
HINT
If the [USB Video Device] icon does not appear in the [My Computer]
window...
i The device driver installation may not have been successful. Open the
[Printer and Other Hardware] folder in [Control Panel], delete [USB Video
Device] from [Scanners and Cameras], and reinstall the device driver.
English
26
SG113_soft_EN.book Page 27 Thursday, February 1, 2007 2:45 PM
CONNECTING IN THE MTP MODE
If Windows Vista is your computer’s operating system, you can connect your
camera in the MTP mode.
1 Start your computer, and use the supplied USB interface cable to
connect the docking station to the computer.
h Connect the docking station’s USB/AV terminal to the computer’s USB
connector.
2 Press the ON/OFF button to turn the camera on, and set the camera
in the docking station.
h The USB Connection Screen appears on the camera’s monitor.
USB CONNECTION
COMPUTER
PRINTER
CANCEL
CANCEL
OK
USB/AV terminal
To AC adaptor
To USB connector on the computer
Supplied dedicated USB interface cable
i Insert the plug with the [n] mark facing up.
27
English
SG113_soft_EN.book Page 28 Thursday, February 1, 2007 2:45 PM
3 Select “COMPUTER”, and press the
SET button.
h The screen to select the computer
connection mode appears.
4 Select “MTP”, and press the SET
button.
USB CONNECTION
CARD READER
MTP
SCREEN CAPTURE
PC CAMERA
CANCEL
OK
CAUTION
Insert and pull out the cable carefully
i When connecting the cables, make sure that the cable plugs are correctly
oriented and that they match the shapes of the terminal sockets on the
devices. Push the plugs in straight when connecting them. If undue force is
used to connect a cable, it may permanently damage the connector pins in
the terminal socket.
i Do not use excessive force when connecting and disconnecting cables.
i Please connect the dedicated USB interface cable to your computer’s USB
connector. Do not connect it to the USB port on your monitor or keyboard,
or to the USB hub. Be especially careful when installing the driver
software. In some instances, it may not be possible to correctly install the
driver software.
English
28
SG113_soft_EN.book Page 29 Thursday, February 1, 2007 2:45 PM
ABOUT MovieFactory
MovieFactory is an integrated tool for processing and storing video, music,
photo and data files to disc with your computer.
The limited edition contained in the SANYO Software Pack comprises DVD
authoring functions only.
For information concerning how to use MovieFactory, click on [Program] →
[Ulead DVD MovieFactory 5] → [User Manual], and select [DVD MovieFactory
User Guide] to access the user’s manual.
Main features
i Create your own movie discs
Create your own movies in DVD or Video CD format. Download image data
from a DV camera, digital movie camera, digital camera, video tapes and
TV programs, for example, add effects, and then save the edited data on a
disc.
i Edit HD mode video clips
Now you can edit video clips that were recorded in the HD mode without
converting the video files from the HD MPEG4 format.
i Make slideshows
Create a slideshow of the still images etc. captured with your digital
camera, and store them to DVD or CD. Ideal for sorting and managing your
photos.
i Capture directly to disc
Burn DVD discs directly from your DV camera, video tapes, TV programs,
etc., while you view them in realtime.
i Disc copy
It’s easy to make disc-to-disc copies. Works for any kind of disc–DVDs,
music CDs, MP3 files, your homemade discs, data discs.
CAUTION
i Note that MovieFactory cannot be used to successfully record to DVD from
media which incorporate copy-protect or scrambling technologies to
protect copyrights.
29
English
SG113_soft_EN.book Page 30 Thursday, February 1, 2007 2:45 PM
Additional features
i File format conversion
Use MovieFactory to convert the file format and image quality, then save it.
i Burn from disc images
When burning a DVD video, save an image file of the same contents on
your computer’s hard drive. Use this file to burn the data to disc.
i Labels for your discs
Print your own labels for your CDs and DVDs. (Blank labels for printing are
available commercially.)
k For questions about MovieFactory
Further information about MovieFactory can be found at
http://www.ulead.com/
<Where to find the serial number>
i From the MovieFactory environment icons
, select “About Ulead DVD
MovieFactory”. The program version as well as the serial number are
shown.
English
30
SG113_soft_EN.book Page 31 Thursday, February 1, 2007 2:45 PM
SANYO Electric Co., Ltd.