1
User Manual
for
Automatic Random Regression
Testing with Human Oracle
Prepared by: Ivan Maguidhir, C00002614, April 2011
Table of Contents
Introduction......................................................................................................................................3
Prerequisites.....................................................................................................................................3
GCC............................................................................................................................................3
CppUnit.......................................................................................................................................3
Apache Xerces 3.1......................................................................................................................3
Eclipse CDT.....................................................................................................................................3
Installation.......................................................................................................................................4
Configuration of required options....................................................................................................4
GCC........................................................................................................................................4
CppUnit include path..............................................................................................................4
CppUnit library path...............................................................................................................4
C Language Subset .........................................................................................................................5
Using the command-line application...............................................................................................6
Configuration..............................................................................................................................6
Default include path...............................................................................................................6
Default library path................................................................................................................6
Default libraries......................................................................................................................6
Data-type limits......................................................................................................................6
Default array size....................................................................................................................7
NULL pointer probability.......................................................................................................7
Create tests..................................................................................................................................7
Specifying the source-code....................................................................................................7
Choosing the functions to test................................................................................................7
Specifying the number of tests...............................................................................................7
Validating the result................................................................................................................8
Entering the expected result...................................................................................................8
Run tests......................................................................................................................................8
List functions...............................................................................................................................8
Remove functions.......................................................................................................................9
Help.............................................................................................................................................9
Using the Eclipse plug-in.................................................................................................................9
Create tests..................................................................................................................................9
2
Introduction
AutoUnit is software for generating tests with random values for functions written in a subset of the
C programming language. Given a C source-code file it will, for each supported function in the file:
•
Generate random values for the parameters of the function
•
Compile and execute the function and collect the result
•
Display the generated inputs and result
•
Verify with you that the result is the expected one
•
Accept corrections from you if the result is not the expected one
•
Save the generated inputs and expected result in a test database
•
Generate CppUnit tests in the same folder as your source-code
Once tests have been created the software can be run periodically to automatically apply the
generated CppUnit tests and report failures and errors.
The software is provided in two parts:
•
a command-line application
•
a plug-in for the Eclipse CDT development environment
This document provides an outline of the installation and usage of both parts of the software in
addition to a description of the C language subset which is supported by the software.
Prerequisites
GCC
You must have version 4.4 of the GNU Compiler Collection installed to use this software. It is
available as a Debian package called gcc-4.4. Other versions of GCC may work but have not been
tested.
CppUnit
You must have the development version of CppUnit installed for this software to work. It is
available as a Debian package called libcppunit-dev.
Apache Xerces 3.1
You must have version 3.1 of Apache Xerces installed for this software to work. It is available as a
Debian package called libxerces-c3.1.
Eclipse CDT
An installation of Eclipse CDT or Eclipse Classic with CDT installed is required in order to make
use of the Eclipse plug-in.
3
Installation
The software is distributed as a Tar archive with Gzip compression. To install the software copy the
archive to a new arbitrarily named folder. Extract the files from the archive by typing (at the
console):
tar xzvf autounit.tar.gz There should now be an installation script named install.sh in the folder you created. To run this
enter the following commands as root (or using sudo if you prefer):
chmod +x install.sh
./install.sh /path/to/eclipse
replacing “/path/to/eclipse” with the path to your installation of Eclipse CDT. You can also omit a
path altogether if Eclipse CDT is not installed or you do not intend to use the Eclipse plug-in.
Configuration of required options
There are some options which must be configured before using the software for the first time. Other
configuration settings are described later. All settings must be configured from the user account
which will use the software, generally not root.
GCC
GCC is typically located in /usr/bin. To configure autounit to use an installation of GCC located
there type (at the console):
autounit config gcc /usr/bin/gcc
CppUnit include path
The include path for CppUnit header files will typically be /usr/include/cppunit. To configure
autounit to use this path type (at the console):
autounit config cppunitinc /usr/include/cppunit
CppUnit library path
The CppUnit library is typically stored in /usr/lib. To configure autounit to use this path type (at the
console):
autounit config cppunitlib /usr/lib
4
C Language Subset
The software supports the following set of data-types:
char (signed and unsigned)
short (signed and unsigned)
int (signed and unsigned)
long (signed and unsigned)
float double long double The software supports the following data structures:
arrays (with any number of dimensions)
struct union The software supports pointers :
•
pointers to supported data-types
•
pointers to supported data-structures
•
pointers as members/elements of supported data-structures
The software does not support functions which are declared in external files, preprocessor
statements other than #include and the following language features:
•
typedef •
enum •
const •
extern •
volatile Points worth noting:
•
When generating random values for function parameters the software considers a pointer to
a data-type or data-structure as being a pointer to exactly 1 of these. This applies particularly
to char* parameters. Given a function with a parameter of type char*, the software will
not assume that this is intended to be a pointer to a string it will generate a pointer to exactly
one char.
5
•
The software at present does not support pointer to an array as a return type. This is due to
the fact that a typedef is needed to declare this return type prior to its use in a function
declaration.
•
Due to the fact that the software uses dynamic linking to run the user's code to test it, the
compiled code becomes part of the software and an error such as a segmentation fault will
affect not only the user's code which caused the error but will also prevent the software from
continuing normally. Users should consider this point carefully before enabling the NULL
pointer generation feature.
Using the command-line application
Configuration
Configuration settings for the software are modified using the -cf or --config command-line
argument.
Default include path
You can configure the software with a list of default include paths which it will pass to GCC when
compiling source-code. This setting is configured at the console by supplying a comma separated
list of paths as follows:
autounit config include /home/user/src1, /home/user/src2, /home/user/src3
Default library path
You can configure the software with a list of default library paths which it will pass to GCC when
linking object files. This setting is configured at the console by supplying a comma separated list of
paths as follows:
autounit config library /home/user/lib1, /home/user/lib2, /home/user/lib3
Default libraries
You can configure the software with a list of default libraries which it will pass to GCC to be linked
with any compiler output. This setting is configured at the console by supplying a comma separated
list of names as follows:
autounit config libraries library1, library2, library3
Data-type limits
You can set minimum and maximum value limits for all data-types supported by the software. The
software obeys any limits configured when generating test values. This feature of the software
makes a distinction between signed and unsigned versions of data-types. To set the minimum value
to be generated for char to 10, type the following at the console:
autounit config min char 10
6
To set the maximum value to be generated for char to 80, type the following at the console:
autounit config max char 80
To set the default minimum and maximum for char, type the following at the console:
autounit config min char default
autounit config max char default
Default array size
You configure the software with a default array size. It is set to 5 by default, this value tells the
software what size of array to generate when it encounters empty square brackets for the first
dimension of an array parameter, e.g. int func(char a[]). The software will always accept
dimension sizes if they are provided regardless of this setting. To configure the setting type the
following at the console:
autounit config array 3
NULL pointer probability
You can set the probability of a NULL pointer being generated for pointer parameters. This setting
is expressed as a floating point integer. By default, the value is set to 0 meaning that no NULL
pointers are generated. Enter a value between 0 and 1 by typing the following at the console:
autounit config null .68 replacing .68 with your chosen value.
Create tests
Specifying the source-code
To create tests for a particular source-code file the -c or --create command-line argument can be
used followed by the path of the file. For example:
autounit create /home/user/src/test.c
Choosing the functions to test
For each supported function in your source-code the following prompt will appear:
Generate tests for float foo(struct bar x) y/n?
To create tests for the named function type 'y' followed by enter. To skip test generation for this
function type 'n' followed by enter.
Specifying the number of tests
For each function for which you choose to create tests the following prompt will appear:
How many?
Type the number of tests you wish to create for this function followed by enter.
7
Validating the result
The software will generate a set of random input values for your function, run your function with
the generated input values and collect the result. It will then print the input values which it
generated on the console followed by the result indicated by the heading “result:”. After the
values for the result have been printed the following prompt will appear:
Is this the expected result y/n?
Having reviewed the generated input values and result you will know whether or not the result
received is the expected one. If the result is correct type 'y' followed by enter. The message
“Test saved.” will appear indicating that the test has been saved and the software will proceed
to the next test to be generated. If the result is not the expected one type 'n' followed by enter.
Entering the expected result
Having indicated that the expected result was not received the software will prompt you for the
expected result. If the function return type is a complex structure you will be prompted for values of
all member / element variables and their children. If any variable is a pointer you will receive the
following prompt:
Should x be NULL y/n?
The actual variable name will appear in place of “x”. If the variable was expected to be NULL in
the result type 'y' followed by enter. If the variable was expected to have a non-NULL value type 'n'
followed by enter. For all result variables which are not NULL pointers you will receive the
following prompt:
Enter the value for x:
Again, the actual variable name will appear in place of “x”. Enter a value valid for the variables
data-type followed by enter.
Once the expected result has been entered the message “Test saved.” will appear indicating
that the test has been saved.
Run tests
To run tests either of the following commands can be typed at the console or run by a task/job
scheduler:
autounit r
autounit run
Any failures or errors which occur will be recorded in the results.txt file in the .autounit application
folder in your home directory.
List functions
To list functions currently under test the --list or -l command-line argument can be used. It is
possible to list all functions or just those in a specified file:
autounit list autounit list /home/user/src/test.c
8
Remove tests
To remove tests from the test database the --remove or -rm command-line arguments can be used
followed by the name of the source-code file containing the functions under test. This command
removes from the test database, all tests associated with all functions in the specified source-code
file. For example the following command removes all tests associated with all functions in
/home/user/src/test.c:
autounit remove /home/user/src/test.c
Help
To obtain a brief reminder of the commands supported by the command-line application the -h or
--help arguments can be used. This will cause the application to display the following message on
the console:
Using the Eclipse plug-in
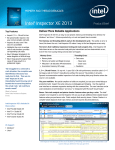
The Eclipse plug-in adds an AutoUnit menu to the IDE. At present the menu contains only one
menu item entitled Create Tests. Clicking this menu item issues a Create Tests command.
Illustration 1: Eclipse menu with AutoUnit plug-in installed
Create tests
The Create Tests command is intended to provide the same functionality as the -c and --create
commands for the command-line application described earlier except that it uses a graphical user
interface instead of a text one. The Create Tests command works only when a source-code file with
9
the “.c” extension is active in the workspace. To illustrate the Create Tests command consider the
following example:
The file currently active in the workspace is named test.c and contains the following code:
int higher(int a, int b)
{ return (a > b) ? a : b; }
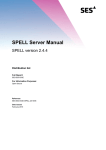
When the AutoUnit->Create Tests menu item is clicked the following dialog will appear:
Illustration 2: Eclipse plug-in test selection dialog
Functions for which tests are to be generated can be indicated by placing a check in the box beside
each function's signature. The number of tests to be generated for each function is indicated by the
numeric value in the text box towards the bottom of the dialog. When the Create button is clicked
the following dialog is displayed for each test generated (in this case 1):
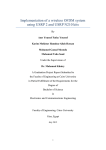
Illustration 3: Eclipse plug-in test results dialog
This dialog shows the values generated for parameters a and b as well as the result whose value is
editable. If the result is not the expected one it is possible to correct it by entering the expected
value and clicking the Save button. When the Ok button is clicked the test is saved and we are
shown the results of the next test or returned to our workspace if there are no further tests to be
generated.
10