1
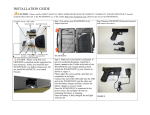
WEAPONEYE
Sparks Technology LLC
Miami FL USA
INDEX
Verifying the firearm is empty ……….…………………………………………..……………...………. 2
WEAPONEYE Parts…………………………………………………………....………………....….……3
How to install WEAPONEYE on the FIREARM…….................…..……..........………………..4
How to Operate WEAPONEYE ………...……………………………………………..………....8
Turning off the camera....................................................................................................................11
Laser………………………………………………………………………………………………11
Memory Card………………………………………………………………………………….….12
Locking the Memory Card .............................................................................................................12
Removing the Memory Card ..........................................................................................................13
Start Recording.....……………………………………………………………………….………..13
Stop Recording.....……………………………………………………………………….………..14
Extracting and playing the Video…………………………………..…………………….…….....15
Safely keeping WEAPONEYE charged......................................................…………….……...…18
Software (Remove or set Timestamp) ...........................................................................................20
Notes................................................................................................................................................22
Page 1 of 22
User’s Manual
WEAPONEYE is a product created to document violent incidents in real time such as: a gunfight, or a case
in which the firearm for personal defense was used. This device consists of a HD Camera, Laser Sight, and
a Flashlight, all in one compact adaptable model.
This current model can be attached to all GLOCK models with rails such as: Glock 17, Glock 19, Glock 20,
Glock 21. Glock 22, Glock 23, Glock 29, Glock 30, Glock 31, Glock 32, Glock 34, Glock 35, Glock 37
Glock 38 and Glock 41. Weaponeye will also fit on Glock 26, 27 and 33.
WARNING: Buying and/or using WEAPONEYE means, you agree with the terms and
conditions on the following documents: User’s Manual, Disclaimer, Warranty and Return Policy, which
can be found inside the Micro memory card inside the WEAPONEYE and, on the website
http://www.weaponeye.com
Verifying the firearm is empty.
CAUTION: Before installing the device to your gun, make sure the gun is completely un-loaded.
This means that THE WEAPON DOES NOT HAVE BULLETS OR AMMUNITION. REMOVE THE
MAGAZINE (Figure A) AND VERIFY THE CHAMBER IS NOT LOADED (Figure B). In any case, the
firearm cannot, nor should be, loaded. Sparks Technology LLC is not responsible for any injury or death
caused by the misuse the firearm during the installation of WEAPONEYE. (See disclaimer)
Do not install WEAPONEYE on a loaded Firearm.
Figure A
Remove Magazine
Figure B
Verify the Chamber is Empty
Never aim or record anyone or any living thing, unless the device is used for defense.
Never direct the laser light at anyone or to any living thing, unless device is used for defense.
Never directly aim the bright light at any one or to any living thing, unless device is used for defense.
Page 2 of 22
WEAPONEYE PARTS
Activation Switch
Reset Button
Toggle Switches (ON-OFF)
Screw to adjust Laser WINDAGE
Micro SD Card Slot
USB Port
Screw to adjust Laser ELEVATION
Charging/Recording
Indicator
Multifunction Button
Microphone
HD Camera Lens
Flashlight
Laser Sight
Page 3 of 22
How to install WEAPONEYE on the FIREARM
Unboxing the new WEAPONEYE
Page 4 of 22
USB CABLE
WEAPONEYE BATTERY PACK
HOLSTER
WALL
CHARGER
SCREWS SCREW DRIVER
AND
HEX KEY
MEMORY CARD
MEMORY CARD ADAPTER
Page 5 of 22
Remove all screws.
Remove the right cover, as it is shown below
Page 6 of 22
Please verify the FIREARM is unloaded before install the new WEAPONEYE(no bullets
whatsoever)
Set your FIREARM onto the WEAPONEYE (See Figure. A, B, C and D)
Figure A
Figure C
Figure B
Set the right side cover, back.
Figure D
Adjust the screws gently.
Page 7 of 22
Once WEAPONEYE has been placed, move the WEAPONEYE with your hand back and forth to ensure it
is secure.
WARNING:
1.
2.
3.
4.
5.
6.
A LASER BEAM is part of the WAPONEYE, avoid any EYE or SKIN exposure. Same
warning applies for the FLASHLIGHT.
ALWAYS keep the gun pointed in a safe direction.
ALWAYS keep your finger off the trigger until ready to shoot.
ALWAYS keep the gun unloaded until ready to use.
Never film yourself while the WEAPONEYE is attached to the FIREARM
Always follow your Firearm manufacture’s safety user manual
Now, your WEAPONEYE is ready to be used.
How to operate Weaponeye
Before beginning to use the WEAPONEYE the battery must be charged.
Please verify the FIREARM is unloaded before start charging the WEAPONEYE (no bullets
whatsoever)
Please connect one end of the USB cable into the USB port in your WEAPONEYE and the other end into
the battery charger, and then connect the battery charger to a power outlet.
(Figure A and B)
Page 8 of 22
Figure A
Figure B
The red light will turn on, indicating that the battery is charging (Figure C)
Figure C
The red light will turn off, once the battery is fully charged.
Page 9 of 22
On the right side of the device there are three (3) small toggle(ON-OFF) switches, these are used to select
the functions you wish to activate when the WEAPONEYE is activated through the
ACTIVATIONSWITCH located underneath the trigger guard (Figure B). The first switch from left to right,
activates the HD Camera, the second switch activates the Flashlight, and the third switch activates the Laser
Sight. All functions you wish to activate should be positioned to ON, like shown on (Figure A)
Figure A
Figure B
The switches are used to select which component you wish to activate independently or combined, at the
time the ACTIVATION SWITCH located underneath the trigger guard is pressed. See Figure B
Example: If the third switch is placed in the on position (ON) and the activation switch located under the
trigger guard is pressed, the laser sight will turn on. This is also possible, with the first switch (CAMERA)
and the second switch (FLASHLIGHT). See picture below Figure D
Figure D
Camera
Flashlight
Laser Sight
Page 10 of 22
Turning off the camera.
Once the WEAPONEYE is activated by the switch located underneath the trigger(Activation Switch) the
operator should hold the Multifunction button down located on left side of the weaponeye (See the Figure
E) for three (3) to five (5) seconds in order to shutdown the CAMERA.
Figure E
Activation Button
Multifunction Button
The Multifunction Switch is also capable of activating the camera. This button is underneath, to prevent an
accidental activation or deactivation, when the device is placed into the holster
Laser
The laser sight is adjusted through the screws located at the right bottom side of the unit.
Figure Laser 1 and Laser 2
Figure Laser 1
Figure Laser 2
WINDAGE
ELEVATION
Page 11 of 22
Memory Card
Insert the Micro SD card inside the slot located at the bottom of the device. Push the Micro SD card with the
HEX key until it locks inside memory slot
Figure Memory 1 and Memory 2
Figure Memory 1
Memory Card
Figure Memory 2
Memory Card Slot
Figure Memory_3
Locking the Memory Card (Micro SD Card)
Figure Memory_4
Page 12 of 22
Insert the HEX Screw inside the Memory Card Slot in the deepest section. Screw in gently with the
HEX key until the screw is on same level as the surface see the Figure Memory_4
Removing the Memory Card (Micro SD Card)
Unscrew the HEX screw with the HEX key, push the SD card with the HEX key, grab the SD Card and pull
it out.
Battery
Charge the battery using the USB cable that comes with the packaging. Connect one end of the cable to the
USB port of the WEAPONEYE and the other end to the charger Figure Battery 1, and 2. The light on the
left front side of the device will turn red, once the battery is fully charged the red light will turn off. The
battery should be replaced if the red light does not turn off after two to four hours.
The user is fully responsible for charging the battery of the device.
Battery 1
Battery 2
Start Recording.
Once you set the first DIP SWITCH to ON position Figure Recording 1, you must press the Activation
button, located right beneath of the trigger guard Recording 2.
Recording 1
Recording 2
First Switch ON, will activate the HD CAMERA
Activation Switch
Page 13 of 22
WEAPONEYE will turn on a yellow light (Recording Indicator Figure Recording 3) located on the left side
of the device. The yellow light will be steady for about 3 and 5 seconds and then the light will start flashing,
indicating the camera is recording.
Figure Recording 3
LED Recording Indicator
Note: The camera will wake up from the standby mode right away but, it will start recording
approximately five (5) seconds after the activation button is pressed, the camera will not start recording
immediately after the activation button is pressed.
Stop the recording and turn off the camera.
To stop the recording, the Multifunction button located on the left side of the WEAPONEYE ,
(Multifunction Button) should be held down for about, 3 to 5 seconds, the camera will stop the recording,
save the video into memory card and then go to standby mode.
WARNING: WEAPONEYE will do recording looping, which means once the memory is full, the newest
videos will automatically delete oldest videos.
Multifunction Button
Page 14 of 22
Extracting and Playing the Video
There is two ways to extract and play the video:
First
WEAPONEYE should be connected to a computer through the USB cable provided in the packaging like
the one in Figure Video 1. Once the cable is connected to the computer and in the WEAPONEYE's usb port,
please press the button located on the left side (Multifunction Button) of the WEAPONEYE, like in Figure
Video 2. The computer will recognize the WEAPONEYE as an external storage device named
WEAPONEYE, the content of the memory card will be displayed on the computer.
Figure Video 1
USB Cable
Figure Video 2
Multifunction button
Page 15 of 22
Page 16 of 22
Second
Remove the SD card from the WEAPONEYE and insert it inside of a card reader and then insert it
into the computer. The computer should recognize it and show its data.
To play the video we recommend a software called VIDEOLAN. Videolan is a free software
available at http://www.videolan.org
Page 17 of 22
Safely keeping WEAPONEYE charged.
Please charge the Battery Pack.
After the Battery Pack is fully charged. Connect it to the WEAPONEYE attached to your firearm.
The red light will turn on, indicating that the WEAPONEYE is charging.
Page 18 of 22
Put them inside your safe.
Lock your safe
Note: To keep WEAPONEYE charged for up to one month, fully charge both, the Battery Pack and the
WEAPONEYE, then connect each other and put them inside the safe.
Page 19 of 22
SOFTWARE (Remove or set Timestamp)
1. Inside the Weaponeye's memory card, in the folder called Software, there is a software called weaponeye.
Click on the Icon shown below
2. To remove the timestamp click on NO Timestamp and follow the instructions, as it is show on the
pictures below
If the WEAPONEYE is not connected, a message like the one below will displayed
Page 20 of 22
Removing Timestamp
Click on NO Timestamp and follow the instruction.
3. To set the Timestamp, click on Synchronize Date/Time and then follow the instructions.
Page 21 of 22
If the timestamp is not set correctly, please repeat the procedure as needed.
NOTES:
Please test the WEAPONEYE before you carry your weapon or before you use it.
1. Verify the micro SD memory card is correctly inserted into the memory slot.
2. Check that all three (3) small toggle switches are in ON position (UP).
3. Press the activation switch, the laser beam, the flashlight will turn on, and the yellow light on the left side
of the unit will turn on and commence flashing, indicating the camera is recording. (The Camera will start
recording approximately three to five seconds after the activation switch is pressed).
4. Turn off the camera pressing the multifunction button located on the left side of the WEAPONEYE for
four (4) seconds or up to the yellow light is off.
This unit has been designed to record in real-time an incident which needs to be clarified. WEAPONEYE is
an electronic device which should be taking care like any other electronic device that has not been classified
as a military grade. This device should not be exposed or submerged in water, exposed to extreme weather
conditions, extreme impacts and so forth. Sparks Technology LLC has performed stress test on the
WEAPONEYE such as recording a shooting session of 1000 rounds; drop the device from a height of five
feet to the ground, leave all components working for long periods of time and many others but, these are
stress tests only.
If you planning use the WEAPONEYE for shooting practice, we strongly suggest install a screw to lock the
SD CARD, preventing it to fall.
Important Message: If the SD CARD is not well placed inside the memory slot or it falls, at the moment of
activation the equipment will turn on the LED recording indicator, (blinking to a high frequency ),
indicating the is not present. It is the user's responsibility to check the SD Card location. To prevent the SD
CARD to fall, please install the screw to lock the SD CARD inside the memory slot.
Like all electronic equipments, WEAPONEYE can fail at any time; such failures could involve all points
described in the disclaimer. Please check the functional wellness of your WEAPONEYE periodically
(Please read Disclaimer inside your Micro SD card of WEAPONEYE or at http://www.weaponeye.com).
This manual can change without notification, for the most updated version of this user’s manual, please
visit http://www.weaponeye.com
Page 22 of 22