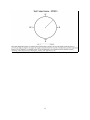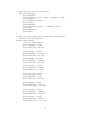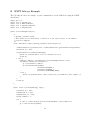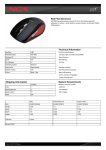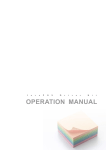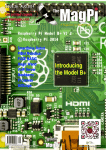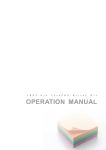
1
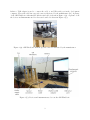
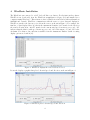
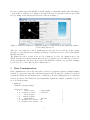
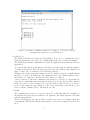
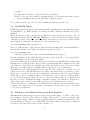
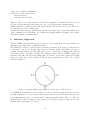
Communication and Control of a Digital Wind Sensor
by
Victoria Pimentel and Bradford G. Nickerson
TR11-211, October 14, 2011
Faculty of Computer Science
University of New Brunswick
Fredericton, N.B. E3B 5A3
Canada
Phone: (506) 453-4566
Fax: (506) 453-3566
E-mail: [email protected]
http://www.cs.unb.ca
Contents
1 Introduction
2
2 Activities
2
3 Tests Settings
2
4 WindSonic Installation
4
5 Data Communication
5.1 Java RXTX Library . . . . . . . . . . . . . . . . . . . . . . . . . . . . . . . . . . . .
5.2 Solution to Avoid Extra Characters in Even Positions . . . . . . . . . . . . . . . . .
5
9
9
6 Interface Approach
10
References
12
A USPP Readme File
13
B Example of a Kermit Input File
14
C WindSonic Command Description
15
D Interface File
16
E RXTX Library Example
19
1
1
Introduction
This report describes the integration of a solid state wind sensor with sensor web based hardware
and software. The work described is part of the project entitled Web Display of Real-time
Environmental Sensor Data as part of the course “Pasantı́a Larga” code EP3420, from the
Computing Engineering program in Universidad Simón Bolı́var, Caracas, Venezuela.
2
Activities
The following activities were carried out:
1. Installation of WindSonic wind sensor and first tests.
2. Investigate and test data communication with WindSonic wind sensor.
3. A first approach to the interface for displaying sensor data.
3
Tests Settings
The computers needs for this exercise are shown in Figure 1.
Figure 1: Hardware requirements for WindSonic software development.
In order to use the manufacturer’s software(e.g. WindView) the development computer must be
running Windows XP or above. For the rest of the tests carried out here, the development computer
was running CentOS version 5.6 with Minicom text-based modem control with terminal emulation
installed and the Python programming language version 2.7.2. The development computer is used
to receive and display data received from the WindSonic.
The Gill WindSonic, option 3 with analog plus serial (RS232, RS422 and RS485) output and serial
number 08320007, is connected to the development computer through an RS232 output cable. An
2
RS232 to USB adapter is used to connect the cable to an USB serial port in the development
computer. The serial cable has a special connector fabricated by the manufacturer [12]. A picture
of the Gill WindSonic with attached RS232 serial cable is shown in Figure 2 (a). A picture of all
the devices and instruments used for the tests described is shown in Figure 2 (b).
Figure 2 (a): Gill WindSonic with the special connector fabricated by the manufacturer.
Figure 2 (b): Devices and instruments used to test the Gill WindSonic.
3
4
WindSonic Installation
The WindSonic was connected to a 12V, lead acid Discovery battery. For the first test the software
WindView was downloaded from the WindSonic manufacturer webpage [10] and installed in a
computer runnig Windows 7. This software works for WindSonic wind sensors with serial numbers
08100001 and onwards. WindView communicates with the sensor, receives data and displays it.
WindView can show the data as received from the sensor, as shown in Figure 3. For example, the
first line of data displayed has “Q” that is the instrument identifier,“123” stands for the direction
the wind is blowing from, “002.70” stands for the current wind speed in meters per second, “M”
indicates that the unit for wind speed is meters per second, “00” is the status code, and “1B” is the
checksum. Note that no date and time is available from the instrument. Further details of setting
display options are found in [12].
Figure 3: WindView displays the sensor data as received.
It can also display a graphic that plots both wind speed and direction, as shown in Figure 4.
Figure 4: WindView plots both wind speed and direction.
4
For a more graphic approach, WindView can also display a compass-like graphic where the number
corresponding to wind speed is displayed and wind direction is represented with an arrow that
moves pointing on the current wind direction, as shown in Figure 5.
Figure 5: WindView displays a compass-like graphic for wind direction and displays the number
corresponding wind speed.
Tests were done using a floor fan to significantly increase and decrease wind speed and rotating
the sensor to vary wind direction. Changes in wind speed and direction were observed through the
WindView interface.
The WindSonic sensor operates in two modes; continuous or polled. In continuous mode, the
WindSonic takes and sends measurements from one to four times a second, while the polled mode
sends a measurement only upon a host request. The WindView software does not allow changing
to polled mode so it was only tested in continuous mode.
5
Data Communication
Data communication between the wind sensor and the development computer ib222m07 running
CentOS 5.6, was tested using three differents strategies and following the command descriptions
found in the WindSonic user manual [12] for continuous, polled and configuration mode. Appendix
C shows an extract of the WindSonic user manual that explains the available commands on polled
mode and their meaning.
1. Minicom.
With the following settings:
Serial Port Setup:
| A Serial Device
| B - Lockfile Location
| C Callin Program
| D - Callout Program
| E Bps/Par/Bits
| F - Hardware Flow Control
| G - Software Flow Control
:
:
:
:
:
:
:
/dev/ttyUSB0
/var/lock
9600 8N1
No
No
5
|
|
|
|
|
|
|
Modem and Dialing:
|A - Init string .........
|
Minicom provided an easy way for receiving and configuring the WindSonic. If the WindSonic
is turned on and connected in continuous mode (which is the default mode), as soon as
Minicom starts the messages received are displayed in near real time, as shown in Figure 6.
Figure 6: Screenshot of a Minicom window showing measurements received in continuous
mode.
To configure the WindSonic (command “*”) and return to measurement mode (command
“Q”), the instructions and commands on the WindSonic user manual were strictly followed,
and the expected output was observed. Tests were done changing configuration options and
observing the expected changes in bahavior. Switching from continous to polled mode and
vice versa can be done as well as sending a measurement request and receiving the answer.
Figure 7 shows the change to polled mode with the command “M4” followed by the echo
made from the WindSonic. Then the command “?” was sent to activate the polled mode
and command “Q” (which is the node unique identifier) was sent four times to request four
measurements. In polled mode the commands written and sent to the WindSonic are not
displayed, only the received answer.
6
Figure 7: Screenshot of a Minicom window were change to polled mode and four
measurement requests are done and answered.
2. Python 2.7.2.
The USPP [11] library was downloaded and installed. It is a tool to communicate from a
Python environment to the serial port by calling simple methods for reading and writing.
The USPP library has three main functions, its use is explained in the Readme file shown in
appendix A.
To read from the serial port; the function inWaiting() was called first; it returns the number
of characters left unread. Then, the function read(n) was called with n being a number less
than or equal to the one returned by the inWaiting() function.
Writing to the serial port uses the function write(str), with str being the command that is
intended to be sent to the WindSonic. In configuration mode, the command string needs to
end with the “\r” character; otherwise the sensor will not recognize it.
Some problems arose when the configuration was changed to polled mode. Apparently the
sensor is not reading all the characters sent but only the ones at odd positions on the command
string. In order to get the command “D3” sent, the method call write(“D3\r”) would not
work. If called with any other character on the even positions like write(“DA3B\r”), the
sensor reads the command “D3\r”, and answers correctly.
3. Kermit.
The command kermit input.txt >output.txt was used to call Kermit with the commands on
the input file and get the responses written to an output file. An example input file for Kermit
is shown in appendix B.
The use of Kermit gave the same problem of reading only every second character that was
found with the USPP Python library when trying to execute any command from the polled
mode.
7
In summary, changing configuration and polled mode works fine with minicom, but not with Kermit and Python. Both Kermit and Python require extra characters in even positions to get the
WindSonic to correctly accept polling and configuration commands in polled mode.
The following steps were carried out to compare Minicom and the USPP Python library:
Minicom is so far the clearer and most robust strategy for communicating with the Gill WindSonic
. Minicom’s weakness shows when binding with a web application interface because a file is going
to be needed and it may slow down the application. The easiest way of working with command
files is using Kermit as explained. Kermit has problems when running commands from the polled
mode, so we might just as well use the Python library avoiding the need to use command files.
Now a new problem arises and it is how do we show these wind sensor observations using a web
based interface? Three strategies are proposed.
1. Access Python code from JavaScript.
Pico [7] is a small web application framework that allows us to write Python modules, classes
and functions that can be imported and called directly from JavaScript. Testing is required.
2. Access the serial port from a JavaScript file.
Node Serial Port [6] is a library that allows access to a serial port from JavaScript. Testing
8
is required.
3. Use a file that saves Python output and is read by JavaScript.
JSON [5] can be used as a format for serializing Python objects [9] and make them accessible
to other programming lenguages like JavaScript. Testing is required.
None of these strategies were tried as a Java communication library was discovered.
5.1
Java RXTX Library
RXTX [8] is a Java library that provides serial and parallel communication for the Java Development
Toolkit (JDK). To get RXTX working on CentOS, Java JDK 7 with Netbeans IDE 7.0.1 [4] were
installed.
The Netbeans project has to include the .jar library file under the lib project folder. Also an
environment variable called LD LIBRARY PATH has to be set from Netbeans by adding the target
“-init-macrodef-java” found on the build-impl.xml file under nbproject directory, to the file buil.xml
and editing it by adding the following line above the “customize” tag:
<env key="LD_LIBRARY_PATH" value=path />
The word “path” should be replaced by the path to the library librxtxSerial.so and librxtxParallel.so
files. On the ib222m07 test computer, the path was specified as follows:
<env key="LD_LIBRARY_PATH"
value=/usr/java/rxtx-2.1-7-bins-r2/Linux/i686-unknown-linux-gnu />
Once the installation is successfull, the import to gnu.io methods should be done along with the
correct initializations, as shown in Appendix E.
Once a successfull connection with the serial device is established, the RXTX library returns a Java
InputStream for reading from the serial port and a Java OutputStream for writing into the serial
port. These two Java classes give flexibility for reading and writing because they can work with
chars or become BufferedReader and BufferedWriter respectively, to work with strings.
The RXTX was tested with the WindSonic in both polled and continuos mode and the expected
behavior was observed. The RXTX library also requires extra characters in even positions to get the
WindSonic to correctly accept polled and configuration commands in polled mode, just as Python
and Kermit do. After a command is written to the WindSonic a delay occurs before data is available
to be read. Our tests indicate that a sleep period of at least 250 ms is required to consistently read
the data, except for commands that change configuration settings of the WindSonic, such as mode
change, that require at least 750 ms. Without a sleep period blank answers are observed.
Using a Java library to communicate to the WindSonic throught the serial port, will make easier
to display sensor data in a web based interface. Java applets or servlets can be used to access Java
code from a web application.
5.2
Solution to Avoid Extra Characters in Even Positions
Gill Instruments technical support [1] was contacted in September 2011 to see if they could provide
fix for missing odd characters in polled mode. Murree Sims was able to provide a solution to this
problem. Their solution consists of sending a command character by character with an added delay
between characters. Tests were done using RXTX Java library adding a 20 ms delay by calling the
Java Thread.sleep(20) method as show in the following code:
9
char[] arr = command.toCharArray();
for(int k=0; k<arr.length; k++){
Thread.sleep(20);
serialOut.write(arr[k]);
}
This solved the need for extra characters. Polled and configuration commands can now be sent in
polled mode without adding extra characters to the odd positions in the command string.
Similar results were obtained for the Python USPP library. The method write(ch) was called once
for each character of the commad string.
Adding delay and sending a command string character by character is not ideal. Fortunately, most
of the commands for the WindSonic are 2 characters in length which would imply only a 40 ms
delay when sending a command string.
6
Interface Approach
Canvas - HTML5 [2] and JavaScript [3] were used to create a first approach of the interface for
displaying sensor data with a compass like graphic.
The WindSonic output for wind direction is an integer interpreted in degrees; North direction
corresponds to zero degrees and the angles increase clockwise, which means East is 90 degrees,
South is 180, and West is 270. This angle will be used to obtain a line pointing in the direction
of the wind. On the other hand, drawing a line with the Canvas element of HTML5 requires the
start and end points of the line in the Canvas plane. Geometry concepts where applied to the input
angle so the end point could be calculated being the start point the known center of the compass
as shown in Figure 8.
Figure 8: Compass with the representation of a 130 degree wind direction.
Some HTML and JavaScript code were written to create a one field form where the user can enter
an angle assuming it to be the current wind direction and press a button that causes the line
representing that direction to be drawn in the compass, appendix D shows this code. The user
input was used because the interface is not connected to the sensor output yet. Figure 9 shows the
interface with a user input of 45 degrees.
10
Figure 9: Screenshot of wind direction interface first draft with a 45 degree input.
11
References
[1] Anemometer contact details - gill. Internet (accessed September, 2011). http://www.gill.
co.uk/main/contactan.htm.
[2] Html5 canvas tutorial (accessed
html5canvastutorials.com/.
august,
2011).
Internet.
http://www.
[3] Javascript tutorial. Internet (accessed August, 2011). http://w3schools.com/js/default.
asp.
[4] Jdk 7 with netbeans. Internet (accessed September, 2011). http://www.oracle.com/
technetwork/java/javase/downloads/jdk-7-netbeans-download-432126.html.
[5] Json. Internet (accessed August, 2011). http://www.json.org/.
[6] Node serial port - github. Internet (accessed August, 2011).
voodootikigod/node-serialport.
https://github.com/
[7] Pico - github. Internet (accessed August, 2011). https://github.com/fergalwalsh/pico.
[8] Rxtx wiki. Internet (accessed September, 2011). http://rxtx.qbang.org/wiki/index.php/
Main Page.
[9] Serializing python objects. Internet (accessed August, 2011). http://diveintopython3.org/
serializing.html.
[10] Ultrasonic wind sensor - windsonic. Internet (accessed August, 2011). http://www.gill.co.
uk/products/anemometer/windsonic.html.
[11] Uspp(universal serial port python library) - ibarona. Internet (accessed August, 2011). http:
//sites.google.com/site/ibarona/uspp.
[12] Gill Instruments Limited. WindSonic GPA Manual - Issue 20, July 2011. http://www.gill.
co.uk/data/manuals/WindSonic-GPA-manual-issue-20.pdf.
12
A
USPP Readme File
This file is part of the Python library USPP. This section was extracted from the Readme file and
it explains how to use the library and provides an example.
6. Usage and documentation
-------------------------You only have to import in your program the uspp module and automatically
it loads the correct classes for the platform in which you are running
the program.
First of all you have to create a SerialPort object with the settings you
want. If a SerialPortException is not generated then you just can
use the read and write methods of the object to read and write to
the serial port.
Example:
>>> from uspp import *
>>> tty=SerialPort("COM2", 1000, 9600)
>>> # Opens COM2 at 9600 bps and with a read timeout of 1 second.
>>> tty.write("a") # Writes a character to the COM2 port
>>> # Now suppose we receive the string "abc"
>>> tty.inWaiting()
3
>>> tty.read()
’a’
>>> tty.inWaiting()
2
>>> tty.read(2)
’bc’
Documentation of the different classes and methods can be found on
uspp module docstring.
13
B
Example of a Kermit Input File
This is the input file used to run Kermit, it contains the list of the commands to be executed on
the serial port.
SET MODEM TYPE NONE
SET LINE /dev/ttyUSB0
IF FAIL EXIT 1 "Device not available"
;SET SPEED 9600
;SET FLOW-CONTROL RTS/CTS
;SET INPUT ECHO ON
set carrier-watch off
OUTPUT *
INPUT 3 OK
OUTPUT D3\13
INPUT 3 OK
OUTPUT M4\13
INPUT 3 OK
OUTPUT Q\13
INPUT 3 OK
exit
14
C
WindSonic Command Description
These commands are only for the polled mode, as explained in the WindSonic user manual.
15
D
Interface File
The following file was created as the first approach to the sensor data interface. It is written in
JavaScript and HTML5.
<!DOCTYPE HTML>
<html>
<head>
<title>Test - HTML5 Canvas</title>
<center>
<b>Test Using HTML5 Canvas</b>
</center><br />
</head>
<body>
<center>
<canvas id="element" width="800" height="610">
This browser does not support Canvas elements
</canvas><br />
</center>
<script type="text/javascript">
/* Calculates the second point on a line which origin is (Ax, Ay), has
a length of c and forms an angle alpha with the North */
function getPoint(alpha, Ax, Ay, c){
var alphaR = alpha*0.0174532925;
var a = c*Math.sin(alphaR);
var b = c*Math.cos(alphaR);
return [a+Ax, b+Ay];
}
/* Draws a line which origin is the center of the main circle, has a
length of the circle’s radius and forms the angle inserted by the
user with the north */
function displayLine(){
var angle = document.getElementById("angle").value;
var point = getPoint(angle, centerX, centerY, radius);
refresh();
elem.moveTo(centerX, centerY);
elem.lineTo(point[0], 600-point[1]);
elem.stroke();
}
/* Refreshes the Canvas element for a new drawing */
function refresh(){
elem.clearRect(0,0,canvas.width,canvas.height);
drawCircle();
drawLetters();
}
16
/* Draws the main circle and its center */
function drawCircle(){
elem.beginPath();
elem.arc(centerX, centerY, radius, 0,2*Math.PI, false);
elem.lineWidth = 5;
elem.strokeStyle = "black";
elem.stroke();
elem.beginPath();
elem.arc(centerX, centerY, 3, 0,2*Math.PI, false);
elem.fill();
elem.lineWidth = 3;
elem.stroke();
}
/* Draws the letters indicating the North, East, South and West
directions with their angles*/
function drawLetters(){
elem.font = "30pt Calibri";
elem.textAlign = "center";
elem.textBaseline = "top";
elem.fillText("N", 400, 10);
elem.textAlign = "center";
elem.textBaseline = "bottom";
elem.fillText("S", 400, 610);
elem.textAlign = "center";
elem.textBaseline = "middle";
elem.fillText("E", 685, 300);
elem.textAlign = "center";
elem.textBaseline = "middle";
elem.fillText("W", 90, 300);
elem.font = "20pt Calibri";
elem.textAlign = "center";
elem.textBaseline = "top";
elem.fillText("0", 400, 45);
elem.textAlign = "center";
elem.textBaseline = "bottom";
elem.fillText("180", 400, 565);
elem.textAlign = "center";
elem.textBaseline = "middle";
elem.fillText("90", 650, 300);
elem.textAlign = "center";
elem.textBaseline = "middle";
elem.fillText("270", 140, 300);
}
17
var radius = 225;
var centerX = 400;
var centerY = 300;
/* Initiates the Canvas element */
var canvas = document.getElementById("element");
var elem = canvas.getContext("2d");
drawCircle();
drawLetters();
</script>
<center>
<br /><form>
Angle: <input type="text" name="angle" id="angle"/>
<input type="button" value="Draw Line" onclick="displayLine()"
id="b1" />
</form><br />
</center>
This small application shows a compass like drawing that is going to be used to
display wind direction. It receives an angle in degrees as input, this angle is
asumed to be the current wind direction and the application draws a line to
display it in a graphic sense. North corresponds to zero degrees and the angles
increase clockwise, which means East is 90 degrees, South is 180, and West is
270.
</body>
</html>
18
E
RXTX Library Example
The following file shows an example of serial communication for the WindSonic using the RXTX
Java library.
import
import
import
import
import
gnu.io.*;
java.io.InputStream;
java.io.BufferedReader;
java.io.InputStreamReader;
java.io.OutputStream;
public class TalkingSerialPort {
/*
* @params: portName string
* This method access and returns a connection to the serial device on the address
* passed as argument
*/
static SerialPort connect (String portName) throws Exception {
CommPortIdentifier portIdentifier = CommPortIdentifier.getPortIdentifier(portName);
SerialPort sp = null;
if(portIdentifier.isCurrentlyOwned()){
System.out.println("Error: Port is currently in use");
return sp;
} else {
CommPort commPort = portIdentifier.open("TalkingSerialPort",2000);
if(commPort instanceof SerialPort) {
sp = (SerialPort) commPort;
sp.setSerialPortParams(9600,
SerialPort.DATABITS_8,
SerialPort.STOPBITS_1,
SerialPort.FLOWCONTROL_NONE);
} else {
System.out.println("Error: Only serial ports are handled by this example.");
}
}
return sp;
}
public static void main(String[] args) {
SerialPort sp = null;
InputStream in = null;
OutputStream out = null;
String command = "";
try {
/* Call to connect method with the known WindSonic serial address */
sp = connect("/dev/ttyUSB0");
19
if(sp != null){
in = sp.getInputStream();
out = sp.getOutputStream();
} else
System.out.println("The connection was not successfull.");
BufferedReader reader = new BufferedReader(new InputStreamReader(in));
BufferedReader user = new BufferedReader(new InputStreamReader(System.in));
/* This loop performs interaction to execute on the serial device the commands
written by the user and read the number of bytes selected by the user */
while(true){
System.out.print("Enter command:");
command = user.readLine();
if(command.equals("bye"))
break;
command = command + "\r";
try {
/* Send the bytes corresponding to the string entered by the user */
out.write(command.getBytes());
System.out.println("Written");
} catch(Exception e) {
e.printStackTrace();
}
try {
/* Sleep a prudential time to wait for the WindSonic answer */
Thread.sleep(2000);
} catch (Exception e) {
System.out.println("Sleep error");
}
/* Shows to the user the availabre number of chars to be read, the user
should select a less or equal number of bytes to avoid blocking */
System.out.print("Chars available to read:");
System.out.println(in.available());
System.out.print("Enter number of Chars to read:");
command = user.readLine();
int num = Integer.parseInt(command);
/* Read the number of chars selected by the user */
for(int i=0; i<num; i++){
char c = (char) reader.read();
System.out.print(c);
}
}
System.out.println("Program closed");
} catch (Exception ex) {
ex.printStackTrace();
}
}
}
20