1
®
80i-500s
AC CURRENT PROBE FOR
OSCILLOSCOPES
Instruction Sheet
INTRODUCTION
The Fluke 80i-500s is a clamp-on current probe that is designed
to reproduce current waveforms found in modern commercial
and industrial power distribution systems. The probe’s
performance is optimized for accurate reproduction of currents at
line frequency and up to the 50th harmonic. The 80i-500s is also
compatible with any instrument capable of millivolt
measurements.
•
Ideal for measuring distorted current waveforms and
associated harmonics.
•
Allows measurement of currents from 1 to 500A ac rms, 5
Hz to 10 kHz without breaking into the circuit.
•
Provides an output of 1 mV ac per 1 amp ac.
•
A passive filter eliminates noise and ring on rapidly rising
waveforms, ensuring accurate reproduction on oscilloscope
displays.
•
Rated for 600V circuits of Overvoltage Category III per IEC
1010-1. (See “Safety Specifications” for an explanation of
Overvoltage Categories.)
WWARNING
Read “Safety Information” Before using the probe.
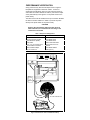
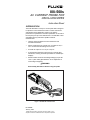
Figure 1. 80i-500s AC Current Probe
PN 936922
January 1994
©1994 Fluke Corporation. All rights reserved. Printed in U.S.A.
All product names are trademarks of their respective companies.
BOX CONTENTS
The shipping container includes the 80i-500s Current Probe, this
Instruction Sheet, a Quick Reference Card, and a product
registration card.
SAFETY INFORMATION
Read the following safety information carefully before attempting
to operate or service the current probe.
•
W Never use the probe on circuits rated higher than 600V in
Overvoltage Category III (CAT III) or 300V in Overvoltage
Category IV (CAT IV) of IEC-1010-1. (See “Safety
Specifications”.) Use extreme caution when clamping around
uninsulated conductors or bus bars.
•
Keep your fingers behind the finger guard.
•
Check magnetic mating surface of the probe jaws; these
should be free of dust, dirt, rust, and other foreign matter.
•
Do not use a probe that is cracked, damaged, or has a
defective cable. Such probes should be made inoperative by
taping the clamp shut to prevent operation.
In this instruction sheet, a WARNING identifies conditions and
actions that pose hazards to the user. A Caution identifies
conditions and actions that may damage the current probe.
International electrical symbols used are explained in Figure 2.
B
AC-ALTERNATING
CURRENT
W
D
Either DC or AC
T
J
EARTH
CAUTION see
explanation in
manual
Equipment protected
throughout by
DOUBLE
INSULATION or
REINFORCED
INSULATION
Figure 2. International Electrical Symbols
The 80i-500s complies with IEC Publication 1010-1 and other
safety standards (see “Safety Specifications”). Follow all
warnings to ensure safe operation.
Use of this equipment in a manner not specified herein may
impair the protection provided by the equipment.
SAFETY SPECIFICATIONS
WRated for 600V ac circuits of Overvoltage Category III per IEC
1010-1 and 300V ac circuits of Overvoltage Category IV per IEC
1010-1.
Overvoltage (Installation) Category III refers to distribution level
and fixed installation circuits inside a building electrical service
entrance. Overvoltage (Installation) Category IV refers to primary
supply, overhead lines, and cable systems outside a building.
Designed to Protection Class II, double or reinforced insulation
requirements of UL 1244, ANSI / ISA S82, CSA-C22.2 No. 1010.
1-92, and IEC 1010-1.
ELECTRICAL SPECIFICATIONS
Current Range: 1A to 500A ac rms.
AC Current Over Range Limit: Up to 700A ac rms for maximum
of 10 minutes, followed by removal from current carrying
conductor for at least 30 minutes.
Output Signal: 1 mV ac/A ac
Influence of Temperature on Accuracy: <0.15% per 10°C
(18°F) for temperatures from -10 to 18°C (14 to 64°F) and
from 28 to 50°C (82 to 122°F).
Basic Accuracy (45 to 65 Hz):
Input Current:
Error:
Phase Shift:
1 to 20A
5% of rdg + 0.3A
Not Specified
20 to 100A
5% of rdg
±3°
100 to 500A
2% of rdg
±1°
Extended Accuracy:
For other frequencies, refer to the appropriate input current range
and add the error listed below to the “Basic Accuracy” error.
Input Current:
Error:
(5 to 10 Hz):
1 to 500A
not specified*
(10 to 20 Hz):
1 to 300A
5%
300 to 400A
15%
400 to 500A
25%
(20 to 45 Hz):
1 to 500A
5%
(65 Hz to 3 kHz):
1 to 50A
50 to 500A
5%+0.4A
5%
(3 kHz to 10 kHz):
1 to 500A
not specified*
*-3 db @ 5 Hz and 10 kHz typical
Input Load Impedance (of host instrument): >1MΩ in parallel
with up to 47 pF
dV/dt max: 0.24 mV/µsec
Rise or Fall Time: <40 µsec
W Working Voltage: 600V ac rms, in compliance with
IEC-1010-1.
W Common Mode Voltage: 600V ac rms from earth ground, in
compliance with IEC 1010-1.
Influence of Adjacent Conductor: <5 mA/A
Influence of Conductor Position in Jaw Opening: +/-(1.5% of
reading +0.1A).
GENERAL SPECIFICATIONS
Dimensions:
66 x 195 x 34 mm (2.6 x 7.7 x 1.3 in.)
Weight:
420g (14.8 oz.)
Temperature:
Operating: -10 to 50°C (14 to 122°F)
Storage: -40 to 71°C (-40 to 160°F)
Relative Humidity:
0 to 95% (10 to 30°C; 50 to 86°F)
0 to 75% (30 to 40°C; 86 to 104°F)
0 to 45% (40 to 50°C; 104 to 122°F)
Altitude:
non-operating: 0 to 12000 meters (0
to 39370 ft.) operating: 0 to 2000
meters (0 to 6560 ft.)
Maximum Conductor Size:
One 30 mm (1.18 in.), 750 kcmils (MCM) THHN, two 25 mm
(0.98 in.), 500 kcmils (MCM) THHN, or one 63 x 5 mm (2.5 x 0.2
in.) Bus Bar.
Output Cable: 1.6 meters (63 in.), BNC termination. Cable and
BNC are rated to 600V ac rms for enhanced safety.
Mechanical Shock: 100G per IEC 68-2-27
INSTRUMENT COMPATIBILITY
The 80i-500s is compatible with any oscilloscope, voltmeter, or
other voltage measuring device that has the following features:
•
Accepts a standard BNC connector. A BNC-to-bannana
adapter (order PM 9053 from Fluke) can also be used with
standard inputs on a digital multimeter (DMM).
•
Range and resolution capable of displaying 1mV of output
per amp of measured current.
•
AC Volts accuracy of 1% or better to take full advantage of
the accuracy of the probe.
•
Input impedance of greater than or equal to 1MΩ in parallel
with a maximum of 47 pF.
OPERATING INSTRUCTIONS (Scope Mode)
1.
Connect the 80i-500s Current Probe to the desired input
channel on the oscilloscope.
2.
Use a 1 : 1 probe setting.
3.
Clamp the current probe around the conductor.
4.
Press S. to select Scope Mode.
5.
Press A.
6.
Adjust V or v (volts/division) for the best vertical display.
(For line power currents less than 100A, 50 mV/div is a good
first choice.)
7.
Adjust t (time/division) for the best horizontal display.
(For power line frequency, 5 msec/div is a good choice.)
OPERATING INSTRUCTIONS (Meter Mode)
1.
See Figure 3. Connect the 80I-500s Current probe to
Channel A.
2.
Use a 1 : 1 probe setting.
3.
Clamp the current probe around the conductor.
4.
Press Mto select the Meter Mode.
5.
Press u or d to select an appropriate meter range.
(The current probe output is 1 mV per ampere measured.)
MEASUREMENT CONSIDERATIONS
Observe the following guidelines for positioning the current probe
jaws:
•
Center the conductor inside the probe jaws.
•
Make sure the probe is perpendicular to the conductor.
•
If possible, avoid measurements close to other current
carrying conductors.
3
XXX.X A
Ø1,2,3
LOAD
2
N
LOAD
5
1A TO 300A
MEASUREMENT
Auto
RANGE
1:1
PROBE
300mV
3V
30V
250V
@RANGE
CHANNEL A
1
X XXX
XXX X
MANUAL
RANGE
1:1
PROBE
300mV
3V
30V
250V
@RANGE
5
300A TO 500A
MEASUREMENT
4
M
Figure 3. Setup Guide (Meter Mode)
MAINTENANCE
Before each use, assure continued safety by inspecting the
probe. Look for cracks or missing portions of the probe housing
and output cable insulating cover and for loose or weakened
components. Pay particular attention to the insulation
surrounding the probe jaws. If a probe fails this inspection, tape
is shut to prevent unintended operation. To check probe
performance, complete the “Performance Verification” procedure.
WARNING
THESE SERVICING INSTRUCTIONS ARE FOR USE
BY QUALIFIED PERSONNEL ONLY. TO AVOID
ELECTRIC SHOCK, DO NOT PERFORM ANY
SERVICING PROCEDURES UNLESS YOU ARE
QUALIFIED TO DO SO. READ THE INFORMATION
TITLED “SAFETY” AT THE BEGINNING OF THIS
INSTRUCTION SHEET BEFORE PROCEEDING.
Repairs or servicing not covered in this instruction sheet should
be performed only at a Fluke Service Center. A probe under
warranty will be promptly repaired or replaced (at Fluke’s
discretion) and returned at no charge. See the registration card
for warranty terms. If the warranty has lapsed, the probe will be
repaired or replaced and returned for a fixed fee.
Cleaning and Storage
Periodically wipe the case with a damp cloth and detergent; do
not use abrasives or solvents. Open the jaws and wipe the
magnetic pole pieces with a lightly oiled cloth. Do not allow rust
or corrosion to form on the magnetic core ends.
PERFORMANCE VERIFICATION
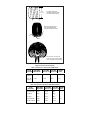
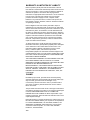
Verify probe accuracy with the test setups shown in Figure 4.
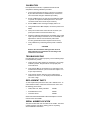
Required test equipment is defined in Table 1. Toriod coil
construction is illustrated in Figure 5. First setup Connection A,
and makes the checks called for in Table 2. (Connect the output
of the probe directly to the signal-in on the phase meter for the
phase check.)
Then disconnect A at the 5100B, and set up Connection B. Make
the first four checks called for in Table 3. (Connect the probe
directly to the phase meter for the phase check.)
CAUTION
Remove the shunt before making the last check at
500A. Otherwise, the maximum current rating of the
shunt will be exceeded.
Table 1. Required Test Equipment
REQUIRED
RECOMMENDED MODEL
AC Calibrator
Transconductance Amplifier
Digital Multimeter (DMM)
Phase Meter
0.05Ω, 2A, non-inductive shunt
Small insulated screwdriver
Banana-to-BNC Adapter
50-Turn Toriod Coil
Fluke Model 5100B
Fluke Model 5220A
Fluke Model 8050A
Clarke-Hess Model 6000
Empro Model HA-2-100
Spectral
Fluke Model PM9053
(See Figure 5.)
PHASE METER
MODEL 6000 PHASE METER
0 – 360
REMOTE
DEGREES
+/– 100
POWER
LOCAL
OVERRANGE
OVERRANGE
ON
OFFSET
UNDERRANGE
UNDERRANGE
REFERENCE IN
REFERENCE IN
10mV – 300mV
10mV – 300mV
RANGE
5100B
A
5100B DIRECT
5220A
B
5100B/5220A
0.05 Ω
0.25W
1%
SHUNT
50-TURN TOROID COIL
8050A
Figure 4. Performance Test and Calibration Setup
50 TURNS WOUND ON
CYLINDRICAL FORM USING
10-GAUGE MAGNET WIRE
10.5 CM
(4 INCHES)
REMOVE FORM AND TAPE
COIL TOGETHER MAKING
SURE 50 WIRES ARE TAPED
TAPE
FAN OUT COIL TO 270° WITH
SPACING 1 CM (0.4 INCH) USING
TAPE TO MAINTAIN COIL SHAPE
Figure 5. Toriod Coil Construction
Table 2. Performance Test Points (5100B Direct)
5100B
SETTINGS
RMS AMPS
MEASURED
LOW LIMIT HIGH LIMIT
OUTPUT mV OUTPUT mV
PHASE
SHIFT
0.1A, 50
or 60 Hz
5A
4.45
5.55
-
0.4A, 50
or 60 Hz
20A
19.0
21.0
±3°
Table 3 Performance Test Points (5100B and 5220A)
5100B
SETTINGS
RMS AMPS
MEASURED
LOW LIMIT HIGH LIMIT PHASE
OUTPUT mV OUTPUT mV SHIFT
1V 50 or 60 Hz
50A
47.5
52.5
-
1V 400 Hz
50A
45.0
55.0
-
1V 1 kHz
50A
45.0
55.0
-
2V 50 or 60 Hz
100A
98.0
102.0
±1°
10V 50 or 60 Hz
500A
490.0
510.0
-
CALIBRATION
If the performance test fails, a qualified technician should
complete the following calibration procedure:
1.
Connect test equipment as shown in Figure 4 (Connection
B) and allow 30 minutes for stabilization. (Do not have the
shunt connected during the calibration procedure.)
2.
Set the 5100B output to 8V at 50 Hz, and enable the 5220A
to operate. This produces 400 ampere-turns in the center
conductor bundle of the toriod coil (8 x 50 turns).
3.
Set the DMM function and range to display 400 mV ac.
4.
Using the Banana-to-BNC Adapter, connect the probe to the
DMM.
5.
Clamp the Current Probe around the coil as shown. (The
probe jaws must be centered around the coil.)
6.
Adjust the calibration potentiometer (accessible next to cable
input to probe handle) to read 403 mV ac on the DMM. (The
adjustment to 403 mV ensures that the probe meets
accuracy specifications where response roll-off occurs.)
7.
Verify calibration by rechecking the test points in Tables 2
and 3.
CAUTION
Remove the shunt before making the last check at
500A. Otherwise, the maximum current rating of the
shunt will be exceeded.
TROUBLESHOOTING
If the 80i-500s does not perform properly, use the following steps
to help isolate the problem:
1.
Inspect the jaw mating surface for cleanliness. If any foreign
material is present, the jaws will not close properly and
errors will result.
2.
Verify that the BNC is connected to an ac volts input on the
measurement instrument. (The Current Probe outputs 1 mV
ac per amp measured.)
3.
Verify that the function selection on the measurement
instrument is correct, i.e., the display vertical resolution is
not to low or high.
REPLACEMENT PARTS
To order replacement parts in the USA, call 1-800-526-4731. To
order outside the USA, contact the nearest service center. Use
the following part numbers:
•
Cable, 600V rms, Safety Insulated
935036
•
Quick Reference Card
936927
•
Instruction Sheet
936922
Order Fluke Part PM 9053 BNC-to-Banana Adapter to use the
Current Probe with a DMM.
SERIAL NUMBER LOCATION
The serial number date code is located on the handle. The serial
number should be used when ordering parts or requesting
service/calibration information.
WARRANTY & LIMITATION OF LIABILITY
Fluke Corporation (Fluke) warrants this instrument to be free
from defects in material and workmanship under normal use and
service for a period of 1 year from date of shipment. Software is
warranted to operate in accordance with its programmed
instructions on appropriate Fluke instruments. It is not warranted
to be error free. This warranty extends only to the original
purchaser and shall not apply to fuses, computer media,
batteries or any instrument which, in Fluke’s sole opinion, has
been subject to misuse, alteration, abuse or abnormal conditions
of operating or handling.
Fluke’s obligation under this warranty is limited to repair or
replacement of an instrument which is returned to an authorized
service center within the warranty period and is determined, upon
examination by Fluke, to be defective, if Fluke determines that
the defect or malfunction has been caused by misuse, alteration,
abuse or abnormal conditions of operation or handling, Fluke will
repair the instrument and bill the purchaser for the reasonable
cost of repair. If the instrument is not covered by this warranty,
Fluke will, if requested by purchaser, submit an estimate of the
repair costs before work is started.
To obtain repair service under this warranty purchaser must
forward the instrument, (transportation prepaid) and a description
of the malfunction to the nearest Fluke Service Center. The
instrument shall be repaired at the Service Center or at the
factory, at Fluke’s option, and returned to purchaser,
transportation prepaid. The instrument should be shipped in the
original packaging carton or a rigid container padded with at least
four inches of shock absorbing material. FLUKE ASSUMES NO
RISK FOR IN-TRANSIT DAMAGE.
THE FOREGOING WARRANTY IS PURCHASER’S SOLE AND
EXCLUSIVE REMEDY AND IS IN LIEU OF ALL OTHER
WARRANTIES, EXPRESS OR IMPLIED, INCLUDING BUT NOT
LIMITED TO ANY IMPLIED WARRANTY OF
MERCHANTABILITY, OR FITNESS FOR ANY PARTICULAR
PORPOSE OR USE. FLUKE SHALL NOT BE LIABLE FOR ANY
SPECIAL, INDIRECT, INCIDENTAL, OR CONSEQUENTIAL
DAMAGES OR LOSS WHETHER IN CONTRACT, TORT, OR
OTHERWISE.
CLAIMS
Immediately upon arrival, purchaser shall check the packing
container against the enclosed packing list and shall, within (30)
days of arrival, give Fluke notice of shortages or any
nonconformity with the terms of the order, if purchaser fails to
give notice, the delivery shall be deemed to conform with the
terms of the order.
The purchaser assumes all risk of loss or damage to instruments
upon delivery by Fluke to the carrier. If an instrument is damaged
in transit, PURCHASER MUST FILE ALL CLAIMS FOR
DAMAGE WITH THE CARRIER to obtain compensation. Upon
request by purchaser, Fluke will submit an estimate of the cost to
repair shipment damage.
Fluke will be happy to answer all questions to enhance the use of
this instrument. Please address your requests or correspondence
to: FLUKE CORPORATION, P.O. BOX 9090, EVERETT, WA
98206-9090, ATTENTION: Sales Department. For European
Customers: Fluke Europe B.V., P.O. Box 1186, 5602 B.D.,
Eindhoven, The Netherlands.
8/93
SERVICE
For service information, call 1-800-825-9810 (USA and Canada).
From other countries, contact the nearest Fluke Service Center.
For application or operation assistance, or information on
Fluke products, call:
USA: 1-888-99-FLUKE (1-888-993-5853)
Canada: 1-800-36-FLUKE (1-800-363-5853)
Europe: +31 402-678-200
Japan: +81-3-3434-0181
Singapore: +65-738-5655
Anywhere in the world: +1-425-446-5500
Or, visit Fluke’s Web site at www.fluke.com.
Address correspondence to:
Fluke Corporation
P.O. Box 9090
Everett, WA 98206-9090
USA
Fluke EuropeB.V.
P.O. Box 1186
5602 BD Eindhoven,
The Netherlands