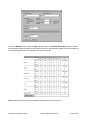
1
CALIFORNIA PATH PROGRAM INSTITUTE OF TRANSPORTATION STUDIES UNIVERSITY OF CALIFORNIA, BERKELEY Video Vehicle Detector Verification System (V2DVS) Art MacCarley, John Slonaker California PATH Research Report UCB-ITS-PRR-2008-21 This work was performed as part of the California PATH Program of the University of California, in cooperation with the State of California Business, Transportation, and Housing Agency, Department of Transportation, and the United States Department of Transportation, Federal Highway Administration. The contents of this report reflect the views of the authors who are responsible for the facts and the accuracy of the data presented herein. The contents do not necessarily reflect the official views or policies of the State of California. This report does not constitute a standard, specification, or regulation. Final Report for Task Order 5327 October 2008 ISSN 1055-1425 CALIFORNIA PARTNERS FOR ADVANCED TRANSIT AND HIGHWAYS Video Vehicle Detector Verification System (V2DVS) Art MacCarley, Prof. of Electrical Engineering, Cal Poly SLO, Principal Investigator John Slonaker, Program Manager, Caltrans Irvine Detector Testbed Supported by the University of California Berkeley PATH program under Task Order 5327, Cal Poly Corporation Project No. 48020 Completed January 28, 2007 Project Summary A practical need to assess the accuracy and attributes of each of the many types of roadway sensors and detectors motivated the California Department of Transportation to construct a traffic detector test bed on I-405 in Southern California. With up to ten detectors of different types under concurrent test in each of six lanes, a means for automating the testing process became imperative, since traditional human verification methods were not practical. This project involved the development of an automated data acquisition and verification system that utilizes a consensus of the results from all detectors under test, along with those of a reference image processing system, to create a preliminary ground truth record requiring manual verification for only a small percentage of ambiguous cases. Individual detector performance is then assessed by comparison with this verified dataset. The test bed architecture, data fusion methodology, and computer vision methods are unique among facilities world-wide. V2DVS Project Summary Page 1 of 1 January 2007 Video Vehicle Detector Verification System (V2DVS) Operators Manual Presented to PATH and Caltrans Division of Research and Innovation John Slonaker, Program Manager, Caltrans Irvine Detector Testbed By the Cal Poly Corporation, California Polytechnic State University, San Luis Obispo Art MacCarley, Prof. of Electrical Engineering, Cal Poly SLO, Principal Investigator Supported by the University of California Berkeley PATH program under Task Order 5327, Cal Poly Corporation Project No. 48020 Revision 4, January 28, 2007 Table of Contents 1 Introduction and System Overview.............................................................................................................. 2 2 Disclaimer ....................................................................................................................................................... 4 3 Acknowledgements ....................................................................................................................................... 4 4 System Functions and Features................................................................................................................... 5 5 V2DVS Components ...................................................................................................................................... 7 6 Field Machine Hardware Interfaces.............................................................................................................. 7 6.1 Contact closure interface .......................................................................................................................... 8 6.2 Video interface .......................................................................................................................................... 8 6.3 Lens Control interface............................................................................................................................... 8 7 Setup and Operation of V2DVS Field Detection Components .................................................................. 8 7.1 Camera Setup........................................................................................................................................... 9 7.2 V2DVS Field Machine Setup ................................................................................................................... 11 7.3 Adjusting Detector Image Acquisition Offsets ........................................................................................ 23 7.4 Internal Utilities ....................................................................................................................................... 24 8 Detection Performance Results.................................................................................................................. 25 9 The V2DVS Server........................................................................................................................................ 25 10 V2DVS Workstation (remote client application).................................................................................... 27 10.1.1 10.1.2 10.1.3 10.1.4 System Settings .............................................................................................................................................. 27 Program Installation and Setup....................................................................................................................... 27 Program Usage............................................................................................................................................... 28 Uninstallation of V2DVS Workstation Program ............................................................................................... 39 11 V2DVS Video-based Presence and Speed Detection Methods ........................................................... 40 12 Detector Signaling.................................................................................................................................... 44 12.1 Hardwired real-time signaling.............................................................................................................. 44 12.2 Network Signaling ............................................................................................................................... 46 13 V2DVS Configuration Options (Central Server) .................................................................................... 48 13.1 14 Removal of archived data and image files from the server................................................................. 49 NTP Timer Services.................................................................................................................................. 50 14.1 Why a local time reference?................................................................................................................ 50 14.2 How to use the V2DVS NTP timer server ........................................................................................... 50 15 V2DVS Software – Detailed Description................................................................................................. 50 15.1 Field detector software........................................................................................................................ 51 15.2 Central server software ....................................................................................................................... 52 15.2.1 15.2.2 15.2.3 15.2.4 15.3 Overall Operation ............................................................................................................................................ 52 How field machine log files are acquired......................................................................................................... 52 Automated processes ..................................................................................................................................... 52 Database structure and definitions.................................................................................................................. 54 V2DVS Workstation software.............................................................................................................. 60 16 For Further Information and Support ..................................................................................................... 61 17 Appendices ............................................................................................................................................... 61 V2DVS Operators Manual V4.0 Page 1 of 62 V2DVS Operators Manual R14e.doc 1 Introduction and System Overview The detection of the presence, speed and/or length of vehicles on roadways is increasingly recognized as critical for effective roadway management and safety. The control of signalized intersections and ramp meters relies on vehicle presence detectors, and the management and characterization of freeway traffic and congestion rely on vehicle speed and length. In some advanced systems, detectors are employed as feedback elements in fully-automated driver warning systems. Among the commonly used vehicle detection mechanisms are fluctuations in a magnetic field (inductive sensors), video image processing, microwave RADAR, optical transmission, laser transmission, reflection or pulse time-of-flight, and acoustic signature discrimination. Each detection method has advantages and limitations that make them appropriate for some applications, but inappropriate for others. The need to assess the relative accuracy and attributes of each type of sensor against a set of common, objective standards motivated the California Department of Transportation to construct a sensor Testbed on Interstate 405, one of the highest-volume freeways in the state. Prior methods requiring comparison against human-verified “ground truth” were no longer practical, with up to ten concurrently tested detectors of different types on each of six lanes, making an automated test process imperative. This document describes the design and implementation of an automated detector verification system intended to verify all individual detection results; the design is based on the fusion of data from each of the detectors under test with data from a reference image processing system to create a reliable composite ground truth record. Additionally, this paper discusses the data acquisition architecture, data fusion methodology, computer vision detection methods, and automated data reduction and reporting methods. The Video Vehicle Detector Verification System (V2DVS) deployed in the Caltrans Irvine Detector Testbed is physically comprised of a cluster of data acquisition computers (field machines), one per lane, at each test site, and a central server for archiving and automated processing of data. In addition, a PCbased client program facilitates remote monitoring and control of all field machines, manual ground truth verification, generation of test results interacting with the central server. All field machines are 2-U industrial-rack mount Linux/PC platforms, each interfaced to a video camera located on an overcrossing above an assigned lane. The collected raw data consists of JPEG-compressed images and a database for the time of arrival, speed, and other metrics of every detected vehicle in each lane, and includes a reference record created by the V2DVS system itself based on real-time image analysis. The system supports multiple test sites, with a maximum of eight hardwired detectors and an unlimited number of network or serial signaling detectors for each lane at each site. At maximum traffic capacity, as many as 96,000 records per hour per site are generated. Figure 1.1 shows the placement of the reference video cameras above each lane, and one of two poles on which wide-area detectors are mounted. Each of the six traffic lanes below each camera are equipped with duplex inductive loops and provision for other interchangeable roadway detectors. The V2DVS field machines are housed in a roadside Caltrans Type 334C cabinet shown in Figure 1.2. V2DVS Operators Manual V4.0 Page 2 of 62 Figure 1.1. Over-lane video cameras and one of two roadside detector masts. V2DVS Operators Manual R14e.doc Figure 1.2 V2DVS Data Acquisition Computers in Type 334 Cabinet, Testbed Site at Sand Canyon Overcrossing. The V2DVS video detection capabilities are implemented only to aid in automated data reduction since the placement of individual cameras above each lane is ideal for imaging purposes, but is not considered practical for general detection purposes. Cameras are positioned above each lane with a down-looking view, canted out approximately 10 degrees from vertical, and are positioned to view departing traffic. Camera height is 10.7 meters above the roadway for every lane. The field of view for each overcrossing-mounted camera currently extends from immediately below the overcrossing deck to approximately 25 meters down-road as required to contain most of the zones used by different detectors (exceptions are video-based detection systems which use far-field approaching or departing traffic views). This view can be adjusted remotely, but should be standardized for all lanes. Wider fields of view yield relatively smaller vehicles within the images, which in turn reduce the measurement accuracy for the vehicle position at the time of detection. Images are color, with a configurable JPEG compression ratio. Default compression settings yield images of size 640x240 pixels and between 15 and 30 kbytes. Each detector under test must signal the V2DVS system for each vehicle. Signaling may be real-time, in which a record is acquired immediately, or delay-time, in which a record is acquired prior to the time of signaling, to accommodate some detectors that do not produce real-time detection signals. The V2DVS computers maintain a circular buffer of the most recent video 300 images, acquired at 60 video fields (images) per second, to facilitate signaling delays of up to five seconds. V2DVS accepts two signal methods: (1) hardwired signaling (contact closure or active-low signal), and (2) network signaling which allows a detector to report an exact time for detection to V2DVS. For real-time signaling, the most recently acquired complete image is recorded along with the time when the signal was received, accurate to 0.001 second. For delay-time signaling, the image acquired at the time closest to the time of detection is recorded as the detection image. V2DVS provides an NTP (Network Time Protocol) local time server which must be referenced by any detector which uses delay-time signaling to insure exact time synchronization. Caltrans Irvine Detector Testbed V2DVS Operators Manual R.4 Page 3 of 62 All records (image and data) are stored locally on each field machine, and automatically pushed via SFTP on a bandwidth-available basis to the central server, which stores data objects in a MySQL database, and compressed images in indexed directories. Local storage capacity allows tests up to twenty days in duration prior to the need to off-load data to the server. Since the field sites are connected to the server via multiple networks, including a slow 802.11b wireless link, periods exceeding 24 hours may be required to push a few hours of traffic data. The server can also be temporarily set up on site to avoid these bandwidth limitations. In post-processing, V2DVS automatically compares all detection times reported for each vehicle by the various detectors. This comparison provides a composite “ground truth” reference dataset based upon user-selectable degree of confidence requirements. V2DVS also estimates vehicle speeds, assuming that the vehicles travel at constant speeds, to compensate for differential detection times due to different detection zones, with the duplex loop detector time-of-flight measurements as secondary vehicle speed measurement references. Video vehicle speed measurement algorithms were developed to insure high accuracy even under adverse ambient illumination conditions; specifically, to accurately measure speed during morning and evening rush hours when the most interesting traffic conditions occur, and when long shadows propagating from vehicles in adjacent lanes would otherwise lead to false vehicle detections. Algorithmic methods were developed and iteratively refined to reliably reject these artifacts, based on both the texture and continuity of a shadow propagating from an adjacent lane. To facilitate the latter mechanism, V2DVS detection zones extend into adjacent lanes on either side of the lane under test. The system pre-categorizes all detections in three categories: verified/grouped, unverified, and false. Each category has its own color code to simplify human verification. A human operator can view all detections, and reclassify any into either verified/grouped or false; both reclassifications have their own color code for later reverification. The automated data reduction greatly reduces the workload associated with ground truth generation, since it requires human verification only for detection records that cannot be automatically correlated. Vehicle detections are classified as either correct, false or failure to detect by this automated approach. Errors are mostly commonly due to ambiguous vehicle lane position. Accuracy is dependent upon the size of the admissible time/distance aperture, with more conservative settings tending to reject valid detections, while less conservative settings admitting incorrect matches which sometimes cause alignment errors that propagate to other proximate vehicles in the ground-truth data set. 2 Disclaimer The contents of this report reflect the views of the authors who are responsible for the facts and the accuracy of the data presented herein. The contents do not necessarily reflect the official views or policies of the State of California. This report does not constitute a standard, specification or regulation. Unless specifically attributed, all statements and opinions expressed herein are the responsibility of the authors alone, and do not reflect the official views or policies of Caltrans, the OTS, or the State of California. 3 Acknowledgements This work was supported by the California Department of Transportation Division of Innovation and Research via the California PATH (Partners for Advanced Transit and Highways) program based at the University of California, Berkeley. The Caltrans and PATH project monitor is John Slonaker, whose guidance and support have been critical to the successful performance of this project. The concept of automated detector validation was originally proposed by Joe Palen, Caltans Division of Innovation and Research. Except where noted, this report and operator’s manual were written by the contract principal investigator, C. Arthur MacCarley, Professor of Engineering at the California Polytechnic State University, San Luis Obispo. Computer programming was performed by research assistant Neils Nesse, David Sharp and Tabber Watts. Hardware and software design and architecture, and hardware fabrication tasks were performed by the principal investigator. Although the project was funded via the Cal Poly Corporation, all development work was performed at the facilities of Loragen Corporation, 3576 Empleo St., San Luis Obispo, CA. Caltrans Irvine Detector Testbed V2DVS Operators Manual R.4 Page 4 of 62 4 System Functions and Features The V2DVS provides the following functions and features: 1. The V2DVS system acquires a jpg image of each vehicle detected by each detector at the time of detection. Detection signaling can be provided either in real-time, or in delay-time to accommodate detectors that require some processing delay prior to reporting a detection event. 2. V2DVS also detects vehicles itself via its image processing system, acquiring an image of each vehicle when it is positioned in a designated detection zone referred to as the baseline position. The computer vision algorithm measures and records vehicle speed to a precision of 0.1 mph. Detection accuracy is limited by illumination conditions. 3. Detection data, including an image and data entry for the detection event, are stored in a distributed database resident on field detection computers. These are automatically uploaded to the master database on the central server. Records includes the exact time of detection, the vehicle speed, and optionally the position of detection provided by each detector. 4. Detector tests are initiated, controlled and terminated via either the user interface of any of the field machines, or remotely from any internet-connected PC via the V2DVS client application. Data accumulated during tests are automatically transferred from the field computers to the central server on a continuous basis until all detection data has been uploaded. Data is retained locally on the field units until successfully transferred to the central database. A double redundancy transfer protocol is used to insure against data loss. Due to the large volume of data coupled with limited bandwidth of the Testbed external network connection, a delay of several hours may elapse between the completion of a test period to full data availability on the server. A separate image (14-25K, average 20K) is acquired for each detector for each vehicle. Typical traffic volume is 6,000 vehicles per hour for the six lane segment of I-405 at the Sand Canyon overcrossing of the Testbed. This implies the generation of 120 Mbytes of data per detector per hour per site. A test period of two hours with four detectors in each of six lanes at one site with this traffic volume would yield 1.92 Gbytes of data transferred to the server. 5. A PC-based Internet-connected client application is provided to allow remote monitoring and control of each field machine, and the automatic generation of comparative accuracy results for all detectors via interaction with the server database. The client application communicates with the central server, providing images of every car in a time-line-like presentation for all detectors in all lanes. A ground truth dataset is created by starting with an automatically-generated set and manually handing all cases that were not assigned by the automatic data reduction process. 6. Automated data reduction will compensate for detection positions outside of the standard detection zone if optional velocity information is available (either reported by the detector itself, generated by V2DVS’s detection of the vehicle, or from duplex inductive loops) . If the detector does not provide speed information for a vehicle (e.g., uses contact closure for signaling) and V2DVS does not detect the vehicle either from video tracking or inductive loop signals, the vehicle will be left for manual verification. 7. If the detection position is variable for each vehicle, this can also be compensated if the detector reports the position of detection information for each vehicle via network signaling. V2DVS matches detection events between the various detectors based upon position-adjusted temporal proximity, i.e., vehicles detected at the same or nearly the same position-adjusted time by all detectors are considered to be the same vehicle. 8. Unclear detection cases, in which a vehicle is detected outside of an admissible time and/or relative position window established by the trusted detectors, are left for manual verification. Following completion of manual ground truth verification, detection accuracy results are calculated relative to the corrected ground truth results. Human correction of the ground truth record is implemented via the client application. 9. Failures to detect as well as false detections are reported for each detector. Each error situation is accompanied by the corresponding image set from all detectors (for failures to detect) or the image Caltrans Irvine Detector Testbed V2DVS Operators Manual R.4 Page 5 of 62 acquired for the time of detection reported by the detector (for false detections). 10. In addition, the server also provides a mechanism (sftp) to directly download user-selected periods of raw data (JPEG image files and associated text records). This enables detector vendor participants to perform their own analysis on the raw data. The V2DVS acquires an image and writes a log entry in a database when requested by any detector under test. We refer to this request as “signaling” the V2DVS system. With multiple detectors under test in parallel at each site, several images and records are acquired for each vehicle detected in each lane. The signaling from each detector may have an offset of up to 5 seconds. V2DVS can perform pre-trigger image recording for detectors with zones outside the field of view of the camera. This capability relies on the speed calculation made by the V2DVS image processor, since most detectors do not report vehicle speed. Signaling is accepted by V2DVS via two physical methods: 1. Hardwired signaling (contact closure or active-low signal). The system receives a detection signal and records the time to the closest millisecond. 2. Network signaling. This provides a means for a detector to report the exact time of detection to V2DVS. Image of vehicle at the time of detection is recorded along with the time of detection. For detectors using network signaling, the sending detector and V2DVS must reference exactly the same absolute time; therefore, V2DVS provides an NTP (Network Time Protocol) local time server for correct data/image correlation. V2DVS maintains its local time standard by referencing the US Internet Time Standard maintained by the US National Institute of Standards and Technology (NIST) in Boulder Colorado. This document also provides specifications for access to and synchronization with this local time server. In post-processing, V2DVS automatically compensates for time offsets due to different physical detection zones when comparing the detection of the same vehicle by each of several detectors (including V2DVS). Such adjustments require a reliable measure of the vehicle speed. If the vehicle speed is not provided by the offset detector, V2DVS measures and records the speed of the detected vehicle, and generates an alternative speed measurement by a duplex pair of inductive loops. The correlation allows the user to chose either speed measurement or the average of the two. Additionally, if the detector uses network signaling, V2DVS will automatically use the speed and position information provided by the detector for time offset compensation. Caltrans Irvine Detector Testbed V2DVS Operators Manual R.4 Page 6 of 62 5 V2DVS Components The Caltrans Video Vehicle Detector Verification System (V2DVS) is comprised of the following components: Hardware: Six down-looking video cameras with computer-controlled lenses positioned on the Sand Canyon overcrossing above each of the six lanes of northbound California Interstate Highway 405. Six “Field Machines”. Each is a 2-U rackmount Linux PC installed in a single Type 334C cabinet located in a dirt area just to the north of overcrossing. Each is associated with a single camera/lane, and accepts trigger inputs from all external detectors for the lane. Many types of trigger signals are accepted, including simple wired contact closures, UDP network signaling, and RS-232 signaling. One central database server, referred to as the “Central Server”. Data acquired by the field machines is passed to this central server over an Internet-accessible network, where it is stored and processed. Software: Running on each Field Machine: V2DVS – (Linux) detection program. This program starts automatically in the background when the field machine is turned on. Includes two main subcomponents, both transparent to the user: V2Setup – (Linux). A subcomponent of V2DVS to permit modification of all settings that affect detection. This is manually activated and used during the setup process, but need not be running at other times. V2View – (Linux). A subcomponent of V2DVS running on each field machine for local viewing of realtime camera image, most recently acquired vehicle and current background image. This is automatically activated by V2Setup, but may also be manually activated from a command line interface. It need not be running during a detection test period. Running on the Central Server V2Server – (Linux) starts all processes for the server and provides a user interface for starting and locally monitoring the server activity. This application starts automatically when the server is booted, so that normally no direct interaction with the server is necessary. Client applications for any Internet-accessible PC V2DVS Workstation – (Windows) allows remote control of data collection, remote setup of field machines, manual verification, and automated data reduction. The latter two functions require communications with the server, either locally or over the internet. Manual verification is the process by which an absolute “ground truth” reference dataset is created. Final scoring of all detectors for accuracy is then done against this dataset, and cumulative statistics are generated. 6 Field Machine Hardware Interfaces Each field machine accepts real-time external inputs via two hardware interfaces, a video input from the overlane camera, and a parallel port interface box which accepts up to eight contact closure inputs. It also generates power control outputs to a motorized lens on the camera for remote control of the iris (F-stop), focus and zoom (focal length). Caltrans Irvine Detector Testbed V2DVS Operators Manual R.4 Page 7 of 62 6.1 Contact closure interface This interface accepts up to eight wired inputs from external detectors for signaling detection events. An external box interfaces the PC parallel port to contact closure or active-low digital inputs. The box requires external DC power in the range of 6 to 24 VDC, with 12 VDC preferred. The box recognizes the closure of an external switch or the contact of one of the eight signal lines to ground. This electrical transition causes the box to generate a 3.5 us pulse on pin 10 of the parallel port, the data acknowledge or ACK line. The V2DVS service running on the PC recognizes this pulse, causing a interrupt which immediately scans pins 2 through 9 (data lines 0 through 7) of the parallel port to determine which input generated the interrupt. This pin is the hardwired source of the detector signal. This cause a log file entry to be generated for this detector, and an image to be stored at the moment the signal is received. 6.2 Video interface The V2DVS service continuously monitors the video input from the over-lane camera and processes the images as previously discussed. The physical interface is a Model PXC200AL PCI video frame grabber manufactured by Cyberoptics of Seattle. This provides full-field rate (60 files per second) analysis and acquisition capability to support both the V2DVS detection function, and the acquisition of images for each external detector. 6.3 Lens Control interface The V2DVS application controls the three functions of the motorized lens mounted on each video camera. Control of the iris by the image processing application is critical to permit reliable detection and standardization of the images acquired for each external detector. The focus and zoom functions are also controllable from the computer, although these are generally set once and not altered after initial setup. The hardware used to perform this function is a 68HC12 microcontroller board connected to a bipolar driver circuit for driving the three lens motors in either direction. These circuits are all installed inside the PC case, only exposing an RJ45 (CAT5) connector connecting the lens control cable (to the cameras on the bridge deck). The V2DVS GUI provides both automatic and manual lens control functions, and sends the signal to the microcontroller using the PC serial port. Each serial command generates a 56ms-long pulse for actuation of the lens motors. Under manual control, these pulses are repeated 10 times per second if selection the button is held down. Under automatic iris control, pulses repeat at a maximum rate of once every two second, to provide slow changes to the iris setting that will not interfere with the backgrounding function of the image processing. Approximately 64 pulses are required to move the iris from fully closed to fully open, yielding an end-to-end slew rate of 32 seconds. 7 Setup and Operation of V2DVS Field Detection Components Under normal conditions, only three simple operations are necessary to get the V2DVS system up and running, divided into three general tasks: 1. Setup of the over-lane video cameras on the bridge. Only required once, unless positions are disturbed. 2. Startup and definition of the detection window for each of the V2DVS field machines. Once the detection windows are defined and computer vision settings are established, this step need not be repeated. 3. Startup and optional configuration of the V2DVS server. Under normal operation, the server runs all the time, so that this need not be repeated. Each task is described in detail below. Caltrans Irvine Detector Testbed V2DVS Operators Manual R.4 Page 8 of 62 7.1 Camera Setup Cameras used by V2DVS for video verification are positioned above each traffic lane on the side of the overcrossing deck. Cameras are permanently mounted in sealed environmental enclosures, and normally do not need to be adjusted. If, however, the position of the camera has been disturbed, or the settings of remotecontrolled zoom or focus have been changed, it may be necessary to reposition or adjust the cameras so the field of view is correct and properly focused. The normal field of view requires that the cameras be tilted approximately 20 degrees from the vertical position, away from the bridge, and that the zoom setting is almost the widest angle position (3.2 mm focal length, almost a fish-eye view). This positioning and focal length assure maximum opportunity to acquire images detected by the various detectors under test with widely dispersed detection positions. The camera angles may be adjusted and the cameras may be serviced safely by rotating the camera mounting arm inward over the sidewalk of the bridge deck, and then rotating them back to their proper position above the traffic lanes. If the camera mounts are rotated, it is necessary to re-align the cameras by observing the camera image and adjusting by hand until the camera is properly positioned. The detection window should also be reset, as will be described below. The position of the camera is important to the proper acquisition of vehicle images – both the images for the detectors under test and for the reference image acquisition by V2DVS itself. Attached to each camera are three cables: a black coaxial cable for the video connection, an orange round power cable, and gray lens control cable. These are all routed inside the frame tubing of the permanent camera mounts down to a junction box, shown in Figure 7.1. If the circuit breaker switch in the box is off (in its down position), turn it on by flipping it to the up position. Normally, it should stay in the up (on) position, since power to the boxes is enabled at the controller cabinet rather than in each individual camera electrical box. Figure 7.1. Camera electrical box. If necessary to confirm proper camera positioning, focus, and focal length, an NTSC monitor can be connected to the Coax “T” located in the electrical box at each camera. Power for the monitor may be accessed via the power outlet in the box, although it will be necessary to insert a multiple outlet adapter so that both the power brick and the monitor may receive power. From the monitor, you can verify the following steps and make adjustments to the camera if necessary. To adjust the camera, swing the camera arm back inside the railing, make the needed adjustment, and swing it back out to the correct position over the traffic lane. Align the camera mounting arms exactly parallel with the direction of travel of the corresponding lane. Make sure the vehicles travel perfectly horizontally across the camera field of view. Verify this using a local monitor or the V2DVS display in the cabinet. If the alignment and position of the camera is correct; the center of the lane should be horizontal and pass down the center of the image. Angled the camera out from the bridge deck just enough that a small sliver of the overcrossing pole structure or other detectors mounted on the V2DVS camera Caltrans Irvine Detector Testbed V2DVS Operators Manual R.4 Page 9 of 62 mounting arm are visible on the right side of the image. Viewed from the bridge sidewalk, the cameras are shown in Figure 7.2 Figure 7.2. V2DVS cameras at Sand Canyon Test Site, showing proper camera positioning. Assure that the focus of the camera is correct. Adjust the focus if the lane lines are not crisp or if details in the road surface are blurred and not distinguishable. Assure that the focal field of view – the camera zoom should be at almost its widest angle position. Figure 7.3 shows an example of the correct camera field of view, as displayed on the V2SAT program computer screen (same as the video monitor screen). Due to the very wide angle lens, there is significant distortion at the extremities of the view. Figure 7.3. Example of correct field of view of V2DVS camera. Caltrans Irvine Detector Testbed V2DVS Operators Manual R.4 Page 10 of 62 7.2 V2DVS Field Machine Setup The detection computers (field machines) are housed in the middle cabinet (Cab 2) of the three Type 334 controller cabinets located at the Sand Canyon test site. Each cabinet also contains a computer monitor, keyboard, mouse, and a KVM (Keyboard-Video-Mouse) switch for selection of each computer for setup purposes. Figure 7.4 shows the field machines in the cabinet. Figure 7.4. V2DVS Detection nodes at Sand Canyon overcrossing site. Turn on the main power, by switching on circuit breakers 4, 5 and 6 in the main power cabinet. The main power cabinet is the small avocado-green cabinet near the 334 controller cabinets. Open cabinet 2, which contains the V2DVS equipment. Enable the UPS (Uninterruptible Power Supply) by changing the position of DIP switch 4 on the back of each UPS (Figure 7.5). A small precision screwdriver is needed for this. The set of 4 DIP switches is located in the middle area on the back of each UPS. The DIP switches are very delicate and require gentle action with a small screwdriver only! At the front of the UPS, LED will change from momentarily press the switch marked “I/O”, to power up the outlets of the UPS. The flashing to solid green to verify that it has been activated. Figure 7.5. Enabling the UPS. Caltrans Irvine Detector Testbed V2DVS Operators Manual R.4 Page 11 of 62 Boot the computers in the cabinet by pressing the yellow power switch on each machine. The system is activated by momentarily pressing the yellow power button on the upper right corner of the field machine. After the Linux boot process (up to 2 minutes) the user will see a login window. The system will automatically start V2DVS with user login as “dfclient” using the current system password. This provides full system control except for some internal operating system functions, which require a special login as root. The field machine is now fully operational and may be remotely either at the system console or via remote control from an instance of the external Internet client application. Following boot-up, the user will see the main screen shown in Figure 7.6. Figure 7.6. V2DVS main screen. The System Status window is the main program window from which all other windows are launched to either set up or monitor the program operation. Note that the V2DVS program is always running in the background. The setup window allows the user to set up the system the first time, or monitor its operation. It does not need to be displayed for V2DVS to be running. If it is closed (by clicking Close or the upper right corner button) it can always be reopened by clicking on the V2DVS logo in the system tray at the bottom of the screen. The System Status window displays a number of real-time metrics of interest, including internal operating parameters of the V2DVS hardware such as temperature and available memory, and also current detection status values such as the state of data collection (ON or OFF), and the date and time of detection (to one second) and speed (in mph) of the most recently detected vehicle. A vehicle count for the current session is also provided. The suffix (F in the example above) following the vehicle speed is a code which indicates which if several hierarchical algorithms was automatically determined to be the most accurate for speed measurement for the most recent vehicle. It is normally of interest only for diagnostic or scientific purposes. The average image brightness is a number, in the range of 0-255 indicative of the overall illumination level of the image. Detection is generally considered reliable for values of this metric above about 25 (10% of full range), although Caltrans Irvine Detector Testbed V2DVS Operators Manual R.4 Page 12 of 62 detection will continue until illumination levels fall below the Min. Intensity parameter set on the Detection Configuration menu to be discussed later. If the video feed is interrupted at any time, the background will eventually become non-current. While it will autocorrect over time, it is expedient to click Update Background to acquire a new base image upon which the background image will be maintained. Vehicle detection will not function correctly without a stable background image, which is expected to change only slowly. The close tab at the bottom of the status menu closes the window but does not terminate the V2DVS program. The status window can be brought up again at any time by clicking on the V2DVS icon at the bottom of the screen: The drop-down menu shown in Figure 7.7 will appear if the Setup button is clicked on the System Status window. Eight menu options are provided; each will be described in the sections to follow. Figure 7.7. V2DVS System Status/setup submenu. Live Images When Live Images is selected, a two-pane view is provided of video images acquired by the V2DVS, shown in Figure 7.8. Figure 7.8. Two-pane live image window, showing real-time video in upper pane, and most recently acquired vehicle image in lower pane. The upper pane always shows the line video feed from the camera at full frame rate. The lower image is selectable to show either the image of the most recently detected vehicle (at the position detected by V2DVS), or the image background (for diagnostic purposes). By default, the most recently detected vehicle is shown. Selection is accomplished by right clicking the mouse while the cursor is above either image pane. A submenu will appear as shown in Figure 7.9 below: Caltrans Irvine Detector Testbed V2DVS Operators Manual R.4 Page 13 of 62 Figure 7.9. Submenu generated by right clicking mouse above the real-time view window. Each tab on this submenu is selected by a dragging the pointer to the item while the left mouse button is held down, and releasing the button while the pointer is above the tab. Each option is described below. Background Image Click this to set bottom pane to show background image of roadway, without cars. This is used primarily for diagnostic purposes. Stripe Detection Image V2DVS permits the choice of two fundamentally different mechanisms for acquiring vehicle images. If this menu tab is selected, the lower pane will show the image of the vehicle most recently detected using the highestprobability detection mechanism based on tracking the vehicle using virtual “stripes”. These stripes can be made visible if the appropriate box is checked on the Detection Configuration menu to be discussed later. This is the default setting. This view is recommended. Box Detection Image If this item is selected, the lower pane will display V2DVS’s detection based on a simple alternative algorithm that measures bulk intensity change in a pair of consecutive detection boxes drawn by the user in the roadway view. The use of this alternative detection algorithm can be selected from the Detection Configuration menu to be discussed later. It is the method employed by most commercial video image processing vehicle presence detection systems. While this simple method is adequate for counting or intersection signal actuation purposes, it is inadequate for the level of accuracy required by automated ground truth generation for the test bed, especially in poor lighting conditions and in the presence of complex shadows. Clicking this menu item displays the vehicle image acquired using this algorithm, which may show the vehicle in a different position from that detected by the default “Stripe” method described above. Displaying this image does not select this detection Caltrans Irvine Detector Testbed V2DVS Operators Manual R.4 Page 14 of 62 method – selection of this method is done form the Detection Configuration menu. This view is not recommended. Change detection box A detection window (box) must be drawn with a mouse on the live view upper pane to establish the zone of detection for V2DVS. This is required when the system is first set up, and any time that the camera is repositioned. This need only be done once, since V2DVS retains this information even after it is powered off. Click the Change detection box tab to set up the detection window. After clicking on this item, the cursor will become cross-like. Position the cursor over the real-time video pane at the intended upper left position of the detection box, click and hold the left mouse button, and stretch the resultant window frame to the right and down, to the lower right corner position of the window. Release the mouse button to set the window. A vertical orange line will then appear through the cursor. This is the detection position line, which specifies position in the scene at which the image of each vehicle will be captured. Move the line to somewhere within the left half of the detection box, leaving enough room the right of the line for tracking of the vehicle. The detection window should usually be contained within the lane lines, and extend the equivalent of a physical distance of about 25 feet along the roadway. A typical view of the detection window and detection position line is shown in Figure 7.10 below. Figure 7.10. Example of correctly positioned detection window (red box) and detection position line (orange vertical line) in live view pane. Draw lane lines It is also necessary, at least once, to establish a dimensional relationship between the camera image coordinates and the actual roadway coordinates. This is done by clicking the Draw Lane Lines tab. Clicking on this submenu item will cause a sequence of two horizontal orange lines to be displayed which are positioned using the mouse. Position the first line on top of the right (upper) lane line at the midpoint in the image. Right click to set this position. A second horizontal orange line will appear. Position this line using the mouse on top Caltrans Irvine Detector Testbed V2DVS Operators Manual R.4 Page 15 of 62 of the left (lower) lane line at the mid-point in the image, as shown in Figure 7.11 below. Left click the mouse to set this line. Upon left clicking, both lines will disappear. This task need only be performed once, unless the zoom setting (focal length) of the lens is changed. Unless changed again, these settings are retained by V2DVS between sessions, even after powered down. Figure 7.11. Lane lines properly drawn on live camera image. The lane lines are expected to be a known distance apart. This distance must be entered in the Lane Separation box on the Detection Configuration menu to be discussed later. This is a critical measurement since it is used as the basis of the vehicle speed measurements generated by V2DVS. Change secondary detection box (Optional – not recommended) The alternative detection method (Box Detection, described above) requires the placement of two smaller detection boxes, each about the size of a large inductive loop on the roadway. If Box Detection Image is clicked, the main Change detection box menu tab is used to place and size the rightmost (first-encountered) detection box. The second detection box is placed and sized by selection of this menu tab. The placement and sizing of these detection boxes is similar to the procedure described above for a single detection window. Detection Configuration With the exception of the Lane width (in.), the user normally will not access this menu. (The lane width must be set once for the given lane under observation, since it serves as the calibration between the scene coordinates and the image coordinates.) This menu provides a wide range of internal and diagnostic settings to aid in optimizing V2DVS detection and speed measurement. Clicking the Detection Configuration tab displays the menu of Figure 7.12 below. Each parameter is described in the following paragraphs. Caltrans Irvine Detector Testbed V2DVS Operators Manual R.4 Page 16 of 62 Display Options Menu items in this category are for diagnostic purposes only. Show Stripes – Checking this box makes the virtual detection “stripes” visible overlaid upon the real-time camera view in the upper pane of the V2View window. These stripes retract with the approach of the front end of a vehicle, and change colors dependent on whether V2DVS determines the optical flow front to be due to a true vehicle leading edge (red stripes) prior to the capture zone, or shadow (yellow stripes). Red stripes turn green after the vehicle successfully enters the capture (left) zone, indicating a successfully acquired vehicle. Show Car Position – Checking this box makes visible a green vertical line which, on a frame-by-frame basis, tracks the progress of the front end of each vehicle from right to left across the detection box. Pixelize - Checking this box reveals the results of an internal video processing step in which the contents of the detection window are “blurred” by annealing into larger squares each based on a field of 100 (10x10) native pixels. Each pixelized block is itself 5x5 pixels in size. Stripe Parameters Detection and tracking of the front edge of a vehicle requires that at least one of the following three tests be satisfied on a field-by-field basis: For edges that are brighter than the background, the intensity change must exceed the Bright threshold (% deviation), stated as a percentage. For edges that are darker than the background, the intensity change must exceed (be darker than) the Dark threshold absolute minimum level, in the range of 0 to 255, AND the foreground in the vicinity of the edge (at least three pixels prior to the edge) must be brighter than the Dark threshold setting by an amount equal to the Bright threshold percentage. Three pixels immediately to the right of the detected edge must differ by Color threshold (milliradians) in their color angle (in the RGB space) compared with the background color angle beneath these pixels AND all three pixels must be greater than the Darkness threshold. User-settable parameters affecting basic detection are: Reject Shadows – This is the default setting. The detection algorithm uses several methods to reject false detections due to the presence of long shadows from vehicles in adjacent lanes. Inevitably, this involves some trade-offs which could compromise the proper detection of some vehicles (especially ones that look like shadows) under poor lighting conditions. If the box is unchecked, the shadow rejection features will be disabled. Under conditions of no shadows but otherwise very poor lighting, detection accuracy may be enhanced. Under normal conditions, this box should always be checked. Figure 7.12. Detection Configuration Menu Caltrans Irvine Detector Testbed V2DVS Operators Manual R.4 Page 17 of 62 Num Stripes – The primary detection method used by V2DVS to track, detect and measure the speed of each vehicle is based on the propagation of a set of stripes from left to right through the detection box. As vehicles progress from right to left, these stripes retract at the perceived leading edge of the vehicle. This parameter box reports the number of stripes used in the current detection window. This number is automatically determined when the detection box is created, as described above. It is possible to override this number directly by entering a number in this parameter box for diagnostic purposes only, but this is not advised for normal operation. Stripe Separation – This parameter is the number of pixels measured vertically between each detection stripe. This is normally set to an optimal overall value and not adjusted by the user. Decreasing this number increases the number of detection lines contacting a given vehicle, which improves the probability of detecting very dark cars with few distinguishing features, but increases the processor load. Minimum Stripe Group Size – A stripe group is a collection of detection stripes which terminate at horizontal positions (indicative of the front end of a vehicle) within a range of positions less than the Maximum Group Separation, defined below. The value set in the Minimum Stripe Group parameter box is the minimum number of such stripes required to define a valid front-end position for the vehicle. Maximum Group Separation – This parameter defines the maximum spread of horizontal positions at which stripes may terminate, in order for them to meet the requirements of a valid stripe group. The units of this distance parameter are pixels. Ratio Test Depth (ft) – The shadow rejection feature of the detection algorithm requires that a true shadow extends for some minimum horizontal depth. If the potential “shadow” area does not exceed this depth, it is not determined to be a shadow, but is detected as a regular vehicle feature. The Ratio Test Depth parameter defines this horizontal depth in units of feet, based on the current pixels/feet calibration. A word on Speed measurement methods and criteria: Once a valid set of samples of the vehicle front end are detected from the array of detection stripes, these are processed to determine if the set represents a valid vehicle (as opposed to a shadow or video artifact) and the speed of the vehicle is measured from this dataset. A hierarchical set of three methods is used for the measurement of the vehicle speed. If the criteria for one method are not satisfied, the next method is used. If the criteria for all three methods are not satisfied, no speed is measured and the potential vehicle is rejected. The three methods for speed calculation, in order of application, are: Linear least curve fit (code F) – The time-position ordered pairs determined along all stripes are submitted to a least squares linear curve fitting algorithm, and resulting slope (rate) coefficient is reported as the mean speed of the vehicle through the detection window. Simple Time of Flight (code P) – A qualified set of position samples is used to establish the maximum interval over which the vehicle progression is considered “smooth”, e.g., with a consistent progression between successive video fields. The endpoints of this qualified interval are then used to determine a distance, which is divided by the elapsed number of video fields, each of know duration, to calculate the vehicle speed. This method is straightforward but conservative due to its requirement for a sufficiently large smooth set of position samples. Clustering Algorithm (code C) – Many speed measurements are made along each individual stripe, based on every pairing of valid position samples separated by three successive video fields. A time-offlight calculation is performed based on each of these local speed calculations, and these numbers are classified into bins, each within the error bounds defined by the block size (the position error). These speed measurement bins are allowed to overlap in a histogram. After the passage of vehicle, the speed corresponding to the peak point in the histogram is declared to be the speed of the vehicle. This approach essentially yields the local speed measurement which is measured most often during the passage of the vehicle. It is the most liberal of the speed measurement methods since it only requires some minimum number of valid pairs of position samples. Parameters associated with each method are described below: Caltrans Irvine Detector Testbed V2DVS Operators Manual R.4 Page 18 of 62 Curve fit speed calc. Vehicle progress from right to left through the detection window is sampled as the retraction of each stripe. During every video field, each stripe that terminates on the front end of the vehicle generates an ordered timeposition pair each Min stripe samples – Position samples along each stripe are admitted to the curve fit dataset for a given vehicle only if a minimum number of valid position samples have been detected. This criteria is applied to each individual stripe as a requirement for utilization of its position samples. This parameter establishes this minimum quantity. Min stripes – Minimum number of stripes in each video field that must satisfy the minimum stripe sample requirement (above) in order for a valid vehicle position to be detected and tracked. Min Samples – Minimum number of total valid vehicle position samples, accumulated over all stripes, required in order for the curve fit algorithm to be run. Failing this test causes this detection method to fail. Clustering speed calc. Min votes – The minimum number of position sample pairings, obtained from any of the stripes, required for a valid detection to be declared by this algorithm and for the probabilistic speed analysis to be performed. Min voting inverse ratio – The clustering algorithm groups pairs of position samples a fixed number of fields apart (currently fixed at three fields for each pairing). The minimum voting inverse ratio is the divisor of a fraction which establishes the minimum number out of the total number of valid position pairs required for a valid clustering-based speed measurement to be performed. Time-of-flight speed calc. Loop 1 Detector – The detector number assigned as the first (lead) of the two loops in the duplex pair used for loop-based speed measurements. Loop 2 Detector - The detector number assigned as the second (trail) of the two loops in the duplex pair used for loop-based speed measurements. Loop Separation (in) – Distance in inches between the leading edges of two duplex loops, used as the basis for loop-based speed measurements. Noise Parameters Baseline noise – Minimum noise level, on the 0 to 255 intensity scale, of two adjacent 10x10 pixel blocks which is tolerated prior to acceptance as a valid optical flow field edge. The default value is 4. Bkgnd Error Factor – Overall tolerated video intensity error amount, considering both baseline noise and the image brightness intensity threshold, on a scale of 0 to 255, prior to acceptance of a valid optical flow field edge. This may possibly be increased in situations where excessive errors occur due to abrupt lighting changes. The default value is 180. Image Brightness Noise – The overall foreground image brightness is divided by this quantity and added to the baseline noise parameter to establish the dynamic noise threshold, which adapts to variations in illumination level. Zone detection parameters Volume box enable – Checking this box activates an alternative method of detection based upon bulk intensity change in two sequential detection boxes positioned with the mouse on the roadway. This is the detection method used by almost all commercial video vehicle presence detection systems. It is inferior to the tracking methods implemented as the default by V2DVS, especially with regard to shadow-rejection ability. Caltrans Irvine Detector Testbed V2DVS Operators Manual R.4 Page 19 of 62 Box on ratio (1/8 value) – The fraction bulk intensity change in each of the detection boxes in order for vehicle presence to be recognized. Presence is considered “on” when this threshold is exceeded. Box off ratio (1/8 value) - The fractional bulk intensity change in each of the detection boxes in order for vehicle presence to be non-recognized. Presence is considered “off” when this threshold is exceeded. This setting, in combination with the Box on ratio, implements a form of hysterisis which reduces false detections. Min. on threshold – The absolute intensity threshold that the must be exceeded in a detection box in order for vehicle presence to be recognized. Presence is considered “on” when this threshold is exceeded. Min off threshold - The absolute intensity threshold that must be achieved in a decreasing sense in a detection box in order for vehicle presence to be non-recognized. Presence is considered “off” when this threshold is exceeded. Roadway geometry Lane width (in.) – The separation distance in inches between lane lines in the scene. The parameter must be entered at least once for speed measurement to be performed correctly. The lane width serves as the calibration between the scene coordinates and the image coordinates. It need not be reset again, even if the camera position or field of view is changed, since it is characteristic of the roadway itself. The default value is 144 inches (12 ft.). Scene parameters Target brightness – The set point, on an intensity scale of 0 to 255, for the automatic iris control. Default value is 100. Brightness range – The intensity range, centered about the target brightness set point, inside which the average image intensity is considered acceptable for image processing. The computer-controlled iris will not change when the average brightness is in this range about the target brightness level. The default value is 25. IIR Filter constant – The image background is accumulated with the aid of a recursive (Infinite Impulse Response or IIR) filter acting on a pixel-by-pixel basis. The intensity y i ( k ) of the ith pixel in the background image is calculated as follows: yi ( k ) = (1 − α ) yi ( k − 1) + αxi ( k ) where yi (k − 1) was the prior value of the background intensity of the ith pixel, and xi ( k ) is the current intensity value of the ith pixel. The IIR Filter Constant divided by 256. The default value is 11. α is a fractional quantity state as an integer from 0 to 255 which is Min intensity – The minimum average scene intensity at which vehicle detection by V2DVS is performed. The default value is 20 on a scale of 0 to 255, with 0 corresponding to zero light and 255 corresponding to a completely white image. Config External Triggers Clicking this item on the System Status menu brings up the menu window shown in Figure 7.13, which allows the user to associate each of the eight hardware signaling channels with a particular detector, listed by the absolute detector reference number assigned to it in the central server database. Figure 7.13. Menu for configuration of external trigger inputs to V2DVS. Contact closure numbers for the V2DVS computer are matched to the absolute detector numbers. Caltrans Irvine Detector Testbed V2DVS Operators Manual R.4 Page 20 of 62 View External Triggers Clicking View External Triggers will bring up a small window that appears to have 8 LED’s, one for each contact closure channel, as shown in Figure 7.14. When an external detector signals V2DVS by a contact closure, the corresponding LED will pulse for approximately 1/3 second. A log file entry and an image will be acquired at the exact moment of the contact closure for each detector channel. Figure 7.14. View External Triggers window, showing real-time state of all hardware triggers. Camera Control Figure 7.15 shows the Camera Control menu. The iris of the camera lens is normally automatically controlled by V2DVS. If the user wishes to manually adjust the iris, or the focus or zoom positions of the lens, click the Manual Lens Control button. Six buttons below it will now be highlighted for manual control of each lens function. When manual adjustment is complete, be sure to click Automatic Lens Control to revert to V2DVS control of the lens iris prior to data collection, since the exposure level is critical to the correct function of the video detection algorithm. Figure 7.15. Video camera lens control menu. Data Collection Figure 7.16 shows the menu that appears when the Data Collection tab is clicked, and All Lanes Is selected. This window shows the data collection status of the field machine in each lane. It also allows the enabling or disabling of data collection for each lane, or for all lanes at the site. The lane corresponding to the actual machine you are working on is noted by an asterisk. The Logs column indicates the number of vehicle records In the Data Collection column, one of three states will be displayed: OFF: Data collection is disabled for that lane. Video and hardware trigger inputs are actually still being processed by that field machine, but they will not be reported to the server. ON: Data collection is currently in progress by the field machine for that lane. All vehicle records and associated images are being transferred to the server on a band-width-available basis. DISCONNECTED: Network communications could not be established with the field machine for that lane. This can be because of the lack of a operational network connection, or because the field machine is off, or the V2DVS program is either disabled or hung up. Caltrans Irvine Detector Testbed V2DVS Operators Manual R.4 Page 21 of 62 Figure 7.16. Data Collection Window, with all lanes selected. A word on the process used to upload data to the server: Data is accumulated by the field machines in a continuous text file referred to as the log file, which is a textreadable file to which one line is written for each detection event. Periodically, data is transferred from the log file to a smaller “transport” file. How often this occurs is based on a formula which considers both the time since the last transport file was created and the number of accumulated lines (events) in the log file. When data collection is turned on or off, an transport file is created immediately. A typical transport file size is 5 Kbytes. When the transport file is first created, it is suffixed as a .tmp file, and the suffix is changed to .log only after the writing of the file has been completed. This avoids potential problems with the ftp of a partially created transport file during uploading field to the server, described below. The upload of data to the server from all field machines is initiated by the server, once every ten seconds, or as soon as all other field machines have been serviced by the server. Upon each request from the server, all accumulated transport files with .log suffixes are ftp’d to the server, and the information is transferred to the SQL database. Upon successful upload, the server connects to the field machine via SSH and deletes each file that it has successfully received. Thus, the transport file is not removed from the field machine until its arrival is confirmed on the server. If the transport file cannot be successfully uploaded, it remains of the field machine until a successful ftp transfer to the server can be performed. Therefore, if the server cannot be reached, the field machine continues to accumulate transport files until connectivity to the server is restored, after which the transfer process begins automatically until the data synchronization has “caught up” with the data generation. Site Configuration This menu, shown in Figure 7.17 is used to associate the IP address of each field machine with a particular lane. On any individual field machine, this affects only the ability of the machine to communicate with the other machines. If the physical IP address of any machine is changed (via ifconfig or a netconfig statup script at the operating system level on the field machine) the new IP address of that machine must be entered on each of the other machines so that they can communicate with it properly. IP addresses for all machines and the server are fixed as shown in Figure 7.17, and need normally never be changed. Caltrans Irvine Detector Testbed V2DVS Operators Manual R.4 Page 22 of 62 Figure 7.17. Site Configuration menu, for assignment of IPs to field machines (lanes) and identification of the server’s IP. Help Clicking the Help tab brings up a copy of the user manual (this document, without appendices) in a PDF file reader. The PDF file is internally annotated so that a word search is possible using the reader included reader utility. 7.3 Adjusting Detector Image Acquisition Offsets Many detectors have detection zones beyond the field of view of the V2DVS cameras, which extends only about 60 feet downroad from the baseline (first loop) position. To enable V2DVS to acquire images for these detectors, the V2DVS stores a continuous queue of 5 seconds (300 fields) of video images prior to any moment in time. If the offset of the detection zone is specified, and the vehicle speed is properly measured, V2DVS can calculate the approximate video field that the vehicle should be found in while it was in the baseline position. The image for that detector is then acquired at the time it appeared at the baseline, before it was actually detected by the detector. Vehicle speeds are calculated by the V2DVS image processing algorithm for the vehicle most proximate to the predicted time of arrival in the base zone. In cases where a valid V2DVS speed measurement is not available, such as a false detection by the detector under test, the most recently acquired vehicle speed is used. The specification of the offset position for image acquisition purposes is specific to each lane and detector. It must be entered in a text file via a regular text editor such as VI. The format of the file is shown in Figure 7.18. The first field of each line is the detector number (as registered in the database, not the terminal block number on the hardware interface). The second field is the offset from baseline position (center of first loop) measure in inches. For detection zones down the road from the baseline position, this value is negative. The third field is an optional time offset measured in seconds. This is used to adjust the time of image acquisition for possible absolute time delays. A negative value in this field means that the image will be acquired that amount of time before it’s detection signal reaches V2DVS. Thus a detector which delays 1 second after detection in sending its detection signal to V2DVS should have -1 in this field to compensate for the detector delay. Any text on the line after the third field is considered a comment and is not used by V2DVS. The # marks shown in Figure 7.18 are actually unnecessary. Caltrans Irvine Detector Testbed V2DVS Operators Manual R.4 Page 23 of 62 Figure 7.18 Detection zone offset specification text file format, used to schedule pre-trigger image acquisition for detection zones outside camera field of view. 7.4 Internal Utilities A command line window may be brought up outside of the V2DVS program on the field machines by clicking on the “aterm” icon in the icon tray at the bottom of the main screen. All standard Linux/Unix utilities are available, and in addition, some specific utility programs to help quickly identify and set configuration parameters used by V2DVS. One internal utility of particular value is rt_config. This command takes as it’s first parameters one of three arguments: list, get or set. list – Displays the current values of each real-time parameter used by V2DVS for detection. get – Requires one argument, the name of the single real time parameter that you wish to display. set - Requires two arguments, the first the name of the real time parameter you wish to set, and the second the value you wish to set it to. Cautionary note: Entering an inappropriate value in rt_config can potentially crash the program, and is recommended for diagnostic purposes only. Most of the real time parameters are editable via GUI interfaces. Caltrans Irvine Detector Testbed V2DVS Operators Manual R.4 Page 24 of 62 8 Detection Performance Results Preliminary tests of the VTDS video detection performance using video tapes acquired from cameras at the test site over a wide range of traffic an illumination conditions, yielded the following results: Illumination condition Overhead sun Diffuse moving shadows Crisp moving shadows from adjacent lane Fixed (bridge) shadow in detection zone Dappled shadows from adjacent lane Low light (20-30) Sample size (Total vehicles) 300 300 Correctly detected 299 (99.7%) 298 (99.3%) Failed to detect False detected 1 2 0 0 Velocity measurement Excellent Excellent 300 295 (98.3%) 5 0 Excellent 200 197 (98.5%) 3 0 Acceptable 200 194 (97.0%) 3 3 Acceptable 300 298 (99.3%) 2 1 Acceptable Under ideal or near-ideal lighting conditions, V2DVS correctly acquires vehicle images in more than 99% of all cases, and is exceptional at not falsely detecting vehicles. The ability of V2DVS to reject shadows from adjacent lanes is very good, except when the shadow itself has the texture of an actual vehicle. This can occur when sunlight passes through the windows of the vehicle onto the pavement, in the middle of the shadow. Such cases are referred to as “dappled shadows” in the table above, and represent the weakest detection conditions, on 97% accurate with 1.5% false detections. The accuracy of the vehicle speeds measured by V2DVS is not considered as accurate as its presence detection results, although quantitative accuracy could not be reported since no reliable reference was available in preliminary testing. Once the system is deployed and has access to the duplex loop detector outputs at the test site, these two measurements may be compared. Both video-based and loop-based speed measurements have known limitations, noting that speed measurements from duplex loops are subject to significant error due to the difference between the true leading edge of a vehicle and its inductive threshold. 9 The V2DVS Server The V2DVS central server computer is connected to the field machines either directly via a local area network cable, or over the Internet from a remote location. In normal operation, the user simply boots the server by turning on the power, and does nothing. The server is designed for “plug-n-play” normal operation. The central server collects data from the field machines, acquires all vehicle record data and images in a large distributed SQL database, and hosts the client V2DVS Workstation application for remote data reduction. The central server is physically a 4-U rackmount computer with a total of 500 Gbyte of data storage capacity. It communicates with all field machines via a 100-Base T Ethernet connection, and is designed to function automatically unattended on a 24/7 basis. Once the server is powered up, it automatically launches the database and communications services. It is not necessary to log into the server under normal conditions. The screen image upon boot is shown in Figure 9.1. No user interface is generated, even though the server is running and will automatically start attempting to collect data fro field machines, and start hosting client data reduction requests from remote V2DVS Workstation sessions. The application may be exited by clicking on the ON/OFF symbol at the right bottom of the icon tray on this screen. Select “shutdown” to turn off the server; do not log out. If you do log out, it will be necessary to log in the next time the server is booted up, by simply clicking on the “dfserve” username on the resultant login screen. Caltrans Irvine Detector Testbed V2DVS Operators Manual R.4 Page 25 of 62 Figure 9.1. Opening screen image of V2DVS Server. To monitor the operation of the server, a command-line window can be activated, shown in Figure 9.2. This provides access to several command-line utilities related to the V2DVS server as well as operating system functions. Under normal conditions, the user need not use any of these capabilities. Figure 9.2. Command line window on V2DVS server, for diagnostic purposes. Caltrans Irvine Detector Testbed V2DVS Operators Manual R.4 Page 26 of 62 One other window can be brought up on the server to allow a user on console to add new field machines or to associate a lane with a particular field machine IP address, as shown in Figure 9.3. On the site(s) have/has been configured, changes to this window are no longer needed. Figure 9.3. Field machine configuration window on server. Other than these small user interface windows, the server does not provide or require any operator intervention. It is not necessary that the server be up in order to perform a data collection run. The field machines can each accumulate up to 80 Gbyte (several days) of image and log data that will be uploaded to the server whenever it is accessible. Once the server has established a network connection to the field machines, transfer of data starts automatically. In view of the huge size of the image data generated for typical traffic by each field machine, it may take a long period of time to retroactively transfer field data to the server, especially over a slow network connection. A slow network connection between the field machines and the server does not prevent the transfer of data, but it can easily slow it to the point that the data flow rate over the network is less than the data accumulation rate of all the field machines operating at once. It may therefore take considerably longer to upload the data to the server than the time it takes to acquire the data. 10 V2DVS Workstation (remote client application) An MS Windows (2000, ME, XP) program is provided to permit remote interaction with the database for manual ground truthing, data reduction, administration of services, and remote control and monitoring of field machines. The program, referred to as V2Workstation, is packaged for installation as a standard windows application with installation wizard. 10.1.1 System Settings The PC monitor must support a minimum resolution of 1024x768 in order to view the complete windows provided by this program. Other than this requirement, any Internet-connected windows PC should be sufficient. 10.1.2 Program Installation and Setup Download the installation package: V2DVS_W orkstation _v1.4.exe Caltrans Irvine Detector Testbed V2DVS Operators Manual R.4 Page 27 of 62 from the ftp site: ftp://guest:[email protected]:/V2DVS/. The file can be placed anywhere, such as the windows desktop. Double click the program icon to start the installation. Follow the prompts of the installation wizard. 10.1.3 Program Usage After installation, a program icon will be added (if this option was selected during installation) to the desktop: V2DVS Workstation.lnk Double click this desktop icon to launch the V2DVS Workstation Program (client applications). In order to interact with the server database or control the field machines, your computer must have a network connection with so that the program can communicate with the server and the field machines. It is still possible to run V2DVS Workstation using data and images previously downloaded to your computer. It may be necessary to activate a VPN client if the PC is outside the UCI/ITS Virtual Private Network. This application will be provided by the UCI/ITS (contact Ziggy Bates) upon request. If not already configured correctly, it may be necessary to tell the program the IP address of the Central Server. To do this, change the working directory to the install directory which is by default c:\Program Files\V2DVS. Edit the file CONFIG.TXT using notepad or any text editor. Change the first line to read: remote_ip=<IP address of server>. If locally installed, the default IP address of the server is 192.168.40.50. Once V2DVS Workstation has started, you will see a login window: Log in by clicking Click to Login and then typing in the username/password in the following menu window: Caltrans Irvine Detector Testbed V2DVS Operators Manual R.4 Page 28 of 62 At this point, the user has two choices. If data and images have been previously downloaded to the local PC, this data may be viewed, ground truthed, and analyzed by clicking Work Offline. Working offline does not require entry of a password. To access data sotred on the server, such as recently acquired data from a detector run, enter a valid username and password and click Submit to connect to the Central Server. The admin password for the application at the time of publication of this user manual is loragen805. If you have logged into the server successfully, you will see the “Main Menu” window: Each button corresponds to a group of features, described below. If you have chosen to work offline, only the Field Machines, Ground Truth and Log Out will appear. Administration Clicking the Administration tab brings up the Administration menu: Clicking Back returns to the Main Menu. If you have connected as “admin” or a user with administrative privileges, clicking Users will list every user with authorized access to the Central Server via the V2DVS Workstation application: Caltrans Irvine Detector Testbed V2DVS Operators Manual R.4 Page 29 of 62 You may add or remove users, and change the level of access for any user. If logged in as a non-administrative user, clicking Users will not result in any response. Clicking Sites will bring up the menu below which permits the user to add or select new detection sites. Doubleclicking on a site name allows the user to modify or remove the site. Clicking on Detectors brings up the following list of all detectors at all registered sites: The menu also permits the user to add or remove detectors by clicking Add or double clicking on the particular detector. Note the “Automatically Added” entry for detector number 15. This entry was automatically created when an unidentified detector, such as one of the hardware signaling detectors, signals a detection. This occurred because a detector number 15 was configured on the field machine using the “Contact Closure” window, but there were no corresponding entry in the database on the server yet. Caltrans Irvine Detector Testbed V2DVS Operators Manual R.4 Page 30 of 62 Clicking on Field Machines displays the following menu, that permits the user to add or remove field machines from the database: Field Machines Clicking Field Machines on the Main Menu brings up the following window: Clicking Field Machine Status brings up a status window indicating the available free and used disk space, the amount of RAM available, and other current operating information about each field machine. Selecting All Machines presents the window below. Caltrans Irvine Detector Testbed V2DVS Operators Manual R.4 Page 31 of 62 Selecting a particular machine provides the entry point for remote control of an individual field machine, via the window shown below: At the bottom of the window are three images, from left to right: a periodic sample of the current video feed from the camera, the image of the most recently detected vehicle (detected by V2DVS), and the current background image (for diagnostic purposes). Each image can be immediately updated by mouse-clicking on it. Real-time remote control of the camera lens is also possible using the six buttons at the top of the window, allowing the remote user to zoom in or out, refocus, or manually adjust the iris of the lens. The status of data collection for the selected field machine (lane) is shown in the middle of the window. The current system hardware and software status are also, displayed, including the available disk space, uptime, etc. Since the user is communicating with the field machine via a multi-hop Internet connection, there may be considerable latency for some control actions. For the present configuration at the Caltrans Irvine detector test bed, if the remote PC running V2DVS Workstation is not connected to the local area network in the field cabinets, it is necessary to install a VPN client provided by UCI/ITS to obtain external via the Internet. Caltrans Irvine Detector Testbed V2DVS Operators Manual R.4 Page 32 of 62 Clicking Data Collection on the Field Machine menu opens a window from which data collection runs are usually started and stopped, either for an individual lane (field machine) or for all lanes concurrently. The current status of the data collection from each lane available in terms of logs and archives transferred to the server. Manual Verification and Ground Truth Clicking on the Ground Truth of the Main Menu brings up the following menu. The Generate Ground Truth Report button brings up a series of self-explanatory menus that allows the user to define periods of data collection, by defining start and stop points in a graphically displayed body of available field data. These periods are named and packaged as “Reports” which serve as the basis for ground truth data set generation and most of the analysis. Once created and named, the report may be “submitted” to the server, where it can be selected by external users for manual verification, as previously described. Clicking on the Manual Verification button permits identification of the V2DVS server IP address and the directory on your PC which you want to store all the data and images for manual verification. Default values are shown below. The image and data storage directory should be on a hard drive with adequate space for a large number of jpeg files. We suggest at least 5 Gbytes of free space on this drive. This menu window also permits selection of two options: connecting to the Central Server with the specified IP address, or working offline using data and images already stored on your PC. Caltrans Irvine Detector Testbed V2DVS Operators Manual R.4 Page 33 of 62 Clicking either Connect or Work Offline presents the user with a large blank Manual Verification window: Selecting File -> Select Report from the menu bar at the top left of this window creates the following menu, in which the selection of the data collection report is specified. Caltrans Irvine Detector Testbed V2DVS Operators Manual R.4 Page 34 of 62 Once a report has been selected, and OK is clicked, the Lane Manager menu window comes up, which allows the user to specify the particular lane to analyze during the specified data reporting period: If the report has been previously imported (downloaded) to your PC, then View/Edit displays the data for the specified lane in the report in the Manual Verification Window, as shown below. If the report still resides only on the server, clicking Import downloads it to the PC (but does not show the results in the Manual Verification window until View/Edit is clicked. Caltrans Irvine Detector Testbed V2DVS Operators Manual R.4 Page 35 of 62 The admin login has access to all the reports because admin was the creator of the reports. All other users will only have access to one report as they are the sub-creators added by admin, either detector vendors or people designated by the admin to assist with manual verification. A report is defined as an interval of detection data stored on the server, that first must be manually verified to create a complete ground-truth set for this period, and then may be used to generate performance statistics for each detector. A report is initially created in a manual ground truth verification session, either in-progress or completed. Each report is separate, although the same actual data may be used for multiple reports generated by more than one designated user. Each recorded detection is represented by a V2DVS color-coded dot, as specified by the Toolbar Menu shown above the Manual Verification window above. The user can traverse the detections using a cursor represented as a black square surrounding the highlighted detection. Selected verified detections are highlighted as green dots. The user can then manually verify each detection using the toolbar found in the “view” menu or a keystroke: Caltrans Irvine Detector Testbed V2DVS Operators Manual R.4 Page 36 of 62 Select/Deselect (s): The user can select an individual detection, or select a grouped detection and its group. Selected detections are highlighted as white dots. Goto unverified (x): The user can go to the next unverified detection in the timeline. Clear selection (backspace): Clears all selected detections. Group (g): A selected detection or detections are placed in their own group, represented as teal dots. If a selected detection or detections are grouped and were originally part of another grouping, the remaining detections of the other group will remain in their own group. False detection (f): Toggles a highlighted or selected unverified detection as false. The user-defined false detects are represented with bright red dots. Ungroup detection (u): Toggles a highlighted or selected verified detection as unverified. Unverified detection (f): Toggles a highlighted or selected false detection as unverified. Center detection (c): A highlighted detection will be centered in timeline window. Zoom in (+): Zooms in and centers a highlighted detection. Increases visible time precision of the detection. Zoom out (-): Zooms out and centers a highlighted detection. Decreases visible time precision of the detection. Use scrollbar slider to move through timeline. The program also supports the use of a mouse wheel and “click and drag” to perform this functions. The page up and page down keys move the timeline one quarter of the current window width. The arrow keys can be used to move the detection cursor. Moving the detection cursor to a detection on either edge of the visible timeline causes the timeline to automatically scroll. In cases where the preset detector offsets do not provide adequate correlation for a given set of data, the user can manually modify the detection offsets in feet in the “view” menu, selecting “Detector Offsets.” There, the user can select a detector and modify the distance offsets in feet. An additional tool under the View pull-down menu in the Manual Verification window is the Automatic Correlation tool which allows the user to select two detectors as the most trusted detectors to compared the rest of the detectors against for detects, false detects, and unverified detects. Caltrans Irvine Detector Testbed V2DVS Operators Manual R.4 Page 37 of 62 Finally, the Statistics button under the View pull-down menu in the Manual Verification window is used to automatically generate the results for the relative accuracy of each detectors against a ground truth data set. The statistics report can then be exported and saved as a text file. Note: Closing the Manual Verification Window will disconnect you from the server. Caltrans Irvine Detector Testbed V2DVS Operators Manual R.4 Page 38 of 62 Ending the V2DVS Program To terminate the V2DVS workstation program, click Exit on the file menu, or click the X in the upper right corner of the main program window. Change Password Clicking this tab brings up a dialog box which allows a user to change their password. Log Out Clicking this tab initiates the logout process. This is the preferred method of exiting the program. This is necessary even after all program-related windows have been closed. 10.1.4 Uninstallation of V2DVS Workstation Program The V2DVS Workstation program can be uninstalled using the Uninstall program included with the V2DVS installation package. Currently, V2DVS does not appear as a program under Windows, so using Windows’s Add/Remove Program feature would not uninstall V2DVS. Caltrans Irvine Detector Testbed V2DVS Operators Manual R.4 Page 39 of 62 11 V2DVS Video-based Presence and Speed Detection Methods The V2DVS field machines detect the positon and velocity of each vehicle in the corresponding lane by computer processing of the video camera image. Processing of every video field, at 60 fields/second, is performed. The series of algorithms that perform these detection tasks are desribed in general terms in the program flow chart. Each block represents a process or component operation. Some run concurrently, and not all data dependencies can be represented in this form. However, the general flow is from top to bottom, with branches performed from left to right. Video Processing Loop Runs each new video field Acquire Video Field from frame grabber Update Background Image via IIR filter Add current field to video processing queue As processor availability permits, process each field Tracking (Stripe-based) detection algorithms field Zone detection algorithms Isolate Vehicle from background (Grid 1) Determine presence in successive zones (Grid 5) Flow front detection (Grid 2) Measure speed as time of flight between zones (Grid 6) Shadow and artifact rejection (Grid 3) Measure velocity (Grid 4) Figure 11.1. V2DVS detection flow chart (multiple pages). Caltrans Irvine Detector Testbed V2DVS Operators Manual R.4 Page 40 of 62 Grid 1 Isolate Vehicle from background Calculate average intensity in each color plane Adjust differentiation threshold as function of average intensity in each plane. Computer tertiary difference image (dark/light/equivalent) in each color plane Grid 2 Flow front detection Detect first qualifying dark transition on each stripe Detect first qualifying light transition on each stripe Repeat for all strips to establish vehicle front end profile in each color plane Caltrans Irvine Detector Testbed V2DVS Operators Manual R.4 Page 41 of 62 Grid 3 Flow front detection Detect first qualifying dark transition on each stripe Detect first qualifying light transition on each stripe Repeat for all strips to establish vehicle front end profile in each color plane Grid 4 Shadow and artifact rejection Check if at least one stripe in either guard zone has characteristic of shadow Check if shadow-like flow fronts propagates up or down into detection zone from guard zones Reject shadow-like vehicles in detection zone if extending continuously from either guard zone Caltrans Irvine Detector Testbed V2DVS Operators Manual R.4 Page 42 of 62 Grid 5 Measure velocity Linear curve fitting algorithm Clustering algorithm Calculate sample qualifiers Measure time of flight for every pairing 3-samples apart along each stripe in each color plane Admit stripes meeting validity qualifications Check direction of propagation along each stripe Collect validated time-position flow-front samples from all color planes Generate histogram of distribution of time of flight calculations from every admissible pairing Average time of flight algorithm Calculate positioning qualifiers Select admissible periods of measurement based on constant-acceleration segments of flow-front propagation Measure time of flight during each period Report most-likely speed as center of mass of speed measurement distribution histogram Report speed as mean of individual measurements Collect validated time-position flow-front samples from all color planes Least-squares linear curve fit Caltrans Irvine Detector Testbed V2DVS Operators Manual R.4 Page 43 of 62 12 Detector Signaling As previously discussed V2DVS accommodates a number of different signaling methods from detector under test. Each is described below. 12.1 Hardwired real-time signaling V2DVS will accept up to eight binary inputs per lane for real-time hardware signaling (total of 56 binary inputs across seven lanes, or eight detection systems operating on all seven lanes). Each binary input corresponds to a specific lane and a specific detector. Each line could correspond to a different detection zone within that lane, since a different detection position may be specified for each detector in its setup configuration. Signaling is active low edge detection. Hardware interface is open collector ground-referenced, which is compatible with both 0-5V TTL and 0-24V typical of Type 222 detector card outputs. The V2DVS user interface GUI includes configuration tools for assignment of detectors to particular terminals of the hardware interface for lane. Each V2DVS computer uses its parallel port for detection of the contact closures, via an interface box with a circuit that isolates and level shifts all inputs, and generates a 3-microsecond interrupt pulse to signal the PC of a signal transition. The interface boxes are the gray boxes shown on the left side of the back of the 334 cabinet in Figure 12.1. The interface circuit schematic is shown in Figure 12.2. All components are HCT-series CMOS, for high noise immunity. Figure 12.1. Contact-closure interface boxes for each lane, mounted on back left rail of 334 cabinet. Caltrans Irvine Detector Testbed V2DVS Operators Manual R.4 Page 44 of 62 Figure 12.2. Schematic for contact-closure interface box (one for each V2DVS field machine). Caltrans Irvine Detector Testbed V2DVS Operators Manual R.4 Page 45 of 62 12.2 Network Signaling Each detector can also signal V2DVS via the local area network that connects equipment within the cluster of cabinets at the site. Signaling requires that each detector opens a socket connection on the appropriate V2DVS computer, and transfer a small packet containing both required and optional information. The packet contains ASCII information in right-justified, space-padded fixed fields. The byte count for each field is one more than the required number of characters for the information item, which provides a leading space character to make the packet string easier to visually interpret when displayed on a terminal. <detector code> (required) A single byte field containing an ASCII character, 0-9,A-F which identifies the detector. Codes must be unique for each detector. Detector code “V” is reserved for detection records generated by V2DVS itself. <lane #> (required) Two bytes containing a single right justified, space-padded ASCII character 0-9,A-F which identifies the lane. <time of detection> (centisecond accuracy) (optional) This field is required only for detectors which do not report their detection in real-time. V2DVS maintains a FIFO of 300 past video fields, allowing time-delayed references of up to 5 seconds. 15 bytes, right-justified spacepadded ASCII representation of the date/time formatted as YYMMDDhhmmsscc where cc is centiseconds (10-2 seconds). <speed> (0.1 mph accuracy) (optional) This field is required only for detectors which do not detect in the standard (baseline) detection zone. 5 bytes, right-justified space-padded ASCII representation of the vehicle speed in Mile/hour formatted as mm.t where t is tenths of a mile per hour. <position> (accurate to 0.1 ft. from reference position) (optional) This field is required only for detectors which detect in variable positions in a given lane. Position is distance in feet down-road of the standard (baseline) detection zone. 6 bytes, right-justified space-padded ASCII representation of the detection distance offset in feet formatted as fff.t where t is tenths of afoot. <site code> (optional) This field is only required if detection tests span more than one test site. Two bytes containing a single (right justified) ASCII character 0-9,A-F which identifies the test site. Fields may be left blank by filling with ASCII spaces. Any data beyond the last fixed field is ignored by V2DVS. The packet is truncated at the end of the non-empty fields. No specific termination character is required. Optional fields need not be space-padded; the packet will be assumed to be terminated at the end of whatever ASCII string is sent. A typical data string, if displayed on a terminal, might be: A 5 06010114301550 65.0 150.0 S Which would mean: Detector code = R (RTMS) Lane = 5 Year = 2006 Month = January Day = 1 Time = 2:30 PM and 15.50 seconds Caltrans Irvine Detector Testbed V2DVS Operators Manual R.4 Page 46 of 62 Speed = 65.0 MPH Distance offset from baseline = 150.0 feet Site Code = S (Sand Canyon) Network Protocol Network signaling will use UDP (User Datagram Protocol) defined by RFC 768 http://www.ietf.org/rfc/rfc0768.txt?number=768. The V2DVS is physically embodied in seven computers (one per lane) at each of the present Testbed sites. To avoid the complication of requiring detectors to know the different IP addresses or different port numbers for each lane, all detectors, regardless of the lane of detection, will broadcast UDP packets to port 2000 of the local address 255.255.255.255. In this mode, all V2DVS computers will receive every signaling packet, but only the computer corresponding to the lane number specified in the <lane> field of the packet will process the packet payload. Below is a sample function in ANSI C to send a signaling packet for UNIX or GNU/LINUX systems. This code can be easily ported to an MS Windows-based system by replacing the UNIX system calls with the equivalent windows API functions. The sample function accepts a pointer to the assembled signal string and returns a status code of 0 on a successful send and a –1 in case of failure. #include<sys/socket.h> #include<sys/types.h> #include<netinet/in.h> #include<stdio.h> #define BROADCAST_ADDRESS "255.255.255.255" #define SIGNALING_PORT 2000 /* Send signaling packet containing character string “payload”. Returns 0 on success and -1 on failure */ int send_signaling_packet(char *payload) { struct sockaddr_in broadcast_addr; int fd; /* create UDP socket */ fd = socket(PF_INET, SOCK_DGRAM, IPPROTO_UDP); if(fd) { int val = 1; int size; /* enable broadcast */ if(!setsockopt(fd, SOL_SOCKET, SO_BROADCAST, &val, sizeof(val))); { /* set address */ Caltrans Irvine Detector Testbed V2DVS Operators Manual R.4 Page 47 of 62 broadcast_addr.sin_family = AF_INET; broadcast_addr.sin_port = SIGNALING_PORT; inet_aton(BROADCAST_ADDRESS, &broadcast_addr.sin_addr); /* attempt to send */ size = sendto(fd, payload, strlen(payload), 0, (struct sockaddr *)&broadcast_addr, sizeof(struct sockaddr_in)); if(size == strlen(payload)) { close(fd); return 0; } } close(fd); } return -1; } 13 V2DVS Configuration Options (Central Server) The V2DVS Central Server is configured on-console or via SSH connection over the Internet. A number of configuration parameters may be set for each detector. Some entries are required while some are optional, depending on the detector: Detector Identification Information (optional) A text string may be entered to identify the detector by vendor and product name, version number, etc. If no string is entered, the detector will be identified only by its alphanumeric detector code, below. Detector Code (required) An alphanumeric ASCII character must be assigned to identify the detector. It must be the same as the character in the first field of the signaling packet sent from the corresponding detector. Case-independent. Detection position (optional) This entry specifies the detection position, relative to the baseline position in each lane. If non-blank and nonzero, this tells V2VDS to expect a numeric value in the <speed> field of each detection packet, from which it will calculate the “position-adjusted time of detection” for correlation with other detectors. If left blank, the baseline (standard) detection zone above the first loop detector is assumed and the position-adjusted time of detection will be the same as the actual time of detection. A selectable option is also available to specify that the detection position varies for each vehicle, which will tell V2DVS to expect a position offset value in the <position> field in each detection packet (above). Acquire image? (optional) Caltrans Irvine Detector Testbed V2DVS Operators Manual R.4 Page 48 of 62 This entry is required only for those detectors with detection positions outside of the field of view of the V2DVS cameras. For such detectors, this entry provides a way to specify if an image should or should not be acquired at the actual time of detection. Three selectable options are possible: Y (yes) implies acquire and image at the time of detection. N (no) implies do not acquire an image at the time of detection. V (V2DVS) implies back-calculate from the time of detection using the position information and vehicle speed to estimate the time at which the vehicle appeared in the standard detection zone. Acquire the image at this adjusted time, and use it as the image of the vehicle for this detector. If this entry is left blank, a “Y” entry is assumed. 13.1 Removal of archived data and image files from the server. In normal operation, the server continues to accumulate all data and vehicle images drawn from all field machines, each monitoring ten or more detectors. The server contains 500 gigabyes of hard disk capacity, which is sufficient for months of data accumulation. However, as a maintenance item, it is necessary to periodically remove the accumulated data and image files from the server to avoid exceeding the capacity of the disks. During the process of data reduction and verification, all these data files are copied one or more client machines. Therefore, they are no longer required on the server. The procedure for removing image files is as follows. 1. Log into the server on console or remotely via SSH as root. The root password is in the possession of the Caltrans project manager, John Slonaker <bbroygbVgw>. After logging in, a Linux command window will appear with a command prompt. 2. To remove all image files type: “rm –rf /home/dfserv/store This will remove ALL past data and images. It is also possible to selectively removal of data accumulated before a particular date or for a particular detector or field machine, but /home/dfserv/store/<detector number>/<site number>/<lane number>/<year, 4 digits>/<month number>/<day number>/<hours, 24-hour format> month, day, and hour numbers are NOT zero-padded, i.e., no need to put a leading zero in front of the number 2 (NOT 02). To flush the data from the database on the server, type at the Linux command prompt: mysql --user=tabber --password=dellipoo central You will get a mysql command prompt. Type: Delete from report_log where stamp between yyyy-mm-dd and yyyy-mm-dd; (records associated with a report) Delete from field_log where stamp between yyyy-mm-dd and yyyy-mm-dd; (records associated with all detections) Caltrans Irvine Detector Testbed V2DVS Operators Manual R.4 Page 49 of 62 14 NTP Timer Services As discussed above, signaling with time offsets requires that clock time be exactly synchronized between the detector and V2DVS. To facilitate this, the master V2DVS computer at the site hosts a network time server, which provides a local master time reference accurate to 1 ms. The NTP (Network Time Protocol) http://www.ntp.org/ is used for propagation of the time reference over the local area network (between the cabinets at a site). NTP is a standard protocol designed to synchronize clocks of computers over a network. The server will support both NTP version 3 formalized in RFC 1305, and Simple NTP (SNTP) version 4, described in RFC 2030. 14.1 Why a local time reference? There are many open-access internet time references. V2DVS uses time-c.timefreq.bldrdoc.gov or one of several alternatives listed on http://ntp.isc.org/bin/view/Servers/StratumOneTimeServers . While individual detectors can also reference one of these servers directly, stochastic network latency over the multi-component network connection between the field sites and ultimately the Internet, limits the time accuracy to only slightly less than a second. Accurate acquisition of video images requires synchronization accuracy no worse than the nearest centisecond (10 milliseconds). This accuracy is critical since the separation between each video image is 16.67 ms. In this short period of time, a vehicle traveling at 66 MPH will progress 20 inches along the roadway. Clock misalignments as small as a few milliseconds could cause the acquisition of the wrong video image for the detected vehicle. By providing a local time reference over the close-coupled local area network, network latency is greatly reduced, and time synchronization is much improved. System that signal in delaytime which do not synchronize their time with the V2DVS server may or may not acquire the video frame acquired at the time closest to the actual time of detection. One alternative is GPS-based time, although the standard NMEA (National Marine Electronics Association) http://nmeatool.nmea2000.de/download/0183.pdf format time string provided by commercial GPS may not resolve time to an adequate precision level, depending on the GPS unit. Units that communicate at the NMEA standard 4800 bps serial rate incur a latency of 1.667 ms per character in transmission, which could imply a delay of the order of several centiseconds before the 35 byte time string (alone) can be processed. Also note that since V2DVS references time periodically over the Testbed network, the local time reference may not be exactly the same as GPS time. 14.2 How to use the V2DVS NTP timer server A network connection is required (100 Base-T/Cat 5). Local time synchronization services are not provided over the serial connections due to the slow data transfer rate of RS-232 communications. There are many public domain and commercial sources for NTP or SNTP client code to time synchronization. For UNIX or GNU/LINUX systems, the preferred (free) NTP client is OpenNTPD. For systems that do not have OpenNTPD installed as part of the OS distribution, source code is available at www.openntpd.org. Prepackaged binaries are also available for various operating systems via links from this web site. For other NTP clients, please refer to the documentation provided with the software. To enable time synchronization using OpenNTPD, the program ‘ntpd’ must be started at boot time and the file ‘/etc/ntpd.conf’ should be edited so that it contains only one line of the format: “server xxx.xxx.xxx.xxx” where ‘xxx.xxx.xxx.xxx’ is the IP address of the local time server. The V2VDS time server IP address is 192.168.0.1. This local (non-routable) address is supported at all sites. The default NTP/SNTP port 123 is used. 15 V2DVS Software – Detailed Description Caltrans Irvine Detector Testbed V2DVS Operators Manual R.4 Page 50 of 62 V2DVS is a suite of applications that runs on three platforms: field machines (one per lane at each site), a central server, and one or more Internet-connected PCs running MS Windows. The internal details of the software services and applications running on each platform are described below: 15.1 Field detector software Linux-based with real-time extensions. Linux login name is dfclient, password is loragen805. It is necessary to log in to bring up a field machine from a non-powered state. v2dvs The main detection program. Automatically stared following login to system. Processes video image stream from camera, receives contact closure signals via parallel port adaptor, receives network-based signal packets, maintains 300-image queue for delayed detection purposes, performs video detection and image acquisition for each vehicle, converts each acquired image into a jpeg file, controls motorized control of iris, focus and zoom, via accessory microcontroller. cron Job runs every minute. If v2dvs is started but not running, the system is rebooted. ntp Each field machine is capable of serving as the local time server, both for synchronization of the other field machines and all of the detectors under test that report detection times for delayed signaling. 3 field machines agree on time by connecting to 4 time servers each and peering with each other. No two peers have any servers in common. The remaining field machines get time from the peers. v2dvs_start Started automatically by v2dvs service. v2dvs_start invokes v2sat and receives log messages from v2sat and it's threads v2sat V2sat performs the following four functions, each a separate software module. v2dvs_start invokes the first instance of v2sat which creates 4 threads: video, jpeg, pport (parallel port) , and sport (serial port) rt_config Provides real-time access to v2sat's settings. changes will be commited to disk whenever v2sat shuts down. rt_config only works when v2sat is running. v2view Provides a window into v2sat's video processing activities. displays the real-time video feed, the last detected car, and the background. depending on the current real-time configuration colored lines may be displayed over the real-time feed to visualize the detection process and aid in the calibration of detection thresholds. setup.php A user-friendly GUI for modifying v2dvs's real-time configuration, manually controling the camera lens, and monitoring system status. v2view.php Started by setup.php. starts v2view and visualises the contact closures with 8 psudo-LED's Files used on the field machines /etc/rt_config Contains saved v2dvs configuration settings. Loaded into memory when v2dvs starts and saved when v2dvs shuts down. /detect Caltrans Irvine Detector Testbed V2DVS Operators Manual R.4 Page 51 of 62 Fifo over which contact closure events are communicated between v2sat to v2view.php /vidbuf/queue Memory mapped file in which the video queue and v2dvs configuration settings are stored /home/dfclient If the machine is configured as a client log files are saved to "log/" before uploading and images are stored in "img/" until they are copied to the server. the last lines of the log file "log/main.log" will contain one or more error messages if v2dvs shuts down unexpectedly (optional) /home/dfserv If the machine is configured as a server, log files are uploaded to the "log/" directory by clients and images are downloaded into "store/" 15.2 Central server software 15.2.1 Overall Operation The Central Server acts as central repository for all detection information. If the Central Server is connected to the Field Machines while having a connection to the internet the Central Server will act as a collector to the Field Machines and a data server to the Remote Client. 15.2.2 How field machine log files are acquired If the Central Server is connected to the Field Machines, the Field Machines will push their log files onto the Central server. If the Central Server is connected to the Field Machines at a later time, the Central Server will pull the logs from the Field Machines if logs are older then five minutes. The Central Server waits five minutes to ensure the Field Machine is not trying to push the log file to the Central Server. When the Central Server is pulling log files, they are not pulled in one batch FTP call but instead with multiple gets, but this does not mean that FTP connections or closed and opened multiple times for one pull session. 15.2.3 Automated processes Each of the following processes are started via the v2collect.php script. If you want to change the wait period before each script is executed you need to modify the v2collect.php script and then restart the v2collect daemon. o Processing of log files (process_log_files.php) Checks the store directory for any log files. If the log is new its name is entered into the log_files table and a file size check is done and stored. On the second pass of a log its file size is checked again, if the file size check is the same as the previous check then the log is released and will be parsed into the database. The two file size checks are done to prevent the processing of log files that are in the middle of transferring. When a log file is parsed, all of its data will go into one of two tables. The error_log table where all system messages and collection signals are stored or the field_log table where all detections for all detectors are stored. o Acquiring log files that have not been pushed to the collector (check_unsent_logs.php) The Central Server will make an FTP connection to each Field Machine and check the log files that reside on that Field Machine. If the log file does not appear in the log_files table or in the store directory and is older then the max_time_before_upload variable (defined in common.php) then the Central Server will grab that log file from the Field Machine. FTP connection to the Field Machine is not closed until all files have been checked. o Acquiring images from field machines (get_images.php). The Central Server queries its field_log table and finds all detections where an image has not been pulled from the Field Caltrans Irvine Detector Testbed V2DVS Operators Manual R.4 Page 52 of 62 Machine by looking at the image field but will only grab a maximum amount of images during any given run, currently set at 100. The query grabs the oldest entries made in the field_log table and orders them by field machine number. Since entries are ordered by field machine number, one connection is made to each field machine per session. o Automatic data reduction of vehicle detections for ground truth report (process_reports.php) Automatically groups detections based of a user defined window and maximum separation of trusted detectors which are defined through remote client. The script will gather all trusted detector A detections and then try to pair a trusted detector B, but if there are two trusted detector B detections in the maximum separation of trusted detectors then a pair is not formed with trusted detector A. Once pairs have been made the window is applied to each center time of the pairs. If any of the windows overlap, the pairs involved in the overlapping are removed and you are left with pairs of trusted detectors with windows that do not touch. The pairs are then given their window again and a single detection is attempted to be grouped with the pair. If two detections for a single detector are retrieved the one closest to the center time is taken and the other(s) are bumped out for human verification. All pairs and their children, now considered groups, are inserted into the report_log table and given a unique group id, for that given report number. The user never sees these group numbers and are just used internally. All other detections that are not in a group are also placed in the report_log table but flagged for human verification. The script will also handle extensions and reductions of reports time on an individual lane basis. If a reduction in time, then those detections not in the time window are removed from report_log. If an extension in time, then the same process for initial detector matching is conducted, the only difference is any detection that has already been grouped or marked as a false detection are not changed. o Releasing a ground truth report (release_report.php) When a report is complete, when all manual verifications have been done on all lanes, then they are presented with the option in the remote client to “Release Report”. This changes a flag in the reports table which triggers this script. This script goes through each group made and adds a failure to detect entry into report_log for every detector that was not part of that group. Once this script is finished the report can be viewed with the statistics page and be viewed by users with vendor status. o Removing a ground truth report from release status (unreleased_report.php) If an error was found in the ground truth report, its release status must be removed to be edited. This can be done through the ‘report status’ page of the remote client. When activated, the script removes all failure to detects from the report_log table and allows report to be manual verified again. But one must re-release the report for new statistics to be generated. o Checking for detectors that have been added in the field (stray_detector_check.php) All detectors have unique ids assigned by the database but it is possible to enter a detector id in the field for any given contact closure channel or UDP. The only issue is that it must be unique otherwise that detector will have false identity. The script checks for any detection ids in field_log table that are not in detectors table and will insert them into the detectors table with the name blank. It is up to a system admin or admin to modify the name to it’s true name. Caltrans Irvine Detector Testbed V2DVS Operators Manual R.4 Page 53 of 62 15.2.4 Database structure and definitions o o o o dc_log contains all start and stop times for data collection for reports id site_id releation to sites table id start_time start time of data collection duration duration of data collection Detectors holds all information for all detectors that are in the field, only one id needs to be generated for every type of detector at each site Id site_id relation to sites table id name: name of detector, blank will be put in if automatically assigned velocity: currently not used in any scripts pictures: currently not used in any scripts shift: amount of feet that a detector is from the center of V2DVS detection. Positive means upstream and negative means downstream. error_log Contains all system and collection status messages emitted by all field machines. Currently no scripts use or access the system messages but the collection status messages are used by the remote client. Id field_id relation to field_machines table id sub_system See Niel’s documentation on what type of sub_system messages can be displayed type same as sub_system time_sec unix timestamp and micro seconds of when message was logged. Looks like 1135154539.505221 message message recorded field_log all detections are stored in this table, from every detector id Caltrans Irvine Detector Testbed V2DVS Operators Manual R.4 Page 54 of 62 o o field_id relation to field_machines table id site relation to sites table id stamp time of detection in format MM/DD/YYYY HH:mm:ss AM/PM msec increases resolution of detection on hundredths of a second lane detection lane detector relation to detectors table id velocity velocity reported, if not velocity then zero is reported source_log relation to log_files table id image 0 – image not downloaded 1 – image downloaded 2 – image did not exist on field machine so skip download field_machines Holds all field machines for every site id name unique name for field machine site relation to sites table id lane lane that field machine monitors ip ip address of field machine active is the field machine considered active 0 – not active 1 – active If a field machine is not active then statistics can not be retrieved and logs will not be gathered from that machine log_files stores status and processing of log files from field machines id name name of file Caltrans Irvine Detector Testbed V2DVS Operators Manual R.4 Page 55 of 62 o o status 0 – unknown 1 – file has been processed 2 – file is being processed 3 – file is ready for processing 4 – file is ready for second filesize check size file size in bytes report_log when a report is generated the relation between that report and the detections are through this table. This keeps the detection data static and allows multiple reports to be generated on one data set. id report_id relation to reports table id detector relation to detectors table id field_log_id relation to field_log table id group_id unique group id for each report that is generated for every group type 0 – false detection 1 – correct detection, also an indication that it is in a group but could be singular 2 – failure to detect 3 – human verification required by relation to users table id but will be set to 0 if done automatically by the automatic data reduction algorithm reports when a report is generated, modified or worked on its status is stored here id stamp time that the report was initially generated optional_name optional name that can be assigned to report only through generation process, no mechanism to change it trusted_detector_a should be V2DVS and might want to make it permanent but is used as one of the trusted detector pair to be used by that automatic data reduction algorithm trusted_detector_b is used as one of the trusted detector pair to be used by that automatic data reduction algorithm dc_id relation to dc_log table id Caltrans Irvine Detector Testbed V2DVS Operators Manual R.4 Page 56 of 62 dc_from data collection start in format YYYY-MM-DD HH:mm:ss dc_to data collection end in format YYYY-MM-DD HH:mm:ss window_type 1 – time window 2 – distance window window_size window size (msec,ft) max_sep maximum separation of trusted detectors (msec,ft) complete 0 – report not processed awaiting pickup by process_reports.php 1 – report is being processed by process_reports.php 2 – awaiting human verification, there are one or more detections that require human verification 3 – report is being worked on by a user 4 – human verification has been started but is not finished 5 – report has no more human verification detections and is ready for relase 6 – report is waiting for release_report.php to pick it up 7 – report is being processed by release_report.php 8 – report is release and ready for public viewing and statistics to be generated 9 – report is waiting for unreleased_report.php 10 – report is being processed by unreleased_report.php 11 – User is modifying lane range times and nothing else can happen 12 – report is waiting for process_reports.php 13 – report is being processed by process_reports.php stamp2 last time report was modified author relation to users table id, identifies user that generated report authorized1 relation to users table id, identifies which user is allowed to help with the reports manual verification authorized2 relation to users table id, will always be set to admin user, so admin is able to modify all reports check_out 0 – currently not checked out 1 – currently being worked on check_out_by relation to users table id, identifies who is currently working on the report progress used by process_reports.php to show progress on automatic data reduction algorithm Caltrans Irvine Detector Testbed V2DVS Operators Manual R.4 Page 57 of 62 o o o o reports_lane stores modified times of fuzzy edges used by each lane to avoid having to find a break in all detections of every lane to make a clean data collection period id report_id relation to reports table id lane lane number from start time of detection to end time of detection new_from new start time that was modified new_to new end time that was modified change 0 – no modification has taken place 1 – modification to time range sites listing of sites and their name id name unique name of site system used to maintain version information on remote client software that can be used. This is used with the intention of being able to completely disable one version of software and force users to download new version id stamp effective date ver_maj major version ver_min minor version disabled 0 – not disabled 1 - disabled message never seen by user but used as notes user_log loggin information on all users id Caltrans Irvine Detector Testbed V2DVS Operators Manual R.4 Page 58 of 62 o user_id relation to users table id stamp time of attempted loggin ip currently not used code1 0 – failed attempt 1 – correct loggin code2 0 – failed attempt 1 – correct attempt var1 username used var2 not used interface not used users authorized users to use the system id username username that must be unique pass password that is stored as an md5sum name name of user email email of user but not used in system level1 menu access level2 not used level3 admin access type 1 – Vendor – can only access ground truth (view and statistics) 2 – Assistant – Vendor privileges + manual verification 8 – Admin – Assistant privileges + report statistics + report generation + admin + field machines 9 – System Admin – Access to everything should only ever be one of these Caltrans Irvine Detector Testbed V2DVS Operators Manual R.4 Page 59 of 62 15.3 V2DVS Workstation software • Features of the client software o Field machine status Contains all the functions that are needed to remotely control the field machines but none of the advance functions. o Ground truth report generation, status, modification, and statistics Generation of ground truth reports, modification of report times, manual verification of reports and statistics on released reports. o Admin Editing all displayable aspects of the client environment including users, detectors, sites, and field machines. • How to install software and special considerations during installation o Configuration file Collector ip The Central Server IP or address must be correct otherwise you cannot use the system Image locations The location of where images are stored can be changed but the entire images folder stored in c:\Program Files\DF\images must be moved to this new location Logging in o Restrictions that could get you locked out If you incorrectly log in with your username for more then 10 times you will be locked out of the system and a system admin or admin must unlock you. Field machines menu o Status Get detailed status on a single field machine or overall status of a given site. You must manual refresh the page because connections need to be made via SSH and could bog down the network. NOTE: if it is the very first time a user is trying to do this operation or any operation connecting to a field machine in the command window it will ask you yes/no type in yes at that window. o Data collection Start and stop data collection for a given site or on a individual field machine basis. • • • • Ground truth menu o Generate ground truth report 5 step process of generating a ground truth report o Report status After choosing a report it is updated periodically but will show the status of the report. In real time. o Manual verification GUI to visually see all the detections and group them or assign them as false detections o View ground truth Same as manual verification but can only be used on repots that have been released and you are not allowed to modify anything. o Statistics Once a report is released, statistics can be viewed. Admin Can only be viewed by system admin and admin types o Add/Modify users o Add/Modify sites o Add/Modify detectors o Add/Modify field machines Caltrans Irvine Detector Testbed V2DVS Operators Manual R.4 Page 60 of 62 16 For Further Information and Support Further information can be obtained from: John Slonaker, Project Monitor, Data Fusion Project, Caltrans Detector Testbed, [email protected] Or Art MacCarley, Principle Investigator, Data Fusion system contractor, Cal Poly San Luis Obispo, [email protected] 805-756-2317 17 Appendices CD attached containing source code and executable program files for all software developed under the Data Fusion contract. A descriptive CONTENTS.TXT text file on the CD provides an index to the CD contents. Caltrans Irvine Detector Testbed V2DVS Operators Manual R.4 Page 61 of 62