1
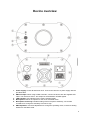
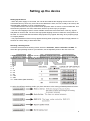
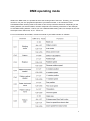
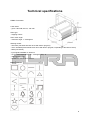
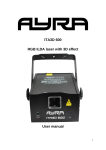
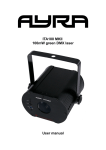
50 mW green DMX laser
User manual
1
Safety precautions
WARNING: This unit may cause serious injury to eyesight when used incorrect. It therefore is strongly
advised to read this user manual carefully, to get familiar with the functions of this laser device.
WARNING: This unit must be operated by, or under the supervision of an adult. This device is not
suitable for children.
WARNING: Do not look directly into the beam coming out of the lens, from short distance or when a
solid beam is projected. This may cause serious injury to eyesight. Ayra is not responsible for any
injuries caused by incorrect use of this device.
WARNING: Do not project the beam of this unit on to reflective surfaces, as the shattering beam may
cause injury to eyesight.
Installation requirements:
- Always check the voltage settings on the unit and the power supply you want to connect the device
to. If the voltage requirements do not meet, do not connect the device as this may cause serious
damage.
- This device must be installed by a professional technician, in a standing or hanging position. Always
pay attention to the positioning of the unit, as the beams may project directly into your audience.
- It is strongly advised to NOT project the beams directly into your audience. Ayra strongly
recommends a minimum distance of 1.5 meters in height between the lowest projected laser beam
and your audience, for optimal safety. If there is no other option, keep a minimum distance of 5 meters
from the beam exit to the first beam that hits your audience.
- When installed in a standing position, a safety cable is recommended to secure the unit. Ayra
recommends to use the bracket when installing the unit on a flat surface, by mounting it with a proper
bolt into the surface it is placed on.
- When installed in a hanging position, this unit MUST be secured by using a safety cable, capable of
holding 10x the weight of this device.
- When installed in a hanging position, this unit must be mounted to a proper surface, e.g. a truss
system. When using a truss system, Ayra recommends the use of a proper hook or halfcoupler.
- Make sure there are no flammable objects in the direct environment of the device (such as
decorative objects). Keep a minimum distance of 1.5 meter.
- Do not block the beam-exit and fan
- Keep a minimum distance of 0.5 meter from any walls to provide sufficient cooling
- Make sure the beam-exit and fan are not blocked by any objects in the near environment
- This unit must be connected to a grounded power supply that meets the voltage requirements of the
device.
Maintenance and protection
- Keep the unit away from dusty environments, as this may have negative effect on the fan-cooling
system and laser optics. Ayra recommends using a flightcase for storage of this device. Clean the
optics and fan of the laser with a small, soft brush and vacuum cleaner when needed. Clean the
housing of the unit with a damp cloth. WARNING: Always disconnect the unit from the power supply
when cleaning the unit. Reconnect the unit only if any moist on the fixture disappeared completely.
- This laser device is a lighting effect, designed to support visual entertainment while playing music.
Continuous use is not recommended. Do not use the device longer than 3 hours subsequently, so the
unit can cool down. This will provide a longer lifespan for the diodes. Apply a cooling-down time of 25
2
minutes before re-activating the laser.
- Do not switch the power on and off too often, as this may cause serious damage to the unit.
- Avoid heavy shocks and collision during transport and use, as this might cause damage to the laser
diodes, electronic circuit, optics and housing.
- Keep the device away from moisture, rain, water or any liquids as this may cause a short circuit
and/or electric shocks. If any liquid enters the unit, power supply or housing of the unit, disconnect the
unit immediately and do not reconnect the power supply. Contact your local dealer or technician to
inspect the unit for any damage.
IEC in/out power supply
Connect several units by using the provided IEC to Schuko cable. It is possible to link multiple ITA
devices, but after 10 units the connection to the main power supply must be renewed! Also don’t
combine the power link function of ITA units with any other devices, especially not with devices that
consume lots of energy (such as fog machines, active speakers, etc.)
3
Box contents
Box contents
1x laser device
1x user manual
1x IEC to Schuko power cable
Unit and accessory inspection
- Always use the supplied power cable to connect the unit to a power supply. If the cable appears
broken or has visible damage, do not use it. The supplied cable can be replaced with a regular IEC to
Schuko cable, with a minimum cable diameter of 0.75m².
- If the unit will not be used for a longer period of time, disconnect it from the power supply and store it
in a dust-free environment.
- Always check the unit for possible damage before use. If you suspect that something is wrong with
the unit, do not connect it to a power source! When you suspect that your unit is broken or damaged,
contact your local dealer or a certified technician to inspect the unit.
- When your device does not generate any laser beams, do not look directly into the lens. When the
laser suddenly produces a beam, it may cause severe eye damage, possibly resulting in permanent
visual loss.
4
Device overview
1. Power supply: Power IN and Power OUT. Connect the device to a power supply with the
provided cable.
2. DMX in/output: When using a DMX-controller, connect the device with the supplied XLRcable. The unit has a XLR in- and output for the distribution of DMX signals.
3. LED indicator: LED indicator for the music-activated mode
4. Microphone: Built-in microphone for the music-activated mode.
5. Microphone sensitivity: Variable setting of the microphone sensitivity, use a small
screwdriver to change the sensitivity from low to high.
6. DMX dipswitch: Use these dipswitches to change the operating mode, or select a starting
address for the DMX-mode.
5
Setting up the device
Setting up the device
- When the power supply is connected, the unit will first calibrate the stepping motors of the unit. It is
normal that this may cause any noise. When the calibration is done, the unit is ready to be used (in the
selected DMX, automatic or music controlled mode)
- It is possible that the unit may shut off the beam projection when no music or sound is detected. This
will avoid the projection of a solid, static beam, which may cause injury to eyesight.
- This unit uses stepping motors to create variable movements to the laser beam. This way, figures
and patterns can be made. The unit uses high-speed stepping motors to create the moving beams of
the laser. It is normal that the laser beam and projection may appear ‘flickering’ when projecting large
or complex patterns.
- The projected beams of the unit may appear shivering when projecting complex or large patterns on
surfaces as a wall, ceiling or decorative cloth.
Selecting a working mode
This laser device has three working modes, which are automatic, music-controlled and DMX. To
select the right operating mode for your situation, use the dipswitch panel on the rear of the unit.
A DMX-dipswitch panel works with a binary character. It sends a 0 or 1 message to the electrical
circuit. To select a working mode, pay close attention to the information scheduled below. Every DMX
dipswitch stands for a certain value, which is on or off. The values are stated as below:
1–1
2–2
3–4
4–8
5 – 16
6 – 32
7 – 64
8 – 128
9 – 256
10 – mode switch (DMX ON/OFF)
To select the different working modes, pay close attention to the setting of DMX dipswitches below:
6
DMX operating mode
While in the DMX mode, it is possible to select the working mode of the laser. That way, you can either
choose to use your own programmed presets of your DMX controller, or to activate the music
activated/automatic working mode of the laser to have a fully-automatic lasershow. Depending on the
starting address you selected earlier, the laser responds to the following commands. In this example,
we use DMX starting address 1. When you use a different DMX-starting value, for example 29, the unit
will respond from channel 29, 30, 31.. and so on.
For more information about DMX, consult the manual of your DMX controller or software.
7
Technical specifications
TYPE: ITA 04 MKII
Laser diode:
- green: class 3B, 532 nm, >50 mW
Scan type:
- stepping motors
Scan motor angle:
- maximum angle: +/- 25 degrees
Working modes:
- automatic (full-automatic laser show with built-in program)
- music activated (full-automatic laser show with built-in program, responding to the beat of music)
- DMX (8 channels)
- input signal bandwidth: 0~5000 Hz
- environment temperature: -10 – 35 degrees Celsius
- netto weight: 1.7 kg
- dimensions: 160 x 150 x 120 mm
Built-in patterns:
8
Electrical diagram
9