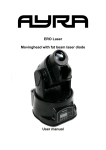
1
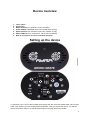
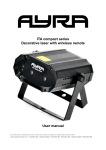
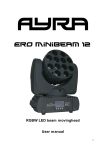
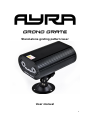
Stand-alone grating pattern laser
User manual
1
Safety precautions
WARNING: This unit may cause serious injury to eyesight when used incorrect. It therefore is strongly
advised to read this user manual carefully, to get familiar with the functions of this laser device.
WARNING: This unit must be operated by, or under the supervision of an adult. This device is not
suitable for children.
WARNING: Do not look directly into the beam from short distance. This may cause serious injury to
eyesight. Ayra is not responsible for any injuries caused by incorrect use of this device.
WARNING: Although the scattered, moving beams are harmless on larger distance, Ayra
recommends not to install this laser on low ceilings or any close distance to your audience.
Installation requirements:
- Always check the power supply you want to connect the device to. If the voltage requirements do not
meet, do not connect the device as this may cause serious damage.
- This device must be installed by a professional technician, in a standing or hanging position. Always
pay attention to the positioning of the unit, as the beams may project directly into your audience.
- As the power of the laser diodes is scattered trough the grating lens, the moving beams of this laser
are not harmful on larger distance. Ayra does not recommend projecting the beams into your audience
on short distance.
- When installed in a standing position, a safety cable is recommended to secure the unit. Ayra
recommends to use the included bracket when installing the unit on a flat surface, by mounting it with
the included hardware.
- When installed in a hanging position above your audience, this unit MUST be secured by using a
safety cable, capable of holding 10x the weight of this device.
- The unit is not designed to be installed with a halfcoupler or G-clamp. It is possible to modify the
bracket and add metal rings for stability, but it is not recommended. Ayra is not responsible for any
damage or injuries caused by these modifications.
- Make sure there are no flammable objects in the direct environment of the device.
- Do not block the beam-exit and fan
- Keep a minimum distance of 0.25 meter from any walls to provide sufficient cooling
- Make sure the beam-exit and fan are not blocked by any objects in the near environment
- Always use the included power supply. Contact your local dealer for a replacement unit if necessary.
Maintenance and protection
- Keep the unit away from dusty environments, as this may have negative effect on the fan-cooling
system and laser optics. Clean the optics and fan of the laser with a small, soft brush and vacuum
cleaner when needed. Clean the housing of the unit with a damp cloth. WARNING: Always disconnect
the unit from the power supply when cleaning the unit. Reconnect the unit only if any moist on the
fixture disappeared completely.
- This laser device is a lighting effect, designed to support visual entertainment while playing music.
Continuous use is not recommended. Do not use the device longer than 3 hours subsequently, so the
unit can cool down. This will provide a longer lifespan for the diodes. Apply a cooling-down time of 25
minutes before re-activating the laser.
- Do not switch the power on and off too often, as this may cause serious damage to the unit.
- Avoid heavy shocks and collision during transport and use, as this might cause damage to the laser
diodes, electronic circuit, optics and housing.
2
- Keep the device away from moisture, rain, water or any liquids as this may cause a short circuit
and/or electric shocks. If any liquid enters the unit, power supply or housing of the unit, disconnect the
unit immediately and do not reconnect the power supply. Contact your local dealer or technician to
inspect the unit for any damage.
3
Box contents
Box contents
1x laser device
1x user manual
1x power supply
1x installing bracket
1x small bag with mounting hardware
Unit and accessory inspection
- Always use the supplied power adapter to connect the unit to a power supply. If the adapter appears
broken or has visible damage, do not use it.
- If the unit will not be used for a longer period of time, disconnect it from the power supply and store it
in a dust-free environment.
- Always check the unit for possible damage before use. If you suspect that something is wrong with
the unit, do not connect it to a power source! When you suspect that your unit is broken or damaged,
contact your local dealer or a certified technician to inspect the unit.
- When your device does not generate any laser beams, do not look directly into the lens. When the
laser suddenly produces a beam, it may cause severe eye damage, possibly resulting in permanent
visual loss.
4
Device overview
1.
2.
3.
4.
5.
6.
7.
Laser output
Cooling fan
Mode selection (off, automatic, music controlled)
Power adapter connector (Only use included power supply)
Speed selection (for automatic mode; slow, medium or fast)
Status LEDs (Blue for sound-active, red for power indication)
Built-in microphone for music controlled operation
Setting up the device
To activate the unit, connect the included power supply with the unit and a suitable 230V, 50 Hz power
outlet. Then select one of the working modes (automatic, music) to activate the device. You will see
that the internal fan will turn on and the beam output of the laser will become visible.
5
Automatic mode:
Select one of the three built-in speed presets. These go from slow, to medium, to fast. The unit will not
respond to the beat of music and will display a continuous loop of patterns on a fixed speed. The unit
will also change colors frequently.
Music controlled mode:
Select this mode when you want to have a music-synchronized laser show. The unit has a built-in
microphone, which it uses to ‘listen’ to the beat of the music. With every beat, a certain action is taken.
This may be the rotation of the grating wheel, causing patterns to be switched, or the switching of
colors.
Mounting the bracket
On the bottom of the laser, there is a special hole provided. You are able to mount the included
bracket directly into this hole. Tighten the bracket securely, but do not apply force.
It is possible to mount the bracket on a ceiling, wall, bar, floor, desk or any flat surface.
6
Technical specifications
- compact laser device with grating technology
- two laser diodes, two outputs
- green 30mW laserdiode
- red 100mW laserdiode
- diffraction (grating) lens, dividing the laser beams into hundreds of small individual beams
- rotating lens and cross-star autorotation effects
- music controlled and automatic working mode
- music controlled mode with internal microphone
- automatic working mode with continuous rotation and flashing diodes
- adjustable speed (slow, medium,fast)
- mode-switch
- included mounting bracket
- mounting hardware included
- included power supply
- power requirements: 230V AC, 50 Hz
- operation voltage: 12V DC
- dimensions: 98 x 140 x 60 mm
- weight: 0.5 kg
7