1
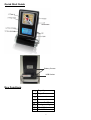
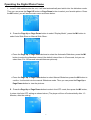
1.4” Digital Picture Frame Item Number: 61000090 User’s Manual * Important Notice: Please read this manual carefully All brand names and trademarks are the property of their respective owners FCC Norm FCC This equipment has been tested and complies with limits for Class B digital devices pursuant to Part 15 of Federal Communications Commission (FCC) rules. FCC Compliance Statement These limits are designed to provide reasonable protection against frequency interference in residential installations. This equipment generates, and radiates radio frequency energy, and if not installed properly or used in accordance with the instructions, may cause harmful interference to radio communication. However, there is no guarantee that interference will not occur in television reception, which can be determined by turning the equipment on and off. Interference may be corrected by one or more of the following measures: Reorient or relocate the receiving antenna Increase the separation between the equipment and the receiver Plug the equipment into an outlet on a circuit different from that to which the receiver is connected. CAUTION! The Federal Communications Commission warns the user that changes or modifications to the unit not expressly approved by the party responsible for compliance could void the user’s authority to operate the equipment. 2 Overview • The 1.4” Digital Photo Frame enables you to view up to 70 digital photos. There’s no need to use a computer. You can enjoy your photos anytime and anywhere. It’s very convenient and quick. • • • • The Digital Photo Frame does not require a continuous direct connection to a computer. Built-in Alarm Clock, Calendar and Temperature read out. Battery operated, fully portable. USB connection for easy downloads. Package Contents • Digital Photo Frame • USB Cable • User’s Manual • CD Software • 2XAAA Battery System Requirements • Microsoft Windows2000, XP, Vista. • An available USB port • CD-ROM drive to install the software CD 3 Quick Start Guide Battery Covers USB Socket Key Functions △ 1 Page Up ▽ 1 Page Down △ 2 Increase time ▽ 2 Decrease time M1 M2 Power On/Off Background light Model Button Model Button 4 Operating the Digital Photo Frame 1. Install 2 AAA batteries into the unit, it will start automatically and switch into the slideshow mode. Then you can press the Page UP button or Page Down button to select your favorite picture. Press the M1 button, you will see the main menu as shown below: A.Press the Page Up or Page Down button to select “Display Mode”, press the M1 button to select Auto Slide Show or Manual Slide Show: • Press the Page Up or Page Down buttons to select the Automatic Slideshow, press the M1 button to setup the slideshow interval (the default interval time is 10 seconds, but you can select from 0 to 120 second intervals between pictures): • Press the Page Up or Page Down button to select Manual Slideshow, press the M1 button to confirm. It will switch into the manual Slideshow mode. Then you can press the Page Up or Page Down button to view the pictures. B.Press the Page Up or Page Down button to select Auto OFF mode, then press the M1 button, it enters into Auto OFF setting as shown below: (The player will turn off automatically after 1-3 Minutes, after the setting) 5 C.Press the Page Up or Page Down button to select LCD Contrast it switches into LCD setting as shown below: D. Press the Page Up or Page Down button to select Delete it switches into Delete Menu as shown below: Press the Page Up or Page Down button to select NO/YES, press the M1 button, it will Delete the current picture E.Press the Page Up or Page Down button to select Exit, press the M1 button to confirm, it will quit the setting. (Note: when you stop operating the setting for up to 60 seconds, the photo viewer will switch into photo viewing mode automatically.) F.Press and hold “Power On/Off” button for 5 seconds to turn off or turn on. 6 Operating the Digital Photo Frame (Continued) 2. Setting the TIME, TEMPERATURE Set the Time: 1. Press the M2 button once, the Temperature will disappear. 2. Press the button, The Year digits flash 3. Press the △ 2 and ▽ 2 button to set. 4. After finish Press the button, The Month digits flash 5. Press the △ 2 and ▽ 2 button to set. 6. After finish Press the button, The Hour digits flash 7. Press the △ 2 and ▽ 2 button to set. 8. After finish Press the button, The Minute digits flash 9. Press the △ 2 and ▽ 2 button to set. Set the Alarm 1. Press the M2 button twice. 2. Press the button, Hour digits will flash 3. Press the △ 2 and ▽ 2 button to set. 4. Press the button, Minutes digits will flash 5. Press the △ 2 and ▽ 2 button to set. 6. After setting, Press M2 to confirm Note: You can press the △ 2 button one time to turn off the Alarm 7 Select the Temperature Format Press and Hold the for four seconds to set the temperature shown in °C or °F. Specifications • Picture Capacity: Approx 70 digital photos • LCD 1.4” CTSN. • Memory: 8MB • Displays JPG, BMP, GIF, TIF, PNP picture formats • Resolution: 128 x 128 • Supports Slideshow mode • Interface: USB 2.0 • Power supply: Requires 2 AAA batteries • Thermometer power supply: 3V button battery Replacing the Battery for Thermometer Your Digital Picture Frame comes with one CR2032 button cell. In order to replace this button cell: 1. Open the battery cover with a coin. 2. Install the button cell into the battery compartment correctly. 3. Replace the battery cover. Computer Software Installation Allows you to view and load pictures onto your Digital picture frame. Please install the software to your PC by inserting the software CD into your drive and making a copy to the desktop. 8 Downloading Pictures If there are no pictures in the player, the screen will display: Install the software to your PC, connect the Digital Picture Frame to your PC using the included USB connection cable and a message should pop up on the screen as below. Press the Page Up or Page Down button to select USB Update, press the Mode1 button to confirm, or if you do not press any button for 60 seconds, it will enter into the USB Charge mode. In this mode you can’t download photos into the digital picture frame, but you can operate the unit in order to view them as long as the unit is turned ON. Note: You should install the software attached in CD before you use this tool. 1. Running the tool: PhotoViewer.exe. 2. Select the photo that you want to convert 3. Edit the picture that you want to convert :Click it to choose any part of the picture you selected :Click it to cancel the above action :click it to make the selected pictures clockwise and counterclockwise rotation : you can delete the picture you want by clicking this button, and then press “Synchronize” to delete it. :you can save the pictures in any disk of the computer. 4. Click“ ”button, then you can add the picture to the Album, then press” Synchronize” to start converting the picture. 5. When all of the photos are converted, then click “OK” to exit. 6 .Please Exit the USB in a normal way. 9 Service Procedure For technical support after the first 14 days of purchase, please call the toll free number below to obtain service. A customer service representative will assist you and provide a return authorization number (RA number) if needed allowing you to ship your product to the service center. DO NOT RETURN THIS PRODUCT TO THE STORE. PLEASE CONTACT THE TOLL FREE NUMBER LISTED BELOW Please have the following information available when you call the service center: Your Name and Address Date of Purchase Model Number Serial Number Store Name and Address Store Location Number Type of problem with the unit After receipt of the RA number: Send the complete unit, including power cord and adapter in the original carton to the address below. Include a copy of the original receipt for proof of purchase (within 90 days). Write the RA number on the outside of the package. Packages without RA numbers will not be accepted. The Digital Photo Frame is fragile. Use extreme care when handling and packaging the unit. The purchaser is responsible for any shipping charges to the repair facility and assumes all risk. The service center will repair or replace the unit and send it back to the purchaser within 10 working days from receipt of the unit. To contact the service facility, please call 508-435-4830 or 800-639-3803. The address for this facility is: Fourstar Group 26840 Fargo Ave. Suite C Bedford Heights, OH 44146 Email Support: [email protected] 10 Warranty 90 Days Limited Warranty This product is warranted to be free from defects in material and workmanship for a period of 90 days. Warranty obligations are limited to replacement or repair of defective parts and components, at the option of the manufacturer. The warranty of this product is null and void if the product is subjected to negligence, abuse, modification, misuse, accident or if the customer uses the product for a function it was not intended for. This warranty is only valid for the original purchaser of this product and will not be honored if the product is resold. This warranty gives you specific legal rights, and you may also have other rights which vary from state to state. The manufacturer will not be liable for incidental or consequential damages caused by the use of this product. The manufacture will not be liable for any costs such as lost profits or revenues, cost of temporary replacements, loss of data, loss of equipment or use of equipment or any claims by third parties. After 14 days from purchasing the product, please call the phone number mentioned below to obtain service. DO NOT RETURN THIS PRODUCT TO THE STORE. A customer representative will give you a return authorization (RA number) allowing you to ship the product to the service center. The purchaser must have a copy of the original receipt for proof of purchase within 90 days. The purchaser of this product is responsible for any shipping charges to the repair facility. The manufacturer service center will repair or replace the unit in question and send it back to the purchaser within 10 working days of receipt of the unit. In order to contact the service facility, please call 508-435-4830 or 800-639-3803. The address for this facility is: Fourstar Group 26840 Fargo Ave. Unit C Bedford Heights, OH 44146 E-mail Support: [email protected] 11