1
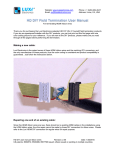
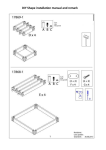
Website: www.luxielectronics.com
Email: [email protected]
Phone: +1 (949) 654-2047
Address: Irvine, CA, USA
DiiVA DIY Field Termination User Manual
For terminating Cat6 cables with DiiVA connectors
Thank you for purchasing the Luxi Electronics patent pending DiiVA DIY (Do It Yourself) field termination
products. If you are an experienced installer with the DIY products, you can just print out this first page
with wire color coding picture for your reference. If you are new to the DIY products, please make sure
you read through all the pages before performing the termination.
Wire color coding
Please note that the Luxi DiiVA DIY products DO NOT follow the industry TIA-568A or B pin
configurations.
Please follow the Luxi pin configurations show below.
DiiVA DIY user manual
Revision: 0.55
Date: 1/3/2012
Website: www.luxielectronics.com
Email: [email protected]
Phone: +1 (949) 654-2047
Address: Irvine, CA, USA
Identifying the components
First, make sure you have all the necessary parts for the field termination.
As shown in the picture above, you’ll need the Luxi DiiVA DIY connector components (3-piece), Luxi
connector clamshell (2-piece), standard Cat6 cables, a Luxi hand tool and a blade.
Be familiar with the component names as show below.
DiiVA DIY user manual
Revision: 0.55
Date: 1/3/2012
Website: www.luxielectronics.com
Email: [email protected]
Phone: +1 (949) 654-2047
Address: Irvine, CA, USA
Step 1, wire preparations
Step 2, wire threading
1.1 Use a blade to cut around a circle of the
Cat6 cable overall jacket about 4 cm (1-1/2”)
from the end then remove the jacket
2.1 Carefully thread the wires one by one thru
the wire holder per the color coding on page
1; the entrance has a lip around the sides
1.2 Cut off the center cross divider from the very
bottom you can reach
2.2 Important! Slide the wire holders as far
inward as they can go for best performance
1.3 Un-twist the wires of the 4 twisted pairs
DiiVA DIY user manual
Revision: 0.55
Date: 1/3/2012
Website: www.luxielectronics.com
Email: [email protected]
2.3 Insert the wire holders all the way into the
No. 1 hole on the hand tool following the
marked orientation; perform a pre-crimp
2.4 This tool has a ratchet design. If you ever
need to release the latch, turn the thumb nail
in the marked direction
DiiVA DIY user manual
Phone: +1 (949) 654-2047
Address: Irvine, CA, USA
Step 3, final assembling
3.1 Use your fingers to press the wire holders
into the connector core half way
3.2 Insert the connector core with wire holder all
the way into the No. 2 hole following the
marked orientation; perform a crimp
Revision: 0.55
Date: 1/3/2012
Website: www.luxielectronics.com
Email: [email protected]
3.3 Place the bottom metal shell onto the top
metal shell, line up the 4 notches, push
together until you hear or feel clicks
Note: if you are using a shielded Cat6 cable, be
sure to wrap all braids and drain wires around
the cable jacket under the strain relief tabs.
Phone: +1 (949) 654-2047
Address: Irvine, CA, USA
3.5 Press the metal shells into the top clamshell
3.6 Place the bottom clamshell onto the top one
and press them together until you hear or
feel clicks
3.4 Use the No. 3 dies to crimp the strain relief
tabs tightly around the cable jacket
3.7 Congratulations! You’ve just made a
beautiful DiiVA termination!
Note: If you are using a shielded Cat6 cable, cut
off the excessive braids and drain wires
exposing from the strain relief after the crimp.
DiiVA DIY user manual
Revision: 0.55
Date: 1/3/2012
Website: www.luxielectronics.com
Email: [email protected]
Phone: +1 (949) 654-2047
Address: Irvine, CA, USA
Max cable length
The max cable length depends on many factors such as the signal data rate (resolution), source device
signal quality, TV sensitivity and the compatibility between them. As a rule of thumb, this DIY cable
typically should work for up to 25 m (82’) at 1080p signal rate.
Technical support
Please contact your distributor or directly to Luxi Electronics for technical support.
DiiVA DIY user manual
Revision: 0.55
Date: 1/3/2012