1
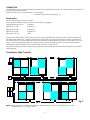
Fig. 4 In Fig. 4 you’ll see the DMX Dipswitch setting for DMX address 001. Channel 1 0-10 11-45 46-80 81-115 116-150 151-185 186-220 221-255 Off 4 Channels (CH2 Red, CH3 Green, CH4 Blue) 7 Channels (CH2-4 RGB Right part Tile, CH5-7 RGB Left part Tile) 7 Channels (CH2-4 RGB Bottom part Tile, CH5-7 RGB Top part Tile) 7 Channels (CH2-4 RGB Left Top+Right Bottom, CH5-7 RGB Left Bottom+Right Top) 13 Channels-control the colors RGB of each section independently 3 Channels (CH1 flow, CH 2 control each section with built-in programs, CH3 speed from slow to fast) 3 Channels sound-controlled (CH1 flow, CH 2 control each section with built-in programs, CH3 speed from slow to fast) DMX Setting of the Deco-Tile 1) Set the first panel’s switch to MASTER. 2) After you have set the DMX address, please turn the switch to SLAVE and connect to the DMX console! Then it will be controlled by DMX console! 3) Please note that the first channel of the DMX console is used to select the DMX mode for the Deco-Tile! You can push the first channel to set 4, 7 or 13 channels for the Deco-Tile! 11~45 is 4 channels 46~150 is 7 channels 151~185 is 13 channels. The 7 channels-mode has three different combinations of the segments! You can change the first channel to see the combination! As you can see there are four segments on the Deco-Tile! You can control the colors (RGB) of the whole tile by 3 channels, or control every 2 segments by 6 channels, or control each segment separately by 12 channels! Connect to DMX Controller Connect to DMX IN of the Deco-Tile Linking The First Deco-tile to the Second Deco-Tile Connect to DMX OUT of the first Deco-Tile Connect to DMX IN of the second Deco-Tile 7