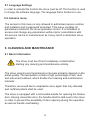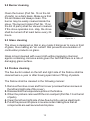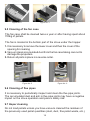
1
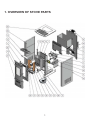
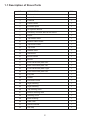
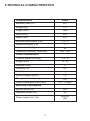
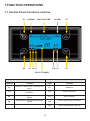
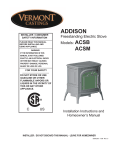
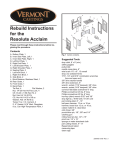
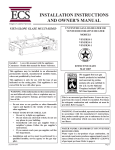
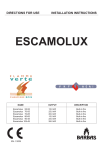
USER MANUAL
9kW LILLY PELLET STOVE
Table of Contents
1.Overview of Stove Parts .....................................................................1
2.Technical Characteristics .................................................................. 3
3.Important Information ........................................................................ 4
4.Pellet Specification ............................................................................5
5.Technology ....................................................................................... 6
6.Installation ........................................................................................ 6
7.Function Operations .......................................................................... 8
8. User Menu ......................................................................................10
9.Maintenance and Cleaning ..............................................................12
10. Environmental Protection ............................................................. 15
11. Appendix ...................................................................................... 16
ABC PROIZVOD D.O.O.
Miloša Obrenovića 2
31000 Užice
telefoni: +381 (0)31 514 501. 514 502
e-mail: offi[email protected]
1. OVERVIEW OF STOVE PARTS
1
1.1 Description of Stove Parts
NO.
DESCRIPTION
PCS
1
Firebox sheets
1
2
Interior firebox sheets
1
3
Pedestal
1
4
Pellet inserter
1
5
Encased spiral
1
6
Air injection device
1
7
Assembly of sheets behind the firebox
1
8
Hoper
1
9
Top firebox outlet
1
10
Bottom firebox outlet
1
11
Top burner outlet
1
12
Top outlet
1
13
Ribbed outlet
1
14
Stove door
1
15
Burner holder
1
16
Burner
1
17
Front vermiculite plate “left”
1
18
Back vermiculite plate “left”
1
19
Front vermiculite plate “right”
1
20
Front vermiculite plate “left”
1
21
Lilly Fan
1
22
Heater
1
23
Electronic board
1
24
Right sheeting
1
25
Right sheeting
1
26
Top sheeting case
1
27
Bottom sheeting case
1
28
Sheeting cover
1
29
Back sheeting
1
30
Gear case
1
31
Stove controller
1
32
Ash trap
1
2
2.TECHNICAL CHARACTERISTICS
Characteristics
Value
Efficiency ratio (%)
90,1
Weight (kg)
115
Height (mm)
1080
Width (mm)
500
Depth (mm)
630
Min-max stove power (kW)
2,4 - 9
Required draught (Pa)
3
Hoper capacity (kg)
25
Operation autonomy (max-min)
50h - 13h
Pellet Characteristics
Thermal power (kWh/kg)
4,5 - 5
Length (mm)
10 - 30
Diameter (mm)
6
Humidity (%)
6,6
Ash (%)
Specific weight (kg/dm
1
3)
1,0
Flue pipe diameter (mm)
100
Pellet consumption (min-max)
0,5 - 1,8 kg/h
Electricity consumption
Ignition phase (W)
360
Operation phase (W)
60
220/230
(50)
Power supply (vol - Hz)
3
3.IMPORTANT INFORMATION
General Warnings and Safety Information
§ Read the entire manual before putting the stove into operation.
§ Only adequate means of transportation with the confirmed load
capacity may be used to transport the product.
§ Fuel combustion results in extensive heating of the external stove
surfaces (door, glass, side walls, flue pipe, etc.). Do not touch the
specified parts without using the adequate personal protective
equipment.
§ Warn children of dangers and keep them away from the operating
stove.
§ Do not dry clothes on the stove.
§ Do not use highly flammable and explosive materials in the same
room when the stove is operating.
§ When operating, the stove must be connected to the mains
voltage (230V). Should unexpected power failures occur, install
the UPS that will provide voltage for undisturbed stove shutdown
and prevent smoke from entering the room
Danger to health and life of people in the room unless the UPS
is provided
WARNING !!!
§ For safety reasons, do not open the stove doors when operating.
§ When loading pellets take care that the pellet does not fall into the
stove parts under high temperatures. Otherwise, pellet will start to
burn and smoke will appear in the room.
§ It is recommended to load the stove when it is completely
cooled.
4
4.PELLET SPECIFICATIONS
What is pellet?
The wooden pellet is standardized fuel. Every manufacturer must
comply with certain rules in order to provide highly energy efficient
heating.
Please check with your local dealer for the list of manufacturers of
attested pellets. The use of poor quality pellets may have a
negative impact on the stove operation. The recommended
standards for pellet quality are: ÖNORM, DIN Plus or ENplus-A1
Specification of wooden pellets in accordance with En plus – A1
Parameter
Unit of measurement
Enplus-A1
Diameter
mm
6
Length
mm
3,15 do 40
Bulk density
kg/m3
600
Calorific value
MJ/kg
16,5
Water content
Max %
10
Ash residue
Max %
0,7
Chlorine content
Max %
0,02
Sulphur content
Max %
0,03
Nitrogen content
Max %
0,3
Copper content
mg/kg
10
Chromium content
mg/kg
10
Arsenic content
mg/kg
1
Cadmium content
mg/kg
0,5
Mercury conten
mg/kg
0,1
Lead content
mg/kg
10
Nickel content
mg/kg
10
Zinc content
mg/kg
100
5
Storage of Pellets
It is very important that the pellets are stored at the dry place. It is not
advisable to store pellets in bags exposed to atmospheric conditions.
Too wet pellets may block the auger
5.TECHNOLOGY
Your new stove is technologically enhanced as a result of years of
testing and top quality built-in components. The practical advantages
of the Lilly stove are as follows:
§ Electronic monitoring of all devices along with monitoring of
combustion temperature in the firebox guarantees the optimum
operation of stove in all phases.
§ The large heat exchanger surface with the unique control of
combustion air results in low consumption of pellets and high
energy efficiency.
§ Precisely weighed pellet loading to the burner made of special cast
iron leads to perfect combustion resulting in low emission of
hazardous substances into atmosphere.
§ The top quality cast parts such as burner resistant up to 1300 and
doors ensure long and safe operation.
6.INSTALLATION
§ Remove all accessories from the stove (user manual, power cable,
§
§
§
§
§
§
remote controller, etc.).
The stove must be connected to the chimney the minimum diameter
of which is 120mm.
The combustion air circulation is based on the negative pressure in
the firebox and very low overpressure in the flue pipe. The flue pipes
must fit the diameter of outlet pipes and no leaks shall be detected at
joints.
Make sure that the horizontal length of the flue pipe does not exceed
1.5m.
Do not install too many elbows (direction changes of flue gases) on
flue pipes. The maximum number of elbows shall be 3.
Be sure to leave the room for easy dismantling of the flue pipe and
easy access to the opening for cleaning.
The stove must be installed on the fire-proof surface. Should the
surface be flammable (wood, carpet, etc.), it is recommended to set a
fireproof basis (glass, metal, ceramic tiles, etc.)
6
6.1 Electrical Connection
§ The stove is equipped with the power supply cable that needs to
be connected to the mains 230V/50Hz
§ The average power consumption is ± 20W during operation and
300 W in the ignition phase for about 10 minutes.
§ The power cable must be laid so to avoid contact with the hot
stove surfaces.
6.2 Combustion Air
Every combustion process requires oxygen or air. The air taken
from the room must be compensated. The loss of oxygen may occur
in modern houses with high insulation efficiency and perfectly sealed
windows and doors. Unless the stove is connected to fresh air intake,
the room in which the stove is installed must be more frequently
ventilated.
6.3 Supply of fresh air for combustion
§ The stove structure has a connection on the back side
§ The fresh air supply pipes may be made of steel or aluminium.
The minimum diameter amounts to 50 mm.
§ The maximum pipe length shall not exceed 4 m in order to ensure
adequate supply of fresh air. The pipes must not have too many
elbows.
§ A failure to provide some of the specified conditions may result in
poor combustion and vacuum generation in a room
Safety distances from the stove
§ The distance between the flammable objects and front part of the
stove must be up to 800mm, while the distance between the stove
side walls and flammable objects must be up to 200mm
§ The distance between the non-flammable objects and front part of
the stove must be up to 400mm, while the distance between the
stove side walls and non-flammable objects must be up to 100mm
7
7.FUNCTION OPERATIONS
7.1 Control Panel: Functions and Use
P1
P2
CHRONO
DATE AND TIME
L1 L2 L3
ALARM
L10 L11
P3
P4
PELLET POWER
Buttons
Buttons
Led lampice
Function
Light
Function
P1
ON-OFF / alarm reset / exit from the
menu
L1
Heater on
P2
Menu / data storage / chrono option
activation
L2
Motor reducer on
P3
Visualisation / increased parameter
values
L3
Not in function
P4
Visualisation / decreased parameter
values
L10
L11
8
Lack of pellet (not in function)
Room temperature achieved
7.2 Alarms
System
condition
Alarm
Number
Safety thermostat
Blocked
Er 01
Safety Pressure Switch
Blocked
Er 02
Shutting down due to the low temperature of exhaust gases
Blocked
Er 03
Shutting down due to the high temperature of exhaust gases
Blocked
Er 05
Pellet safety thermostat
Blocked
Er 06
Encoder error (in case that P25-1ili2)
Blocked
Er 07
Encoder error (failed fan control)
Blocked
Er 08
Date and time are not up to date due the power outage
Blocked
Er 11
Failed ignition
Blocked
Er 12
Lack of power supply
Blocked
Er 15
Lack of fuel
Blocked
Er 18
Damaged flow sensor
Blocked
Er 39
The maximum flow has not been reached
Blocked
Er 41
Maximum flow(F40)
Blocked
Er 42
Door open
Blocked
Er 44
Probe error during the system check-up phase
Blocked
Prob
DESCRIPTION
7.3 Visualizations
By pressing P3 and/or P4
Exhaust Temp: 103
Room Temp: 25
Air flow: 750
Exhaust Fan: 1250
Auger: 1.2
Product Code: 473-000
FSYSI01000022.0.0
FSYSF01000200.0.0
- Firebox temperature
- Room temperature
- Air flow
- Fan speed
- Motor reducer speed
- Product code
- Software code and revision
- Control panel code and revision
9
8. USER MENU
8.1 Setting pellet power
The pellet power may be set in this menu. The mode may be manual
or automatic. In the first case the user shall select the pellet power,
while in the second case the system automatically selects the pellet
power based on the set temperature. The letter “A” appears on the left
side of the display for the automatic mode of operation, while the letter
“M” appears for the manual setting of pellet power.
8.2 Chrono
The Chrono option is used to activate and set time for the system start
and shutdown.
8.3 Time ON/OFF Settings – Chrono
Monday
Tuesday
Wednesday
Thursday
Friday
Monday
ON
09:30
00:00
00:00
OFF
11:15
00:00
00:00
Select a day of the week and set the ON/OFF time in the following
manner:
§
§
§
§
§
Select the time by pressing the button P3 or P4.
Button P2 activates the value change (the selected time flashes)
Set the desired time by pressing P3 or P4
Save the changed values by pressing P2
A long press on P2 activates (letter “V” appears) or deactivates
(“letter “V” does not appear) the time setting process.
10
Midnight time settings:
Set the ON time of the previous day at the desired time (for example,
20.30)
Set the OFF time of the previous day at 23.59 Set the ON time for the
next day at 00.00 Set the OFF time for the next day (for example,
6.30)
The system will be ON on Thursday at 20.30 and OFF on Wednesday
at 6.30.
8.4 Calibration
The calibration option allows fine tuning of the pellet power. If the
pellet power 5 is too high and pellet power 4 insufficient, set the
”Auger” to minus 1 or 2 if the stove is operating at maximum power or
to plus 1 or 2 to if the set pellet power is 4. This procedure results in
the pellet power between 4 and 5. If you increase the “Auger”
calibration, set the “Fun” calibration to the same degree.
8.5 Remote controler
Button 1 activates shutting down.
Button 2 activates ignition.
Button 3 or 4 increases or decreases the pellet power.
When the stove is automatic mode, the remote
controller is not operational.
8.6 Pellet manual loading
This option is to be activated when the stove is put into operation for
the first time or when there are pellets in the hopper and auger needs
to be loaded. The loading automatically stops after 600 seconds or at
any time during operation by pressing the button P1.
To activate this function it is necessary that the furnace is off.
11
8.7 Language Settings
In order to activate this function the stove must be off. This function is used
to change the software language. The language that is bolded is in use.
8.8 Instalers menu
The access to this menu is only allowed to authorised service centres
and installers and is password protected. This menu contains all
parameters related to the stove operation control. It is forbidden to
access and change any parameters without prior consultations with
the service centre or manufacturer as it may result in disturbed stove
operation.
9. CLEANING AND MAINTENANCE
9.1 Basic Information
The stove must be off and completely cooled before
starting any cleaning and maintenance activity.
The stove cleaning and maintenance intervals primarily depend on the
pellet quality. The wet pellets contain a high percentage of ash, dust
and unburned residues, which double the cleaning and maintenance
intervals.
Therefore, we would like to emphasize once again that only attested
and certified pellets shall be used.
The stove is equipped with a removable handle for opening the firebox
door. Having closed the door, the handle shall be laid next to the stove
in order to prevent the possibility of door opening during the operation
as well as handle overheating.
12
9.2 Burner cleaning
Clean the burner (Part No. 16 on the list
of parts) on a daily basis. Make sure that
the air intakes are always clean. The
burner may be easily cleaned inside the
stove. The burner holder (Part No. 15 on
the list of parts) shall be vacuum cleaned.
If the stove operates non- stop, the stove
shall be turned off at least twice every 24
hours.
Figure No. 1
9.3 Glass cleaning
The stove is designed so that in any mode it brings air to zone in front
of glass, thus making an “air curtain” that prevents accumulation of
combustion products on glass.
Glass is best cleaned with a wet cloth without applying chemical
agents containing corrosive acids given the fact that there is a risk of
damaging glass surface.
9.4 Firebox cleaning
The flue ducts located on the left and right side of the firebox shall be
cleaned twice a year or after having spent about 700 kg of pellets.
The firebox shall be cleaned in the following manner:
1. Remove the stove cover and front cover (unscrew the two screws on
the left and right side of the cover)
2. Disassemble the temperature probe in the firebox.
3. When the probe is removed lift the iron cast part (Part No.13 on the list
of parts)
4. Clean the left and right side of due flue ducts by using a steel brush.
5. Put all the pieces into place in reverse order making sure that all
components are well secured and in place
13
Figure No. 2
Figure No. 3
Figure No. 4
9.5 Cleaning of the fan case
The fan case shall be cleaned twice a year or after having spent about
700kg of pellets.
The fan is located in the bottom part of the stove under the hopper.
1. It is necessary to remove the lower cover and then the cover of the
opening for cleaning
2. Vacuum clean accumulated dust from the fan case taking care not to
damage the propellers.
3. Return all parts in place in a reverse order.
Figure No. 5
Figure No. 6
9.6 Cleaning of flue pipes
It is necessary to periodically inspect and clean the flue pipe joints.
The accumulated dust and ash in flue pipe joints may have a negative
impact on the stove operation and pose a safety risk.
9.7 Hoper cleaning
Do not load pellets unless you have vacuum cleaned the residues of
the previously used pellet quantities (dust, dust, fine pellet waste, etc.)
14
10. ENVIRONMENTAL PROTECTION
The crossed-out trash can
indicates that this product cannot
be treated as household waste. Instead, the product shall be handed
over to designated collection centres for the recycling of secondary
raw materials.
The adequate storage of this product will prevent the potential
adverse impacts on environment and health of people which could
otherwise be caused by inappropriate waste handling of this product.
For more detailed information about treatment / disposal of this
product, please contact designated local institutions for collecting
recyclable materials or the shop where you purchased the product.
15
11. APPENDIX
CE Declaration of Conformity:
Manufacturer:
„ABC PROIZVOD“ doo
Miloša Obrenovića 2
31000 Užice/ Srbija
hereby declares that the pellet stove: Lilly, conforms to the CE
requirements and provisions (Construction Products Directive) 89/
106/ EEC as well as the following harmonized standard:
EN 14785
In 2007, ABC PROIZVOD doo, Užice implemented the quality
management system
SRPS ISO 9001/ 2008, which is maintained and improved.
Another 2 standards have been implemented since 2013:
SRPS OHSAS 18001/ 2008 and
SRPS ISO 14001/ 2005, Therefore, the company has an
INTEGRATED QUALITY MANAGEMENT SYSTEM certified by the
accredited body.
11.1 Certificates
16