1
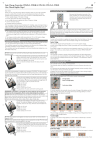
Care and Maintenance
Dirt and dust on the surface of the panel can reduce the power output. The surface
of the panel can be cleaned with a damp cloth. The panel itself is waterproof but the
Solar Charge Controller is not waterproof. Do not allow the controller to get wet,
Keep any plugs and connections out of dirt and water.
The solar panels are made of a very strong tempered glass and will withstand heavy
knocks. However, it is still glass and can break if it sustains a heavy enough impact.
Take care not to drop the panels or submit them to large impacts.
Batteries can produce flammable gasses when being charged. Avoid making sparks
and make sure that the area around the battery is well ventilated.
General Tips on Battery Care
There are many types of 12V battery and you should be conversant with the specific
characteristics of your battery. Following are some general tips on battery care.
CONNECTION
80W & 120W
Folding Solar Panels
Instructions
A Deep Cycle battery should be used as these allow a greater depth of discharge.
The Solar Charge Controller will prevent the battery from being overcharged. If
appliances are connected direct to the battery then care must be taken not to allow
deep discharge of the battery as this can cause permanent damage. The battery can
be tested with a battery analyser or with a voltmeter (the battery should not be
allowed to drop below 11.5V).
The battery should be fully charged before storage and topped up every 3 months.
When the battery and Solar panel are used for an extended time the battery should
be regularly allowed to be fully charged (at least monthly). This should be done
without any load to ensure full charge is reached.
Warranty
Our goods come with guarantees that cannot be excluded under the Australian Consumer Law.
You are entitled to a replacement or a refund for a major failure and for compensation for any
other reasonably foreseeable loss or damage. You are also entitled to have the goods repaired or
replaced if the goods fail to be of acceptable quality and the failure does not amount to a major
failure.
This product is guaranteed by Outdoor Connection to be free of faults in material or workmanship
for a period of two years from the purchase date. The product may be repaired or replaced if it is
found to be defective within the warranty period. If the product is no longer available, and cannot
be repaired it will be replaced with one of equal or greater value. The guarantee is valid only to
the original purchaser on presentation of the original purchase receipt. Any claim, including the
return of the defective merchandise, should be made to the retailer from whom the goods were
purchased. The guarantee does not cover normal wear and tear of parts, nor exposure to the
weather. Misuse or negligent use of the product, or any alteration or repair done other than by
Outdoor Connection or its agents, will void this warranty.
The efficiency of Silicon Solar Cells will slowly degrade with time however the high grade cells
used in Outdoor Connection’s Solar Panels are guaranteed to produce at least 90% of its original
output after 10 years and 80% of its original output after 20 years.
Congratulations on purchasing another quality Outdoor Connection
product. Solar Panels give clean, cheap access to power to charge your
12V battery and we are sure that you will get many years of reliable
service from your solar panel. Please read the following instructions to
get the best out of your panel.
Set Up
Connecting a load (12V appliance)
Please note that this solar panel is only to be used with a 12V lead/acid or gel battery.
Load can be connected direct to the battery or through the Solar Charge Controller.
If you connect it through the Solar Charge Controller your battery will be protected
by the low voltage disconnect feature which prevents damage to the battery
through deep discharge. When the Solar Charge Controller detects that the battery
voltage is lower than 11.5V it will disconnect the load until it reaches 12.5V again
and the reconnect the load. To avoid any voltage on the wires connect the wires to
the load first then to the controller. Make sure that the wires are connected with the
correct polarity. The minimum wire size should be 4mm².
1.
2.
3.
4.
5.
6.
Select an area of full sun within 5m of your battery.
Undo the catches and open the panel
Fold out the legs
Ensure the plug near the Solar Charge Controller is connected and the locknut screwed up tight
Stand the Panel back on its legs
Connect the red clip to the positive terminal on the battery and the black clip to the negative terminal or connect it to your system with the Anderson plug.
Position the panel facing the sun
Your Solar Panel should now be generating power and charging your battery.
The Solar Charge Controller has a maximum load current of 8Amps and also has an
Over Current/Short Circuit protection which will switch off power to the load when
it detects an overload or short circuit. When this happens switch off all loads and
remove the short circuit. The controller will automatically switch on power to the
load after approx 1 minute.
Positioning your Solar Panel for maximum power
Solar Charge Controller
Solar panels must be pointed at the sun for maximum power and it is best to move the
panel from time to time during the day to track the sun.
Your Solar Panel is equipped with a high quality Phocos CA08 Solar Charge
Controller. (A full user manual for the controller can be found at www.phocos.com).
The Charge Controller has 3 LED displays
The angle of the panel can also have a bearing on power generation. Ideally the
angle should be approximately the latitude of your position, this would put the sun
perpendicular to the surface of the panel.
1.
7.
•
Outdoor Connection Solar Panels have been set to sit at 28° which is the latitude of
Northern NSW. A variation of 7 or 8° in either direction will not make a big difference
so 28° is fine for most of Australia. If you wish to alter the angle you should increase the
angle the further south you are and decrease it the further north. Always try to position
the solar panel on even ground as positioning it on a slope may adversely affect the
angle to the sun.
•
Solar panels work by converting light to electricity so it is very important to position
the panels so that they are not affected by shade. Shade on any part of the panel will
reduce the power generation substantially. A cloudy sky will also significantly reduce
the amount of power generated.
•
The ability of a silicon solar cell to generate electricity will also reduce when the
surface temperature of the cell increases above 25°C. For every 10° increase in surface
temperature above 25° the solar panel will loose about 3.8% of its efficiency. It is
important therefore to site the panel in a well ventilated area with air circulation above
and below.
2.
•
•
3.
•
•
•
Charge Display
When the green light is on electricity is being
supplied.
If the green light is off no electricity is being
supplied.
Charge Display
Battery Voltage Display
Red LED off - the battery level is OK.
Red LED on - the battery level is low (it is
recommended that any load on the battery
be reduced)
Red LED flashing – The battery level is very
low. ( It will subsequently switch off the load
if connected through the controller)
Battery Voltage
Display
Load Status
Display
Load Status Display (when load is
connected)
Red LED off – Normal operation
Red LED on – Low voltage disconnect
Red LED flashing – Overload or short circuit
of load
Solar Panel
Connection
Battery
Connection
Load
Connection