1
INSTRUCTIONS MANUAL
for the
Power and Light
Controller
PLC-C
doctorseyes LLC
1396 Poinsettia Ave.
Vista, CA 92081
USA
1 800 971 9917
www.doctorseyes.com
Version 2.0/US
doctorseyes™
doctorseyes.com
the world of digital dental imaging
Notes
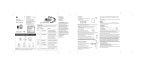
Included in doctorseyes PLC-C:
! Power and Light Controller PLC-C
! Tripod screw
! doctorseyes Ringlight 52 incl.
macro lens +10
! Occlusal mirror
! Mounting element 52
! Charging Unit for Controller
doctorseyes.com
®
doctors eyes.com
the world of digital dental imaging
doctorseyes.com
the world of digital dental imaging
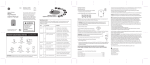
Turning the Controller On and Off
Brightness and Battery Life
The PLC-C can be turned on and off
by pushing the button in the top
right corner of the controller. Both
the brightness display and the light
combination display will be
illuminated in yellow when the
controller is on.
The brightness of the doctorseyes
Ringlights remain constant even
when the battery weakens. The
controller will automatically turn off
the lights when the battery is too low
to function. Before the controller
shuts off due to a lack of energy, the
low battery display illuminates in red.
®
doctors eyes.com
Regulating Brightness
®
doctors eyes.com
Changing Light Segment
Combinations
The doctorseyes Compact System
offers great flexibility in close-up
illumination through the activation of
specific sections of the center ring
light.
®
doctors eyes.com
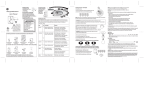
Charging the Controller
The light can be adjusted in two
levels by pressing the middle button.
The current level of brightness is
indicated by the yellow brightness
symbol below the button.
When charging the controller, only
use the power unit provided by
doctorseyes. Connect the power unit
to the socket on the front of the
controller.
®
doctors eyes.com
The blinking loading symbol shows
the loading status even when the
controller is turned off. When the
controller is fully charged, the loading
symbol changes from red to green.
The red low battery symbol
disappears after charging.
With the upper left button one can
choose from four settings. These
successively ordered options are:
right half of the ring; left half of the
ring; left-right combination; and the
complete ring.
2
3
doctorseyes.com
the world of digital dental imaging
doctorseyes.com
the world of digital dental imaging
doctorseyes Power and Light Controller PLC-C
Version 1.0
Dear Dental Photographers,
Technical Specifications:
Congratulations and thank you for choosing the doctorseyes
Compact System.
doctorseyes 52 Ringlight
Outer diameter . . . . . . . . .
Inner thread diameter . . . .
LED distance to opening . .
Filter thread . . . . . . . . . . .
Weight . . . . . . . . . . . . . . . .
Light color temperature . . .
LED life cycle . . . . . . . . .
54 mm
30 mm
1.5 mm
52 mm
1.2 ounces
> 5800 K
50,000 hours
doctorseyes Light and Power Controller
Compact System
Dimensions (mm) . . . . . . .
Weight
Battery capacity
Battery illumination time
Voltage
Charging indicator
Charging voltage
50 x 109 x 24
5.7 ounces
2000 mAh
approx. 3 hours
3.6 V
yes
8.6V - 9V
Our lighting system is very user-friendly and intuitive.
Nevertheless, the following pages provide you with brief
instructions on using the doctorseyes Ringlight. Tips and
tricks relating to the camera settings can be found in the
camera's separate user manual.
We would like to thank all the dentists and dental technicians
for their stimulating ideas which have influenced the
development and hence the quality of our products.
Your comments and suggestions are always welcome.
We hope you enjoy the world of digital dental photography.
The doctorseyes Team
Warning
Never look directly into the LED light beam. The
intense bright light can burn the retina.
If necessary, provide the patient with protective
eyewear or a mask.
Note: It is normal for the doctorseyes Ringlight to
become warm when in use.
Warning
When working with patients never leave the power
and light controller connected to the power supply
and never leave the camera connected to its power
supply.
4
1