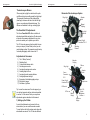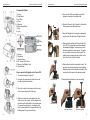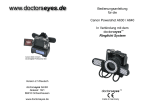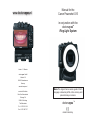
1
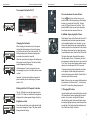
www.doctorseyes.nl
Manual for the
Canon Powershot G15
in conjunction with the
doctorseyes
Ring Light System
TM
Version 1.1 / Benelux
doctorseyes GmbH
Abteistr: 28
88416 Ochsenhausen
Germany
www.doctorseyes.nl
exclusive Distributor
René Smit International
Parkweg 17a
2585 JH Den Haag
The Netherlands
Tel. +31 70 355 10 20
Fax +31 70 386 77 07
Note: The original Canon camera guide in Dutch
language is stored as pdf file on the memory card
placed inside your camera.
doctorseyes TM
made in Germany
doctorseyes.com
the world of digital dental imaging
doctorseyes.com
the world of digital dental imaging
4) Reset all to factory settings
In case you encounter any problems you can easily
reset all adjustments to the factory setting.
Resetting Settings to Their Default Values
Select [Reset All].
1. Press the MENU button.
2. Use the
button to select the
3. Use the
button to select [Reset All].
4. Press the
menu.
button.
Make settings.
1. Use the
2. Press the
button to select [OK].
button.
21
doctorseyes.com
the world of digital dental imaging
not recognize the camera, then click on the following
statement on [yes]. The USB-Driver will then be
installed automatically when connecting the camera
to the computer.
You can also view the pictures on a TV screen by
connecting the camera to the TV with the supplied
AV cables. (For more informations kindly view your
camera manual)
3) Printing pictures without a PC - directly
from the camera
You can print pictures without having to transfer them
to a computer .
1. Connect the camera to a direct print compatible
printer.
• Open the camera’s terminal cover and insert the
interface cableall the way into the terminal.
• See the printer’s user guide for connection instructions.
1.
the world of digital dental imaging
Table of contents:...........................................................................................Page
Introduction and security advice ................................................................. 2
A)the doctorseyes System
The professional Controller PLC-4 .............................................................. 3
Working with the PLC 4 Professional Controller........................................ 4
How to save your favourite settings............................................................. 5
The compact Controller PLC-C .................................................................... 6
Working with the PLC C compact Controller............................................... 6
Comparing technical data of PLC-C and PLC-4 ......................................... 7
B) The Canon Powershot G15
What is supplied with the dental sets 1 or 2................................................ 8
Overview operating elements....................................................................... 9
How to mount the Ringlight on the Canon G15......................................... 10
How to mount accessories on the ring light ............................................. 10
The doctorseyes Diffusors ......................................................................... 12
The PowerShot G15 adjustments............................................................... 12
Disabling flash, Adjusting the Tone (White Balance)................................ 13
• Since this camera uses a standard protocol (PictBridge), you can use it with other PictBridge-compliant printers in addition to Canon-brand printers.
How to activate the macro mode................................................................ 14
For details, see the Direct Print User Guide.
The Focus Trick - how it‘s done: ................................................................ 14
2. Turn on the printer.
A-Mode: Improving depth of focus ............................................................ 15
3. Press the camera’s (Playback) button to turn on
the power.
How to save adjustments in Custom Mode............................................... 16
• The button next to the symbol
will light blue.
4. Use the directions button to select an image to
print and press the print button.
Assigning the focussing area to the center of the display...................... 14
Changing ISO values................................................................................... 15
Examples for dental photography setups.................................................. 17
Playback of pictures on display.................................................................. 17
C) Worth Knowing
• The button will blink blue and printing will start.
Compression of data.................................................................................... 18
• You can also select images by using the control
dial.
Connecting the camera to a computer and printing pictures.................. 19
• After you finish printing, turn off the camera and the
printer and disconnect the interface cable.
20
doctorseyes.com
Printing pictures without a PC - directly from the camera....................... 20
Reset all to factory settings........................................................................ 21
1
doctorseyes.com
the world of digital dental imaging
Dear Dental Photographer,
Congratulations and thank you for choosing the
doctorseyes ring light System.
This manual will give you instructions and tips on
how to set up your Canon G15 to be used in conjunction with the doctorseyes Ringlight and obtain
optimal imaging results. Our lighting system is
very easy to use and it’s usage is very intuitive. In
section A you will find how to mount and operate
the ring light system. Section B will explain camera settings and section C will provide you with
further useful information and show some example setups for dental photography. Furthermore you
will find additional and more detailed information in
the camera’s user’s guide.
As we strive for continual product innovation, your
comments and suggestions are always welcome.
We hope you enjoy the world of digital dental
photography.

CEO of doctorseyes GmbH
Warning
Never look directly into the LED light beam. The
intense bright light can burn the retina.
2
doctorseyes.com
the world of digital dental imaging
Left or right
4) confirm with FUNC/SET button
we recommend using „L“
The best working distance when using the doctors
eyes ring light is 16 - 21,5 cm. This distance might
change according to the close-up lens you use.
Because of parallax error and for ergonomic reasons
you should only use the display and not the optical
viewfinder to determine the image section.
2) Connecting the camera to a computer. &
printing pictures
If necessary, provide the patient with protective
eyewear or a mask.
Connect the supplied interface cable to the
computer’s USB port and to the camera’s DIGITAL
terminal.
Note: It is normal for the Ringlight to become
warm when in use.
Open the camera’s terminal cover and insert the
interface cable all the way into the terminal.
Warning
Preparing to download images to the computer.
When working with patients, do not leave the
power and light controller connected to the power
supply. In addition, never leave the camera connected to its power supply.
1. Press the (Playback) button to turn on the camera.
The software supplied by canon must be installed on
your computer so that your pc can detect the camera.. When starting the first time your PC will start the
recognition process operation. In case your PC does
19
doctorseyes.com
the world of digital dental imaging
doctorseyes.com
the world of digital dental imaging
12) Activating grid lines on Display
A) the doctorseyes System
Especially when taking front teeth shots the grid lines
will help to prevent tilting of the camera . You will not
see the grid lines on the taken images.
The Power & Light Conroller PLC-4
1) Press Menu button
2) Turn control dial to subject custom display and confirm choice with FUNC./SET button.
3) With the directional buttons step to „Grid lines“
4) You can now assign Grid lines to C1 or C2 (custo
modes) by pressing FUNC./SET button. A checkmark
will appear on the display.
5) Confirm your assignment by pressing the menu button and return to recording mode.
C) Worth knowing
1) compression of data
2) Connecting the camera to a computer
3) Printing Images without a pc
4) Reset the camera to factory settings
1) Compression of data
Factors which affect image quality
Filesizes:
L (large)
M (medium)
M2 (med.2)
M3 (med.3)
S (small)
resolution: 3648 x 2736 pixels
resolution: 2816 x 2112 pixels
resolution: 2720 x 1704 pixels
resolution: 1600 x 1200 pixels
resolution: 640 x 480 pixels
Recommendation: choose Filesize above M2. M2 - S
are for usage on PC screens.
18
How to change value:
1) Press FUNC/SET,
2) Step 6x downwards with direction buttons,
3. Choose desired resolution with direction buttons
Charging the Controller
Frontview of PLC-4
charging socket on the
back of PLC-4
charging indicator PLC-4
When charging the controller, only use the power
unit provided by doctorseyes. Connect the power
unit to the socket on the back of the controller.
The blinking loading symbol shows the loading status even when the controller is turned off. When the
controller is fully charged, the loading symbol changes from red to green. The red low battery symbol
disappears after charging.
When the PLC4 is fully charged the blinking charging
symbol will disappear. The elements of the battery
will appear on the display. It will take approx. 3 hours
to charge but you can stop charging at any time. The
battery has no memory effect.
Important: You can have the battery connected to
power constantly due to trickle charge. (Firmware
version >2.3)
Low Discharge Technology
Staring at version 32 the PLC-4 is equipped with low
discharge technology. Even if you don*t use the controller for 6 months the batterys will still have 90% of
it‘s capacity.After 12 months it will still have 80% of
it‘s capacity.
3
doctorseyes.com
the world of digital dental imaging
doctorseyes.com
10) Examples for dental photography setups
Working with the PLC 4 Professional
close-up lens: +4 dpt
16 cm
Dig. Zoom: activated
Zoom: 9,1 x
Macro mode: activated
16 cm
close-up lens: +4 dpt
Dig. Zoom: activated
Zoom: 5,6 x
Macro mode: activated
16 cm
close-up lens: +4 dpt
Dig. Zoom: activated
Zoom: 2 x
Macro mode: activated
16 cm
close-up lens: +4 dpt
Dig. Zoom: activated
Zoom: 3 x
Macro mode: activated
16 cm
close-up lens: +4 dpt
Dig. Zoom: activated
Zoom: 4 x
Macro mode: activated
On / Off:
The PLC-4 can be activated with the button on the
top right side and the blue display will be illuminated.
Brightness control:
The brightness can be adjusted in 13 steps with “+”
and “-” buttons on the right side. The current setting
will be displayed via a bar chart and when reaching
the brightest level the word “ultrabright” will be displayed.
Switching of LED segments:
You can activate or deactivate segments on the Ring
and Winglights. This gives the user a maximum of
light situations.
The 3 pairs of buttons on the left side allows you
control of the led segments. The activated segments
will be displayed
Every Setting is also displayed with a specific number. When reaching the last setting the presets start
from the beginning. The presets can be selected by
pressing the buttons accordingly. When pressing the
button longer than 1 sec., you step from one setting
to the next more rapidly. This will speed up the process of finding the desired settings. You only need to
look on the camera’s display.
Tip: When making shots of the front teeth then it is
more efficient using light supplied by the the wings
and deactivating segments from the ring light.
Note: When making front teeth shots it is adviseable
to switch off the Ring Light using only ilumination
supplied by the Wing Lights.
4
the world of digital dental imaging
16 cm
close-up lens: +4 dpt
Dig. Zoom: activated
Zoom: 3 x
Macro mode: activated
11) Playback of pictures on display
You can view your pictures right after shooting. Simply pree playback button and the last shot picture will
appear on the display..
17
doctorseyes.com
the world of digital dental imaging
the world of digital dental imaging
8) Determining the favorite zooming position
Memory - storage function:
Determine your favorite zoom position by zooming in
or out by adjusting the angle of view with the zoom
lever. Saving your settings now lets the camera
always go to the same zoom angle when starting up
the camera..
The PLC-4 allows for two preferred lighting combinations to be saved and each retrieved by the
push of a button. This is especially helpful when a
specific lighting combination is used repeatedly. To
save a light segment combination, have the camera
lit the way it should be saved. Press either the ‚1‘ or
‚2‘ button longer longer than one second. The light
combination is stored when you see ‚f1‘ and ‚P1‘ in
the controller display. To retrieve the lighting combination, press the same number again (either 1 or 2).
Note: Saving the zoom position only works in the
„C1 oder C2“ Mode!
9) How to save adjustments in Custom
Mode:
1) Press Menu button.
2) Move the Control Dial one click to the left or click
on the directional buttons to navigate to the last
item „Save Settings“.
3) With the FUNC./SET button
you now activate the Menu
4) Choose now where you want your adjustments to
be saved („C1“ or „C2“).
5) Confirm your adjustments by pressing the FUNC./
SET button.
6) Press the Menu button to return to recording
mode.
All values have now been saved. The data will remain active even after change of battery. According
to Canon the camera will keep its values for a period
of 2 weeks without batterys.
16
doctorseyes.com
Technical specifications:
doctorseyes Power and Light Controller PLC-4
professional
dimensions (mm)
50 x 130 x 74
weight240g
charging capacity
2200 mAh
max. duration up to 3,5 hours
voltage4,8 V =
charging display yes
charging voltage
8V - 12V ~
charging time approx. 3 hours
The PLC-4 was contructed according to EN
60335-2-5 technical guide.
5
doctorseyes.com
the world of digital dental imaging
doctorseyes.com
the world of digital dental imaging
The compact Controller PLC-C
Battery Status
charge control
Light Intesity control
Attachment Screw
Light Segment Control
on/off button
power input jack
Charging the Controller
When charging the controller, only use the power
unit provided by doctorseyes. Connect the power
unit to the socket on the front of the controller. The
blinking loading symbol shows the loading status
even when the controller is turned off.
When the controller is fully charged, the loading symbol changes from red to green. The red low battery
symbol disappears after charging.
It will take approx. 3 hours to charge but you can
stop charging at any time. The battery has no memory effect.
Important: You can have the battery connected to
power constantly due to trickle charge. (Firmware
version >2.3)
Working with the PLC-Compact Controller
The On / Off button is on the right upper front side
of the PLC-C. When it is switched on the brightness
display and the yellow segment display will light up
Brightness control
Above the second button on the right side the brightness can be changed in 2 steps. The yellow symbol
displays the actual setting
6
You can also move the area of focus:
Press the
button (see picture). Now you can
move the area of focus by pressing on the direction
buttons or by turning the Control Dial. This only
works if AF Frame is turned to „FexiZone“. If you
push the MENU. button you can also change the
size of area where the camera will focus on.
6) A-Mode: Improving depth of focus
Adjust depth of focus In the P-mode the Canon G15
automatically sets the shutter speed and aperture
with acceptable depth of focus. If desired, you can
influence the depth of focus by manually setting the
camera’s aperture.Turn the mode dial to the A-mode.
The display will show an A in the upper right corner.
To select aperture value, Move the front Control Dial
The higher the number, the smaller the aperture,
thus more depth of focus. The aperture you select
also depends on whether the zoom is set more to the
W or T side. One can shoot pictures without using a
tripod up to a shutter speed of 1/60 of a second.
To change aperture just press the button as shown
on the picture until the setting for the aperture is
selected and change value with the Control Dial to 8
(maximum value for this camera).
Note: We have set up your camera with the aperture
8 preselected on Custom mode C1. Just turn menu
dial until C1 stops at the yellow glowing mark .
7) Changing ISO values
In case the light might not be sufficient then raise the
ISO speed value to prevent getting badly focussed
pictures. If you choose too high an ISO speed
then the picture quality will decrease.When using a
doctorseyes lighting system you should always have
enough light. If not kindly check the brightness control on the Power & Light Controller
15
doctorseyes.com
the world of digital dental imaging
doctorseyes.com
the world of digital dental imaging
4) How to activate the macro mode
LED control
Press the Tulip-Symbol
. The macro mode has
been activated when you see the tulip symbol in the
top of your display.
With the left button you can activate or deactivate
LEDS in 4 configurations (half ring right - half ring left
- simulation twin flash unit - full ring)
5).Assigning the focussing area to the center
of the display.
The AF frame indicates the area of the composition
on which the camera focuses. Select „center“ - the
camera then fixes the AF frame at the center. This
is convenient for making sure the focus is exactly
where you want it.
How to assign to center focus:
1) Press MENU button
2) Select first section (AF Frame).
3) Select FlexiZone.
4) Press MENU button.
The white sqare (turns green when in focus) shows
area on display where camera will focus on.
The Focus Trick - how it‘s done:
Technical specifications:
doctorseyes Power and Light Controller
Compact PLC-C
dimensions (mm)
55 x 124 x 30
weight194g
charging capacity
2200 mAh
max. duration
up to 3,5 hours
voltage
4,8 V =
charge display
yes
charging voltage
8V - 12V ~
charging time
approx. 3 hours
The PLC-C was constructed according to the EN
60335-2-5 specification guide
1. Press the MENU button.
2. In the   menu, use the   Button to select [AF Frame].
3. Aim your camera to the tooth or region
that should be in focus and slightly
press the release button without taking
a picture letting the camera focus. Keep your
finger on the button slightly pressed down holding
the point of focus and letting the AF frame turn
green.
4. Then adjust the camera’s position until all the
teeth and details are shown in the display of the
camera.
5. Take the picture.
14
7
doctorseyes.com
the world of digital dental imaging
B) The Canon Powershot G15
The doctorseyes dental Set 1 „compact“
consists of:
●
●
●
●
●
●
●
●
●
●
●
●
Canon G15 digital camera wit accessories
doctorseyes Ring Light
Close-Up Lens („built in“ or „add on“)
Power & Light Controller “Compact”
Charging Unit for Controller
Adapter tube for Canon G15
Step-up Adapter Ring
Magnet Coupling
Dental Mirror (optional)
Mounting Element (optional)
Chin Support (optional)
Diffusor (optional)
The doctorseyes dental Set 2 „professional“
consists of:
●
●
●
●
●
●
●
●
●
●
●
●
●
Canon G15 digital camera wit accessories
doctorseyes Ring Light
doctorseyes Wing Lights
Close-Up Lens („built in“ or „add on“)
Power & Light Controller “Professional”
Charging Unit for Controller
Adapter tube for Canon G15
Step-up Adapter Ring
Magnet Coupling
Dental Mirror (optional)
Mounting Element (optional)
Chin Support (optional)
Diffusor (optional)
doctorseyes.com
the world of digital dental imaging
customizable menues. Even adjustments like zoom
position and custum white balance settings can be
recalled this way.
2) Disabling flash
Press on the flash button (see picture) until the „flash
disabled“ symbol appears on the display. This symbol will also remind you anytime that the flash has
been disabled.
3) Custom white balance setting
The light supplied by our ring light is equivalent to a
cloudy light situation. In order to reproduce the right
tooth colours in your practice you should perform
a custom white balance reading with the camera.
Some light situations are too difficult for the AWB
(auto white balance) setting to interpret correctly.
Adjusting the Tone (White Balance):
1) Switch on Ring Light
2) Press FUNC./SET Button and step on to WB
Menu with the direction buttons
1 in the
3) Select Custom White Balance
horizontal Menue in the right bottom corner.
4) Point the camera (with the lighting system turned
on) on a white sheet of paper and press the
button.
5) The camera will take a picture and it will use the
„white“ as a reference for further takes. Now press
the MENU button. You will see a color square.
Move the point two pixels in direction M and one
pixel in direction B. Now press MENU to get back.
Chose My Colors menu below WB menu and
select „Lighter Skin Tone“ to get the best dental
results.
Note: When using the doctorseyes Ring Lights you
should make the white balance measurement using
the same lighting conditions as you will when making
dental shots of your patients.
8
13
doctorseyes.com
the world of digital dental imaging
doctorseyes.com
the world of digital dental imaging
The doctorseyes diffusors
When using the ring light for smile shots, the optional diffusor helps to smoothly spread the light output.
This prevents reflections and the shading effect
(dead spot) in between the leds. Also the soft light
gives a very professional illuminated image. The
diffusers are avaliable for all ring- and wing lights.
Elements of the doctorseyes System
Adapter
tube
Ring Light
Wing Light
Magnet
Coupling
The PowerShot G15 adjustments:
The Canon PowerShot G15 offers a multitude of
adjustment possibilities and options. We have made
a selection of necessary adjustments for you to reproduce to enable you to optimize your results.
The G15 has a two memory functions which lets you
store your setups ( Custom Mode) so that you can
recall settings anytime. We prepared a specific setup
for dental photography which is saved on C1.
Wing Light
Connector
Power & Light
Controller PLC-4
Close-Up
Lens
Mounting
Element
Chin
support
Adjustments of the camera
1)
2)
3)
4)
5)
6)
7)
8)
9)
10)
11)
The C-Mode (Custom1)
Disabling flash
Custom white balance check
Activating macro mode
Assigning focussing area to center
Adusting depth of focus
Assigning favorite zooming distance
Saving adjustment settings
Examples of dental photography setups
Playback of images
Activation of grid lines
Tip: In case the camera won‘t function properly you
can set back camera to delivery status as described
in section C of this manual. Now you can perform
adjustments agais as described in this manual.
1) Setting up the C-Mode
Magnetic
Coupling
Diffusor
Wing Light
Adaptertubus
Canon
Powershot
G15
Power & Light
Controller PLC-4
Play button
LED control
LED in use
Battery
Display
On / Off Button
Brightness
Buttons + / Brightness
Display
A variety of adjustments can be saved in the custom mode so you can recall them when needed.
To recall just torn dial to the custom mode where the
adustments were saved. The G15 has two different
12
9
doctorseyes.com
the world of digital dental imaging
doctorseyes.com
the world of digital dental imaging
Components Guide:
1) Lamp
2) Strap Mount
3) Hot Shoe
4) Flash
5) Speaker
6) Ring release Button
7) Ring
8) Lens
5. Screw on the 58-62 mm adapter ring with the
magnetic coupling on the adapter tube.
t
6. Attach the Power & Light Controller to the bottom
of the camera using the tripod screw.
7. Snap the Ringlight on the magnetic coupling and
plug the cable into the Power & Light Controller.
8. When using the professional Power & Light Controller PLC-4 it is possible to attach the optional
doctorseyes Winglights. Please press on to the
attachment spheres so they snap on. The spheres are located on the side of the ring light. The
cables are to be inserted into the sockets on the
front of the Power & Light Controller.
1) Screen
2) Viewfinder
3) Terminal Cover
4) DC Coupler Cable Cover
5) Memory Card/Battery Cover
6) Tripod Socket
9. Other options include the mountable mirrors, These are to be connected directly to the ring light by
sliding the mirror into the attachment element. The
screw will hold the mirror in the desired position.
How to mount the Ringlight on the Canon G15
1. The camera should be turned off.
2. Press the ring release button, hold it down, and
turn the ring counter-clockwise.
view from top
Please attach the optional chin rest accordingly.
3. When the ● mark on the camera and the ● mark
on the ring are aligned, lift off the ring.
4. Align the ● mark on the lens adapter tube with
the ● mark on the camera. Turn the adapter tube
clockwise as far as the mark on the camera goes.
(To remove the adapter tube, including the ring
light, turn the adapter in the opposite direction by
holding down the ring release button.)
10
view from top
view from bottom
view from bottom
11