1
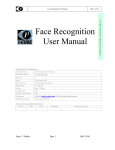
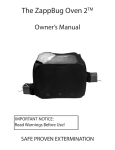
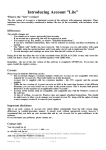
Face Recognition
FID (Face Image Database)
User Manual
Document Configuration
Document Name:
Face Recognition FID (Face Image Database) User Manual
Document Number:
Revision:
A
Date:
05 January 2006
Electronic File:
Face Rec FID User Manual BASIC.doc
Prepared for:
I-CUBE
Author:
Configured by:
Security Classification:
None
Distribution:
Web site (www.I-CUBE.co.za), CD and Installed with Systems
Distribution Format:
Word (.doc) / PDF file
Document Amendment Record
Revision
Date:
ECP No.
Amended by:
Summary of Changes
CONTENTS
1.1. Components .................................................................................................................................... 4
2. FID (Face Image DataBase) ................................................................................................................ 5
2.1. Face Image Comparison............................................................................................................... 5
2.1.1. Creating a NEW Subject........................................................................................................ 6
2.1.2. Searching for a Subject.......................................................................................................... 9
2.1.3. Getting Good Alignment....................................................................................................... 14
2.2. Capturing own images................................................................................................................. 14
2.2.1. Standardizing Your Images ................................................................................................. 15
2.2.2. Analogue image capture (CCTV input) ............................................................................. 16
Digital camera input .............................................................................................................. 16
2.2.3.
2.2.4. Existing digital images.......................................................................................................... 17
2.3. Creating own/new image database ........................................................................................... 17
The database is located in the I-CUBE folder. Change the PATH to the new folder. ............. 17
Copy the contents of the original directory and then edit it via the FID application, creating
and removing images as required. ................................................................................................... 17
2.3.1. Create the Face Templates................................................................................................. 17
List of Figures
PAGE
Figure 1 face recognition system ............................................................................................................... 4
Figure 2 FID desktop icon ........................................................................................................................... 5
Figure 3 FID application............................................................................................................................... 5
Figure 4 Face Recognition FID Application Column names .................................................................. 6
Figure 5 Creating a new subject line in the database (Arrow down, after the last person) .............. 6
Figure 6 The details of the new person have been added in the image above. ................................. 7
Figure 7 The images of the new person, where they are in a single folder, can be added with
batch add. ............................................................................................................................................... 7
Figure 8 The images of the new person are added as the person name, and increasing image no.
.................................................................................................................................................................. 8
Figure 9 Ensure the new person images eyes are correctly aligned in order for comparisons to
work well. ................................................................................................................................................ 8
Figure 10 Manual correction - Zoom in with the mouse by pressing the left button. ........................ 9
Figure 11 The eyes are correctly aligned in order for comparisons to work well. .............................. 9
Figure 12 Select the image to compare to the datbase, then use “Compare to DB”. Scroll down
to review the full results. ..................................................................................................................... 10
Figure 13 Select the image in the “Compare Results” window in order to see the details of the
compared image. ................................................................................................................................. 11
Figure 14 When the image in the “Compare Results” window is selected the details of the
compared image appear. ................................................................................................................... 11
Figure 15 When the image is not in the datbase, use “Open image File”. Only those images
above 8 are shown, below 8 the image is added to image test in the database....................... 11
Figure 16 When the image is not compared with a high score to the database, “Search failed”
appears and the image is added to the Test Image user. ............................................................ 12
Figure 17 The above image is in the Image Test folder of the database . ........................................ 12
Figure 18 In order to move the image to a new record, create the record and t drag the image to
the folder. .............................................................................................................................................. 13
Figure 19 When the image is not required delete with ‘Delete Image File”....................................... 13
Figure 20 Image types supported............................................................................................................. 15
Figure 21 Each person must get their own folder of images ............................................................... 15
Figure 22 CCTV camera application........................................................................................................ 16
Figure 23 Demonstration of the optimal size of the face in the image ............................................... 16
Figure 24 Face recognition Digital image capture ................................................................................. 16
Figure 25 Open the BDE Administrator, located in the Control panel................................................ 17
HARDWARE CONFIGURATION SETUP
1.1.
Components
The following components may be incuded in the system:
- Lap top;
- Power supply;
- Frame grabber / video to digital convertor;
- Warrenty
The following components may be incuded in the system:
- Camera;
- Lens;
- Power supply;
- Instruction CD;
- International plug (US, UK, EU)
Figure 1 face recognition system
2.
FID (FACE IMAGE DATABASE)
The I-CUBEFID (Face Image DataBase)is designed to simply, easily, and quickly get a fully functional
faceFID (Face Image DataBase) application up and running.
2.1.
Face Image Comparison
Figure 2 FID desktop icon
Open the application by double clicking the short cut on the desktop “I-CUBE FID ” or select the
application from: Start, programs, I-CUBE, FID.
Figure 3 FID
application
The total number of images in the database is listed on the left, as Person ID. Next to this is the actual
image number currently selected, shown by an arrow and highlighted in blue.
There are 5 columns:
Figure 4 Face Recognition FID Application Column names
Person_ID – lists the people as they are added.
Surname – Surname of the person
Name – name of the person
Tag – a user specified number
Use – if you wish to seach against this person (I.E. if they were to leave and you did not want to use those
images).
2.1.1.
Creating a NEW Subject
Figure 5 Creating a new subject line in the database (Arrow down, after the last person)
Figure 6 The details of the new person have been added in the image above.
Figure 7 The images of the new person, where they are in a single folder, can be added with batch add.
Figure 8 The images of the new person are added as the person name, and increasing image no.
Figure 9 Ensure the new person images eyes are correctly aligned in order for comparisons to work well.
Once a subject is set, its face position must be determined. This can be done manually by clicking on the
eye positions with the mouse or by pressing the Auto Alignment button on the subject search dialog.
Figure 10 Manual correction - Zoom in with the mouse by pressing the left button.
Figure 11 The eyes are correctly aligned in order for comparisons to work well.
2.1.2.
Searching for a Subject
The results are ranked according to confidence, being the degree of match beter the two images. The name
of the image is listed on the right. An identical image obtains a value of 10. Use the arrow key down to
see the other possible matchs.
Due to changes in lighting, size, colour, orientation, reflections, glasses, hair, expression, etc. it may be
necessary to check the top 5-10% of search results (images) in order to confirm that the person is not in the
database.
Figure 12 Select the image to compare to the datbase, then use “Compare to DB”. Scroll down to review the full results.
Figure 13 Select the image in the “Compare Results” window in order to see the details of the compared image.
Figure 14 When the image in the “Compare Results” window is selected the details of the compared image appear.
Figure 15 When the image is not in the datbase, use “Open image File”. Only those images above 8 are shown, below 8
the image is added to image test in the database.
Figure 16 When the image is not compared with a high score to the database, “Search failed” appears and the image is
added to the Test Image user.
Figure 17 The above image is in the Image Test folder of the database .
Figure 18 In order to move the image to a new record, create the record and t drag the image to the folder.
Figure 19 When the image is not required delete with ‘Delete Image File”.
2.1.3.
Getting Good Alignment
If you’re having difficulty matching two images that you just know come from the same face, or your
possible matches appear highly dissimilar, there’s a good chance one or both of the images is suffering
from bad alignment. This basically means that the reference points to I-CUBE FID (Face Image DataBase)
has used to map and compare faces are highly dissimilar – even though they come from the same face. It’s
like having two maps of the same city but, because of faulty surveying, one map shows the town square a
mile from city hall, while the other has them five miles apart. If you had to say what city it was judging
from the maps only (which is basically what to I-CUBE FID (Face Image DataBase)must do), you’d think
you were looking at two different cities.
There are some things you can do to help to I-CUBE FID (Face Image DataBase)make good “face maps.”
In most cases, if you have a good image, the auto-alignment feature (which you can find by hitting the
“Align” button) will work fine even at the lowest setting. To get good auto-alignment then, make sure you
are standardizing your images the best you can.
Another thing you can do is adjust the alignment manually (see aligning images ), so you know it’s good. If
the crosshairs are centered on the dark part of the eye, then you’ve got good alignment.
2.2.
Capturing own images
The are a number of ways to capture images. In all of them please ensure that the best quality image
possible is captured. The lap top has the ability to hold over 2 million images, thereafter a larger hard drive
is available. Hence the best quality image is suggested to get the best results out of the I-CUBE face
recognition system.
Figure 20 Image types supported
The following image files are supported: JPEG (*.jpg), Bitmap (*.BMP), GIF (*.gif), Tiff (*.tif and tiff).
When saving the images, ensure they are saved to their own directory, so that each person would have a
directory of all images relating to one person.
2.2.1.
Standardizing Your Images
Although FaceIt DB/Surveillance is adept at matching records with a wide number of variables, images
taken under similar conditions will always give you better recognition.
Figure 21 Each person must get their own folder of images
The more similar the camera distance, lighting, and head and eye positioning, the better your chances for a
match. The best time to standardize your images, of course, is right when you capture them. Here’s a brief
checklist you can go through when you’re capturing images:
1. Make sure your camera is properly configured.
2. Make sure you have adequate lighting.
3. If your subject is wearing a hat or sunglasses, ask them to remove it.
4. The subject’s entire head should be visible in the video feed.
5. The subject should be face forward, with their eyes looking directly into the camera lens.
2.2.2.
Analogue image capture (CCTV input)
Open the image capture application.
When the person is in the field of view, capture a number of images.
Save the image as a JPEG image to the persons directory. If required edit
the image with I-CUBE Media Editing application.
Figure 22 CCTV camera application
Figure 23 Demonstration of the optimal size of the face in the image
2.2.3.
Digital camera input
Ask the person to stand against a light wall.
Take a number of images of the person.
Transfer these images to the persons folder on the lap top.
If required edit the image with I-CUBE Media Editing application.
Figure 24 Face recognition Digital image capture
2.2.4.
Existing digital images
Any existing images will be added for free to the database for you by I-CUBE when the order is placed.
Either e-mail or write all images to CD and send to I-CUBE.
2.3.
Creating own/new image database
This section is for ADVANCED USERS only. Only
continue if you are certain you are computer literate and an
advanced face recognition user.
Figure 25 Open the BDE Administrator, located in the Control panel
The database is located in the I-CUBE folder. Change the PATH to the new folder.
Copy the contents of the original directory and then edit it via the FID application, creating and removing
images as required.
2.3.1.
Create the Face Templates
Under PROCEDURES are found:
- Rename image files from log to image (where log files are kept);
- Batch Compare (to compare images);
- Recalculate full + vector templates (on a per image basis)
- Set Licence information
Before you can search a database, you must create the Face Templates. This is done for you automatically
with the FID application when you load the images.
You can not search quickly if you search directly on the images. Each face must have a corresponding
template stored in the database.
IF YOU HAVE ANY PROBLEMS PLEASE E-MAIL [email protected]