1
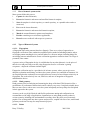
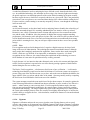
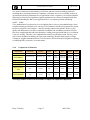
Page 1 of 29
Face Recognition User Manual
Document Configuration
Document Name:
Face Recognition User Manual
Document Number:
I-Cube-001.doc
Revision:
A
Date:
19 November 2003
Electronic File:
D:\btd\I-Cube\user manuals
Prepared for:
Development
Author:
Barry T. Dudley
Configured by:
BTD
Security Classification:
None
Distribution:
Web site (www.i-cube.co.za), CD and Installed with Systems
Distribution Format:
Word (.doc) / PDF file
Document Amendment Record
Revision
Date:
Barry T. Dudley
ECP No.
Amended by:
Page 1
Summary of Changes
2003/12/08
I-CUBE (Integrated, Intelligent, Imaging)
Face Recognition
User Manual
Page 2 of 29
Face Recognition User Manual
CONTENTS
TRAINING OUTLINE ................................................................................................................... 5
1. introduction ............................................................................................................................ 6
1.1. Uses for I-CUBE face recognition DataBase Search ................................................. 6
1.1.1. Law enforcement: ................................................................................................... 7
1.1.2. Security: ................................................................................................................... 7
1.1.3. Surveillance: ............................................................................................................ 7
1.2. Value proposition ........................................................................................................... 7
1.3. Typical client................................................................................................................... 8
1.3.1. Casino client ............................................................................................................ 8
1.3.2. Shopping Centre or large shop, such as Gateway or Game.............................. 8
1.3.3. Small shop or work place environment................................................................. 8
Hardware setup ............................................................................................................................ 9
2. OPERATING SYSTEM ISSUES ......................................................................................... 9
2.1. OS Setup ........................................................................................................................ 9
2.1.1. OS Setup Useful References................................................................................. 9
3. HARDWARE CONFIGURATION SETUP .......................................................................... 9
3.1.
Components ................................................................................................................... 9
4. BIOMETRICS ...................................................................................................................... 10
4.1. Introduction to biometric identification techniques.................................................... 10
4.1.1. What is a biometric? ............................................................................................. 10
4.1.2. How a biometric system works: ........................................................................... 11
4.1.3. Types of Biometric Systems ................................................................................ 11
4.1.3.1. Fingerprints..................................................................................................... 11
4.1.3.2. Hand geometry............................................................................................... 11
4.1.3.3. Retina.............................................................................................................. 11
4.1.3.4. Iris.................................................................................................................... 12
4.1.3.5. Face ................................................................................................................ 12
4.1.3.6. Signature ........................................................................................................ 12
4.1.3.7. Voice ............................................................................................................... 13
4.1.4. Comparison of biometrics .................................................................................... 13
Barry T. Dudley
Page 2
2003/12/08
Page 3 of 29
Face Recognition User Manual
5. I-CUBE DataBase Search.................................................................................................. 14
5.1. Face Image Comparison............................................................................................. 14
5.1.1. Selecting the (White Male) Database ................................................................. 14
5.1.2. Selecting a Subject ............................................................................................... 15
5.1.3. Searching for a Subject ........................................................................................ 16
5.1.4. Getting Good Alignment....................................................................................... 17
5.2. Capturing own images................................................................................................. 18
5.2.1. Standardizing Your Images.................................................................................. 18
5.2.2. Analogue image capture (CCTV input)............................................................... 19
5.2.3. Digital camera input .............................................................................................. 19
5.2.4. Existing digital images.......................................................................................... 19
5.3.
Creating own/new image database............................................................................ 20
5.3.1. Create the Face Templates ................................................................................. 22
5.3.2. Creating a New Database.................................................................................... 23
5.3.3. Selecting a Subject ............................................................................................... 24
5.3.4. Searching for a Subject ........................................................................................ 24
5.4. FaceIt Settings ............................................................................................................. 25
5.5. Tips for More Speed .................................................................................................... 26
6. REMOTE MONITORING ................................................................................................... 27
6.1. Introduction................................................................................................................... 27
7. TROUBLESHOOTING ....................................................................................................... 28
7.1. BIOS Setup................................................................................................................... 28
7.2. Mechanical Issues ....................................................................................................... 28
7.3. Power Supply does not work ...................................................................................... 28
Appendix A ................................................................................................................................. 29
Barry T. Dudley
Page 3
2003/12/08
Page 4 of 29
Face Recognition User Manual
List of Figures
PAGE
Figure 2 MBA Dissertation assists in evaluation of proposed biometric solutions (Exclusive
to I-Cube) ............................................................................................................................... 7
Figure 3 I-Cube face recognition system................................................................................... 9
Figure 4 I-Cube DB Search desktop icon ................................................................................ 14
Figure 5 I-Cube DB Search application ................................................................................... 14
Figure 6 Open an existing database ........................................................................................ 14
Figure 7 Selecting the white male database ........................................................................... 14
Figure 8 White male database.................................................................................................. 14
Figure 9 Column names ............................................................................................................ 15
Figure 10 Importing a subject ................................................................................................... 15
Figure 11 Subject directory selection ....................................................................................... 15
Figure 12 Subject image selection ........................................................................................... 15
Figure 13 Subject image display .............................................................................................. 15
Figure 14 Manual eye position selection by clicking and holding.......................................... 16
Figure 15 Auto Alignment of the eye positions ....................................................................... 16
Figure 16 Search results ........................................................................................................... 16
Figure 17 Identical image search results................................................................................. 16
Figure 18 Search results ranking ............................................................................................. 17
Figure 19 Closest face image search result ............................................................................ 17
Figure 20 Closest face image search result ............................................................................ 18
Figure 21 Each person must get their own folder of images ................................................. 18
Figure 22 CCTV camera application ........................................................................................ 19
Figure 23 Demonstration of the optimal size of the face in the image.................................. 19
Figure 24 Digital image capture................................................................................................ 19
Figure 25 I-Cube DB Search desktop icon .............................................................................. 20
Figure 26 I-Cube DB Search application ................................................................................. 20
Figure 27 I-Cube DB Search desktop icon .............................................................................. 20
Figure 28 Press and hold to zoom in ....................................................................................... 20
Figure 29 Click once on the eye to mark the position of the eye .......................................... 20
Figure 30 Press and hold to zoom in ....................................................................................... 21
Figure 31 Click once on the eye to mark the position of the eye .......................................... 21
Figure 32 Auto Align all records ............................................................................................... 21
Figure 33 Sort records by alignment then manually fix .......................................................... 21
Figure 34 Create Full Templates .............................................................................................. 22
Barry T. Dudley
Page 4
2003/12/08
Page 5 of 29
Face Recognition User Manual
TRAINING OUTLINE
Instr
Time
Own
No
limit
Barry T. Dudley
Training Topic
Pg
Ref
Competence
Required
•
•
Page 5
2003/12/08
Page 6 of 29
Face Recognition User Manual
1.
INTRODUCTION
Welcome to I-CUBE face recognition DataBase Search, currently the world’s most advanced face
recognition tool. Technology once reserved for the fictional world of James Bond is now at your
fingertips, and using it, you’ll be able to capture and store the images of tens of thousands of faces,
then electronically compare them against each other to find the face you’re looking for – fast.
Already, I-CUBE DB Search is becoming a powerful ally for law enforcement agencies, as well as
corporate and private security systems. It is a bold, groundbreaking step in the revolutionary field of
biometrics.
This user’s guide is designed to help you operate all of the functions and tools I-CUBE DB Search
has to offer. Once you run the program, you’ll find that a little bit of experimentation goes a long
way towards developing your proficiency. The entire text of this guide is appears in not only on the
Lap Top, but also on-line at www.i-cube.co.za.
1.1.
Uses for I-CUBE face recognition DataBase Search
Face recognition is rapidly gaining acceptance as the biometrics of choice for many applications.
This is not surprising considering that face recognition has many intrinsic strengths that set it apart
from other biometrics. Advantages of face recognition over other biometrics include:
• Passive Process: Face recognition can be performed passively without requiring the participation
of the subject. This makes it convenient to use but it also makes it particulary useful for monitoring
and surveillance applications where active participation of the subject is not possible.
• Often the only biometrics available: There are many situations where facial photographs are the
only information available. These include certain law enforcement applications as well as
applications that search the photographic stockpiles around the world.
• A human can be used as a backup: Humans are very adept at face recognition. This is not
surprising considering the amount of social information faces convey. This is a blessing for
automated face recognition systems because it means that when they fail a human operator can be
used as a backup. This cannot be done with finger print or easily with voice since a trained expert is
required to verify that two finger or voice prints are identical.
• Higher social acceptability: We are all accustomed to having our photographs taken when we
apply for a driver's license or a passport. A human photograph does not carry criminal connotations
as much as a finger print or an iris scan.
• No special or costly hardware is required: The input devices to automated face recognition
systems can be standard video cameras. They do not use any unusual hardware such as thermal,
laser, iris, retinal or finger scanners. This means face recognition capabilities can be added to
current infrastructure without serious investment in new hardware. For example most ATMs
currently have video cameras in them and hence the investment could be very minimal to equip
those ATM's with face recognition.
Barry T. Dudley
Page 6
2003/12/08
Page 7 of 29
Face Recognition User Manual
1.1.1.
Law enforcement:
Law enforcement is usually the first application that comes to people’s minds when they hear about
face recognition applications. Obviously, if you can store “mug shot” type images of a large number
of convicted criminals, then digitally search them against those of suspects, you’ve eliminated the
cumbersome, sore-eyed task of pouring through dozens of “face-books.” With I-CUBE face
recognition DataBase Search, law enforcement personnel can quickly narrow possible suspects
down to a select few and solve crimes faster. It can also be used to search for missing people.
1.1.2.
Security:
Because I-CUBE face recognition DataBase Search can store a virtually limitless number images, it
is a perfect identification tool. A doorman at a corporate research office, for example, can use ICUBE face recognition DataBase Search to ensure that people accessing the building are who they
say they are. (While entry codes and PIN numbers can be stolen, and ID cards can be forged, it next
to impossible to steal or convincingly duplicate someone’s face!).
1.1.3.
Surveillance:
One of the most promising uses of I-CUBE face recognition DataBase Search is in the field of
surveillance. Ninety-nine percent of the time, criminals and terrorists are caught only after they’ve
committed their most recent crime, while their trail is still fresh. I-CUBE face recognition DataBase
Search, however, helps catch them while they’re still at the scene, even before they’ve committed
their next crime. Used at a checkpoint at an airport, for example, a guard can check the faces of
boarding passengers against a database of known terrorists; a bank can do the same thing with
known robbers.
1.2.
Value proposition
The face recognition product supplied by ICube is the only product tailored to provide
all the face recognition requirements of the
end user.
The systems comes with everything
required to capture, save, create databases
of known transgressors and compare and
print facial images. The system is designed
to get the novice end user up and running
quickly, with no messy installation
required, no delays waiting for codes and
quick, knowledgeable support if needed.
Figure 2 MBA Dissertation assists in evaluation of proposed biometric solutions (Exclusive to I-Cube)
Barry T. Dudley
Page 7
2003/12/08
Face Recognition User Manual
1.3.
Page 8 of 29
Typical client
The typical client would have a couple of cameras already, would be capturing and keeping facial
images to identify problem people. May be printing out the images to hand out to guards and
surveillance operators.
1.3.1.
Casino client
The typical casino client would have a number of facial databases:
1 – Banned clients who need to be kept off the casino floor for use by the security guards;
2 – Pick pockets and other common criminals who must be kept off the casino grounds, who are
recognised by the surveillance operators and guards.
3 – Known card sharks who would cheat the casino odds, recognised by both surveillance operators.
The new National Gambling Bill introduces a system of voluntary and court-ordered exclusion of
problem gamblers from casinos. A wide range of exclusion techniques for access control could be
applied to South African casinos. However, there are no clear criteria on which to base the decision
of which system is to be implemented. Various role players need to be considered to determine
what can be deployable in casino applications.
In order to assist in seleting the appropriate biometric, a MBA dissertation is made available, in
which a framework, from a business perspective, is proposed which allows multiple role players
and varied criteria to effectively evaluate a range of possible solutions. The framework was applied
to the role players affected by the proposed exclusion of problem gamblers from gambling. The
main role players evaluated a number of possible exclusion techniques according to a range of
important criteria.
The MBA dissertation written by B.T. Dudley is available to promote the logical purchase of face
recognition. This obtained a first grade pass at the University of Natal. It can be obtained from
www.i-cube.co.za or from Barry T. Dudley ([email protected]).
1.3.2.
Shopping Centre or large shop, such as Gateway or Game
Existing images of known shop lifters would be installed on the I-Cube lap top face recognition
system before the system was delivered, meaning that as soon as the system arrived it could be used
immediately to check for known shop lifters.
The security control centre or surveillance room would use fixed or dome cameras to watch for in
store thefts by either staff or customers. If a suspicious activity or person was identified, the
persons face could be compared to the the data base of known shop lifters.
When a gang is identified the security management need to be able to e-mail images of the thieves
to other shops in the area for them to be on the look out for the gang.
1.3.3.
Small shop or work place environment
The security function may be a single person or a part time person who screens prospective
employees. They take pictures of all staff and have a database of staff who have been fired for theft
and other misdemeanours. This allows them to compare prospective employees with images of
people they should not employ. When a person is caught stealing they let all other similar
companies know not to employ that person.
Barry T. Dudley
Page 8
2003/12/08
Page 9 of 29
Face Recognition User Manual
HARDWARE SETUP
If an analogue camera is going to be connected to the I-Cube face recognition system, connect the
camera cable (RJ 179/79) end (BNC connector) to the analogue to digital convertor via a RCA
connector.
2.
2.1.
OPERATING SYSTEM ISSUES
OS Setup
The operating system is Windows 2000 and comes pre-installed on the Lap top. Service Pack 4 is
installed. No Anti-Virus software is installed (but is suggested). A free ware firewall software
package is installed to prevent illegal access of the lap top.
2.1.1.
OS Setup Useful References
See www.Dell.co.za
3.
3.1.
HARDWARE CONFIGURATION SETUP
Components
The following components may be
incuded in the system:
- Lap top;
- Power supply;
- Frame grabber / video to
digital convertor;
- Warrenty
The following components may be
incuded in the system:
- Camera;
- Lens;
- Power supply;
- Instruction CD;
- International plug (US, UK,
EU)
Figure 3 I-Cube face recognition system
Barry T. Dudley
Page 9
2003/12/08
Page 10 of 29
Face Recognition User Manual
4.
BIOMETRICS
Biometrics is the science of measuring and coding unique biological characteristics.
In order to select the appropriate biometric technique, free access to a MBA dissertation, Casino
Exclusion Technique Exploration - Framework Development, is provided. This was submitted
in partial fulfilment of the academic requirements for the degree of MASTERS IN BUSINESS
ADMINISTRATION, Graduate School of Business, Faculty of Management, University of Natal
(Durban). A 1st grade pass mark was obtained.
A wide range of exclusion techniques could be applied. However, there are no clear criteria on
which to base the decision of which system is to be implemented. Various role players need to be
considered to determine what can be deployable.
A framework, from a business perspective, is proposed which allows multiple role players and
varied criteria to effectively evaluate a range of possible solutions. The framework is applied to the
role players affected by the proposed exclusion of problem gamblers from gambling. The main role
players evaluated a number of possible exclusion techniques according to a range of important
criteria.
4.1.
Introduction to biometric identification techniques
As organizations search for more accurate methods for face image comparisons, and other security
applications, biometrics is gaining increasing attention.
4.1.1.
What is a biometric?
The security field uses three different levels of authentication:
Level
1
Meaning
ID badge or card something you HAVE - card key, smart card, or token (like a
SecurID card)
2
PIN or other ID Number something you KNOW
3
BIOMETRICS is something you ARE
Of these, a biometric (Level 3) is the most secure and convenient authentication tool. It can't be
borrowed, stolen, or forgotten, and forging one is practically impossible.
Biometrics measure individuals' unique physical or behavioral characteristics to recognize or
authenticate their identity. Common physical biometrics include fingerprints; hand or palm
geometry; and retina, iris, or facial characteristics.
Behavioral characters include signature, voice (which also has a physical component), keystroke
pattern, and gait. Of this class of biometrics, technologies for signature and voice are the most
developed.
Barry T. Dudley
Page 10
2003/12/08
Page 11 of 29
Face Recognition User Manual
4.1.2.
How a biometric system works:
Most systems follow this process:
1.
Capture the chosen biometric;
2.
Process the biometric and extract and enroll the biometric template;
3.
Store the template in a local repository, a central repository, or a portable token such as a
smart card;
4.
Live-scan the chosen biometric;
5.
Process the biometric and extract the biometric template;
6.
Match the scanned biometric against stored templates;
7.
Provide a matching score to business applications;
8.
Record a secure audit trail with respect to system use.
4.1.3.
Types of Biometric Systems
4.1.3.1. Fingerprints
A fingerprint looks at the patterns found on a fingertip. There are a variety of approaches to
fingerprint verification. Some emulate the traditional police method of matching minutiae; others
use straight pattern-matching devices; and still others are a bit more unique, including things like
moiréfringe patterns and ultrasonics. Some verification approaches can detect when a live finger is
presented; some cannot.
A greater variety of fingerprint devices is available than for any other biometric. As the prices of
these devices and processing costs fall, using fingerprints for user verification is gaining
acceptance—despite the common-criminal stigma.
Fingerprint verification may be a good choice for in-house systems, where you can give users
adequate explanation and training, and where the system operates in a controlled environment. It is
not surprising that the workstation access application area seems to be based almost exclusively on
fingerprints, due to the relatively low cost, small size, and ease of integration of fingerprint
authentication devices.
4.1.3.2. Hand geometry
Hand geometry involves analyzing and measuring the shape of the hand. This biometric offers a
good balance of performance characteristics and is relatively easy to use. It might be suitable where
there are more users or where users access the system infrequently and are perhaps less disciplined
in their approach to the system.
Accuracy can be very high if desired, and flexible performance tuning and configuration can
accommodate a wide range of applications. Organizations are using hand geometry readers in
various scenarios, including time and attendance recording, where they have proved extremely
popular. Ease of integration into other systems and processes, coupled with ease of use, makes hand
geometry an obvious first step for many biometric projects.
4.1.3.3.
Retina
Barry T. Dudley
Page 11
2003/12/08
Page 12 of 29
Face Recognition User Manual
A retina-based biometric involves analyzing the layer of blood vessels situated at the back of the
eye. An established technology, this technique involves using a low-intensity light source through
an optical coupler to scan the unique patterns of the retina. Retinal scanning can be quite accurate
but does require the user to look into a receptacle and focus on a given point. This is not particularly
convenient if you wear glasses or are concerned about having close contact with the reading device.
For these reasons, retinal scanning is not warmly accepted by all users, even though the technology
itself can work well.
4.1.3.4. Iris
An iris-based biometric, on the other hand, involves analyzing features found in the colored ring of
tissue that surrounds the pupil. Iris scanning, undoubtedly the less intrusive of the eye-related
biometrics, uses a fairly conventional camera element and requires no close contact between the
user and the reader. In addition, it has the potential for higher than average template-matching
performance. Iris biometrics work with glasses in place and is one of the few devices that can work
well in identification mode. Ease of use and system integration have not traditionally been strong
points with iris scanning devices, but you can expect improvements in these areas as new products
emerge.
4.1.3.5. Face
Face recognition analyzes facial characteristics. It requires a digital camera to develop a facial
image of the user for authentication. This technique has attracted considerable interest, although
many people don't completely understand its capabilities. Some vendors have made extravagant
claims—which are very difficult, if not impossible, to substantiate in practice—for facial
recognition devices. However, the casino industry has capitalized on this technology to create a
facial database of scam artists for quick detection by security personnel.
Largely because it is less intrusive than other biometric tools, such as iris scanners and fingerprint
readers, facial recognition is expected to be one of the fastest-growing segments of the biometric
market during the next two to three years.
The Basics: Facial recognition — also known as facial scan or face verification — is a biometric
technology that identifies people based on their facial features. Facial-scan systems can recognize a
person, using parts of the face that are not easy to alter, such as the areas around the cheekbones, the
upper outlines of the eye sockets and the sides of the mouth. Systems generally work by comparing
the facial scan of an individual to facial scans stored in a database.
The system attempts to match the scan made from a fixed or dome camera, for example, against the
scans of known problem drivers obtained from known offenders or police records to see if there's a
match — what's known as a one-to-many check. Facial-recognition solutions employ the same
four-step process that all biometric technologies do: sample capture, feature extraction, template
comparison and matching. The sample capture takes place in the enrolment process, during which
the system takes multiple pictures of the face, usually from slightly different angles, to increase the
system's ability to recognize the face. After enrolment, certain facial features are extracted and used
to create a template
4.1.3.6. Signature
Signature verification analyzes the way a user signs her name. Signing features such as speed,
velocity, and pressure are as important as the finished signature's static shape. Signature verification
enjoys a synergy with existing processes that other biometrics do not. People are used to signatures
Barry T. Dudley
Page 12
2003/12/08
Page 13 of 29
Face Recognition User Manual
as a means of transaction-related identity verification, and most would see nothing unusual in
extending this to encompass biometrics. Signature verification devices are reasonably accurate in
operation and obviously lend themselves to applications where a signature is an accepted identifier.
Surprisingly, relatively few significant signature applications have emerged compared with other
biometric methodologies. But if your application fits, it is a technology worth considering.
4.1.3.7. Voice
Voice authentication is not based on voice recognition but on voice-to-print authentication, where
complex technology transforms voice into text. Voice biometrics has the most potential for growth,
because it requires no new hardware—most PCs already contain a microphone. However, poor
quality and ambient noise can affect verification. In addition, the enrollment procedure has often
been more complicated than with other biometrics, leading to the perception that voice verification
is not user friendly. Therefore, voice authentication software needs improvement. One day, voice
may become an additive technology to finger-scan technology. Because many people see finger
scanning as a higher authentication form, voice biometrics will most likely be relegated to replacing
or enhancing PINs, passwords, or account names.
4.1.4.
Comparison of biometrics
Characteristic
Fingerprints
Hand
Geometry
Retina
Iris
Face
Signature
Ease of Use
High
High
Low
Medium
Medium
High
High
Voice
Error incidence
Dryness, dirt, age
Hand injury, age
Glasses
Poor
Lighting
Lighting, age,
glasses, hair
Changing
signatures
Noise,
colds,
weather
Accuracy
High
High
Very High
Very High
High
High
High
Cost
*
*
*
*
*
*
*
User acceptance
Medium
Medium
Medium
Medium
Medium
Medium
High
Required security
level
High
Medium
High
Very High
Medium
Medium
Medium
Long-term stability
High
Medium
High
High
Medium
Medium
Medium
*The large number of factors involved makes a simple cost comparison impractical.
Barry T. Dudley
Page 13
2003/12/08
Page 14 of 29
Face Recognition User Manual
5.
I-CUBE DATABASE SEARCH
The I-CUBE Database Search is designed to simply, easily, and quickly get a fully functional face
database search application up and running.
5.1.
Face Image Comparison
Figure 4 I-Cube DB Search desktop icon
Open the application by double clicking the short cut
on the desktop
“I-CUBE Database Search” or select the application from:
Start, programs, I-Cube, I-CUBE DB Search.
Figure 5 I-Cube DB Search application
5.1.1.
Selecting the (White Male) Database
Select ‘OPEN’ from the File menu or Press the OPEN button on the toolbar.
Figure 6 Open an existing database
Figure 7 Selecting the white male database
Select the database to open:
“C:\face recognition\images\male\white\white male.txt”
Figure 8 White male database
Barry T. Dudley
Page 14
2003/12/08
Page 15 of 29
Face Recognition User Manual
The total number of images in the database is listed on the bottom right. Next to the is the actual
image number currently selected.
There are 4 columns:
Figure 9 Column names
Image – lists the name and type of image.
Alignment – indicates if the image is aligned
(none, poor, low, Medium and high)
Full –
Vector –
5.1.2.
Selecting a Subject
Figure 10 Importing a subject
The ‘subject’ is the person who is to be searched for in the
database. You can select a subject from the currently opened
database by selecting a person and then pressing the ‘Set as
Subject’ button or selecting the ‘Set as Subject’ item in the
‘Records’ menu.
Figure 11 Subject directory selection
It the subject is not part of the database, then use the ‘Import Subject’ under the File menu, or press
the Import Subject Button, or if the subject search dialog is opened, you can simply drag and drop
the image file to set it as the subject.
Figure 12 Subject image selection
Figure 13 Subject image display
Barry T. Dudley
Page 15
2003/12/08
Page 16 of 29
Face Recognition User Manual
Once a subject is set, its face position must be determined. This can be done manually by clicking
on the eye positions with the mouse or by pressing the Auto Alignment button on the subject search
dialog.
Figure 14 Manual eye position selection by clicking and holding
Figure 15 Auto Alignment of the eye positions
5.1.3.
Searching for a Subject
There are different types of searches available. The types of searches
available are Standard, Scan, and Hierarchical (and variations of
each). All types are available through the main menu under Database,
Search or from the subject search dialog from the drop down list.
Suggested to use standard search initially until the database size is
over 500 000 images.
Figure 16 Search results
The results are ranked according to confidence, being the degree of
match beter the two images. The name of the image is listed on the
right. An identical image obtains a value of 10. Use the arrow key
down to see the other possible matchs.
Figure 17 Identical image search results
Barry T. Dudley
Page 16
2003/12/08
Page 17 of 29
Face Recognition User Manual
Figure 18 Search results ranking
Due to changes in lighting, size, colour, orientation,
reflections, glasses, hair, expression, etc. it may be necessary
to check the top 5-10% of search results (images) in order to
confirm that the person is not in the database.
Figure 19 Closest face image search result
5.1.4.
Getting Good Alignment
If you’re having difficulty matching two images that you just know come from the same face, or
your possible matches appear highly dissimilar, there’s a good chance one or both of the images is
suffering from bad alignment. This basically means that the reference points to I-CUBE face
recognition DataBase Search has used to map and compare faces are highly dissimilar – even
though they come from the same face. It’s like having two maps of the same city but, because of
faulty surveying, one map shows the town square a mile from city hall, while the other has them
five miles apart. If you had to say what city it was judging from the maps only (which is basically
what to I-CUBE face recognition DataBase Search must do), you’d think you were looking at two
different cities.
There are some things you can do to help to I-CUBE face recognition DataBase Search make good
“face maps.” In most cases, if you have a good image, the auto-alignment feature (which you can
find by hitting the “Align” button) will work fine even at the lowest setting. To get good autoalignment then, make sure you are standardizing your images the best you can.
Another thing you can do is adjust the alignment manually (see aligning images ), so you know it’s
good. If the crosshairs are centered on the dark part of the eye, then you’ve got good alignment.
Barry T. Dudley
Page 17
2003/12/08
Page 18 of 29
Face Recognition User Manual
5.2.
Capturing own images
The are a number of ways to capture images. In all of them please ensure that the best quality
image possible is captured. The lap top has the ability to hold over 2
million images, thereafter a larger hard drive is available. Hence the
best quality image is suggested to get the best results out of the I-Cube
face recognition system.
The following image files are supported: JPEG (*.jpg), Bitmap
(*.BMP), GIF (*.gif), Tiff (*.tif and tiff).
Figure 20 Closest face image search result
When saving the images, ensure they are saved to
their own directory, so that each person would have
a directory of all images relating to one person.
5.2.1.
Standardizing Your Images
Although FaceIt DB/Surveillance is adept at
matching records with a wide number of variables,
images taken under similar conditions will always
give you better recognition.
Figure 21 Each person must get their own folder of images
The more similar the camera distance, lighting, and head and eye positioning, the better your
chances for a match. The best time to standardize your images, of course, is right when you capture
them. Here’s a brief checklist you can go through when you’re capturing images:
1. Make sure your camera is properly configured.
2. Make sure you have adequate lighting.
3. If your subject is wearing a hat or sunglasses, ask them to remove it.
4. The subject’s entire head should be visible in the video feed.
5. The subject should be face forward, with their eyes looking directly into the camera lens.
Barry T. Dudley
Page 18
2003/12/08
Page 19 of 29
Face Recognition User Manual
5.2.2.
Analogue image capture (CCTV input)
Open the image capture application.
When the person is in the field of view, capture a
number of images.
Save the image as a JPEG image to the persons
directory. If required edit the image with I-Cube
Media Editing application.
Figure 22 CCTV camera application
Figure 23 Demonstration of the optimal size of the face in the image
5.2.3.
Digital camera input
Ask the person to stand against a light wall.
Take a number of images of the person.
Transfer these images to the persons folder on the lap top.
If required edit the image with I-Cube Media Editing application.
Figure 24 Digital image capture
5.2.4.
Existing digital images
Any existing images will be added for free to the database for you by I-Cube when the order is
placed. Either e-mail or write all images to CD and send to I-Cube at:
[email protected]
Barry T. Dudley
Page 19
2003/12/08
Page 20 of 29
Face Recognition User Manual
5.3.
Creating own/new image database
Open the I-CUBE DB Search application
Figure 25 I-Cube DB Search desktop icon
Figure 26 I-Cube DB Search application
Add images by either drag and dropping images onto
the application or by selecting ‘Import Record’ from
the file menu. Note, you can drag and drop entire
directories.
Once all of the images are added to the database, you
must mark the eyes of each person. This can be done
manually or automatically.
Figure 27 I-Cube DB Search desktop icon
In order to manually mark the eye positions, make sure the ‘Toggle Alignment
Mode’ button is depressed on the tool bar and then left click on each eye in the
image. To automatically mark every
eye position, select the ‘All Records’
menu item under the Database/Auto
Align menu. For a single record,
press the Auto Align button on the
toolbar, or select Auto Align from
the Record menu.
Figure 28 Press and hold to zoom in
Figure 29 Click once on the eye to mark the position of the eye
Barry T. Dudley
Page 20
2003/12/08
Page 21 of 29
Face Recognition User Manual
Marking the eye positions is one of the most time consuming parts of preparing the database.
Accurately marking the eyes is essential for good recognition performance.
Figure 30 Press and hold to zoom in
Figure 31 Click once on the eye to mark the position of the eye
Typically you will Auto Align the entire database, then look to see which records were aligned with
less than a ‘medium’ confidence. Those
leftovers can then be manually aligned or the
FaceItDB settings can be re-adjusted and the
records can re-aligned with ‘All < Medium’
under the Database/Auto Align menu.
Figure 32 Auto Align all records
Figure 33 Sort records by alignment then manually fix
Barry T. Dudley
Page 21
2003/12/08
Page 22 of 29
Face Recognition User Manual
5.3.1.
Create the Face Templates
Figure 34 Create Full Templates
Before you can search a database, you must create the Face Templates. You can not search quickly
if you search directly on the images. Each face must have a corresponding template stored in the
database. These face templates are about 3.5k in size. In this application, the templates are stored in
a single, large file outside of the database. This is called the FID (FaceItData) file. Each face in the
database has associated with it a description of where to find its corresponding template. In this
case, we store the file offset of the data.
Select ‘Create Full Template’ from the Database menu to create the templates. Before or after you
have created the templates it is a good idea to de-fragment your hard drive. This helps increase
search speed. To further increase search speed one may want to create an additional template called
a vector template. This is an additional 88 bytes per face. However, on larger databases it can
drastically increase the search speed. Select ‘Create Vectors’ from the Database menu to create
these vector templates.
IF YOU HAVE ANY PROBLEMS PLEASE E-MAIL SUPPORT
AT I-CUBE ([email protected])
Barry T. Dudley
Page 22
2003/12/08
Page 23 of 29
Face Recognition User Manual
5.3.2.
Creating a New Database
Select ‘New’ from the File menu or Press the New button on the toolbar. Then add images by either
drag and dropping images onto the application or by selecting ‘Import Record’ from the file menu.
Note, you can drag and drop entire directories.
Once all of the images are added to the database, you must mark the eyes of each person. This can
be done manually or automatically.
In order to manually mark the eye positions, make sure the ‘Toggle Alignment Mode’ button is
depressed on the tool bar and then left click on each eye in the image. To automatically mark every
eye position, select the ‘All Records’ menu item under the Database/Auto Align menu. For a single
record, press the Auto Align button on the toolbar, or select Auto Align from the Record menu.
Marking the eye positions is one of the most time consuming parts of preparing the database.
Accurately marking the eyes is essential for good recognition performance. Typically you will Auto
Align the entire database, then look to see which records were aligned with less than a ‘medium’
confidence. Those leftovers can then be manually aligned or the FaceItDB settings can be readjusted and the records can re-aligned with ‘All < Medium’ under the Database/Auto Align menu.
Before you can search a database, you must create the Face Templates. You can not search quickly
if you search directly on the images. Each face must have a corresponding template stored in the
database. These face templates are about 3.5k in size. In this application, the templates are stored in
a single, large file outside of the database. This is called the FID (FaceItData) file. Each face in the
database has associated with it a description of where to find its corresponding template. In this
case, we store the file offset of the data.
Select ‘Create Full Template’ from the Database menu to create the templates. Before or after you
have created the templates it is a good idea to de-fragment your hard drive. This helps increase
search speed. To further increase search speed one may want to create an additional template called
a vector template. This is an additional 88 bytes per face. However, on larger databases it can
Barry T. Dudley
Page 23
2003/12/08
Page 24 of 29
Face Recognition User Manual
drastically increase the search speed. Select ‘Create Vectors’ from the Database menu to create
these vector templates. In this particular demo application, you must first create the Full Templates
before creating the vectors, though this is not a requirement of using the vectors in general.
Note that in order to create any templates, you must have a valid license entered into the about box.
Each license has associated with it a maximum number of allowed templates. Each template you
create will add a count to your license. Once the limit has been reached, no more templates will be
created. You can modify the template afterward it is created as much as needed without increasing
the counts though.
5.3.3.
Selecting a Subject
The ‘subject’ is the person who is to be searched for in the database. You can select a subject from
the currently opened database by selecting a person and then pressing the ‘Set as Subject’ button or
selecting the ‘Set as Subject’ item in the ‘Records’ menu. It the subject is not part of the database,
then use the ‘Import Subject’ under the File menu, or press the Import Subject Button, or if the
subject search dialog is opened, you can simply drag and drop the image file to set it as the subject.
Once a subject is set, its face position must be determined. This can be done manually by clicking
on the eye positions with the mouse or by pressing the Auto Alignment button on the subject search
dialog.
5.3.4.
Searching for a Subject
There are different types of searches available to demonstrate the different searching methods. All
types are available through the main menu under Database, Search or from the subject search dialog
from the drop down list.
The types of searches available are Standard, Scan, and Hierarchical (and variations of each).
Standard: The standard search is the most basic (and slowest) way to search. It uses the
settings (from View/FaceIt Settings) and reads the data from the big FID file. Since the data
Barry T. Dudley
Page 24
2003/12/08
Page 25 of 29
Face Recognition User Manual
in the FID file is fairly large, the search will be IO limited when set for Scan intensity. It is
best suited for searches where the entire database is to be searched in ‘Normal’ or
‘Intensive’ mode.
Scan using Full Template: This is identical to a Standard when the compare intensity is set
to Scan. The data is pulled from the big FID file.
Scan using Vector: Here the search is done using the vector templates. The compare
settings do not affect vector template comparisons. The data is pulled from the vector FID
(VFID) file. This should perform very fast compared to the full templates.
Scan using Vector in RAM: Performs the same scan as ‘Scan using Vector’ except this
time the data is pulled directly from RAM – eliminating all disk access. You must first load
the vectors into ram from the Database menu. You should achieve the fastest search results
using this method -- typically in excess of 15,000,000 records per minute on a 400MHz
computer.
Hierarchical: The hierarchical search is the type of search you would most likely use in
your application. It first scans through the data in the fastest possible way. It then sorts the
results and takes the top % of the matches and runs them through a standard search using
‘Intensive’ mode. You will have to decide on the % to send to quick mode depending on the
size and quality of your database. On a large database (100,000 records or more) with good
images, 1% may be more than enough. For this demo you can chose 1%, 2%, 5%, and 10%.
5.4.
FaceIt Settings
When Auto Aligning images you may want to change the settings in the for face finding. The face
finding intensity ranges from 0 to 10, with a default of 8. High numbers search harder for a face, but
are slower than lower values. In the advanced section, you can set the size of the faces you are
looking to find (the eye spacing). Setting the eye spacing manually is the first thing to try when
certain faces are having trouble with auto alignment. When you set the eye spacing manually, the
Barry T. Dudley
Page 25
2003/12/08
Page 26 of 29
Face Recognition User Manual
image to the right of the settings will show the range of the settings visually as an overlay on the
current record.
5.5.
Tips for More Speed
The speed of a database search is very dependent upon the hardware and the OS. This demo does
not take advantage of dual processors, but of course will run faster on faster CPUs. We recommend
at least a Pentium II 300. The biggest bottleneck in a fast search is the hard disk access. The faster
your hard drive spins, the better the performance. It is extremely important to keep your hard drive
de-fragmented. If your data is fragmented on the disk, performance may be decreased by a factor of
three. Lastly, the more ram you have, the better the program will handle larger FID files. A safe
estimate is that you should have enough ram to fit an entire FID file in memory plus about 64MB
for the operating system.
Note that if your database is not very big, the full and scan templates may end up in cache after the
first search. The remaining searches will be very fast since there will be no disk access.
If you plan on searching small databases (less than 50,000 records) then it should be easy to store
the vector data in RAM. Searches should be very fast on this data.
Barry T. Dudley
Page 26
2003/12/08
Page 27 of 29
Face Recognition User Manual
6.
6.1.
REMOTE MONITORING
Introduction
The software installed on every I-Cube face recognition system allows communication to be
established between itself and the server using TCP/IP. The only requirement is that the two boxes
are either connected by an ethernet network, or that they have isdn or pstn modems installed to
facilitate dialup communications.
This enables I-Cube to dial in to a remote I-Cube face recognition system, and control the system as
though he/she was sitting at the user interface on the box itself. This will only be used when a
problem occurs and initialted by the customer. Please contact [email protected] with the IP
address to be logged into.
Barry T. Dudley
Page 27
2003/12/08
Page 28 of 29
Face Recognition User Manual
7.
7.1.
TROUBLESHOOTING
BIOS Setup
Refer to www.DELL.co.za Procedures for Bootup Failure.
7.2.
Mechanical Issues
Before booting a system up:
1.
Check that all the cables connected i.e. power cable.
2.
7.3.
Power Supply does not work
Contact Dell.
Barry T. Dudley
Page 28
2003/12/08
APPENDIX A
TO DO
Barry T. Dudley
Page 29
2003/12/08