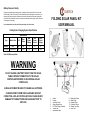
1
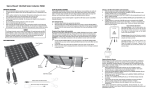
Battery Reverse Polarity
Full protection against battery reverse polarity, no damage to the controller will result. An error code
602 will display on the LCD screen. This code indicates the positive and negative connections to your
battery are the wrong way around. Disconnect the wires from the battery and reconnect making sure
the positive lead is connected to the positive terminal on the battery and the negative lead is connected
to the negative on the battery.
FOLDING SOLAR PANEL KIT
USER MANUAL
It is recommended to move the solar kit indoors during rain, hail or storms.
Folding Solar Charging System Specification
Specifications
Type
Module Size
N.W.
Max
Power
Max
Power
Voltage
Max
Power
Current
Open
Circuit
Voltage
Module
mm
kg
W
V
A
V
2 x 100W
930x666x70
18
200
17.5
11.43
22.3
Solar Cell: Monocrystalline
WARNING
DO NOT CHARGE A BATTERY DIRECT FROM THE SOLAR
PANELS WITHOUT CONNECTING TO THE SOLAR
CONTROLLER PROVIDED OR AN EXTERNAL SOLAR
CONTROLLER.
A REGULATOR MUST BE USED TO CHARGE ALL BATTERIES.
CHARGING DIRECT FROM THE SOLAR PANEL WITHOUT
CONNECTING A SOLAR CONTROLLER COULD CAUSE INJURY,
DAMAGE TO YOUR BATTERIES OR CAUSE A BATTERY TO
EXPLODE.
1.
2.
3.
4.
5.
6.
7.
Handle
Latches
Aluminium Frame
Strong Support Legs
LCD Solar Charge Controller
Junction Box
Specification Label
8.
9.
10.
11.
12.
13.
Battery Lead Cable
Battery Clips
Anderson Plugs
Protective Corners
Storage Carry Bag
Inline Fuse
Installation
Frequently Asked Questions
1.
2.
Q. What type of batteries can be used with the kit?
A. Factory set for AGM Batteries, but will charge Gel, Flood and Calcium Batteries too.
3.
4.
Remove the solar panel kit from the handy carry bag.
Unclip the two latches on the side of the unit and fold two panels outward. Loosen the wing nut to
each leg and fully extend the two legs then tighten the wing nut to each leg to lock the legs into
position to gain maximum support.
Place solar panel kit in the position facing the sun, free from over hanging branches or
obstructions.
Fully extend battery lead and connect to solar charger controller battery lead. Connect the battery
clips to the + positive (red) & - negative (black) battery terminals. Ensure that the connection is
secure.
Note: To obtain maximum output it is suggested that the solar panel kit direction be frequently
adjusted to track the suns movement throughout the day.
Operation LCD Screen
To view the LCD screen when the solar kit is operational simply pull the regulator towards you. The
regulator will swing down for easier viewing.
The LCD screen will show the battery voltage, input amps and total input amps charged when hooked
to a 12V battery.
To see individual details press the VOLT/AMP Button.
Each time this button is pressed information on the screen will change and eventually return to display
the voltage which is the start of the information screens.
When the battery being charged is fully charged the FUL will be displayed.
This indicates the battery is fully charged.
Four battery types are able to be charged.
Press and hold the battery type button for 3 seconds to enter battery type selection mode. The current
battery type will be displayed towards the top of the LCD screen. The default setting is AGM.
Each time the battery type button is pressed the battery type to be charged will display towards the top
of the LCD screen. When the correct battery type to charge is displayed simply stop pressing buttons
and wait for the regulator to exit selection mode.
Each battery type charge values have been preset into the regulators memory. By changing the battery
type the charge values will automatically change.
Refer to the solar controller manual for more details.
Q. Can I bypass the regulator to charge my battery?
A. ONLY when the kit is connected to the battery via another solar charge controller. A battery should
never be charged direct to any battery without a solar controller being used. Damage to your battery or
an explosion may occur as the voltage output by the solar panels will exceed the battery charge limit.
(VERY IMPORTANT TO NEVER CHARGE A BATTERY WITHOUT A REGULATOR)
Q. Will the solar panels over charge my battery?
A. The solar controller (regulator) ensures that a steady charge is supplied and will not over charge the
battery. It has up to five levels of charging Soft Charge, Bulk Charge, Absorption Charge, Equalization
Charge (only for wet or calcium batteries) and Float Charge.
Q. Can I extend/lengthen the battery lead?
A. If the lead is extended this could result in a loss of voltage and insufficient power transferred from the
solar controller (regulator) to charge the battery. Quality wire should always be used to extend the lead
length.
Q. Is the Controller water resistant.
A. Yes it is waterproof but it is recommended during rain, hail or storms the kit be moved indoors to
protect it.
Q. How do I clean the solar panel?
A. Dust & dirt should firstly be swept off the panel surface using a soft brush and then use a wet cloth to
wipe the panel surface to remove remaining dirt & grime. It is recommended that any bird droppings be
removed as soon as possible as if left can cause damage to the surface.
Troubleshooting
Check all connections to ensure they are secure and free from moisture & debris.
Check the solar panels are in good sunlight.
Test the battery the solar kit is hooked to, to ensure it is not faulty.
Disconnect the solar kit from the battery wait 30 seconds and reconnect. This will restart the solar
controller.
To test if your kit is working, check the battery voltage before you connect the solar kit to it. Then
There are 6 LED lights which display charge status and battery condition.
Refer to the solar controller manual for LED colour explanation.
connect the solar kit and leave it on for 10 minutes, then check the voltage in your battery. The battery
voltage would now be higher than your first reading if the kit is working correctly.
If problems continue please consult your place of purchase.
Error code 601 means the kit is not connected to a battery.
Connect to a battery and this code will change and display the battery voltage.