1
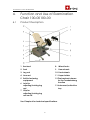
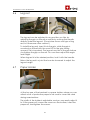
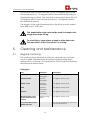
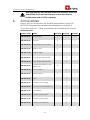
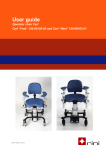
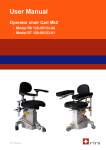
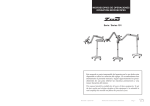
User Guide Examination chair 100-00100-00 2009-0008 issue 1 Tel +46-8-594 771 70 Fax +46-8-92 Examination chair 100-00100-00 Contents 1. The RINI examination chair 100-00100-00 ...................................... 3 2. Important - Before use...................................................................... 3 3. Installation ......................................................................................... 5 4. Function and Use of Examination Chair 100-00100-00 ................. 6 4.1 Product Description ........................................................................ 6 4.2 Product identification label........................................................... 7 4.3 Intended use.................................................................................... 8 4.4 Wheels and brakes ......................................................................... 9 4.5 Armrest.............................................................................................. 9 4.6 Leg rest ........................................................................................... 10 4.7 Paper Holder.................................................................................. 10 4.8 Position/Trendelenburg position ................................................. 11 4.9 Adjusting the chair seat and backrest ...................................... 11 5. Cleaning and Maintenance .......................................................... 12 5.1 Regular cleaning........................................................................... 12 5.2 Disinfection..................................................................................... 13 5.3 Maintenance and service ........................................................... 13 6. Accessories ..................................................................................... 14 7. Security ............................................................................................ 15 7.1 Warnings and other labels........................................................... 15 7.2 Statement of CE Conformity ....................................................... 15 8. Technical specification .................................................................. 15 8.1 Technical data .............................................................................. 15 8.2 Transport and storage conditions .............................................. 16 8.3 Reference Information ................................................................. 16 8.4 Disposal and Recycling................................................................ 16 9. Guarantee ....................................................................................... 16 2 Examination chair 100-00100-00 1. The RINI examination chair 100-00100-00 Thank you for choosing RINI’s examination chair for gynecology and urology. The examination chair 100-00100-00 is designed to offer optimum comfort, ergonomics, strength, and practical design to meet the requirements of daily work. The chair has been developed to meet the needs of both the patient and the operator. The examination chair is custom-designed for gynecological and urology examinations. The extremely stable construction is based on a sturdy metal frame equipped with a lifting mechanism that lifts the patient without twisting. The stability of the chair and the calm motion let the patient feel very secure. To maximize hygiene, the chair has a smooth easy-to-clean surface: exposed parts have protective covers to prevent dirt from collecting and to reduce the work involved in cleaning. The chair is developed in close collaboration with one of the best manufacturers of ultrasound equipment, BK Medical in Denmark. BK Medical has many years of experience with ultrasound as used in gynecology and urology examinations. The result of our collaboration is the Pro Focus Gynecology Solution (Pro Focus GS) and is based on an all-in-one principle, with the ultrasound scanner built into the examination chair, complete with the monitor, keyboard, CD/DVD drive and USB device all in a compact, ergonomically designed format. It is also easy to retrofit BK Medical equipment on the examination chair. RINI is constantly working to improve our current products and develop future ones. We always focus on the user, and we appreciate hearing viewpoints and ideas that can move our products forward, so please do not hesitate to let us know what you think about our products. 2. Important - Before use To ensure patient safety and the life of the product, it is important to observe the following instructions before use. Please read this manual carefully and understand how to use the product before you start. 3 Examination chair 100-00100-00 Before you unpack the product, check the packaging: Make sure that the packaging has not been damaged during transport. Report any damage immediately to the transport company and your local RINI representative. Remove the packaging: Detach the top and remove it. Remove any non-installed accessories that are packed on top of the chair. Detach one of the short sides and remove it. Detach the remaining brackets between the lower edge of the packaging and the transport pallet. Lift the remaining sides of the packaging away in one piece. Remove all the packing material such as plastic, tape, etc. from the chair. Warning! Do not use sharp tools when removing the packaging material. This can cause damage. Make sure that the delivery includes all ordered parts. Contact your RINI sales representative if you find any discrepancies. Lift the chair off the transport pallet. Warning! Be careful when lifting the chair off the pallet. The chair is heavy and may cause injury. Avoid bumping it. This can cause material damage. Before using the product, please check the following: The product has not been damaged in transport. All cables are connected as described in this manual. Please contact your local RINI sales representative if you have any concerns. 4 Examination chair 100-00100-00 3. Installation RINI examination chair 100-00100-00 When you receive the chair as a separate unit, it is already assembled and ready to use, except for a few large accessories that are included in the package and must be assembled as described in this manual or as directed by RINI’s sales representative. All electrical connections are ready to use. Because the chair is designed to be plugged directly into the wall, all you have to do is plug it in. Pro Focus Gynecology Solution A trained technician from BK Medical must assemble the Pro Focus Gynecology Solution. This includes installing the ultrasound scanner, connecting the cables, and installing the monitor arm, monitor, keyboard arm, keyboard, printer, USB and DVD units on the RINI examination chair 100-00100-00. 5 Examination chair 100-00100-00 4. Function and Use of Examination Chair 100-00100-00 4.1 Product Description 1 Backrest 8 Wheel locks 2 Seat 9 Rear wheels 3 Leg rest 10 Front wheels 4 Arm rest 11 Paper holder 5 Rail for fastening equipment 12 The backrest release for the Trendelenburg function 6 Joint for adjusting/locking leg rest 13 Instrument/collection tray 7 Grip for adjusting/locking leg rest on rail See Chapter 6 for technical specifications. 6 Examination chair 100-00100-00 4.2 Product identification label This label is located on the rear of the chair. Label Description Warning. Risk is present. Read accompanying text and information in the user manual. Type B equipment with ground for protection against electric shock. SWL Safe Work Load. The chair must not be loaded with more than the specified weight. Corresponds to 180 kg. Mode of operation Average ratio between operating time and rest time of the electrical lifting mechanism. Standard EN 60601-1 Product approval for medical products of this type. 7 Examination chair 100-00100-00 4.3 Intended use The examination chair is primarily intended for gynecological and urology examinations and is used to support the patient in the desired position during investigations and procedures. The seat is raised and lowered using an electric-powered telescopic lifter. The lowest position is a convenient height for the patient to sit down in the chair or get up from it; the highest position provides a good ergonomic working position for the operator. The backrest and the seat are individually adjustable using an electrically driven positioner. The backrest position can be varied from 70 degrees above the horizontal plane to 15 degrees below the horizontal plane (-15 degrees), which corresponds to the shock/Trendelenburg position. The seat angle can vary from 20 degrees above the horizontal plane (front of seat up) to 14 degrees below the horizontal plane (-14 degrees). A hand control or optional foot control is used to control the chair. On each side of the chair is a rail for fastening tools. The chair has individually adjustable arm and leg rests. Below the seat is the holder for the instrument/collection tray. A paper holder is located on the rear of the backrest, at the top. On the backrest are 2 manual release handles for the Trendelenburg function. The chair has four large wheels; the rear wheels are steerable and can also be locked. The chassis is painted, and large parts are enclosed in protective plastic covers, which make the chair easy to clean. 8 Examination chair 100-00100-00 4.4 Wheels and brakes The chair has four large wheels: the two front wheels are fixed, and the two rear wheels are steerable. This makes the chair easy to move and steer. The rear wheels can be locked. Press down the bracket between the rear wheels with your foot to lock the wheels. Move the bracket up to release the wheel lock. Warning! To avoid personal injury, it is important to keep the wheels locked when the chair used with patients. Warning! The chair must not be used to transport people. 4.5 Armrest The chair has two individually adjustable armrests. These can be adjusted in height, and the distance between them can be changed. To adjust their position, loosen the thumbscrews and position the armrests. Then tighten the thumbscrews. A drop-down armrest is also available. Moving the armrest out of the way makes it easier to lift a patient, for example. Pull out the thumbscrew below the armrest so that the armrest can drop down out of the way. 9 Examination chair 100-00100-00 4.6 Leg rest The leg rest can be adjusted to any position you like, by adjusting the grip on the rail as well as by moving the handle directly under the leg rest. (The picture shows one type of leg rest, but there are other versions.) To install the leg rest, insert it into the grip, while the grip is mounted on the rail with the word UP on the grip facing upward. This is important. The leg rest must be in the grip before you tighten the grip on the rail. You can then adjust the angle and height. When leg rest is in the desired position, lock it with the handle. Below the leg rest is a joint that can be loosened to adjust the leg rest angle. 4.7 Paper Holder At the top rear of the backrest is a paper holder, where you can attach a roll of protective paper to be used to cover the chair during examinations. The width of the holder is adjustable, and you can easily adjust it to fit the paper roll. Loosen the screws on the bottom, insert the paper roll, and tighten the screws. 10 Examination chair 100-00100-00 4.8 Position/Trendelenburg position The chair has a shock position that can be achieved electrically and also manually. The chair can be moved electrically to the Trendelenburg position using the hand or foot control. If necessary, you can also put the chair in the Trendelenburg position manually by twisting one of the red release handles located on either side of the backrest and then pushing the backrest down. Warning! If the seat front is down, relative to the horizontal plane, it will not be possible to put the chair at the correct Trendelenburg angle when the backrest drops down to the Trendelenburg position. Therefore the seat should be located horizontally (or with the front of the seat raised) for most purposes. 4.9 Adjusting the chair seat and backrest The angles of the seat and backrest can be adjusted independently. You maneuver the seat parts with the hand or foot control (optional accessory), pressing the buttons to move the seat parts. The height of the chair is also adjusted with the hand or foot control. 11 Examination chair 100-00100-00 Movement area for the backrest is from 70 degrees above the horizontal plane to -15 degrees (below the horizontal plane) (in Trendelenburg position). The seat has a movement area which is 20 degrees above the horizontal plane to -14 degrees (below the horizontal plane). The height of the seat (measured from the floor) can be varied from 680 mm to 1080 mm. The examination chair must not be used for people who weigh more than 180 kg. To avoid injury, never place a hand or other limb near the mechanics of the chair when it is moving. 5. Cleaning and Maintenance 5.1 Regular cleaning The chair must be cleaned as often as necessary, but at least once a week. Exposed parts should be cleaned after each examination. However, it is important to follow hospital cleaning requirements and routines. Detergent Part Wheel Detergent General detergent Information Use slightly damp cloth Painted metal General detergent Use slightly damp cloth Plastic cover General detergent Use slightly damp cloth Seat General detergent Use slightly damp cloth Armrest General detergent Use slightly damp cloth Electrical parts, such as the hand and foot control Mild cleaning agent Use slightly damp cloth I Pro Focus GS version. - See documentation for Pro Focus GS from BK Medical Ultrasound part 12 Examination chair 100-00100-00 5.2 Disinfection Clean the chair with disinfection/bactericidal agent, following the disinfectant manufacturer's instructions. Follow hospital or office procedures for cleaning body fluids from the chair’s surface. Recommended disinfection Part Seat, backrest, leg rest Detergent Disinfectant without alcohol Armrest Disinfectant Holder for tray Disinfectant Foot and hand control Disinfectant Information Follow the manufacturer's instructions regarding concentration Do not use disinfectants containing alcohol because they can dry out the material of the seat and backrest. Follow the manufacturer's instructions Use slightly damp cloth Tray Disinfectant Autoclaving 5.3 Maintenance and service 5.3.1 Service Follow the manufacturer's instructions The product is designed so that it does not require regular servicing, such as lubrication. On the other hand, you should conduct an annual inspection and functionality test to maintain operating and personnel safety. Contact your RINI sales representative for service and testing. 5.3.2 Spare parts and repairs Spare parts Please contact your RINI sales representative for information about spare parts for your product. Repairs Repairs must be carried out only by RINI or by a service center or engineer authorized by RINI. Products under warranty must always be sent to RINI authorized service center. 13 Examination chair 100-00100-00 Warning! Repairs and modifications not made by the RINI's authorized service personnel may cause the chair to malfunction and void the warranty. 6. Accessories Here is a list of accessories for the RINI examination chair 10000100-00. Standard accessories are described in chapter 4 “Function and use”. Other accessories are mentioned in the list. Accessory list Product Code Name Standard Optional Quantity 140-00108-00 Leg rest grip X 2 140-00109-00 Leg rest X 2 140-00102-00 Adjustable paper holder X 1 140-00110-00 Armrest, left X 1 140-00111-00 Armrest, right 140-00104-00 Drop-down armrest, left X 1 140-00105-00 Drop-down armrest, left X 1 140-00114-00 Instrument/collection tray without lid 140-00103-00 Foot control 140-00147-00 Hand control 140-00112-00 Seat X 1 140-00113-00 Extension rest for legs X 1 140-00118-00 Pro Focus GS accessory set X 1 140-00115-00 Neck pillow X 1 140-00116-00 Stand for coloscope X 1 140-00117-00 Stand for accessories X 1 170-00120-00 Stool for the operator X 1 1 X 1 X X 14 1 1 Examination chair 100-00100-00 7. Security The examination chair must only be used for the intended use as described in this user manual. Misuse and failure to follow the safety instructions could cause harm to people or product. This manual should always be available near the examination chair. Please note the warning labels on the chair. 7.1 Warnings and other labels Warning! Warning label used when there is risk to patients, staff or equipment. 7.2 Statement of CE Conformity Examination chair 100-00100-00 follows MDD EU Directive 93/42 EEC for medical products. Tested according to standard EN 60601-1 8. Technical specification 8.1 Technical data Examination chair 100-00100-00 Dimension Backrest Seat Armrest L x b (mm) 900 x 600 400 x 600 130 x 360 Total width 749mm without leg rest Total length 1150mm without bracket for wheel locks Seat height lowest/highest 680-1080mm Weight 120Kg Max load 200Kg Safe working load 180Kg Mains connection Protection Class Input; 230Vac, 50Hz Output voltage: 24V DC IP 24 Medical Classification Class I Operating conditions Temperature +10°C to +40°C 15 Examination chair 100-00100-00 Relative humidity Atmospheric pressure 8.2 20% to 90% at +30°C 700 to 1060 hPa Transport and storage conditions Examination chair 100-00100-00 Transport conditions Temperature Relative humidity Atmospheric pressure Storage conditions Temperature Relative humidity Atmospheric pressure 8.3 -25°C to +60°C 20% to 95% at +40°C 700 to 1060 hPa Reference Information Ref. 8.4 -25°C to +60°C 20% to 90% at +30°C 700 to 1060 hPa Document Disposal and Recycling The RINI examination chair is mainly made from environmentally recyclable material. The product consists mainly of steel, stainless steel, aluminum, PVC and other plastics. RINI recommends that the material be sorted and recycled as much as possible in connection with the destruction of the product. 8.4.1 Electronic parts and cables Electronic parts and cables shall be handled as electronics trash in accordance with local requirements. 9. Guarantee In agreement with RINI's general requirements and conditions, the warranty is valid for one year from purchase date. 16 Rini Ergoteknik AB Fågelsångsvägen 3B SE-186 42 VALLENTUNA SWEDEN Phone +46 8 594 771 70 Fax + 46 8 92 92 79 [email protected] www.rini.se