1
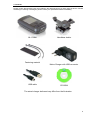
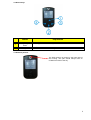
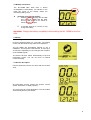
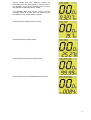
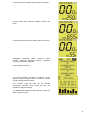
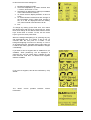
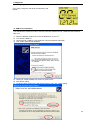
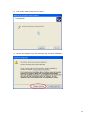
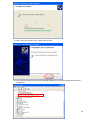
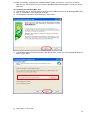
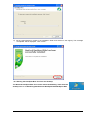
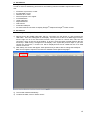
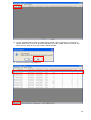
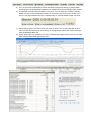
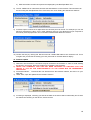
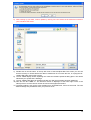
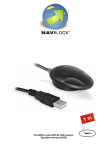
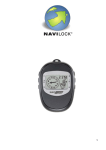
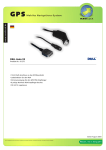
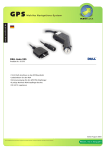
NL-130BK Bike GPS
User manual (61718)
1
Thank you for choosing a Navilock product. We are sure that the use of the NL-130BK will bring you
much pleasure. In order to avoid anything that could dampen your fun, please read this user manual
carefully before starting to use the device.
This manual provides illustrated step-by-step explanations of all the functions of this device and the
software. After reading this manual carefully, you can start using the device.
1. Introduction and Safety Information
1.1 Introduction
The NL-130BK is a GPS based bicycle computer with a DataLogger function that not only displays
current speed, but also records your leisure experiences so that they can later be transferred to Google
Maps. The M-STAR GPS-chipset allows the device to receive satisfactory signals even under adverse
conditions.
1.2 Safety Information
Important Health and Safety Information
When using this product, you should take the following safety precautions in order to avoid possible
damage and legal consequences. Please comply carefully with all safety and operation instructions
and keep it safely. Please pay attention to all warnings in this user manual and on the product. In
order to avoid injury, electric shock, fire or damage to this product, please comply with the following
warnings.
ELECTRICAL SAFETY
This product is designed to be powered by a rechargeable battery. Any other use can be dangerous
and will lead to the loss of any warranty claim for this product. Use only the original equipment and
never charge the rechargeable battery with any charger not approved by the manufacturer.
Handle storage batteries with care
If not handled properly, storage batteries can be a fire hazards and cause burns. Never
disassemble, destroy, perforate or short-circuit this battery. Never throw it into a fire or water, or
expose it to temperatures above 60°C (140°F).
NOTE: PLEASE RECYCLE OR DISPOSE OF USED BATTERIES OR STORAGE BATTERY CELLS
ACCORDING TO THE LOCAL REGULATIONS OR IN COMPLIANCE WITH THE INFORMATION
ENCLOSED WITH THIS PRODUCT.
SAFETY INFORMATION CONCERNING DIRECT SUNLIGHT
Avoid exposing the device to excessive dampness and extreme temperatures. Do not leave the device,
the battery, or storage battery cells, in a vehicle or any other place where the temperatures could rise
above 60°C (140°F) for any length of time. For exam ple, on top of a car dashboard, a windowsill or
behind a pane of glass exposed directly to the sun or very strong UV-light. This might damage the
device or the vehicle and overheat the batteries.
Damage requiring repairs
In the following cases, unplug the product, remove the rechargeable battery, and
contact an authorized repair specialist or your dealer:
• A liquid or an object has seeped in or penetrated the product.
• The product has been exposed to rain or damp.
• The product was dropped or damaged.
• There are visible signs of overheating.
• The product does not function correctly even when operated properly.
2
Please avoid using the device immediately after it has been subjected to large temperature
differences
If the device has been exposed to strong temperature and/or humidity fluctuations, condensation
may form inside the casing. In order to avoid damage to the device, wait until the moisture has
evaporated before turning it on.
NOTE: When the device has been taken from a cold place into a warm one, or vice versa, allow it to
reach ambient temperature before turning it on.
2. Specifications
Electronic and Mechanical details
Item
Max. waypoints
Max. routes
Display size
Display type
Pixels (h x w)
Weight
Protection class
NL-130BK
130848
99
29 x 28 mm
LCD with 4 grey levels
128 x 128
60g
no
Dimensions
75 x 42 x 18 mm
Background illumination
Operating temperature
Humidity
Power supply
Charging connector
Battery
Battery life
PC connection mode
Charging time
Ordinary
o
o
-10 C to +60 C
5% to 95% non-condensing
via Mini USB port
DC 5 volt via Mini USB port
900mAh Li-ION battery
GPS (3D Fix), illumination on
approx. 8 hours
GPS (3D Fix), illumination off
approx. 12 hours
USB interface
Mini USB 350mA, 3 hours to full charge
GPS parameters
GPS chip set
Frequency
C/A code
Channels
Antenna type
Position
Speed
Time
Date
New detection
Hot start
Warm start
Cold start
Height
Maximum speed
Acceleration
Vibration
MStar MB2122
L1, 1575.42 MHz
1,023 MHz chip rate
48
Built-in patch antenna
5 meters
0.1 m/s
1µs synchronized to GPS time
WGS-84
0.1 seconds, on average
1.5 seconds, on average
32 seconds, on average
34 seconds, on average
18,000 meters (60,000 feet) max.
515 meters/second (1000 knots) max.
less than 4g
20 m/sec3
3
3. Contents
3.1 Accessories
Please confirm that all these parts are included in the package before you start using the device. Should
something be missing or damaged, please contact your specialized dealer immediately.
NL-130BK
Fastening material
USB cable
Handlebar holder
Mains Charger with USB connector
CD-ROM
The actual charger delivered may differ from the illustration.
4
3.2 Device keys
Button
1.
2.
3.
4.
On/Off & Light
Marking Waypoint/
Enter
Left
Right
Explanation
On/Off switch
Waypoint save / Enter key
To move the menu to the left
To move the menu to the right
3.3 Antenna position
The GPS antenna is located in the lower part of
the housing. This part should always have an
unobstructed view of the sky.
5
3.4 Battery instructions
The NL-130BK Bike GPS uses a built-in
rechargeable Li-ION battery. An indicator in the
lower left corner of the display shows the
remaining battery power.
Charging of the storage battery:
1.
Insert the Mini USB plug into the USB
port of the NL-130BK and the other
end in a USB port on a PC, vehicle or
mains charging adapter.
2.
SPD/trip
O0
.O
1.27.21
KM
time
It will take about 5 to 6 hours to fully
charge the battery.
Important: Charge the battery completely before starting the NL-130BK for the first
time.
4. Startup
4.1 Starting the NL-130BK
Press the ON/OFF button for 2 seconds. The startup
screen with the Navilock logo will then be displayed.
The NL-130BK will immediately attempt to get a
satellite fix. This may take a few minutes, or even up to
30 minutes, depending on the strength and reception
of the satellite signals.
The device will then switch automatically to the first
information screen. You can use auto or manual
screen switching.
4.2 Screen description
Current speed and current UTC time with the set time
zone.
All information screens contain the general “current
speed” information, or SPD (“speed”).
The current trip as a time designation. The clock starts
automatically with any movement.
6
Current speed and total distance covered (in
kilometers) since the initial startup, or the last reset of
the odometer. A reset is only possible from a PC using
the software provided with the NL-130BK.
The NaviSport Bike Tool can be used to set the
odometer display to another value, for example, if the
NL-130BK is to be used by different people.
Current speed and daily distance covered.
Current speed and average speed.
Current speed and maximum speed to date.
Current speed and current altitude (above sea level).
7
Current speed and average altitude (above sea level).
Current speed and maximum altitude (above sea
level).
Current speed and minimum altitude (above sea level).
Datalogger information about maximum routes
(traces), maximum waypoints (points), remaining
routes and remaining waypoints.
Saving routes and points I
The GPS information provides an indication of the
quality of signal reception and the number of satellite
signals currently being received.
The numbers under the bars are the satellite
transponder numbers; those above the bars are
indications of signal strength.
The latitude and longitude of the location are given as
North (N) and East (E).
8
In this screen there are settings for:
1. Background lighting On/Off.
2. Time zone adjustment, eg. Berlin summer time
+ 2 hours, winter time +1 hour.
3. Switching from kilometers to miles (not available
in the current firmware version).
4. To switch the time display between 24 and 12
hours.
5. To switch between manual and auto change of
the information screen. When auto change is
set, an A will be displayed below the battery
icon, when manual is set this will be an M.
6. Exit
To change any setting, press Enter once, then select
the desired item with the left or right arrow key. Press
Enter, and change to the desired value with the arrow
keys. Press Enter to confirm. To exit, use the arrow
keys to go to Exit, then press Enter.
When the background lighting is off, pressing any key
will automatically turn it on again; it will go out 10
seconds after the last push of a button. If the
background lighting is turned on it will stay on. This is
an important function, especially during night rides, but
it reduces the battery operation time between charges
considerably.
If you want to save a waypoint but no satellite fix is yet
available, “GPS positioning” will be displayed. A
waypoint can only be saved after a satellite fix has
been achieved, until then, no latitude and longitude
data are available.
If you save a waypoint, this will be confirmed by “PO|
Saved”.
The “About”
information.
screen
provides
Navilock
contact
9
6. Waypoints
6.1 Saving Waypoints
If you save a waypoint, this will be confirmed by “PO|
Saved”.
10. USB Driver Installation
10.1 Installing the USB driver
The USB driver is required in order to use the connection between the NL-130BK and the NaviSport
Bike Tool.
1)
2)
3)
4)
Place the Navilock product CD in the CD-ROM drive of your PC.
Turn the NL-130BK on.
Connect the NL-130BK to a free USB port using the supplied USB cable.
Your system will find new hardware.
5) Change to “Install software from a list or a given source.”
6) Click Weiter (Next).
7) Locate the Driver folder on the CD list and confirm. Then click Weiter (Next).
10
8) Your system starts a search for the driver.
9) Confirm the Windows Logo Test message with “Continue installation.”
10) The driver will be installed in the system.
11
11) After it has been included, click “Fertig stellen (Finish).”
12) The COM port assigned to the Navilock NaviSport Bike driver will now be displayed in the device
manager list.
12
13) After successfully completing the installation please restart your system. A re-boot is necessary
otherwise you will encounter an error when the NaviSport Bike Tools attempts to access the device
COM port.
10.2 Installing the NaviSport Bike Tool
1) The CD menu has a “TOOLS” button to access to the installation routine of the NaviSport Bike Tool.
2) Click on “Installation” in the displayed About tab.
3) The installation information will be displayed. Click “NEXT.”
4) The NaviSport Bike Tool will be installed in the default folder, unless you have changed the path to a
folder of your choice.
5) Click “NEXT” in any case.
13
6) All the required data is copied to the installation folder and entered in the registry. The message
“Completed” will be displayed. Click “Finish.”
10.3 Starting the NaviSport Bike Tool from the Desktop
The Navilock NaviSport Bike Tool can be started immediately, either from the
desktop icon or via Start\Programs\Navilock NaviSport Bike\NaviSport Bike
14
11. PC Software
11.1 System Requirements
In order to achieve satisfactory performance, the following minimum hardware requirements must be
met:
•
•
•
•
•
•
•
•
•
•
A Pentium III processor, or later
512 Mb RAM or more
Windows XP or Vista
Internet Explorer 6.0 or higher
A CD-ROM drive
16 Mb videocard
Keyboard/mouse
VGA monitor
A free Mini USB port
An active Internet connection to display Google™ Maps and Google™ Earth content
11. PC Software
11.2 Handling the NaviSport Tool
1) Disconnect the NL-130BK USB cable, wait for 3 seconds, turn the device on, and reconnect the
USB cable. Two icons will appear on the display. The left one is for the PC-to-DataLogger function,
and the right one is for the PC-to-GPS function. Since you want to choose data, make the left
connection, which is also set as the default. To do this, press the button located between the two
arrow keys. “USB Linking” will appear on the display. If not, repeat the previous steps. If you have
chosen the wrong item, a mouse icon will be displayed and the NL-130BK will act as a GPS
receiver for the PC.
2) After startup, this screen will appear. Click Options and you will be able to change the NaviSport
Bike Tool to English if required. This switch is available under Option/Language/....
3) The tool will restart automatically.
4) To select the data, click on “Select routes.”
15
5) The pre-recorded data from the NL-130BK will be loaded. This is confirmed in a small pop-up
window. Make sure you want to delete the read data on the NL-130BK, otherwise click No. The
choice is yours. Click No if you don’t want to delete the data.
6) The route overview will be displayed.
7) You can view the individual recordings separately. If you want to change the route name, use the
“Change data” function.
16
a) You can view a track selected by a mouse click (blue background) directly on Google Earth.
This program must be separately installed and is available free from the Google Earth website.
b) The opened route file shows the details of your track, such as distance in relation to altitude,
speed, time and to the Google Maps function. An overview of the whole course is also given
and you can switch between the map, a satellite image or a hybrid satellite image map view.
c) Export KML is used if you want to show your track to others. You can send the KML file by email. The KML file can then be viewed directly on Google Earth, without the viewer needing to
have the NaviSport Bike Tool.
d) Export GPX works in a similar way, but only for software that supports the format such as GPS
Track Analyse (http://www.gps-freeware.de/).
17
e) GPX format files can also be imported and displayed by the NaviSport Bike Tool.
8) The NL-130BK has an odometer that shows the total distance covered to date. This odometer can
be reset using the NaviSpart Bike Tool. Click Tools, then click “Setting the total device distance.”
9) A window opens in which the 5 digits before the decimal point can be set. For example you can set
00010 for a distance of 10km, or for a reset, 00000 for zero km. This allows the bicycle computer to
be used by several people who can record their individual total distances covered.
10) Confirm the entry by clicking OK. Disconnet the NL-130BK USB cable to turn the device off. Turn it
on again and you will see the setting you have just made on the total distance display.
12. Firmware update
12.1 Procedure
1) With time, new functions or corrections may be included in the firmware. In order to avoid sending
the device in for service, there is a simple way to install the new firmware.
2) NEVER USE FIRMWARE THAT HAS NOT BEEN RELEASED BY NAVILOCK FOR THIS
DEVICE. IF YOU DO THE FUNCTIONABILITY OF THE DEVICE MAY BE IRREPARABLY
DESTROYED.
3) Proceed as follows:
Download the new firmware from the Navilock website, and save it to your
hard disk.
4) Under Tools, open the Update Device firmware function.
5) A warning is displayed, informing you that all the data on the device will be irretrievably lost. If there
are still tracks remaining on the device, save them first.
18
6) After backing up your data, confirm update by clicking Yes. Now select the firmware file located on
your hard disk. See below:
7) Double-click on the file name. In the top left corner of the NaviSport Bike Tool screen you can see
that the memory is cleared before the data is transferred. Do not close the tool, or unplug the NL130BK USB cable, during this process.
8) The NL-130BK display shows “Updating now” while the firmware update is taking place. This will be
followed by an “Update OK!” Message.
9) The NL-130BK USB cable can be disconnected only after this message has been displayed.
10) Now turn the NL-130BK on. The firmware version is displayed in the lower right corner of the
startup screen. And the version number should now be higher than before.
11) The basic settings, such as the clock deviation from UTC/GMT time, must now be made. The new
default settings may be different from your previous ones.
19
13. Maintenance
13.1 Safety information
Explosion hazard upon contact with fire!
Do not expose the device to temperatures above 60°C /140°F!
13.2 Cleaning
•
•
•
Never clean the NL-130BK with solvents or cleaners containing naphta, as this will damage the
housing.
Use a soft, slightly moistened cloth with a small amount of detergent to clean the NL-130BK. The
cloth should be just slightly moist and not soaking wet.
Small scratches on the display can be removed with the polishing agents freely available on the
market. But we are not liable for the success or failure of this procedure.
14. Possible Sources of Error
14.1 The device will not power on. Check that the storage battery has been charged. In order to do so,
plug the NL-130BK into the charger and connect it to the electrical socket. The display will show running
bars in the battery icon when the NL-130BK battery is being charged.
14.2 The rechargeabe battery has been charged, but the NL-1250 still does not power on. In this case,
please contact Navilock Support.
14.3 Your PC does not support the auto-boot function and does not boot the CD ROM automatically.
Please read the information under http://msdn2.microsoft.com/en-us/library/Aa969329.aspx.
14.4. Your NL-130BK does not find a FIX or it needs too much time for doing so. An unobstructed
view of the sky is needed to receive GPS signals. However, today’s highly sensitive chip sets make it
possible to get a signal, even without a satisfactory view of the sky, but this is only possible if the
signals are good enough. Sometimes, even with clear blue skies, the satellite signals can be distorted
to such an extent that they cannot be used. This is not the fault of the NL-130BK, but due to the basic
physical laws of electromagnetic radiation. Switch the NL-130BK off and try again later. Look for a
clear position, preferably not situated near the exterior walls of a building, as these may cause
reflections that interfere with the signal.
When using the NL-130BK for the first time, the first satellite fix might take up to 30 minutes. The same
might happen when you use the receiver on another continent.
14.6. The NL-130BK has become moist or wet: Do not connect the receiver to the charger, as this
can destroy the device completely and irreparably. Send the receiver with a note indicating „Water
Damage“ to our support department. Our support engineers will disassemble, dry and test the
receiver for function.
14.7. You have used the wrong charger for the NL-130BK. In this case, only the Navilock Repair
Center can determine the extent of the damage and submit an estimate of repair costs. Send the
device by prepaid postage to us with a note indicating "KVA-Wrong Power Supply.”
As the Navilock Repair Center tries to be as accommodating as possible, please explain the real
reason of the defect. Normally, we can determine during the error analysis, if the failure was caused
by unauthorized interference, water, damage from dropping, overcharging or incorrect handling.
Some malfunctions often have very simple solutions. It is not always necessary to immediately replace
a product. And this might not even rectify the malfunction, which may not be in the GPS-hardware at all.
Please contact Navilock Support before setting off to your dealer. We will help you quickly and
efficiently, so that you can avoid an unnecessary replacement.
20
In such a case, please provide as detailed an error description as possible, add the information about
your terminal equipment, the software used, and the operating environment (operating system, service
pack version, CPU size and type, memory size, hard disk type and interfaces, etc.) and send an email
to [email protected].
A member of the support team will look into your problem and work out a solution.
We hope you have much fun with your Navilock product!
15. Certificates
•
CE, FCC und R&TTE can be requested under [email protected] or viewed under
www.navilock.de in the Support section.
16. Warranty/Support/Copyright
16.1. Period of Warranty
• We will repair the GPS-receiver within the statutory time of the warranty free of charge, as long as
there has been no unauthorized interference, damage by water or moisture, damage resulting from
dropping, or any damage resulting from incorrect use.
16.2. Support
• For further support requests, please contact our support team: [email protected] /
www.navilock.com
You can also find up-to-date product information on our homepage: www.navilock.com
Please send products to be repaired, always by prepaid postage, to:
Tragant Handels- und Beteiligungs GmbH
Navilock Repair Center
Beeskowdamm 13/15
D-14167 Berlin-Zehlendorf
Please enclose proof of purchase and a detailed description of the malfunction. "Does not work” or
“defective” does not count as a detailed description of a malfunction. Time errors have to be
especially mentioned. For logistic reasons, we cannot accept carriage forward shipments.
16.3. Final Provisions
• The information and data contained in this manual is subject to change without prior notice. Errors
and misprints excepted.
16.4 Copyright
• Without explicit approval in writing from Navilock, no part of this user manual may be reproduced or
disseminated for any purpose whatever. This is irrespective of the kind and method or the means –
electronic or mechanical – this is used.
The brand label Navilock is a registered trademark and may not be used without written approval of
the rights holder. Under no circumstances may it be changed or amended by additions.
16.5. Brands of Third Parties
• Brands, trademarks, product names and logos of third parties, which are shown in this
documentation, are possibly brands or registered brands of the respective rights holders.
21
Declaration of Conformity
The CE declaration of conformity can be found at http://www.navilock.de/support/ in the conformity declaration section, or
requested by sending an e-mail to Konformitä[email protected].
WEEE Note
The WEEE (Waste Electrical and Electronic Equipment) Directive, which became effective on February 13, 2003, as European
Law, led to comprehensive changes with regard to the disposal of waste electronic equipment. The main purpose of this directive
is the avoidance of waste electrical and electronic equipment (WEEE) and at the same time promotion of re-use, recycling and
other forms of reprocessing in order to reduce waste. The WEEE logo on the product and the packaging indicates that the
product is not to be disposed of with normal household waste. You are responsible for delivering all used electrical and electronic
equipment to the authorized collection points. Separate collection and sensible reprocessing of your waste electrical and
electronic equipment supports more careful use of natural resources. Moreover, the reprocessing of the waste electrical and
electronic equipment is a contribution towards the preservation of the natural environment and also human health. Additional
information about the disposal of electric and electronic products, their recycling and collection points are available at your local
authority, disposal company, specialist stores and from the manufacturer of this product.
RoHS Compliance
This product complies with the Directive 2002/95/EC of the European Parliament and the Council of January 27, 2003 regarding
the limited use of hazardous substances in electrical and electronic devices (RoHS) as well as its modifications.
22
Date: 01.12.2009
23