1
OPEN SYSTEMS® Accounting Software
Bills of Materials/Kitting
User’s Manual
PN/2210.BK70
© 2005 Open Systems Holdings Corp. All rights reserved.
Document Number 2210.BK70
No part of this manual may be reproduced by any means without the written permission of Open Systems, Inc.
OPEN SYSTEMS is a registered trademark and OSAS, Resource Manager, Resource Manager for Windows,
and Report Writer are trademarks of Open Systems Holdings Corp. BBx is a trademark and PRO/5 and Visual
PRO/5 are registered trademarks of BASIS International Ltd. Novell and NetWare are registered trademarks
of Novell, Inc. Microsoft, Windows, Windows 95, Windows NT, Windows 2000, and MS-DOS are either
trademarks or registered trademarks of Microsoft Corporation. Adobe and Acrobat are registered trademarks
of Adobe Systems, Inc. TrueType is a registered trademark of Apple Computer, Inc.
Open Systems Accounting Software for UNIX uses PKZIP utilities from PKWARE, Inc.,
648 N. Plankinton Ave, Suite 220; Milwaukee, WI 53203. Phone: (414) 289-9788 Internet: www.pkware.com
Printed in U.S.A. This manual is recyclable.
November 2005, Release 7.0
This document has been prepared to conform to the current release version of OPEN SYSTEMS Accounting
Software. Because of our extensive development efforts and our desire to further improve and enhance the
software, inconsistencies may exist between the software and the documentation in some instances. Call your
customer support representative if you encounter an inconsistency.
Open Systems, Inc.
4301 Dean Lakes Boulevard
Shakopee, Minnesota 55379
General Telephone
(952) 403-5700
General Fax
(952) 496-2495
Support Telephone
(800) 582-5000
Support Fax
(952) 403-5870
Internet Address
www.osas.com
Bills of Materials/Kitting User’s Manual
Contents
Introduction
Welcome to OSAS
The Bills of Materials/Kitting System
Starting OSAS
Navigating OSAS
1-3
1-5
1-9
1-13
Installation and Conversion
Installation
Conversion
2-3
2-5
Set Up and Work Flow
Setting Up Bills of Materials/Kitting
Work Flow
3-3
3-9
Daily Work
Assembly Inquiry
Build Assembly
Undo Build
Build Assembly Journal
Post Transactions
4-3
4-5
4-11
4-13
4-15
Reports
Print a Report
Where-Used Report
Available Components Report
Component Cost Report
Bill of Materials History Report
Bills of Materials/Kitting User’s Manual
5-3
5-5
5-7
5-9
5-11
iii
Contents
File Maintenance
Kits
Bill of Materials
Components
Multilevel Cost Rollup
Tables
Purge Bill of Materials History
6-3
6-9
6-17
6-21
6-23
6-27
Master File List
Printing a Master File List
Kits List
Bill of Materials List
Tables List
7-3
7-5
7-7
7-9
References
System Messages
File Descriptions
Index
iv
A-1
B-1
IX-1
Bills of Materials/Kitting User’s Manual
Bills of Materials/Kitting User’s
Manual
Introduction
Welcome to OSAS
The Bills of Materials/Kitting System
Starting OSAS
Navigating OSAS
Bills of Materials/Kitting User’s Manual
1
1-3
1-5
1-9
1-13
1-1
Welcome to OSAS
Welcome to the Bills of Materials/Kitting application for OPEN SYSTEMS
Accounting Software® (OSAS®). Bills of Materials/Kitting helps you manage
assembled and kitted items in inventory by recording the components involved in
these items. Bills of Materials/Kitting works with the OSAS Inventory
application to calculate how many assembled items you can build from existing
component quantities and with the Sales Order application to sell assemblies and
kits.
Bills of Materials/Kitting plugs into Resource Manager, the foundation of OSAS.
Consult the Resource Manager guide for more information on basic OSAS
functionality and details on how Resource Manager works within the OSAS
system.
About This Guide
This guide describes the functions that make up the Bills of Materials/Kitting
application and gives details on how Bills of Materials/Kitting fits into your
existing business workflow. This guide is divided into these sections:
•
Chapter 1 introduces OSAS and the Bills of Materials/Kitting application,
and describes the basics of the Bills of Materials/Kitting system and how to
navigate around OSAS.
•
Chapter 2, Installation and Conversion, details how to install Bills of
Materials/Kitting using Resource Manager and how to create or convert the
data files it requires.
•
Chapter 3, Getting Started, gives information and checklists on the steps you
need to perform to set up Bills of Materials/Kitting.
•
Chapters 4 through 12 contain function descriptions organized by menu.
These chapters mirror the order that appears on the Bills of Materials/Kitting
menu.
Bills of Materials/Kitting User’s Manual
1-3
Welcome to OSAS
Introduction
•
The Appendixes contain supplimentary material not directly related to Bills
of Materials/Kitting functionality.
•
The Index is a topical reference to the information in the rest of the chapters,
and concludes this guide.
Conventions
This guide uses the following conventions to present information.
When the Inquiry or Maintenance commands (or both) are available for a field,
the Inquiry and Maint flags appear in the margin. See page 1-20 and page 1-25
for more information on these commands.
When you see the phrase “use the Proceed (OK) command” in this guide, press
Page Down in either text or graphical mode to continue. In graphical mode, you
can also click OK to proceed.
1-4
Bills of Materials/Kitting User’s
The Bills of Materials/Kitting System
Use Bills of Materials/Kitting to account for assemblies that you manufacture
(bills of materials) or take from inventory and sell (kits). The assemblies can be
created from raw materials, other assemblies, or a combination of raw materials
and assemblies.
For example, a computer reseller sells a computer system as a single unit made
up of a monitor, a keyboard, a CPU, a printer and a printer stand. The reseller
buys the monitor, the keyboard, the CPU and the printer from different
companies. The business also buys raw material for the printer stand, but the
reseller’s business builds the stand for the customer.
The computer system is a kit. The reseller identifies the system as a kit ID
(CS0001), with five types of components from inventory: one monitor, one
keyboard, one CPU, one printer, and one stand. Each can be sold separately.
The stand is an assembly represented as a bill of materials. The reseller identifies
it as an assembly ID (SH0001), with three types of components: five boards, two
metal plates, and eighteen screws. The boards, plates, and screws are not sold
separately from each other.
The parts that make up the other components are not sold separately either—for
example, the F7 key or the monitor shell is not sold separately. The difference
between the stand and the other components is that the reseller is in charge of
assembling the stand. The reseller does not need to assemble a keyboard, a
monitor, and a CPU; they may as well be raw materials.
The example illustrates the difference between a kit and a bill of materials. Each
different kind of component in a kit can be sold separately. (You must use the
Sales Order application to sell kits; Bills of Materials/Kitting does not work with
the Accounts Receivable application alone.) Selling a kit is no different from
selling its components separately (other than saving keystrokes).
A bill of materials is composed, at least in part, of components that are not sold
separately and that the user’s business is in charge of building.
Bills of Materials/Kitting User’s Manual
1-5
Introduction
The Bills of Materials/Kitting
The final stage involving a kit is its sale through the Sales Order application
(which recognizes the item as a kit). The final stage involving a bill of materials
is updating the INVExxx (Inventory Items) file with the on-hand quantity of the
finished product. After the assembly is built, it is identified as an item in the
Inventory application, and you can sell it as an item through the Accounts
Receivable application or the Sales Order application.
An assembly (or a built bill of materials) is identified differently from a kit. Bills
of Materials/Kitting is the only OSAS application that identifies an item ID as an
assembly ID. Inventory, Accounts Receivable, and Sales Order see an assembly
as another item. However, Bills of Materials/Kitting and Sales Order distinguish
between a kit and an item.
Inventory and Bills of Materials/Kitting check the Inventory system for the item
ID if the item is an assembly. Sales Order and Bills of Materials/Kitting read the
BKMHxxx (Master Header) and BKMDxxx (Master Detail) files for the item ID if
the item is a kit.
If an assembly is sold as a kit, the appropriate items are subtracted from
Inventory. Following the example above, if the reseller sells one kit CS0001 (the
computer system), the on-hand quantities of CPUs, keyboards, monitors, printers
and stands are all decreased by one.
If an assembly is sold as an item, its quantity decreases by one in Inventory; the
quantities of its constituent parts decrease when the assembly is being built.
Following the example above, when the computer system is sold, the number of
stands decreases by one, but the number of boards, plates, and screws stays the
same. Those numbers are adjusted accordingly only when you use the Build
Assembly function.
If the reseller sells the kit and each component decreases by one, the reseller must
check the quantities of each piece of equipment. If the number of monitors,
keyboards, CPUs, or printers is in the negative range, the reseller orders more
from the vendor. If the number of stands is in the negative range, the reseller,
knowing that the stand is an assembly, sees from the bill of materials for the stand
that each stand uses five boards, two plates, and eighteen screws.
1-6
Bills of Materials/Kitting User’s
The Bills of Materials/Kitting System
Introduction
The reseller checks inventory again for the bill of materials’ components. If the
right quantity of necessary items is not in stock, the reseller places the
appropriate order. If the right quantity is in stock, the reseller supervises the
assembly of the stand and then uses Bills of Materials/Kitting to enter the fact
that a stand has been built.
To do this task with only the Inventory application, the reseller needs to know
which items make up a stand along with any other items the business is
responsible for making. Inventory can track an item’s ID, description, quantity,
cost, and so on, but it cannot automatically track its constituent parts or quantities
of those parts.
Daily Work
Use the Daily Work functions for operations that involve building and tracking
assemblies, producing the Build Assembly Journal, undoing a build, and posting
transactions.
Reports
Use the Reports functions to produce summarized information about
components, costs, and histories.
File Maintenance
Use the File Maintenance functions to set up and maintain information about
assemblies and kits.
Master File Lists
Use the Master File Lists functions to produce information about kits and bills of
material.
Bills of Materials/Kitting User’s Manual
1-7
The Bills of Materials/Kitting
Introduction
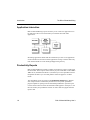
Application Interaction
Bills of Materials/Kitting requires Inventory to run. These two applications can
be used alone, but are most useful when you interface them with other
applications.
Interfacing applications means that the information you enter in one application
can be transferred to and used in other applications. Doing so reduces data entry
time and the number of errors that might happen along the way.
Productivity Reports
Bills of Materials/Kitting includes a number of productivity reports in Microsoft
Excel® format. These reports connect directly to your OSAS data via the ODBC/
JDBC driver (included with OSAS 7.0) and allow you to use spreadsheet tools to
manipulate the data as you want and produce charts and graphs to visualize
trends.
The spreadsheet reports are listed on the Productivity Reports menu. Doubleclick a report name to automatically launch Excel or any other spreadsheet
program capable of opening an Excel-formatted spreadsheet to open the report.
Use the selection boxes to filter the information that appears in the report, or use
the tools within your spreadsheet software to create charts and graphs from the
report’s data.
1-8
Bills of Materials/Kitting User’s
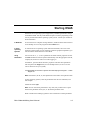
Starting OSAS
OSAS runs on an operating system supported by 150 MB of permanent storage
and 4 MB of RAM. You may need additional space or memory, depending on the
size of your data files and the operating system you use. Consult your reseller for
more information.
In Windows
To start OSAS on a computer running Windows, double-click the OSAS shortcut
on the desktop or access the program from the Start menu.
In Other
Operating
Systems
To start OSAS on an operating system other than Windows, enter osas at the
operating system prompt. If your operating system has graphical capabilities, you
can also use the OSAS shortcut to start OSAS.
Using
Parameters
You can use the -u, -c, -a, and -t parameters in OSAS shortcut properties or after
the osas command so that the system automatically uses the appropriate user ID,
company ID, and access code to save time logging in.
In Windows, open the OSAS shortcut’s properties and enter these parameters
after the path in the Target field (as in the example below; be sure to use the
correct directories for your system).
C:\basis\bin\bbj.exe osasstrt.txt -q -tT00 -cD:\osas70\progrm\config.bbx - -uSam
-aapple -cH
Note: In Windows, the -u, -c, and -a parameters must follow the separation dash.
In other operating systems, enter the parameters after the osas command, as in
this example:
osas -t T2 -c B -a apple
Note: You can enter these parameters in any order, but you must leave a space
between the parameter mark (-t, -c, or -a) and the parameter itself.
Refer to the Resource Manager guide for more information on these parameters.
Bills of Materials/Kitting User’s Manual
1-9
Starting OSAS
Introduction
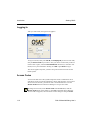
Logging In
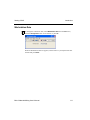
After you start OSAS, the login screen appears.
To log in to OSAS, enter your User ID, the Company ID you want to work with,
and your Access Code. If you want to save your access code so that you do not
need to enter it again, select the Save Password? check box (or enter Y in text
mode) to save your information. Finally, click OK or press Enter to log in.
This screen appears only after you have set up users and access codes for the
OSAS system.
Access Codes
Access codes limit use of the system and protect sensitive information. Each
code allows access to specific applications, menus, and functions. If you cannot
select a menu or function, your access code is not authorized for it. Use the
Access Codes function in Resource Manager to set up access codes.
To change access codes, select Access code from the File menu, click the
Access Code button on the toolbar, or press F4 on the main menu. When the
Access Code box appears, enter the access code to change to and press Enter.
1-10
Bills of Materials/Kitting User’s
Introduction
Starting OSAS
Workstation Date
To change the workstation date, select Workstation date from the File menu,
click the Change Date button on the toolbar, or press F6.
When the Workstation Date box appears, use the button or your keyboard to enter
the date and press Enter.
Bills of Materials/Kitting User’s Manual
1-11
Navigating OSAS
OSAS menus and functions are available in two modes: graphical and text. The
graphical mode allows both keyboard and mouse commands and uses data entry
fields and buttons similar to those found in any graphical software program. The
text mode presents information in a simpler text format and uses keyboard
commands to access functions and move around the screen. If you use an
operating system that does not have graphical capabilities, the text mode is the
only mode available.
You can use either text or graphical function screens indepently of the main
menu. For example, you can use text function screens while using the graphical
main menu, and vice versa. Select GUI Functions from the Modes menu or press
Shift+F6 to toggle between the text and graphical modes for function screens.
When available, press Shift+F5 to switch between graphical and text menu
modes, or press Shift+F6 to switch between modes on function screens. You can
also use the Resource Manager Defaults function to select the default mode to
use for the main menu and function screens.
In text mode, use the Page Up, Page Down , arrow, and Enter keys to move
between menus, select and enter functions, and move around function screens.
When a list of commands appears at the bottom of a function screen, press the
highlighted letter to use a command. These methods also work in graphical
mode, or you can use the mouse to click on fields and command buttons.
Graphical Mode
If you’re familiar with other graphical software programs, you’ll find it easy to
navigate around the OSAS graphical mode, which uses buttons, toolbars, text
entry boxes, and menus to help you move through your tasks.
Bills of Materials/Kitting User’s Manual
1-13
Navigating OSAS
Introduction
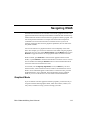
Main Menu
If you use BBj in graphical mode, the main menu is available in two flavors:
graphical and MDI. To switch between the two styles, press Shift+F5. If you use
Visual PRO/5, the graphical main menu is the only graphical menu available.
Graphical
Main Menu
The graphical main menu is shown below.
You can move around the graphical menu in these ways:
1-14
•
Click an application to view that application’s menu. Click a menu item to
view its functions. Double-click a function name to enter that function.
•
To exit from the graphical menu, click a different application or menu name
or press Tab to return to the main menu.
•
To exit from OSAS, click the Close box in the upper-right corner of the
screen, press F7, or select Exit from the File menu.
Bills of Materials/Kitting User’s
Introduction
Navigating OSAS
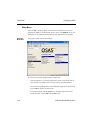
MDI Main
Menu
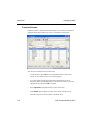
The MDI menu centralizes all OSAS functionality in one location: applications
appear as tabs at the top of the screen, their menus and functions appear in a
navigation pane on the left side of the screen, and function screens appear in the
large pane on the right. Using this menu, you can open more than one function
screen at a time and move or minimize screens as needed. However, you cannot
open two functions that lock the same data file at the same time.
You can move around the MDI menu these ways:
•
To view an application’s menus, click that application’s tab.
•
To view the functions a menu contains, click the menu name. The menu
expands to list the functions it contains. Click the function name to enter the
function. The function screen appears in the right pane.
•
To exit from a menu, click a different menu name or application tab. To exit
from OSAS, click the Close box in the upper-right corner of the screen,
press F7, or select Exit from the File menu.
Bills of Materials/Kitting User’s Manual
1-15
Navigating OSAS
Introduction
Function Screens
Graphical screens contain the same functionality as text screens, presented in a
graphical format that includes easy access to commands via the mouse.
You can move around the screen in these ways:
1-16
•
Use the mouse or press Tab to move from field to field. Use the scroll
buttons to move from line to line in scrolling regions.
•
If a screen appears prompting for the kind of information to enter or
maintain (such as on File Maintenance or Transactions screens), select the
appropriate option and click OK to continue.
•
Press Page Down if prompted to move to the next section.
•
Click Header when it appears to return to the screen’s header section.
•
Press F7 to exit the screen and return to the main menu.
Bills of Materials/Kitting User’s
Navigating OSAS
Introduction
Menus
Both the graphical main menu and graphical function screens contain drop-down
menus that give you access to additional commands without using the function
keys. While you can use the function keys to access commands in graphical
mode, you may find it easier to access command through these menus.
To access a menu’s commands, click a menu title. The commands for that menu
appear, followed by any associated hot key combinations in brackets < >. To use
a command, click the command name or press the hot key combination.
Refer to the Resource Manager guide for more information on the menus
available in OSAS and their commands.
Shortcut
Menu
OSAS gives you quick access to commands relating to the screen you’re using
via a shortcut menu. The commands that are available depend on the function and
the field you are currently using. To use these commands, click the right mouse
button and select the command from the menu that appears.
On the main menu, the shortcut menu gives you access to commands that help
you manage your Favorites menu, switch between sample and live data, perform
certain setup tasks, and view function information. On function screens, this
menu helps you access help documentation, move around the function screen,
work with EIS dashboards, and so on.
Other
Commands
Menu
The Other Commands (or F4) menu is available on both graphical and text
menu and function screens and gives you access to additional utilities and
commands not directly related to the function you’re currently using. Among
other things, these commands open calculators or allow you to view or enter
additional information. In text mode, press F4 twice on the menu or once on
function screens to access this menu.
Consult Appendix A in the Resource Manager guide for more information on the
commands available on the Other Commands menu.
Bills of Materials/Kitting User’s Manual
1-17
Navigating OSAS
Introduction
Information
Menu
The Information (or Shift+F2) menu is available in some graphical or text
function screens in certain applications and gives you access to additional
information about a customer, vendor, item, job, bill of material, or employee.
The commands available on the Information menu are determined by the
applications you have installed, and can include:
•
•
•
•
•
General Information
Comments
History
Documents
Address Lookup
Not all of the commands above appear on every Information menu; instead,
commands are available only as they are relevant to the task you are performing.
For example, if you are entering a transaction in Accounts Receivable, you can
access comments or documents about items or customers but not about
employees or vendors.
Consult Appendix A in the Resource Manager guide for more information on
how to use the functions on the Information menu.
Favorites
Menu
The Favorites menu gives you quick access to the OSAS functions you use most
by allowing you to add selections for entire menus or particular functions to a
custom menu. After you’ve set up the menu, select Change to Favorites from
the graphical Favorites menu or press F2 to access the functions.
The Favorites menu saves you time by eliminating the need to switch between
applications. You can add functions from several different applications to the
Favorites menu and access them all there rather than switching between
applications on the main menu to access the functions you need.
To add a function to the Favorites menu, select the function you want to add and
press F10. Press F2 to switch to the Favorites menu to confirm that your
selection was added.
To remove a function from the menu, select the function on the Favorites menu
that you want to remove and press F10 again.
1-18
Bills of Materials/Kitting User’s
Introduction
Navigating OSAS
Toolbars
As with menus, graphical screens also contain toolbars that give you fast access
to the most frequently used OSAS commands. The toolbar for the main menu
differs slightly from that of function screens.
Main Menu
Toolbar
The toolbar for the main menu is shown below. Click a button to access that
command.
Access
Code
Workstation
Date
Function
Screen
Toolbar
Command
Help
Application
Versions
Calendar
Calculator
Toggle
Favorites
Call a BBj/Pro5
Program
The toolbar for function screens is shown below. Click a button to access that
command.
File
Maintenance
Start
Over
Delete
Paste
Copy
Calendar
Calculator
Field
Help
Online
Documentation
Address
Mapping
Date Fields
If you use BBj in graphical mode, click the Calendar button when it appears next
to date fields to open a calendar so that you can select the date you want to enter
into that field.
Bills of Materials/Kitting User’s Manual
1-19
Navigating OSAS
Introduction
Browse
If you use BBj in graphical mode, you can use the Browse button when it
appears next to fields to navigate to directories and files and automatically enter
file paths into that field. Click the Browse button to open the Select Directory/
File screen, then navigate to the directory or file and click Open to automatically
enter the file path in the field.
Inquiry
The Inquiry command helps you look up and select valid entries for fields that
are connected to master file records. For example, when you use the Inquiry
command in a Batch ID field, OSAS lists all batches you have set up so that you
can select the one you want to enter in that field. When the Inquiry button
appears next to a field, you can either click the button or press F2 to open the
Inquiry screen and search for valid entries.
Maintenance
The Maintenance command allows you to enter or edit master file records on the
fly from within functions. For example, you can use the Maintenance command
to add a new customer or item from within the Transactions function. The
Maintenance command is available when the Maintenance button appears on the
toolbar. Click the button or press F6 to open the File Maintenance function
associated with that field and enter or edit a new master file record.
Address Mapping
When you are working with a screen that contains an address, you can use the
Address Mapping command to view a map of that address. This command
combines address information with the URL and search variables in the Resource
Manager Web Setup function and the Map Lookup ID in the Company Setup
function to direct your web browser to a mapping website and generate the map.
Note: Before you can view maps, you must set up mapping website information
in the Resource Manager Web Setup function, select the Map Lookup ID to use
in the Resource Manager Company Information function, and enter the path to
your workstation’s web browser in the Resource Manager Defaults function.
1-20
Bills of Materials/Kitting User’s
Navigating OSAS
Introduction
Text Mode
The OSAS text mode is available on all operating systems. If you use OSAS on
an operating system that does not have graphical capabilities, the text mode is the
only mode available. In text mode, all screens are presented in an easy-to-use
textual interface that you navigate through using keyboard commands.
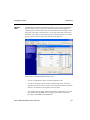
Main Menu
The text main menu is shown below.
When you select an application, the application’s menu is superimposed over the
main menu. Selecting an entry on an application menu opens a function screen or
a submenu.
Bills of Materials/Kitting User’s Manual
1-21
Navigating OSAS
Introduction
You can move around the text main menu in these ways:
1-22
•
Use the arrow keys to move the cursor up and down to highlight the
application you want. Then press Enter to select it.
•
Press the first letter of the application you want to move the cursor to the
first application beginning with that letter. Continue to press the letter key or
the down arrow until the application you want is highlighted, then press
Enter to select it.
•
Use the mouse to click an application to view that application’s menu.
•
To move to the first application on the menu, press Home. To move to the
last application on the menu, press End.
•
On an application menu, press Page Up to move to the menu immediately
behind it. If you are several levels away from the main menu, you can return
to the main menu by pressing Page Up repeatedly or by pressing Tab once.
•
To exit from OSAS, press F7.
Bills of Materials/Kitting User’s
Introduction
Navigating OSAS
Function Screens
Like the text menu, OSAS text function screens can be used on all operating
systems and in combination with graphical menus.
You can move around the screen these ways:
•
Press Enter or the down arrow to move from field to field.
•
To use a command that is listed in the command bar, press the highlighted
letter.
•
Use hot key commands to access information screens or to toggle commands
on and off. Refer to Appendix B in the Resource Manager guide for more
information on these commands and their corresponding hot keys.
•
If a screen contains more than one section, press Page Down when
prompted to move to the next section.
Bills of Materials/Kitting User’s Manual
1-23
Navigating OSAS
Introduction
•
If a menu appears prompting you for the kind of information to enter or
maintain (such as in the example and on Transaction and File Maintenance
screens), select the appropriate option and press Enter.
•
To exit the screen and return to the menu, press F7.
Menus
Like the graphical mode, the text mode also includes menus that give you access
to commands that open additional utilities, show additional information about the
task at hand, or set up a custom menu that contains frequently-used commands.
Refer to Appendix A in the Resource Manager guide for full details about the
menus available in OSAS.
Other
Commands
The Other Commands (or F4) menu gives you access to additional utilities and
commands not directly related to the function you’re currently using. In text
mode, press F4 twice on the menu or once on function screens to access this
menu. See page 1-17 for more information on this menu.
Information
Menu
The Information (or Shift+F2) menu gives you access to additional information
about a customer, vendor, item, job, bill of material, or employee. In text mode,
this menu is available when the Info flag appears at the bottom of a function
screen.
The commands on the menu are available only as they are relevant to the task
you are performing. For example, if you are entering a transaction in Accounts
Receivable, you can access comments or documents about items or customers
but not about employees or vendors. See page 1-18 for more information.
Favorites
Menu
The Favorites menu allows you add the OSAS menus or functions you use most
frequently to a custom menu. After you’ve set up the menu, select Change to
Favorites from the graphical Favorites menu or press F2 to access the functions.
To add a function to the Favorites menu, select the function you want to add
from the main menu and press F10. To remove a function from the menu, select
the function on the Favorites menu that you want to remove and press F10 again.
See page 1-18 for more information on this menu.
1-24
Bills of Materials/Kitting User’s
Introduction
Navigating OSAS
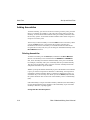
Commands and Flags
Both the text menu and text function screens let you use commands to drill down
to more information, change companies or access codes, switch to sample data,
and perform tasks related to the function you are using. These commands are
analogous to the commands contained on drop-down menus in graphical mode.
You access commands by pressing the hot key combination for the command you
want to use. If you’re working with a keyboard that lacks function keys (labeled
with an F followed by a number) or if you’re working with an emulator in UNIX
(which can cause function keys to become unavailable), press the appropriate
alternate key combination to access the command.
Refer to Appendix B in the Resource Manager guide for a list of all OSAS
commands and their associated hot keys.
Not all commands are available for every function or field; when a command is
available, a flag appears at the bottom of the function screen. Common flags
include Quick, Info, Maint, Inquiry, and Verify.
•
The Quick flag reminds you that you are using the Quick Entry mode to skip
fields that are not required. Press Ctrl+F to toggle quick entry on and off.
•
When the Info flag appears, press Shift+F2 to access the Information menu
to access additional information about a customer, vendor, item, job, bill of
material, or employee. See page 1-18 for more information on this menu.
•
When the Maint flag appears, press F6 to launch the appropriate File
Maintenance function to edit a master file record or enter a new one “on the
fly.” When you finish, press F7 to return to the function you were using.
•
When the Inquiry flag appears, press F2 to use the Inquiry command to look
up additional information and select valid entries for the field you are in.
•
The Verify flag reminds you that you are using verification. When this flag
appears, you must provide verification when you press Page Down or use
the Proceed (OK) command. Press Ctrl+V to toggle verification on and off.
Bills of Materials/Kitting User’s Manual
1-25
Navigating OSAS
Introduction
Command Bar
The command bar appears at the bottom of function screen and gives you access
to commands that allow you to move around the screen, add or edit information,
change settings for selected lines, or select output devices.
The commands that are available depend upon the function you are using, and are
analogous to the command buttons available on graphical screens. Press the
highlighted key to use a command.
Messages
Messages appear at the bottom of the screen when a command is unavailable or
when OSAS needs information to continue.
Address Mapping
When you are working with a screen that contains an address, you can use the
Address Mapping command menu to view a map of that address. This
command combines address information with the URL and search variables in
the Resource Manager Web Setup function and the Map Lookup ID in the
Company Setup function to direct your web browser to a mapping website and
generate the map.
The Address Mapping command is available when the Map flag appears at the
bottom of the screen. To view a map of the first address on the screen, press
Shift+F4. To view a map of the second address (if present), press Shift+F5. The
second command is not available when there is only one address.
Note: Before you can view maps, you must set up mapping website information
in the Resource Manager Web Setup function, select the Map Lookup ID to use
in the Resource Manager Company Information function, and enter the path to
your workstation’s web browser in the Resource Manager Defaults function.
1-26
Bills of Materials/Kitting User’s
Introduction
Navigating OSAS
Reports
All OSAS applications contain a variety of reports to help you view and analyze
your business data. Each report function includes a selection screen that allows
you to select the range of information to include in the report, which appears in
alphabetical order when the report is produced. After you select the information
to include, use one of these options to output the report:
•
Select Printer (or enter P in text mode) to send the report to a printer, then
select the printer to use.
•
Select Print Preview (or enter R) to view the report in a preview window,
from which you can print the report later. This option is only available on
Windows or graphical Linux workstations running BBj.
•
Select File (or enter F) to save the report to a file, then change the directory
path and file name (followed by the .txt extension), if necessary. Directory
paths and file names must be less than 35 characters in length.
Note: To preserve formatting, view the reports you save to a text file with a
fixed-width or monospaced font (Courier or Lucida Console, for example).
•
In text mode, enter S to view the report directly in an OSAS function screen,
then select whether to view it in Standard or Compressed width.
•
When available, select Email (or enter M) to e-mail the report, then enter the
e-mail address to sent the message to, the subject for the message, and
whether to include the report as an attachment to the message.
Generally, reports or forms that make up part of your audit trail cannot be
e-mailed. You also must set up your e-mail system in Resource Manager
before you can e-mail reports.
Note: To preserve formatting, view e-mailed reports (or attachments) with a
fixed-width or monospaced font (Courier or Lucida Console, for example).
Consult the Resource Manager guide for more information about reports.
Bills of Materials/Kitting User’s Manual
1-27
Installation and Conversion
2
Bills of Materials/Kitting
Installation
Conversion
Bills of Materials/Kitting
2-3
2-5
2-1
Installation
Before You Install Bills of Materials/Kitting
Make sure your system meets these minimum requirements before you install
Bills of Materials/Kitting.
The Bills of Materials/Kitting system needs a minimum of 3 megabytes (3 MB)
of disk space to work correctly with programs, sample data, data dictionaries,
system files, and graphics files. Having more disk space available is necessary
for the data files you create and maintain.
The OSAS system requires at least one megabyte (1 MB) of main memory to run.
More memory may be necessary in certain environments and operating systems.
Installing Bills of Materials/Kitting
Use the Install Applications function in Resource Manager (see the Resource
Manager User’s Manual) to install Inventory. Then use the same function to
install Bills of Materials/Kitting.
Setting up Bills of Materials/Kitting
Once you have Bills of Materials/Kitting installed on your system, you must
prepare your data files for everyday use.
You can prepare files for use with Bills of Materials/Kitting in one of two ways:
you can create and set up your files manually on a new system, or you can
convert your old files when you upgrade from an earlier version. To create files
on a new system, use the Data File Creation function on the Company Setup
menu in Resource Manager (see the Resource Manager User’s Manual). For
instructions on converting your files, see the “Conversion” section later in this
chapter.
Bills of Materials/Kitting
2-3
Installation
Installation and Conversion
You must install and set up Inventory before you set up Bills of Materials/Kitting.
If you plan to use General Ledger or Sales Order with Bills of Materials/Kitting,
you must install and set up those applications before you set up Bills of
Materials/Kitting.
2-4
Bills of Materials/Kitting
Conversion
If you use an earlier version of OSAS Bills of Materials/Kitting, you can convert
your files from the older version to the current version.
When you are ready to convert files, use the Data File Conversion function on
the Company Setup menu in Resource Manager (see the Resource Manager
User’s Guide) to upgrade Bills of Materials/Kitting data files. You can upgrade
from version 4.xx, 5.xx, or 6.xx.
If you are converting from version 6.5x to 7.0, no conversion is necessary. You
should still use the Data File Conversion function to copy data files from the old
data directory to the new directory, however.
Note
You must install the new version of Bank Reconciliation before you convert
files. You can replace and update the programs properly only by using the
Install Applications function in Resource Manager.
Before you convert an application’s files, make note of the version number
of the application from which you are converting. The Data File Conversion
function has no way of determining the information from within the
function.
Before you convert an application’s files, back up your data files.
Consider Your Setup
Before you try to convert from your version of Bank Reconciliation, consider the
exact setup of your system. Since OSAS code can be customized, modifications
to your system might be lost if you install a new version of a program or update a
file. If you are not sure if your system is ready for conversion, consult your
value-added reseller.
Bills of Materials/Kitting
2-5
Installation and Conversion
Conversion
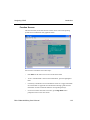
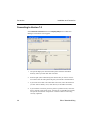
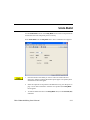
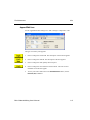
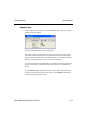
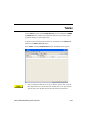
Converting to Version 7.0
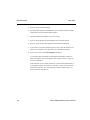
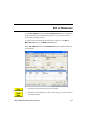
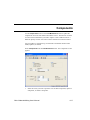
Select Data File Conversion from the Company Setup menu in Resource
Manager. The function screen appears.
2-6
1.
The system displays all valid OSAS data paths. Select the destination
directory where your new data files will reside.
2.
Enter the path (drive and directory) that has the files you want to convert.
You cannot enter the same path as the path you selected as the destination.
3.
If you want source files to be erased after conversion, select the check box
(or enter Y in text mode); if not, clear the box (or enter N in text mode).
4.
If you want the conversion process to pause if a problem occurs, select the
box (or enter Y in text mode); if not, clear the box (or enter N in text mode).
The system considers file corruption or evidence of data not converting
correctly a problem.
Bills of Materials/Kitting
Installation and Conversion
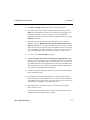
Conversion
5.
Enter BK in the Appl column; Bills of Materials/Kitting appears.
6.
Enter your earlier version number of Bills of Materials/Kitting, and press
Enter. (You can determine the version by looking at the copyrights screen
when you start OSAS, or in most versions, by using the Application
Information tool button on the menu screen in graphical mode or by pressing
Shift+F2 in text mode.
7.
If data files already exist for Bills of Materials/Kitting in the intended
destination path, the BK data files exist. Do you want this task to erase
them? prompt appears. If you want to erase the existing files and convert the
files from the version in the source path, select Yes (or enter Y in text mode);
if not, select No (or enter N in text mode). If you elect not to erase existing
files, you must change your directory choices so that no conflict exists.
8.
To convert, use the Proceed (OK) command.
9.
The Do you want a printout of error log after each application? prompt
appears. If you want the error log to be produced after files are converted for
each application, select Yes (or enter Y in text mode); if you want the log to
be produced after files for all applications are converted, select No (or enter
N in text mode). If you are converting only Bills of Materials/Kitting files,
your answer to this prompt makes no difference.
10. Answer the questions that appear relating to the conversion of the employee
history and last-year files.
11. If a problem occurs and you indicated that you want the system to pause
when a problem occurs, a prompt alerts you. To stop the conversion process,
select Yes (or enter Y in text mode). To let the conversion run its course and
investigate later, select No (or enter N in text mode).
12. When the process is finished, the files are converted. Select the output
device for the error log.
After conversion is finished and the error log is produced, the main menu—
with Bills of Materials/Kitting added—appears.
Bills of Materials/Kitting
2-7
Bills of Materials/Kitting User’s Manual
Set Up and Work Flow
Setting Up Bills of Materials/Kitting
Work Flow
Bills of Materials/Kitting User’s Manual
3
3-3
3-9
3-1
Setting Up Bills of Materials/Kitting
Determining Options and Interfaces
Setting up the options and interfaces is a standard part of installation. The
selections you make determine the way Bills of Materials/Kitting runs.
Interfaces
Bills of Materials/Kitting can be directly interfaced only with General Ledger.
However, it gets most of its information from Inventory, which can be interfaced
with several other applications. See the Inventory User’s Manual and other user’s
manuals for information about other interfaces that could have an indirect effect
on Bills of Materials/Kitting.
Bills of Materials/Kitting version 6.1 does not work with any version of
Inventory, Accounts Receivable, or Sales Order lower than 6.10. Bills of
Materials/Kitting performs a specific operation: it tracks the building of a bill of
materials. This operation involves the creation of a retail item from other
inventory items (and needs the Inventory application).
Assemblies involve only Bills of Materials/Kitting and Inventory. You can sell an
assembly through Accounts Receivable or Sales Order, but its constituent parts
are not directly taken into account at the point of sale.
Building and selling kits involves grouping and selling items as a single item that
can be sold only through Sales Order. If Sales Order is not interfaced with Bills
of Materials/Kitting but Inventory is, you can take advantage only of the
functions that pertain to assemblies; you can still build assemblies, but you
cannot sell them as kits.
If you sell a kit through Sales Order, the constituent parts of the kit are
automatically taken into account. If Sales Order interfaces with Bills of
Materials/Kitting and General Ledger, kit information is sent to the GLJRxxx file
when you post.
Bills of Materials/Kitting User’s Manual
3-3
Setting Up Bills of Materials/Kitting
Set Up and Work Flow
If Bills of Materials/Kitting interfaces with General Ledger, information about
builds is sent to the GLJRxxx file through the BKJRxxx (Transaction/Journal)
file. If Bills of Materials/Kitting does not interface with General Ledger, no
information is sent to the GLJRxxx file when you post.
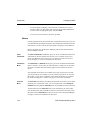
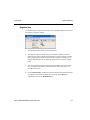
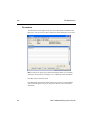
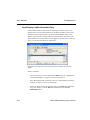
Options
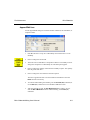
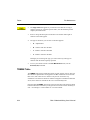
To begin setting up each company’s options and interfaces, use the Resource
Manager Options and Interfaces function (see the Resource Manager User’s
Manual). BK is the application ID. This screen appears:
Your answers to the following questions determine how the system works and
how information flows through it.
1.
3-4
Toggle to YES to interface Bills of Materials/Kitting with General Ledger.
When you interface Bills of Materials/Kitting with General Ledger, the
BKJRxxx (Transaction/Journal) file sends information about an assembly to
the GLJRxxx (Journal) file when you post.
Bills of Materials/Kitting User’s Manual
Set Up and Work Flow
Setting Up Bills of Materials/Kitting
2.
Toggle to YES if you want information about each component that makes up
the assembly to be posted. Toggle to NO if you want information about the
assembly to be posted as one unit.
3.
If you track the building of an assembly and one of its component’s
quantities falls into the negative range, you have a negative build.
Toggle to YES if you want to allow a negative build or track the assembly of
a bill of materials before you get the parts for it; otherwise, toggle to NO.
You might want to select YES if you usually sell items before you build
them.
4.
Toggle to YES if you indicated that you allow negative builds and you want
the system to warn you when you try to build an assembly that uses an item
with a quantity of zero. Toggle to NO if you want the system to proceed
tracking such a build without warning you first.
5.
Toggle to YES if you want to keep history about each item in each kit;
otherwise, toggle to NO. You must select YES if you want the Detail History
Report in Sales Order to take kits into account.
6.
Toggle to YES if the items involved with the assemblies and kits carry
additional descriptions and you want to use them in Bills of Materials/
Kitting; otherwise, toggle to NO. If the items involved with the assemblies
and kits do not carry additional descriptions from Inventory, your entry does
not have an effect.
7.
Toggle to YES if you want to display unit and extended costs on the build
screens. Toggle to NO if you want to exclude the cost information from the
screens during builds and inquiries.
8.
Toggle to YES if you want detailed information about component movement
written to the Inventory Transaction History file, or to NO if you do not want
to save this information.
9.
When you finish setting options, press W to save your changes and return to
the Options and Interfaces screen where you can select another application
or exit to the main menu.
Bills of Materials/Kitting User’s Manual
3-5
Set Up and Work Flow
Setting Up Bills of Materials/Kitting
Preparing Your Data
Follow these steps to prepare your data:
1.
Organize your lists of components that constitute a kit or a bill of materials
and the quantities for each. (Components, kits, and assemblies must be set up
in Inventory first because Inventory must recognize each item.)
2.
Prepare the information specified in Chapter 2 in the Inventory User’s
Manual.
3.
Build tables (see page 6-23).
4.
Define bills of materials (see page 6-9).
5.
Define kits (see page 6-3).
6.
Set up access codes.
You should establish valid kits and bills of materials immediately after you install
Bills of Materials/Kitting.
Tables
Before you begin to define bills of materials and kits, you must set up the system
tables.
3-6
•
The Terminology (TRMBK ) table holds labels of the user-defined fields used
in the Kits and Bill of Materials functions.
•
The General Ledger (BKGLxxx) table assigns the general ledger accounts
you specify to the amounts entered for the three user-defined fields.
Bills of Materials/Kitting User’s Manual
Set Up and Work Flow
Setting Up Bills of Materials/Kitting
Access Codes
To restrict access to data files, menus, and functions that provide confidential
information or are sensitive to change, use the Resource Manager Access Codes
function to set up access codes on your system.
Access codes are company-specific. When you set up an access code for a user,
the code is assigned the company you are in. After you set up your access codes,
print a list of them and store it in a safe place.
Creating a Backup Schedule
Back up your Bills of Materials/Kitting data files whenever they change and
before you run these functions:
•
•
•
•
•
•
Build Assembly
Components
Multilevel Cost Rollup
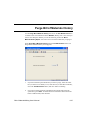
Purge Bill of Materials History
Post Transactions
Undo Build
Back up your programs once a month as insurance against media damage or
deterioration.
Use the Backup function on the Resource Manager Data File Maintenance
menu to back up files.
Note
You must back up all the files in the data path for a particular list of
companies at once to ensure that you have up-to-date copies of the system
files. Do not try to use operating system commands to back up only a few
files that have changed; if you do, your system may not work after you
restore them. The Backup function backs up all the data files for a specified
company in a data path at one time.
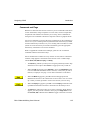
Bills of Materials/Kitting User’s Manual
3-7
Work Flow
Your work flow is divided into daily and periodic tasks. After the kits and bills of
materials are established, you can use the File Maintenance functions to update
information about kits or assemblies, substitute components among several kits
and assemblies, and remove unnecessary data from history.
Daily Tasks
You can use the functions on the Daily Work menu only if you have established
bills of materials.
Adding Kits
To add a kit, you must use an ID of an existing inventory item that has been
marked as a kit in Inventory, provided that it is not already a bill of materials. The
reason is that when you sell the kit, Sales Order gets kit information from
Inventory files. Sales Order cannot recognize it except as an inventory item.
The best way to add a kit is to use the Items function in Inventory. When you use
the Items function, you know that the inventory item has been established to be
used as a kit. Sales Order recognizes the inventory item, and you can change an
established kit in the Kits function.
Deleting Kits
To delete a kit from the BKMHxxx (Master Header) and BKMDxxx (Master
Detail) files, use the Delete (F3) command in the Kits function. You cannot undo
this action.
Bills of Materials/Kitting User’s Manual
3-9
Set Up and Work Flow
Work Flow
Adding Assemblies
To add an assembly, you must use an ID of an existing inventory item, provided
that it is not already an assembly or a kit. The reason is that when you sell the
assembly, Accounts Receivable and Sales Order get assembly information from
the Inventory system. Accounts Receivable and Sales Order cannot recognize it
except as an inventory item.
The best way to add an assembly is to use the Items function in Inventory. When
you use the Items function, you know that the inventory item has been
established to be used as an assembly. Accounts Receivable and Sales Order
recognize the inventory item, and you can change an established assembly in the
Bill of Materials function.
Deleting Assemblies
To delete an assembly, use the Delete (F3) command in the Bill of Materials
function. The assembly record is deleted from the BKMHxxx and BKMDxxx
files, but an assembly of which the deleted assembly was a part is not deleted.
For example, if assembly 100 is part of assembly 450 and you delete assembly
100, the record for assembly 100 is gone; the record for assembly 450 and the
components that make it up are still intact.
Whether you keep the deleted subassembly as part of the definition of assemblies
is up to you. When a component is marked as a subassembly, the component is
considered as another assembly. When a component is marked as an item, it is
considered only as an inventory item. When you use the Delete (F3) command,
the system checks for other occurrences of the assembly’s use as a subassembly
(Sub).
If the subassembly is not part of another assembly’s definition, the subassembly’s
record is deleted and the task is complete. If the subassembly is part of another
assembly’s definition, a prompt appears:
Change Sub ID to Item Everywhere?
3-10
Bills of Materials/Kitting User’s Manual
Set Up and Work Flow
Work Flow
To change the definition of all the other assemblies that use the ID from a
subassembly (assembly) to an item (nonassembly from the Inventory file), select
Yes (or enter Y in text mode). To leave the other assemblies’ definitions alone,
select No (or enter N in text mode).
Note
If you elected not to change other assemblies and you try to build an
assembly that involves a deleted subassembly, you are not allowed to build
the deleted subassembly.
Monthly Tasks
At the end of every month, complete the daily work and print the period-to-date
reports.
Periodic Tasks
Periodic tasks comprise tracking the occurrences of building assemblies and
posting transactions.
Produce the reports on the Reports menu periodically as a backup before you
purge information and as a safeguard against circumstances that might harm your
data.
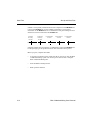
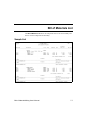
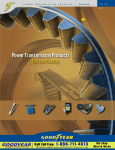
Posting Transactions
If Bills of Materials/Kitting interfaces with General Ledger, entries and
transactions associated with a general ledger account are transferred from the
BKJRxxx (Transaction/Journal) file to the GLJRxxx (Journal) file for accurate
tracking of the individual inventory general ledger accounts and the user-defined
accounts in the BKJRxxx file.
Each component’s inventory account is credited for the cost amount and each
user-defined account. The assembly’s inventory account is debited for the sum of
the components’ costs and the user-defined amounts.
Bills of Materials/Kitting User’s Manual
3-11
Set Up and Work Flow
Work Flow
If detail is to be posted, information about each component in the BKJRxxx file
is sent to the GLJRxxx file. If only summary information is to be posted,
information in the BKJRxxx file is accumulated for each general ledger account
and the sum total is transferred to the GLJRxxx file.
Assembly
Inventory
Account
DB
Component
Inventory
Account
User-Defined 4
Account
CR
CR
User-Defined 5
Account
CR
User-Defined 6
Account
CR
If General Ledger does not interface, no information is sent to the GLJRxxx file,
but the posting log is still produced to show what would have been posted.
Before you post, complete these tasks:
3-12
•
If you have a multiuser system, make sure that no one else is using the Bills
of Materials/Kitting system. You cannot post if someone else is using the
Bills of Materials/Kitting files.
•
Print the Build Assembly Journal.
•
Back up all the data files.
Bills of Materials/Kitting User’s Manual
Bills of Materials/Kitting User’s Manual
Daily Work
Assembly Inquiry
Build Assembly
Undo Build
Build Assembly Journal
Post Transactions
Bills of Materials/Kitting User’s Manual
4
4-3
4-5
4-11
4-13
4-15
4-1
Daily Work
Introduction
This chapter explains the features and uses of the screens and processes in the
Bills of Materials/Kitting application.
4-2
Bills of Materials/Kitting User’s Manual
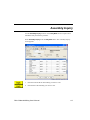
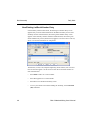
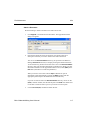
Assembly Inquiry
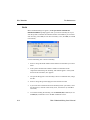
Use the Assembly Inquiry function on the Daily Work menu to inquire about
assemblies that your business produces.
Select Assembly Inquiry from the Daily Work menu. The Assembly Inquiry
screen appears.
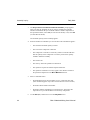
1.
Enter the location ID for the assembly you want to view.
2.
Enter the ID of the assembly you want to view.
Bills of Materials/Kitting User’s Manual
4-3
Daily Work
Assembly Inquiry
3.
The Do you want to calculate the maximum available? prompt appears
when you enter the assembly ID. If you want to calculate the available
number of assemblies that you can build with the available components in
the specified locations, select Yes (or enter Y in text mode); if not, select No
(or enter N in text mode).
The available quantity of the assembly appears.
4.
5.
6.
4-4
Enter the number of assemblies you want to build. This information appears:
•
The maximum available quantity to build.
•
The level of the component or material.
•
The component or item ID. An asterisk (*) before an item ID indicates
that the quantity of the component in inventory is below the quantity
needed to build the assembly.
•
The location ID.
•
The units by which the quantities are measured.
•
The quantities required to build the requested amounts.
•
The quantities available in inventory appear. This number is based on
the specified components in the Bill of Materials function.
Select a command button.
•
Press G and then enter the line number to go to a particular line item.
(This command appears only if there is more than one screen of items.)
•
Press H to edit the fields in the header.
•
Press O to send the information to an output device. Then select the
output device to print the breakdown of necessary components.
Use the Exit (F7) command to exit to the Daily Work menu.
Bills of Materials/Kitting User’s Manual
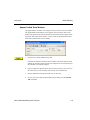
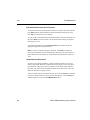
Build Assembly
Use the Build Assembly function on the Daily Work menu to track the assembly
of one bill of materials or many of the same assembly. You can also build an
established serialized or non serialized assembly.
Select Build Assembly from the Daily Work menu. The Build Assembly screen
appears.
1.
Enter the ID of the location that will hold the assembly you want to build.
2.
Enter the ID of the assembly you want to build.
3.
The Do you want to calculate the maximum available? prompt appears
when you enter the assembly ID. If you want the system to calculate the
maximum number of assemblies you can build from inventory, select Yes
(or enter Y in text mode); if not, select No (or enter N in text mode).
Bills of Materials/Kitting User’s Manual
4-5
Daily Work
Build Assembly
4.
Enter or change the build number.
5.
The maximum number of assemblies that you can build with the available
components in the specified locations appears.
6.
Enter the number of assemblies you want to build.
7.
Enter or change the date for the assemblies to be recorded as built.
8.
Enter or change the general ledger period for the date of the build.
9.
If you want to view the Assembly Inquiry screen, select the check box (or
enter Y in text mode); if not, clear the box (or enter N in text mode).
10. To save your work, use the Proceed (OK) command.
If you entered more assemblies to build than the maximum available to
build, the Negative Item screen appears. See “Negative Item” on page 4-7
for more information.
If the assembly involves lotted, serialized, or lotted and serialized items, a
screen appears where you can enter or edit the lot, serial, or lot and serial
numbers for that item. See “New/Existing Lot/Serial Number Entry” on
page 4-8 for more information.
4-6
Bills of Materials/Kitting User’s Manual
Build Assembly
Daily Work
Negative Item
Use this dialog box to instruct the system to track a build that makes the involved
item quantity a negative number.
1.
The item ID and the location for the item appears.
2.
The negative quantity created when you entered the quantity to build is
displayed. You cannot include serialized items in negative builds. You must
have enough serialized items on hand in order to build an assembly. If not
enough serialized items are on hand, the system will not continue with the
build.
3.
To continue building the specified number of assemblies, select the check
box (or enter Y in text mode). To discontinue the build, clear the box (or
enter N in text mode).
4.
Use the Proceed (OK) command to continue with the build. When the build
is complete, enter another assembly ID to build or use the Exit (F7)
command to return to the Daily Work menu.
Bills of Materials/Kitting User’s Manual
4-7
Daily Work
Build Assembly
New/Existing Lot/Serial Number Entry
If the assembly contains lotted items, the Existing Lot Number Entry screen
appears after you enter build information on the Build Assembly screen. If the
assembly contains serialized items, the Existing Serial Number Entry screen
appears. If the assembly contains lotted and serialized items, the Existing Lot/
Serial Number Entry screen (shown below) apppears. Use this screen to enter lot,
serial, or lot and serial numbers for components.
The Item ID, Loc ID, Units, Requested Quantity, Serial Number, Unit Cost and
Price for the item appear. Use this screen to track the lot and serial number of
each serialized item.
4-8
•
Press Enter to edit a lot or serial number.
•
Press A to append a lot or serial number.
•
Press D to exit to the Build Assembly screen.
•
To save your entries and continue building the assembly, use the Proceed
(OK ) command.
Bills of Materials/Kitting User’s Manual
Build Assembly
Daily Work
Append Lotted Serial Number
The Append/Edit Lot Number screen appears when you add or edit a lot number.
The Append/Edit Serial Number screen appears when you add or edit a serial
number. The Append Lotted Serial Number screen (shown below) appears when
you add or edit a lotted serial number. Use this screen to add information about
lotted and serialized items to the assembly.
1.
Enter the lot or serial number for the item.
If the item is lotted and serialized, the lot number associated with that serial
number for the item appears and cannot be changed. The cost of the item and
the extended cost of the item appear.
2.
Enter or change the quantity that is removed from inventory. You can access
this field only if you are working with a lotted, non-serialized item.
3.
Enter an additional comment about the item, if necessary.
4.
To save your entries and continue building the assembly, use the Proceed
(OK ) command.
Bills of Materials/Kitting User’s Manual
4-9
Undo Build
Use the Undo Build function on the Daily Work menu to back out unposted bills
of materials and return component parts to inventory.
Select Undo Build from the Daily Work menu. The Undo Build screen appears.
1.
Enter the number of the build you want to undo. The location ID and
description, and the assembly ID and description appear. The quantity built
and the date of the build appear.
2.
Select the output device to print the Undo Build Error Log. See “Reports” on
page 1-27 for more information. After the list is produced, the Daily Work
menu appears.
3.
To undo the build and return to the Daily Work menu, use the Proceed (OK)
command.
Bills of Materials/Kitting User’s Manual
4-11
Undo Build
Daily Work
Undo Build Error Log
4-12
Bills of Materials/Kitting User’s Manual
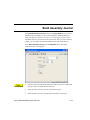
Build Assembly Journal
Use the Build Assembly Journal function on the Daily Work menu to produce a
summary of the assemblies you have instructed Bills of Materials/Kitting to
track. This function is useful if you want to see a list, before you post, of the
assemblies that are to be built or that have been built. After you post to General
Ledger, you can compare the Build Assembly Journal with the Audit Log.
Select Build Assembly Journal from the Daily Work menu. The Build
Assembly Journal screen appears.
1.
Enter the range of assembly IDs and location IDs you want to include in the
journal, or leave the fields blank to include all.
2.
Select the order in which you want to organize the report.
3.
Select whether you want to include detail information in the report.
Bills of Materials/Kitting User’s Manual
4-13
Build Assembly Journal
4.
Daily Work
Select the output device to begin printing the journal. See “Reports” on
page 1-27 for more information. After the list is produced, the Daily Work
menu appears.
Build Assembly Journal
4-14
Bills of Materials/Kitting User’s Manual
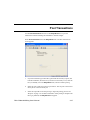
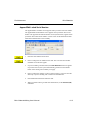
Post Transactions
Use the Post Transactions function on the Daily Work menu to post the
transactions related to building the assemblies to General Ledger.
Select Post Transactions from the Daily Work menu. The Post Transactions
screen appears.
1.
If you have backed up your data files, printed all the necessary reports, and
built all assemblies, select the box (or enter Y in text mode); if not, clear the
box (or enter N), exit to the Daily Work menu, and do so before posting.
2.
Select the year to which you want to post entries. You can post to the current
fiscal year or to the last fiscal year.
3.
Select the output device for the post log to begin the posting process. See
“Reports” on page 1-27 for more information. After posting is complete and
the log is produced, the Daily Work menu appears.
Bills of Materials/Kitting User’s Manual
4-15
Post Transactions
Daily Work
Posting Log
4-16
Bills of Materials/Kitting User’s Manual
Bills of Materials/Kitting User’s Manual
Reports
Print a Report
Where-Used Report
Available Components Report
Component Cost Report
Bill of Materials History Report
Bills of Materials/Kitting User’s Manual
5
5-3
5-5
5-7
5-9
5-11
5-1
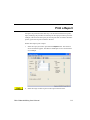
Print a Report
All reports are produced in the same way. Use the instructions below to print a
report, modifying the procedure as necessary for the report you want to print. For
example, if the screen for the report you want to print does not contain check box
options, ignore that step and continue to the next.
Follow these steps to print a report:
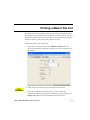
1.
Select the report you want to print from the Reports menu. The selection
screen for that list appears. The Where-Used Report screen is shown below
as an example.
2.
Select the range of values to print on the report in the list boxes.
Bills of Materials/Kitting User’s Manual
5-3
Reports
Print a Report
Leave these fields blank to select all values, or enter values into a
combination of fields to select specific information to print on the list. The
Inquiry (F2) command is usually available with these list boxes.
5-4
3.
If the screen contains selection options such as print Single Level or Fully
Indented , select Single Level to print top level assemblies and one level of
detail. Select Fully Indented to print assemblies and all components
including subassemblies.
4.
If the screen contains selection options for sorting and printing the report
(such as Sort By or Print By), select the option to use when printing the list.
You can select only one option.
5.
If the screen contains check boxes, select the check box (or press Y in text
mode) to include that type of information in the report. Clear the check box
(or press N in text mode) if you do not want to include that type of
information in the list.
6.
Select the output device to begin printing the report. See “Reports” on
page 1-27 for more information. After the report is produced, the Reports
menu appears.
Bills of Materials/Kitting User’s Manual
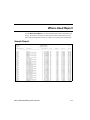
Where-Used Report
Use the Where-Used Report to review assemblies that contain components you
specify. This report is useful if you want to know which components are used
where and how important each one is so that you can easily make substitutions.
Sample Report
Bills of Materials/Kitting User’s Manual
5-5
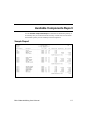
Available Components Report
Use the Available Components Report to determine the maximum quantity of
an assembly that you can build with the inventory on hand. You can also check
the available quantity of each assembly and each component.
Sample Report
Bills of Materials/Kitting User’s Manual
5-7
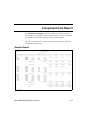
Component Cost Report
The Component Cost Report is a list of assemblies in particular locations. It
shows the level-1 components of those assemblies and every cost (including the
user-defined costs) associated with each component and assembly.
This report is helpful when you plan a budget and want to see how to allocate
components most effectively.
Sample Report
Bills of Materials/Kitting User’s Manual
5-9
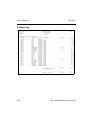
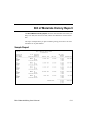
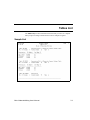
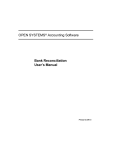
Bill of Materials History Report
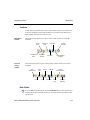
The Bill of Materials History Report shows the date assemblies were built, how
many were built, the unit cost of each, and the user-defined cost of each on that
date.
This report is helpful when you plan a marketing strategy and want to see when
assemblies are in peak demand.
Sample Report
Bills of Materials/Kitting User’s Manual
5-11
Bills of Materials/Kitting User’s Manual
File Maintenance
Kits
Bill of Materials
Components
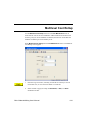
Multilevel Cost Rollup
Tables
Purge Bill of Materials History
Bills of Materials/Kitting User’s Manual
6
6-3
6-9
6-17
6-21
6-23
6-27
6-1
Kits
Use the Kits function on the File Maintenance menu to establish and update
information about kits. This function is useful if you sell many items at once and
want to group them as one item. Kits can be sold only through Sales Order.
To produce a list of the information entered in this function, use the Kits List
function on the Master File Lists menu.
Select Kits from the File Maintenance menu. The Kits screen appears.
1.
Enter the ID of the location that stores the kit.
2.
Enter the ID of the kit you want to add or change. The date of the last
recalculation appears.
Bills of Materials/Kitting User’s Manual
6-3
File Maintenance
Kits
3.
Enter or change the information in your user-defined fields, or blank out the
boxes. The approximate component, assembly totals, and the location ID for
the components that make up the kit appear.
The ID for each component in the kit, the description for the component, the
quantity of each component needed for the kit, and the unit of measure for
the component appear.
4.
5.
6-4
Select a command.
•
Press Enter to edit a line item.
•
Press A to append a line item.
•
Press H to move the cursor to the header region.
•
Press R to recalculate the approximate cost for the kit and update the
Last Recalc field.
•
Press G and then enter the line number to go to a particular line item.
(This command appears only if there is more than one screen of line
items.)
•
Press N to work with the next kit.
•
Press D to add or change documents attached to the kit record.
To exit to the File Maintenance menu, use the Exit (F7) command.
Bills of Materials/Kitting User’s Manual
Kits
File Maintenance
Append/Edit Item
Use the Append/Edit Item dialog box to add or change a component in a kit.
The type of inventory item appears.
1.
Enter or change the location ID. The description of the location appears.
2.
Enter or change the item ID. The description of the item appears.
3.
Enter or change the item quantity the kit requires.
4.
Enter or change the unit of measure used in the kit. The unit cost and
extended cost of the item appear.
5.
To save your entries and return to the File Maintenance menu, use the
Proceed (OK) command.
Bills of Materials/Kitting User’s Manual
6-5
File Maintenance
Kits
Documents
The Documents screen appears when you use the Documents command on the
Kits screen. Use this screen to add or change documents attached to a kit record.
Note: You must set up file types in Resource Manager before you can attach
documents. See the Resource Manager User’s Manual for more information.
Press D to return to the Kits screen.
Press G and then enter the document name to move directly to that document.
(This command appears only if you have more than one screen of attached
documents.)
6-6
Bills of Materials/Kitting User’s Manual
Kits
File Maintenance
Attach a Document
Do the following to attach a document to a master file record:
1.
Click Append or enter A to attach a document. The Append Documents
dialog box appears.
2.
Enter the document file name and extension, the full file path, and a
description of the file you want to attach to the master file record.
You can use the DocumentShare directory (as specified in the Resource
Manager Directories function) to simplify entering document information.
To use this directory, make sure all users have access to the DocumentShare
directory, then store document attachments in that directory. When you enter
document information in the Append Documents screen, enter (DOC) in the
Path field (remember to include the parenthesis).
When you use this convention with the Open command to open an
attachment, OSAS automatically replaces the (DOC) variable with the
appropriate path and opens the attachment from that directory.
If you do not store the file in the DocumentShare directory, do not use the
(DOC) variable. Instead, enter the full file path in the Path field. OSAS will
not be able to locate the file to open it if you enter an incorrect path.
3.
Use the Proceed (OK) command to attach the file.
Bills of Materials/Kitting User’s Manual
6-7
File Maintenance
Kits
Edit Attached Document File Information
To edit file information about attached documents, select the document and then
press Enter. Edit the file information in the Edit Documents dialog box, then
click OK or press F7 to save your changes.
To view the file information about attached documents, select the document and
then press View (or V in text mode). The View Documents dialog box appears.
Press any key to exit.
To edit the document itself, click Open document or press O to launch the
appropriate application and open the file.
Note: If you have problems opening a document, press Enter to change the
direction of the slashes used in the attachment’s directory path. If the directory
path contains backward slashes (\), change them to forward slashes (/) and vice
versa.
Delete Attached Documents
To remove a document attachment, select the attached document you wish to
delete and press F3. When the confirmation message appears, press Y to delete
the attachment or N to return to the Documents screen. Keep in mind that this
procedure only removes the attachment from the master file record; it does not
delete the file from its storage location.
After you finish working with the Documents screen, use the Exit (F7) command
to return to the Kits selection screen. Enter another Kit ID, or use the Exit (F7)
command again to return to the File Maintenance menu.
6-8
Bills of Materials/Kitting User’s Manual
Bill of Materials
Use the Bill of Materials function on the File Maintenance menu to establish and
update information about assemblies. This function is useful if you often sell
items that you assemble yourself.
To produce a list of the information entered in this function, use the Bill of
Materials List function on the Master File Lists menu.
Select Bill of Materials from the File Maintenance menu. The Bill of Materials
screen appears.
1.
Enter the ID of the location that stores the assembly.
2.
Enter the ID of the assembly you want to add or change. The date of the last
recalculation appears.
Bills of Materials/Kitting User’s Manual
6-9
File Maintenance
Bill of Materials
3.
Use the first three fields to enter alphanumeric information you set up in the
Tables function. Use the last three fields to enter numeric information you
set up in the Tables function.
The cost of the components appears.
The total cost of the assembly (including costs in the user-defined fields),
type of component for the bill of materials, location ID of the component,
component ID for the bill of materials, description of the component,
quantity needed to make one assembly, and the component’s unit of measure
appear.
4.
5.
6-10
Select a command.
•
Move to the line you want to edit and press Enter. Then see “Append/
Edit Item” on page 6-11 for more information.
•
Press A to add an inventory item to the bill of materials.
•
Press H to edit the user-defined fields.
•
Press R to recalculate the cost of the bill of materials. If you use the
Standard costing method in Inventory, these costs are updated in
Inventory.
•
Press G and then enter the line number to go to a particular line item.
(This command appears only if there is more than one screen of line
items.)
•
Press N to enter and update information about the next bill of materials.
•
Press B to build the current assembly.
•
Press D to add or change documents attached to a master file record in
OSAS.
To exit to the File Maintenance menu, use the Exit (F7) command.
Bills of Materials/Kitting User’s Manual
Bill of Materials
File Maintenance
Append/Edit Item
Use the Append/Edit dialog box to add or edit bill of material, sub-assemblies, or
component items.
1.
Press S if the item is set up as a subassembly. Press I if the item is not an
assembly.
2.
Enter or change the location ID.
3.
You must enter an item ID for a component to add it to an assembly. Enter or
change the component or subassembly ID. The description appears.
4.
Enter or change the quantity of the item the assembly requires. The quantity
must be greater than zero.
5.
Enter or change the unit of measure the item requires.
The item’s approximate unit cost and extended cost defaults in from the
Items function in Inventory.
6.
To continue with building the assembly, use the Proceed ( OK) command, or
use the Exit (F7) command to exit to the Bill of Materials screen.
7.
After the assembly is built, the File Maintenance menu appears. To exit
from the Bill of Materials function without building, use the Exit (F7)
command.
Bills of Materials/Kitting User’s Manual
6-11
File Maintenance
Bill of Materials
Build
Before the Build dialog box appears, the Do you want to calculate the
maximum available? prompt appears when you enter the assembly ID. If you
want the system to calculate the maximum number of assemblies you can build
from inventory, select Yes (or enter Y in text mode); if not, select No (or enter N
in text mode).
Use the build dialog box to track an assembly.
6-12
1.
Enter or change the build number and the number of assemblies you want to
build.
2.
If the system calculated the number available to build based on the
components that make up the assembly, that number appears. If the system
did not do the calculation, zero appears.
3.
The system date appears. If the assembly is done on a different date, change
the date.
4.
Enter or change the general ledger period for the date of build.
5.
If you want more information about the assembly before you build it, select
the check box (or enter Y in text mode); if not, clear the box (or enter N in
text mode).
6.
To continue building the assembly, use the Proceed (OK) command, or use
the Exit (F7) command to exit to the Bill of Materials screen.
Bills of Materials/Kitting User’s Manual
File Maintenance
Bill of Materials
Negative Item
Use the Negative Item dialog box to track a build that makes the involved item
quantity a negative number.
The item ID and the location for the item appears.
The negative quantity created when you entered the quantity to build appears.
You cannot include serialized items in negative builds. You must have enough
serialized items on hand in order to build an assembly. If not enough serialized
items are on hand, the system does not continue with the build.
To continue building the specified number of assemblies, select the check box (or
enter Y in text mode). To terminate the build, clear the box (or enter N in text
mode).
Use the Proceed (OK) command to continue with the build. When the build is
complete, enter another assembly ID to build or use the Exit (F7) command to
return to the Bills of Material screen.
Bills of Materials/Kitting User’s Manual
6-13
File Maintenance
Bill of Materials
New/Existing Lot/Serial Number Entry
If the assembly contains lotted items, the Existing Lot Number Entry screen
appears after you enter build information on the Build Assembly screen. If the
assembly contains serialized items, the Existing Serial Number Entry screen
appears. If the assembly contains lotted and serialized items, the Existing Lot/
Serial Number Entry screen (shown below) apppears. Use this screen to enter lot,
serial, or lot and serial numbers for components.
Information about the item, such as location ID, unit number, and unit cost
appear.
Select a command:
6-14
•
Move to the line you want to edit and press Enter. Then see “Append/Edit
Lotted Serial Number” on page 6-15 for more information.
•
Press A to append a bill of materials. Then see “Append/Edit Lotted Serial
Number” on page 6-15 for more information.
•
When you finish entering lot and serial data, use the Done (D) command to
save your changes, or use the Exit (F7) command to exit to the File
Maintenance menu.
Bills of Materials/Kitting User’s Manual
Bill of Materials
File Maintenance
Append/Edit Lotted Serial Number
The Append/Edit Lot Number screen appears when you add or edit a lot number.
The Append/Edit Serial Number screen appears when you add or edit a serial
number. The Append Lotted Serial Number screen (shown below) appears when
you add or edit a lotted serial number. Use this screen to add information about
lotted and serialized items to the assembly.
1.
Enter the serial number for the item.
2.
Enter or change the lot number for the item. The cost of the item and the
extended cost of the item appear.
3.
If you are building a serialized item, the Auto Generate check box appears.
If you select the box, the system automatically generates serial numbers
based on the starting serial number you supply.
4.
Enter or change the quantity to remove from inventory. You can access this
field only if you are working with a lotted non-serialized item.
5.
Enter additional information about the item.
6.
When you finish entering lot and serial information, use the Proceed (OK)
command.
Bills of Materials/Kitting User’s Manual
6-15
File Maintenance
Bill of Materials
Documents
Use the Documents dialog box to add or change documents attached to a master
file record in OSAS. See “Documents” on page 6-6 for more information.
Note: You must set up file types in Resource Manager before you can attach
documents. See the Resource Manager User’s Manual for more information.
Press D to return to the Bill of Materials screen.
6-16
Bills of Materials/Kitting User’s Manual
Components
Use the Components function on the File Maintenance menu to update the
components used in several different assemblies at once. This function is useful
if an item is discontinued and you need to replace it with a different item or a
different quantity of items. You cannot use this function for location transfers.
You can produce a verification log of all the bills of materials that have been
added, replaced, or deleted.
Select Components from the File Maintenance menu. The Components screen
appears.
1.
Select the action you want to perform. You can add a component, replace a
component, or delete a component.
Bills of Materials/Kitting User’s Manual
6-17
File Maintenance
Components
2.
Select whether to apply the component update to items in Assemblies, items
in Kits, or items in Both assemblies and kits.
3.
Enter the location ID of the component you want to change.
4.
Enter the ID of the component you want to change. The component
description appears.
The quantity of the component appears.
5.
The unit of measure for the component appears. Change it, if necessary.
6.
The Old section appears if you are replacing a component. Enter the
information about the component you are replacing in the Loc ID,
Component ID, Quantity, and Units fields.
7.
The New section appears if you are replacing a component. Enter the
information about the replacement component in the Loc ID, Component
ID, Quantity, and Units fields.
8.
Enter the range of locations for which you want to change components in the
Pick Location ID boxes.
9.
If you elected to change components in assemblies, enter the range of
assemblies for which you want to change components in the Pick Assembly
ID boxes.
10. If you elected to change components in kits, enter the range of kits for which
you want to change components in the Pick Kit boxes.
11. If you want to print a log of changed components, select the check box (or
enter Y in text mode); if not, clear the box (or enter N in text mode).
12. If you want costs to be rolled up for the range of kits and/or assemblies,
select the box (or enter Y in text mode); if not, clear the box (or enter N in
text mode).
6-18
Bills of Materials/Kitting User’s Manual
File Maintenance
Components
13. If you want standard costs in Inventory to be updated, select the box (or enter
Y in text mode); if not, clear the box (or enter N in text mode).
14. This field appears if you are adding a component. If the component already
exists and you want the system to increase quantities for the component,
select Yes (or enter Y in text mode); if not, select No (or enter N in text
mode).
15. Select the output device to begin printing the update log. See “Reports” on
page 1-27 for more information. When the log is printed, the File
Maintenance menu appears.
Bills of Materials/Kitting User’s Manual
6-19
Multilevel Cost Rollup
Use the Multilevel Cost Rollup function on the File Maintenance menu to
recalculate the cost for kits and assemblies. If Bill of Materials interfaces with
Inventory, and you use the standard cost method, this function recalculates the
standard cost makeup for each assembly or kit.
Select Multilevel Cost Rollup from the File Maintenance menu. The Multilevel
Cost Rollup screen appears.
1.
Enter the range of location, assembly, and kit IDs for which you want to
recalculate costs, or leave the boxes blank to include all.
2.
Select whether to apply the rollup to Assemblies, to Kits, or to Both
assemblies and kits.
Bills of Materials/Kitting User’s Manual
6-21
File Maintenance
Multilevel Cost Rollup
6-22
3.
If you want to update standard costs in Inventory, select the box (or enter Y
in text mode); if not, clear the box (or enter N in text mode).
4.
To save your entries, use the Proceed ( OK) command.
Bills of Materials/Kitting User’s Manual
Tables
Use the Tables function on the File Maintenance menu to maintain the TRMBK
and BKGLxxx tables. Tables store information about the system, data, options,
and default settings for other applications.
To produce a list of the information entered for each table, use the Tables List
function on the Master File Lists menu.
Select Tables from the File Maintenance menu. The BKTB screen appears.
1.
Enter or change the table ID. To set up a company-specific table, enter the
table ID plus the one- to three-character company ID. To set up a terminalspecific table, enter the table ID plus the four-character terminal ID.
Bills of Materials/Kitting User’s Manual
6-23
File Maintenance
Tables
2.
The Copy From field appears if you entered a new table ID. To copy a
company-specific or a terminal-specific table, enter the table ID plus the
company and terminal ID.
3.
Enter or change the description of the table. The number and length of
columns in the table appears.
4.
The type of characters you can enter in the table appears:
•
A – Alphanumeric
•
N – Numeric with two decimals
•
3 – Numeric with three decimals
•
4 – Numeric with four decimals
Although you can change the type, you cannot enter any other type of
character than the table originally specified.
5.
To save your entries and exit to the File Maintenance menu, use the
Proceed ( OK) command.
TRMBK Table
The TRMBK table holds six fields that appear on other function screens. The first
three fields are alphanumeric and appear on the Bill of Materials screen and the
Kits screen; their values are for reference only and are not used in any
calculations. The last three fields are numeric and appear on the Bill of Materials
screen; their values are included in the cost of each assembly built.
Enter the table ID TRMBK. Then enter a label for each field. The first three fields
hold miscellaneous information you might want to associate with an assembly or
a kit—for example, a version number or a revision number.
6-24
Bills of Materials/Kitting User’s Manual
File Maintenance
Tables
BKGLxxx Table
The BKGLxxx table holds three general ledger accounts whose labels you can
define and numbers you can specify when you use the Bill of Materials function.
The values you enter in the fields with these labels are sent to these general
ledger accounts.
Enter the table ID BKGLxxx (xxx is the company ID). The description of fields
4–6 should be the same as user-defined fields 4–6 in the TRMBK table.
Enter the general ledger account number you want the values from fields 4–6 to
be sent.
Bills of Materials/Kitting User’s Manual
6-25
Purge Bill of Materials History
Use the Purge Bill of Materials History function on the File Maintenance menu
to delete records of assemblies from the BKHIxxx (History) file. Use it when you
want to free disk space. Before you use this function, produce the Bill of
Materials History Report. You cannot recover historical data after you purge it.
Select Purge Bill of Materials History from the File Maintenance menu. The
Purge Bill of Material History screen appears.
1.
If you have backed up the information you want to purge, select the check
box (or enter Y in text mode); if not, clear the box (or enter N in text mode),
exit to the File Maintenance menu, and do so before continuing.
2.
If you want to delete historical information about items built before the
system date, press Enter. To delete historical information about items built
before a different date, enter that date.
Bills of Materials/Kitting User’s Manual
6-27
Purge Bill of Materials History
3.
6-28
File Maintenance
To save your entries, use the Proceed ( OK) command. To return to the File
Maintenance menu, use the Exit (F7) command.
Bills of Materials/Kitting User’s Manual
Bills of Materials/Kitting User’s Manual
Master File List
Printing a Master File List
Kits List
Bill of Materials List
Tables List
Bills of Materials/Kitting User’s Manual
7
7-3
7-5
7-7
7-9
7-1
Printing a Master File List
All master file lists are produced in the same way. Use the instructions below to
print a master file list, modifying the procedure as necessary for the list you want
to print. For example, if the screen for the list you want to print does not contain
check box options, ignore that step and continue to the next.
Follow these steps to print a master list:
1.
Select the list you want to print from the Master File Lists menu. The
selection screen for that list appears. The Kits List screen is shown below as
an example.
2.
Select the range of values to print on the report in the list boxes.
Leave these fields blank to select all values, or enter values into a
combination of fields to select specific information to print on the list. The
Inquiry (F2) command is usually available with these list boxes.
Bills of Materials/Kitting User’s Manual
7-3
Printing a Master File List
7-4
Master File List
3.
If the screen contains check boxes, select the check box (or press Y in text
mode) to print that type of information in the list. Clear the check box (or
press N in text mode) if you do not want to print that type of information in
the list.
4.
If the screen contains selection options that control how the system sorts the
list (as in the Sort By box in the example), select the option to use when
printing the list. You can select only one option.
5.
Select the output device to begin printing the report. See “Reports” on
page 1-27 for more information. After the list is produced, the Master File
Lists menu appears.
Bills of Materials/Kitting User’s Manual
Kits List
The Kits List shows the components that are in each kit and the cost of each
component and each kit. This list is helpful when you plan a budget and want to
see how to allocate components most effectively.
Sample List
Bills of Materials/Kitting User’s Manual
7-5
Bill of Materials List
The Bill of Materials List shows the components that are in each assembly and
the cost of each component and assembly.
Sample List
Bills of Materials/Kitting User’s Manual
7-7
Tables List
The Tables List provides information about the table you select. It is helpful
when you plan to change a table and want a list to compare it against.
Sample List
Bills of Materials/Kitting User’s Manual
7-9
References
Bills of Materials/Kitting User’s Manual
System Messages
A
{ID} Already sold.
The serialized item you are trying to work with has been sold and the sale has
been posted.
{ID} Currently in use.
The serialized item you are trying to work with has been sold or is committed.
The sale has not been posted, but it is no longer available.
{ID} Is a BOM.
You cannot use the ID of an existing assembly for a kit or a different assembly.
{ID} Is a Kit.
You cannot use the ID of an existing kit for an assembly or a different kit.
{Item ID} Is not on file.
You cannot use an item that is not in the INVExxx (Items) file. You may have
deleted an item from inventory without deleting it from the definition of an
assembly or a kit.
{Location ID} Is not on file.
{Location ID} Not found.
{Location ID} Is not a valid location.
The location ID you entered does not exist. You cannot add locations in Bills of
Materials/Kitting; you must use the Locations function in Inventory (see the
Inventory User’s Manual).
Bills of Materials/Kitting User’s Manual
A-1
System Messages
{table ID} Table not found.
This table is not on file, probably because it was deleted. Try to reconstruct the
table.
A {BOM/Kit} cannot contain itself.
A BOM or a kit cannot carry its own ID as part of its definition.
Already sold.
You cannot commit an item (assembly or kit) that has already been sold.
Amount entered causes assembly cost to be too large.
A cost cannot be larger than $999,999.9999. The amount you entered pushes the
cost over this amount.
Build abandoned after record in use message.
If you try to build an assembly that involves an item someone else is using, the
Record in Use message appears, and the building operation stops.
Build cancelled. Assembly contains no components.
You cannot build an assembly that does not have any components. One reason
the assembly does not have components might be that the components’ (items’)
IDs were deleted from Inventory since the assembly was defined in the BOM.
Build cancelled. Assembly {assembly ID} not on file.
You cannot build an assembly that is not on file. One reason it is not on file might
be that the assembly (item) ID was deleted from Inventory since it was defined in
the BOM.
Build cancelled. Fractional quantities found for serialized items.
You cannot build an assembly that has a fractional quantity for at least one
serialized item.
A-2
Bills of Materials/Kitting User’s Manual
System Messages
Build cancelled. The maximum of {number} levels has been reached.
You have too many levels of assemblies or kits. You cannot track more than 10
levels.
Build request is above maximum available.
When you send instructions to build more assemblies than your inventory is
capable of supporting, you can proceed only if the Allow Negative Builds option
is set to YES in the Options and Interfaces function in Resource Manager (see
the Resource Manager User’s Manual; the code is BK).
Cannot delete last component of a {Assembly/Kit}.
Cannot delete last line of a {Assembly/Kit}.
You cannot delete the last line of an assembly or a kit; if you could, you would
delete the assembly or kit.
Changing line type to ‘KIT’ will clear all values.
The values in the line-item entry area disappear when you enter the letter K to
declare the item as a kit.
Component already exists for this {Assembly/Kit}.
You cannot assign the same component to an assembly or a kit more than once.
Component {item ID} in location {location ID} not on file.
The specified component is not in the specified location. Perhaps a user used the
Location Transfers function in Inventory to move the component (item) to a
different location since you defined the component as part of the assembly in
Bills of Materials/Kitting.
Cost update aborted.
You cannot update cost information about a kit or an assembly which involves an
inventory item which is not in the INVExxx (Items) file. You must first define all
items in the Items function in Inventory (see the Inventory User’s Manual).
Bills of Materials/Kitting User’s Manual
A-3
System Messages
Currently in use.
You cannot commit an item (assembly or kit) that is being used.
Detail history not selected in Options table.
You cannot work with detail history of an assembly or a kit unless the Keep
Detail History option in the Resource Manager Options and Interfaces function
is set to YES.
Fractional quantities not allowed for {serialized items/material items}.
You must enter whole numbers for quantities of serialized items and material
items.
GL account for {user-defined field} does not exist.
You cannot build an assembly when the BKGLxxx table has a general ledger
account label without an account number.
If you use General Ledger, you must enter an account number. If you do not use
General Ledger, go to the BKGLxxx table and either add a number to the label or
remove the label without the number.
GL account table {ID} not found.
You cannot use a function which involves General Ledger accounts from a
BKGLxxx table which does not exist. The table may have been deleted from the
system with the Delete (F3) command on the table itself.
Invalid unit of measure.
You must enter a valid unit of measure. Valid options appear at the bottom of the
screen.
A-4
Bills of Materials/Kitting User’s Manual
System Messages
Inventory item: {item ID}, Loc ID {location ID}, not found.
The specified item is not in the specified location. Perhaps a user used the
Location Transfers function in Inventory to move the component (item) to a
different location since you defined the component as a part of the assembly in
Bills of Materials/Kitting.
Inventory update for this component aborted.
The update for the quantity of the component in inventory has been stopped
because you cancelled the instruction to build an assembly.
Item already exists on this assembly.
You cannot add an item twice to the same assembly. You can update the quantity
of the item to increase the number of the item the assembly requires.
Item {item ID} does not have a materials list.
The specified item does not have any materials assigned to it; you cannot build it.
Use the Bill of Materials function to assign materials to it.
Item {item ID} is an assembly.
Item {item ID} is not a bill of material.
Item {item ID} is not a component.
An item cannot be an assembly and a kit at the same time.
To work with a kit, you must enter an item that is not already an assembly. To
work with an assembly, you must enter an item that is not already a kit.
Item {item ID} is not an inventory item.
Items you enter, either as assemblies, kits, or components, must already be in
inventory.
Bills of Materials/Kitting User’s Manual
A-5
System Messages
Item {item ID} is not in location {location ID}.
Item {item ID} is not on file.
Item {item ID} not found in location.
The specified item is not in the specified location. Perhaps a user used the
Location Transfers function in Inventory to move the component (item) to a
different location since you defined the component as part of the assembly.
Kit {ID} is not on file.
You must enter the ID of an existing kit. To define a kit, use the Kits function.
A kit cannot contain itself.
You cannot include a kit as part of the definition of itself.
Location {location ID} is not on file.
The location ID you entered is not on file. Enter an ID that is on file in Inventory.
Material List: {list}, Loc ID {location ID}, not found.
The specified list of materials is not in the specified location. Perhaps a user used
the Location Transfers function in Inventory to move the component (item) to a
different location since you defined the component as part of the assembly in
Bills of Materials/Kitting.
Maximum number of lines reached.
Maximum number of lines reached. Cannot insert.
You can assign only 999 items to a kit or an assembly.
Must enter I or K or J.
The type of item you enter must be specified as either an item, a kit, or a job.
Depending on which applications are interfaced, not all these choices may be
available.
A-6
Bills of Materials/Kitting User’s Manual
System Messages
Negative quantities discovered—Press Enter to back out build.
The Allow Negative Builds option is set to NO in the Options and Interfaces
function in Resource Manager. Press Enter to abort.
If you want to build an assembly that will drive the quantity of one of your items
below zero, you must set the Allow Negative Builds option to YES in Resource
Manager.
No bills of material on file.
You have not defined any BOMs. Define a BOM (assembly) in the Bill of
Materials function.
Press any key to continue with Recalc.
To recalculate the number of assemblies to build, press any key.
Press F3 to delete the entire {ID}.
When you try to delete an assembly or a kit, this message appears for
verification. If you do not want to delete, use the Abandon (F5) command.
Quantity must be greater than zero.
You must enter a positive quantity. A quantity of zero would mean that you do no
want to build, and a negative quantity would mean that you want to take
assemblies apart.
Quantity will become {n} for inventory.
You have instructed the system to push the quantity of the assembly larger than
999,999.9999 or smaller than -999,999.9999. Reduce or increase the quantity to
fit within the range.
Bills of Materials/Kitting User’s Manual
A-7
System Messages
Recalculate cost total?
Information about the item (assembly or kit) has changed, probably because of a
change in the INVExxx (Items) file with one of the items involved. To enter the
instruction to recalculate the cost, use the Proceed (OK) command; to cancel,
use the Abandon (F5) command.
Record in use.
Because someone else is using the item (assembly or kit) you are trying to work
with, you cannot change the record, and can read it only when the other user is
finished using the record.
Restoring item: {ID}.
The items that were being assembled are restored when you enter NO in the
Proceed with Build field for one of the assembly’s items after giving the
instruction to build the assembly or when the Negative Quantities Discovered
message appears and you press Enter.
Serialized components must have integer quantities.
You must enter whole numbers for quantities of serialized items.
Serialized kits are not allowed.
Serialized items are not allowed in kits.
You cannot involve serialized items with kits, either as kit IDs or as components
of kits.
Serial number {serial number} found under item {item ID}.
You must assign a serial number to the item involved with the assembly or kit. A
user may have made this item serialized since the assembly or kit was defined.
Service items are not allowed in bills of material.
You cannot include a service item in a bill of materials.
A-8
Bills of Materials/Kitting User’s Manual
System Messages
Terminology table {ID} not found.
You cannot use a function which involves user-defined fields from a TRMBKxxx
table which does not exist. The table may have been deleted from the system with
the Delete (F3) command on the table itself.
Thru value cannot be less than from value.
The Thru value must be greater than or equal to the From value.
A valid {item/location} is required.
You must enter an item or a location that is already in inventory.
Valid units of measure are:
You must enter one of the units of measure listed at the bottom of the screen.
You must build the CNVTxxx table first.
You must build the CNVTxxx table before you build assemblies or assign
transactions to periods. If General Ledger is installed, you can interface Bills of
Materials/Kitting with General Ledger and use the Period Setup function in
Resource Manager to build the CNVTxxx table.
Bills of Materials/Kitting User’s Manual
A-9
Bills of Materials/Kitting User’s Manual
File Descriptions
B
BKHIxxx (History) file
When you build, information is sent from a scratch file to the BKJRxxx and
BKHIxxx files and to the Inventory system.
The BKHIxxx file holds historical information about each assembly built:
quantity and cost of the assembly, date of the assembly, and information in
the user-defined fields.
The file holds information until you remove it. Use the Purge Bill of
Materials History function to remove information from the BKHIxxx file,
based on the date it was built.
BKJRxxx (Transaction/Journal) file
When you build, information is sent from the scratch file to the BKHIxxx,
BKJRxxx, BKTRxxx, and BKLSxxx files and to the Inventory system.
The BKJRxxx file is sent account information about each component:
general ledger period, account number, assembly ID and date of assembly,
entry type and amount, sequence number, description, and reference number.
This information is held in the file until you post, when it is transferred to the
GLJRxxx file.
BKLSxxx (Transaction Lot/Serial Numbers) file
The BKLSxxx file stores quantities and lot and serial information from
builds.
Bills of Materials/Kitting User’s Manual
B-1
File Descriptions
BKMDxxx (Master Detail) file
The BKMDxxx file stores information about assemblies, components, and
general ledger account numbers.
BKMHxxx (Master Header) file
The BKMHxxx file stores information about assemblies and user-defined
fields.
BKTB (Tables) file
The BKTB file stores information about the TRMBK and BKGLxxx tables.
The TRMBK table stores information about user-defined fields that you can
assign to the header section of the Kits function and the Bill of Materials
function. Refer to the Tables function for information about how the
information is used.
The BKGLxxx table stores General Ledger accounts for user-defined fields.
You can assign these accounts to user-defined fields 4 to 6 in the header
section of the Bill of Materials function.
When you build an assembly or a kit, information about which components
are involved comes from the BKMDxxx file. Information about each
component comes from the Inventory system. Information for user-defined
fields comes from the BKTB file.
BKTRx (Build Assembly Transaction) file
The BKTRx file stores information about assemblies, components, levels,
units of measure, general ledger account numbers, quantities, and costs from
builds.
B-2
Bills of Materials/Kitting User’s Manual
Bills of Materials/Kitting User’s Manual
Index
A
access codes
changing, 1-10
command, 1-10
company-specific, 3-7
entering, 1-10
purpose of, 3-7
setting up, 3-7
Accounts Receivable
interfaces, 3-3
selling assemblies, 3-10
additional descriptions
option to use with items, 3-5
Address Lookup, 1-20, 1-26
address mapping, 1-20, 1-26
addresses, 1-20, 1-26
Append Lotted Serial Number window, 4-9, 6-15
Append/Edit Item window, 6-11
assemblies
adding, 3-10
adding and changing, 6-9
building with deleted subassemblies, 3-11
changing definitions, 3-11
creating, 1-5
deleting, 3-10, 6-27
identified as items, 1-6
nonserialized, 4-5
option to post, 3-5
option to track before getting parts, 3-5
recalculating costs, 6-21
selling, 3-3, 3-10
serialized, 4-5
tracking, 4-5
Assembly Inquiry
function, 4-3
Available Components Report
Bills of Materials/Kitting User’s Manual
IX
function, 5-7
sample, 5-7
B
backing up
before posting, 3-12
before using critical functions, 3-7
data files, 3-7
for a list of companies, 3-7
operating system commands, 3-7
programs, 3-7
setting up schedule, 3-7
Bill of Materials
backing out, 4-11
components, 1-5
definition, 1-5
function, 6-9
selling, 1-6
updating INVExxx file, 1-6
when to set up, 3-6
Bill of Materials History Report
function, 5-11
sample, 5-11
when to print, 6-27
Bill of Materials List
function, 7-7
sample, 7-7
Bill of Materials/Kitting
before converting, 2-5
before you install, 2-3
converting to version 7.0, 2-6
installation, 2-3
installing new version before converting, 2-5
interface with General Ledger, 3-11
interfaces, 1-8, 3-3
IX-1
Index
options and interfaces, 3-3
options for setting up, 3-4
setup considerations, 2-5
system requirements, 2-3
BKGLxxx table
description, 3-6, 6-25
setting up, 3-6
Browse, 1-20
Build Assembly
Append Lotted Serial Number window, 4-9
function, 4-5
Build Assembly Journal
function, 4-13
sample, 4-14
when to print, 3-12
Build window, 6-12
builds
posting, 3-4
C
Codes
access codes, changing, 1-10
commands
access code, 1-10
backing up, 3-7
flags, 1-25
hot keys, 1-25
Proceed (OK), 1-4
companies
access codes, 3-7
backing up data files, 3-7
Component Cost Report
function, 5-9
sample, 5-9
Components
as items, 3-10
as subassemblies, 3-10
decreasing, 1-6
function, 6-17
option to post, 3-5
returning to inventory, 4-11
updating in several assemblies, 6-17
conversion
before converting, 2-5
setup considerations, 2-5
IX-2
converting to OSAS version 7.0, 2-6
D
Daily Work
adding assemblies, 3-10
adding kits, 3-9
deleting assemblies, 3-10
deleting kits, 3-9
menu description, 1-7
data
preparing, 3-6
data dictionaries, 2-3
Data File Conversion
function, 2-5, 2-6
Data File Creation
function, 2-3
date fields, 1-19
E
Edit Item window, 6-5
Existing Lot/Serial Number Entry window, 4-8, 6-14
F
F2 Inquiry
button, 1-20
flag, 1-25
F6 Maintenance
flag, 1-25
icon, 1-20
File Maintenance
menu description, 1-7
files
descriptions, B-1
flags, in text mode, 1-25
G
General Ledger
interface with Bill of Materials/Kitting, 3-3, 3-11
General Ledger table
description, 3-6
setting up, 3-6
graphical mode
drop-down menus, 1-17
function screens, 1-16
Bills of Materials/Kitting User’s Manual
Index
graphical main menu, 1-14
Inquiry button, 1-20
Maintenance icon, 1-20
MDI menu, 1-15
shortcut menu, 1-17
toolbars, 1-19
H
distinguished from items, 1-6
function, 6-3
recalculating cost, 6-21
selling, 1-5, 1-6, 3-3, 3-9, 6-3
when to set up, 3-6
Kits List
function, 7-5
sample, 7-5
hot keys, 1-25
L
I
Inquiry (F2)
button, 1-20
flag, 1-25
Install Applications
function, 2-3, 2-5
installation
options and interfaces, 3-3
setting up kits and BOMs, 3-6
installing Bill of Materials/Kitting, 2-3
interfaces, 3-3
Accounts Receivable, 3-3
General Ledger, 3-3
Inventory, 3-3
Sales Order, 3-3
interfaces with Bill of Materials/Kitting, 1-8
Inventory
interfaces, 3-3
item IDs
source for BOMs, 1-6
source for kits, 1-6
items
distinguished from kits, 1-6
identified as assemblies, 1-6
option to keep history, 3-5
replacing discontinued, 6-17
tracking, 1-7
K
Kits
adding, 3-9
components, 1-5
definition, 1-5
deleting, 3-9
Bills of Materials/Kitting User’s Manual
launching
OSAS in other operating systems, 1-9
OSAS in Windows, 1-9
Lists
printing, 5-3, 7-3
M
main menu
graphical, 1-14
MDI, 1-15
navigating graphical, 1-14
navigating MDI, 1-15
navigating text, 1-22
text, 1-21
toolbars, 1-19
Maintenance (F6)
flag, 1-25
icon, 1-20
mapping, 1-20, 1-26
Master File Lists
menu description, 1-7
Master Lists
printing, 5-3, 7-3
menus
Daily Work, 1-7
drop-down menus, 1-17
File Maintenance, 1-7
graphical main menu, 1-14
Master File Lists, 1-7
MDI, 1-15
Reports, 1-7
shortcut, 1-17
text main menu, 1-21
messages, A-1
in text mode, 1-26
IX-3
Index
modes
graphical, 1-13
text, 1-21
monthly work, 3-11
Multilevel Cost Rollup
function, 6-21
N
navigating
graphical function screens, 1-16
graphical main menu, 1-14
MDI menu, 1-15
text function screens, 1-23
text main menu, 1-22
to directories and files, 1-20
negative builds
definition, 3-5
option to allow, 3-5
option to warn about, 3-5
Negative Item window, 6-13
New Lot/Serial Number Entry window, 4-8
New/Existing Lot/Serial Number Entry window, 6-14
O
options
additional descriptions for items, 3-5
allowing negative builds, 3-5
keeping history items in kits, 3-5
posting component information, 3-5
setting up Bill of Materials/Kitting, 3-4
warning about negative builds, 3-5
Options and Interfaces function, 3-4
OSAS
MDI menu, 1-15
modes, 1-13
graphical, 1-13
text, 1-21
setup considerations, 2-5
starting in other operating systems, 1-9
starting in Windows, 1-9
P
parts
tracking, 1-7
IX-4
periodic work, 3-11
posting transactions, 3-11
producing reports, 3-11
Post Transactions
function, 4-15
posting
accounts debited and credited, 3-11
builds, 3-4
detail, 3-12
kit information, 3-3
log, 3-12
preliminary steps, 3-12
summary information, 3-12
T accounts, 3-12
transactions, 3-11
Proceed (OK) command, 1-4
programs
backing up, 3-7
Purge Bill of Materials History
function, 6-27
R
Reports
Available Components Report, 5-7
Bill of Materials History Report, 5-11
Bill of Materials List, 7-7
Build Assembly Journal, 4-13
Component Cost Report, 5-9
Kits List, 7-5
menu description, 1-7
producing periodically, 3-11
Resource Manager
Data File Conversion function, 2-5, 2-6
Data File Creation function, 2-3
Install Applications function, 2-3, 2-5
right-click menu See shortcut menu, 1-17
S
Sales Order
interfaces, 3-3
selling assemblies, 3-10
selling items, 3-3
selling kits, 3-3, 3-9, 6-3
screens
graphical function, 1-16
Bills of Materials/Kitting User’s Manual
Index
graphical main menu, 1-14
navigating graphical, 1-16
navigating text function, 1-23
OSAS MDI menu, 1-15
text function, 1-23
text main menu, 1-21
Select, 2-6
setting up Bill of Materials/Kitting
access codes, 3-7
backup schedule, 3-7
options and interfaces, 3-3
preparing data, 3-6
tables, 3-6
shortcut menu, 1-17
starting
OSAS
in other operating systems, 1-9
in Windows, 1-9
subassemblies
changing assembly definitions, 3-11
deleted, 3-10
deleting, 3-10
toolbars, 1-19
function screens, 1-19
main menu, 1-19
transactions
posting, 3-11
TRMBK table
description, 3-6, 6-24
setting up, 3-6
U
Undo Build
function, 4-11
W
Where-Used Report
function, 5-5
sample, 5-5
workstation date, 1-11
T
T accounts, 3-12
Tables
BKGLxxx table screen, 6-25
function, 6-23
General Ledger (BKGLxxx), 3-6
setting up, 3-6
Terminology (TRMBK), 3-6, 6-24
when to set up, 3-6
Tables List
function, 7-9
sample, 7-9
Terminology table
description, 3-6
setting up, 3-6
text mode
command line, 1-26
commands, 1-25
flags, 1-25
function screens, 1-23
main menu, 1-21
messages, 1-26
Bills of Materials/Kitting User’s Manual
IX-5