1
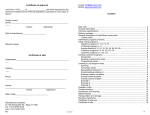
ELMI laboratory equipment
Centrifuge-mixer CM-50M
User manual
ISO 9001:2008
Version 050514
Contents
Page
Contents....................................................................................................................................1
Introduction................................................................................................................................2
Technical specifications.............................................................................................................2
Delivery package.......................................................................................................................2
Getting started...........................................................................................................................3
Rotors........................................................................................................................................4
Rotor assembly and usage.........................................................................................................4
Control buttons..........................................................................................................................5
Additional commands of the buttons...........................................................................................6
Operation with a rotor 50.01.......................................................................................................7
Operation with rotors 50.02/50.03 ..............................................................................................8
Operating centrifuge in “SP” mode.............................................................................................9
“Custom” mode: understanding the interface............................................................................10
“Custom” mode: creating a program.........................................................................................11
“Custom” mode: running a program..........................................................................................12
“Mixer” mode............................................................................................................................13
Troubleshooting: error codes...................................................................................................14
Restoring factory default settings using “TO” menu..................................................................15
Safety precautions...................................................................................................................16
Disinfection and cleaning.........................................................................................................16
Transportation and storage......................................................................................................16
Warranty statements................................................................................................................16
Certificate of approval..............................................................................................................17
Certificate of sale.....................................................................................................................17
Default factory settings.............................................................................................................17
1
Introduction
Dear users!
Centrifuge-mixer Fugamix CM-50M is easy to use and reliable in operation.We ask you to
carefully read the user manual and follow the instructions for proper operation and
maintenance of the CM-50MP. This will insure excellent results and enduring performance.
General information
The Fugamix CM-50M can be used with a range of rotor options, including for 12 x 1.5/2ml
tubes, as well as PCR Strips and tubes. This microprocessor-controlled system provides
smooth rotor acceleration and braking during all segments of the operation. A big graphical
display offers instant readout of all the relevant parameters, including time, braking level,
mixing level and rotor speed (simultaneous RPM and RCF). The centrifuge lid locks during
rotation and unlocks at the end of each run. Adjustable sound alarm , brightness and sleep
mode are also standard. Imbalance detection and a temperature sensor protect the unit from
imbalancing and overheating.
Technical specifications
Rotors: 50.01(50.02/50.03)
Rotor rotation speed, RPM
15000 (12500)
Speed step selection, RPM
100
Centrifugal force, RCF
15294 (10621)
Centrifugal force step selection, RCF
10
Timer settings, Min
0.1-99
Number of braking levels
5
Number of mixing levels
12
Total possible imbalance of test tubes: rotor 50.01 (50.02,50.03) g
1.5 (0.7)
Environmental temperature,°C
10-40
Relative air moisture at 20°C,%
80
Power supply adapter,
24V-5A
Power consumption, W
not more than 120
Size of the device (length x width x height), mm
200х180х145
Weight
3.1
Delivery package
Item
Quantity
Centrifuge..............................................................................................................................1
Rotor nut..............................................................................................................................1
Rotor key.............................................................................................................................1
Power supply adapter 24V- 5A 120W.....................................................................................1
Power cord.................................................................................................................................1
User manual..............................................................................................................................1
Packaging material...................................................................................................................1
(Attention! Type and quantity of rotors are determined by customer)
2
Getting started
Preparation to work
· Unpack the device.
· Inspect the appearance of the device, the adapter and the power cord for damage.
· Open the lid of the CM-50M with the emergency lid opening lever and remove the packaging
material.( see emergency opening of the centrifuge lid p.8).
· In the cold season keep centrifuge at room temperature for at least 2 hours.
· Assembly the rotor.
· Rotor must rotate freely without jamming.
· Centrifuge it self determines and configures to the installed rotor.
· Connect the centrifuge to the adapter and the adapter to the socket.
· Thus the light indicators will light up.
· In the absence of faults or damage the centrifuge can be considered ready to work.
· In the presence of faults and damage, do not use the centrifuge without consulting a specialist.
ATTENTION! Automatic rotor detection system seamlessly detect a type of rotor installed
and reprogram the parameters of the operation accordingly.
ATTENTION! Network socket must correspond to the adapter plug. In case of non
compliance with this condition the rules of electrical safety are violated.
3
Rotor assembly and usage
Rotor 50.01
Highspeed rotor 50.01 for 12 test tubes
with aerodynamic, hermetic lid.
Maximal rotation speed 15 000 RPM.
Maximal centrifugation force 15 294 RCF.
5 braking levels.
Short run mode.
Rotor 50.02
MIX rotor 50.02 for 12 test tubes with
aerodynamic housing.
Maximal rotation speed 12 500 RPM.
Maximal centrifugation force 10 621 RCF.
12 mixing levels.
Full range of available modes.
Rotor 50.03
Strip rotor 50.03 for 2 strips with
aerodynamic housing.
Maximal rotation speed 12 500 RPM.
Maximal centrifugation force 10 621 RCF.
12 mixing levels.
Full range of available modes.
Assembly: Put the rotor on the shaft first and then tighten the nut with a provided hand driven
key.
Usage: always load the rotor symmetrically. By minimizing the difference of weight between the
filled test tubes, you reduce the wear of mechanical parts of the centrifuge. If the overall
imbalance of test tubes exceeds 1gram, centrifuge will stop and the display will show
DISBALANCE error code.
Always apply the accessories for the rotor:
Rotor 50.01 must be used with the aerodynamic lid which seals the contents of the rotor,
reduces noise level and heating of test tubes.
Rotors 50.02 and 50.03 must be used with the aerodynamic housing which reduces noise
level and heating of the tubes.
ATTENTION! It is prohibited to apply the aerodynamic housing with the rotor 50.01.
4
Interface and controls
Control buttons
Timer
RPM
RCF
BRAKE
12 sec
12500
10621
CN
Fig. 1 Control panel.
Lid opening.
“Custom” mode view and configuration.
Mode selection.
Up and Down menu scroll and parameter change.
Start/stop and custom program launch.
Mixer start/stop.
5
Interface and controls
Additional commands of the buttons
By pressing and holding down “MODE” for 3 seconds you enter
“Options” menu to adjust screen brightness, beeper volume and more.
Bright.
Sound
Sleep
Lang.
Timer
RPM
RCF
BRAKE
00
English
Options
12 sec
12500
10621
Timer
Mixer
22 sec
12
Mixer
CN
Timer
Short run
RPM
12500
10621
RCF
Use “START/STOP” and “MIX/STOP” buttons to
switch between centrifugation “CN” and vortexing “Mixer”
modes swiftly. One single click takes to the given mode
immediately.
BRAKE
When timer is set to “Short run” you can push and spin the
centrifuge. Operation will stop when button released.
CN
Timer
Short run
Mixer
12
When timer is set to “Short run” you can push and mix.
Operation will stop when button released.
Mixer
6
Operation
Operating centrifuge with a rotor 50.01
Timer
RPM
RCF
10
15000
15294
BRAKE
Automatic rotor recognition displays an icon of
a rotor currently installed.
CN
When rotor 50.01 is installed system will automatically
reprogram itself to allow maximum speed 15000 RPM.
Also all the other operation modes will be hidden away,
allowing user to use the centrifuge in “CN” mode only.
Rotor 50.01
Rotor icon also has a color code.
- Green color means that the lid is opened.
- Red color means the lid is closed and you can now run the
centrifuge.
green
red
Settings adjustments are made using the “+/- up/down” keyboard.
Parameters can only be changed while the centrifuge is not
running.
To run centrifugation just press “START/STOP” button.
Timer
Short run
RPM
15000
15294
RCF
BRAKE
CN
By reducing the timer to the minimum you will reach a
“Short run” mode. This mode allows using “START/STOP”
button to manage the duration of the spindown.
Centrifuge will run while the button is depressed and will
stop automatically when released.
Braking levels (15000 rpm, full rotor)
Level
Seconds
1....................................................................................................................28
2....................................................................................................................20
3....................................................................................................................15
4....................................................................................................................13
5....................................................................................................................11
ATTENTION! DO NOT use the Aerodynamic housing with the rotor 50.01.
7
Operation
Operating centrifuge with rotors 50.02 and 50.03
Timer
RPM
RCF
10
15000
15294
BRAKE
Automatic rotor recognition displays an icon of
a rotor currently installed.
CN
When rotor 50.02/50.03 is installed system will automatically
reprogram itself to allow mixing functions and limit speed to
12500 RPM.
Rotor 50.02,
Rotor 50.03.
Rotor icon also has a color code.
- Green color means that the lid is opened.
- Red color means the lid is closed and you can now run the
centrifuge.
green
red
Settings are made using the “+/- up/down” keyboard.
Parameters can only be change while the centrifuge is not
running.
To run centrifugation just press “START/STOP” button.
Timer
Short run
RPM
15000
15294
RCF
BRAKE
Timer
RPM
RCF
Mixer
CN
02
03000
00611
07
By reducing the timer to the minimum you will reach a
“Short run” mode. This mode allows using “START/STOP”
button to manage the duration of the spindown.
Centrifuge will run while the button is depressed and will
stop automatically when released.
Custom
Timer
Short run
F1 F2 F3
F4 F5 F6
F7 F8 F9
Mixer
12
Spin mix spin
SP
Mixer
In addition to “CN” mode 3 modes become
available:
SP - sample preparation.
Custom - Spin mix spin programmable
mode.
Mixer - Vortexer mode.
ATTENTION! Use the Aerodynamic housing with rotors 50.02 and 50.03.
8
Operation
Operating centrifuge in “SP” mode
Sample preparation is a programmable sequence of mixing and spin down that allows
effectively mix small volumes of reagents and collect them on the bottom of a test tube.
Timer
RPM
RCF
Mixer
02
03000
00611
07
“Timer” - Controls the overall duration of the procedure.
“RPM / RCF” - Variable spin down speed.
“Mixer” - Vortexing speed.
SP
When all the setting are made just press “START/STOP” button
to launch the program.
Timer
RPM
RCF
Mixer
02
03000
00611
07
SP
When timer is done operation will stop and automatically open up
the lid. Rotor indicator will change from Red to Green and a
sound notification will beep.
ATTENTION! Use the Aerodynamic housing with rotors 50.02 and 50.03.
9
Operation
Operating centrifuge in “Custom” mode
Understanding the interface
Custom
Spin mix spin
F1 F2 F3
F4 F5 F6
F7 F8 F9
Custom mode is a step by step program with 9 independently
programmable steps F1-F9.
Understanding the color code for program steps.
F1
F1
- Yellow field: selection marker. This step is currently selected for editing or running.
- Grey field, grey letters: this step is empty and has no user settings.
F1
- Grey field, white letters: this step contains user created program.
F1
- Grey field, black letters: this step contains user created program and it has already
been executed.
Every step has two parts that are individually programmable:
Timer
Mixer
Timer
RPM
12 sec
09
F1
- Mixer: Variable speed vortexing
30 sec
12500
- RPM: Spin down with an optional speed.
Way to program individual steps.
Timer
Mixer
Timer
RPM
12 sec F1
09
30 sec
12500
F1
Timer
Off
Mixer
00
30 sec
12500
Timer
RPM
- Fully programmed both Mixing and RPM part of a step.
This step will do 12 second mixing with a level 9 speed and then
do 30 sec spin down with 12500 RPM speed.
F1
Timer
Off
Mixer
00
Timer
Off
RPM
00000
- This step is programmed to do only the spin down and skip the mixing
part. It will do 30 sec spin down with 12500 RPM speed. Same way you
can disable the spin down part and do only the Mixing.
- This step has both parts disactivated “Off” and will appear on a main
screen as a grey cell with grey number “Empty”. Programm will just skip
this step.
ATTENTION! Use the Aerodynamic housing with rotors 50.02 and 50.03.
10
Operation
Operating centrifuge in “Custom” mode
Creating a program
Custom
Spin mix spin
F1 F2 F3
F4 F5 F6
F7 F8 F9
Find mode “Custom” in a mode list by pressing “MODE” button.
In order to start programming steps of the program press “SET”.
Timer
Mixer
Timer
RPM
12 sec F1
09
30 sec
12500
Cell editing screen will open up. Here you can modify the settings
of Mixer and RPM by using “+/- up/down” keyboard.
When the first F1 step editing is finished press “MODE” to proceed to
step F2 then F3 and so on.
When all the steps are edited press “SET” and return to main screen
of the “Custom” mode. You will see your edited steps as a grey cells
with white letters.
You can also move between steps by pushing “up and down” buttons
on the control keyboard.
ATTENTION! Use the Aerodynamic housing with rotors 50.02 and 50.03.
11
Operation
Operating centrifuge in “Custom” mode
Running a program
Custom
Spin mix spin
F1 F2 F3
F4 F5 F6
F7 F8 F9
Selector is automatically placed at the beginning of the program
to the fist step F1.
Press START/STOP to run the program.
Custom
Spin mix spin
F1 F2 F3
F4 F5 F6
F7 F8 F9
Upon completion of every step centrifuge will stop, open the lid
and wait to proceed to the next step F2.
Steps that are already completed are marked black color.
To proceed to step two F2 press START/STOP.
If needed you can move selector from one step to another to
change the sequence using the “+/- up/down” keyboard.
Custom
Spin mix spin
F1 F2 F3
F4 F5 F6
F7 F8 F9
When all the steps are completed the system will return to main screen
of the “Custom” mode. You can now repeat the program again.
ATTENTION! Use the Aerodynamic housing with rotors 50.02 and 50.03.
12
Operation
Operating centrifuge in “Mixer” mode
Mixer mode is a fully functional vortexer. Easy to set vibration speed from 1 to 12.
Timer
Mixer
15 sec
12
Settings adjustments are made using the “+/- up/down” keyboard.
Parameters can also be change while the centrifuge is running.
Mixer
To run vortexing just press “MIX/STOP” button.
Timer
Short run
Mixer
09
Mixer
Open
By reducing the timer to the minimum you will reach a
“Short run” mode. This mode allows using “MIX/STOP”
button to manage the duration of vortexing.
Vortexer will run while the button is depressed and will
stop automatically when released.
Centrifuge lid can be either open or shut while vortexer is running.
Shut
Vortexing levels explained.
Vortexing level
1
2
3
4
5
6
7
8
9
10
11
12
13
RPM
105
375
525
575
732
945
1082
1220
1332
1400
1540
1620
Vortexing mode 1 is a Smart function which resembles
hand shaking motion!
Relative speed in rounds per minute from level 2 to lever 12.
Troubleshooting
Error codes and solutions
Error code
“BLACK
SCREEN”
Cause
No main power connection.
Power failure
PCB
OVERHEAT
Check connection of the power cable.
Check if the power supply adapter is
functioning.
Centrifuge lid is left open.
Close and press on the lid till you hear
a click.
Total imbalance of test tubes is
more than 1 gram.
Load rotor symmetrically.
Processor Control Board is
overheated.
Give a little time and centrifuge will
cool down automatically.
Motor is overheated.
Give a little time and centrifuge will
cool down automatically.
THE LID IS
NOT SHUT
DISBALANCE
Solution
MOTOR
OVERHEAT
Rotor detection fails.
Centrifuge does not start. Controller factory settings
Power supply cuts off.
mismatch.
Disbalance detection
failure.
Go to “TO” special menu.
Emergency opening of centrifuge lid
To open the lid of centrifuge in case of power failure or lock damage of the lid it is necessary to
raise the centrifuge and move the lever, which is located on the bottom of a centrifuge under the
control panel, to the side as it is shown on the figure.
3
14
Troubleshooting
Restoring factory settings
using special “TO” menu
Timer
Short run
RPM
15000
15294
RCF
BRAKE
When in “CN” mode turn the centrifuge off by clicking the main power
switch to “off” position.
CN
Press and hold down both buttons (-) and (+).
While holding down the buttons click the power switch to “on” position.
641615
190001
Current. 142142
Temp. 204210
TO
Rotor
Disbal.
Centrifuge will enter to a special service menu “TO”.
Understanding the screen readouts:
Parameter
Modifiable parameter Actual parameter
641615
Disbal. 190001
Current. 142142
Temp. 204210
TO
Rotor
641615
190001
Current. 142142
Temp. 204210
TO
Rotor
Disbal.
15
641615
Disbal. 190001
Current. 142142
Temp. 204210
TO
Rotor
641615
Disbal. 190001
Current. 142142
Temp. 204210
TO
Rotor
Compare the “modifiable parameter” figures with corresponding
factory default figures that you can find on the “centificates”
page in the end of this manual.
If figures does not match - correct them manually using
“up/down +/-” keyboard.
General information
Safety features
Service personnel are prohibited to:
· Plug the devie in to a power outlet with configuration that differs from the power adapters
configuration.
· Use the device with damaged adapter, power cord, rotor aerodynamic lid or housing.
· Move the device during centrifugation.
· Run the unit without rotor aerodynamic lid or housing.
· Load the rotor asymmetry.
· Use damaged tubes.
ATTENTION! Studied Samples may contain pathological material, including pathogens of
serious diseases.
Disinfection and cleaning
Before you start disinfection or cleaning make sure the power adapter is unplugged. It is
recommended to perform cleaning with water and universal washing liquids. Afterwards the
machine should be carefully dried. Do not let the water get inside the centriguge-mixer.
Transportation and storage
To insure safety during the transportation, transported equipment should be packed in the
original manufacturers packaging or similar packaging substitute.
Equipment can be transported by any kind of closed transport make sure that equipment is
tightly fixed and transportation runs accordingly to regulations applied to this way of transport.
Equipment should be stored in original manufacturers packaging in dry room with humidity not
more then 80% and temperature range from +10 C up to +40 C. It is not recommended to store
the equipment more then 36 month.
3
Warranty statements
·
·
·
·
·
·
·
Warranty applies to 24 month period from the date of purchasing.
Malfunctions arisen by the fault of manufacturer during warranty period, are removed free of
charge.
Warranty is is not valid in the following cases:
- If the serial number label of the manufacturer is damaged.
- If damages appears as a result of the incorrect operation, transportation or storage.
These documents are necessary if applying for warranty repair:
- User manual with serial number of the machine.
- Officially signed report, describing the reasons and conditions of equipment malfunction.
Warranty repair could be performed only if the equipment is delivered in the original
manufacturers packaging or equally safe packaging. Therefore please save the packaging
after unpacking the device.
If the above warranty requirements are disturbed, repair charges are applied to the
consumer.
For all further questions concerning exploitation and maintenance please contact
manufacturer or product vendor.
16
Certificates
Certificate of approval
Centrifuge-mixer CM-50M___ N__________________ has been inspected for the technical
conditions and meets all regulations necessary for such class of device.
Quality control person______________________________________________.
(name)
(signature)
Date of manufacture_________________________________.
Place for stamp.
Certificate of sale
Organization _______________________________________________.
3
Address __________________________________________________.
Phone____________________________________________________.
Vendor ___________________________________________________.
(name)
(signature)
Date of sale ___________________.
Manufacturers' address.
21-136 Aizkraukles Str., Riga LV-1006
Tel: (+371) 6755 8743
Fax: (+371) 6755 1934
E-mail: [email protected]
WWW: www.elmi-tech.com
17
Default factory settings
Rotor
Disbal.
Current
ELMI Ltd.
21-136 Aizkraukles Str.
Riga, LV-1006, Latvia
T: +371 6755 8743
F: +371 6755 1934
E: [email protected]
W: www.elmi-tech.com