1
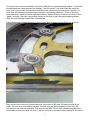
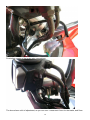
Front brake pulsing I use to have a bad pulse in the front brake but I was able to eliminate it by converting the front disks to full floating. If your front brakes pulse on initial use but then smooth out as the brakes get hot, converting to full floating disks should cure the problem. Try this experiment to see if you have the problem. Find an open stretch of road with no drivers or riders behind you. Perform a high speed stop from say 65 mph or so. If the pulsing goes away by the time you have stopped the bike, the conversion to full floating should cure the problem. The actual cause of the problem is dirt in the gap between the round spacers and the disk. The spring washers on these prevent any rattle sound when doing slow speed maneuvers but also prevent the free motion of the disk that would shake loose any dirt or debris. The reason the brakes pulse when cold but not when hot is due to the expansion of the disk. When it gets hot it grows in diameter. This is why the connection to the hub is designed as it is. The design allows the growth without warping the rotor. However, if dirt or debris gets into the gap created when it expands it will not allow it to return to the smaller diameter. This causes the cold rotor to be warped. To illustrate this take a piece of paper and cut a 4" diameter hole in it. Place three fingers into the hole spaced evenly and then push outward on the edges of the hole. You will see that the paper warps. This is what happens when the disk cools, shrinks, and lands on dirt that won't let it return to its proper diameter. I hope this helps. Welcome, Just a suggestion on the brakes. You might take the front wheel off and re-install as per the owners manual. If you don't follow the procedure you can cock the rotors in the callipers and they won't turn true. That can cause bad vibes. What are these "pins" you are describing and what are you moving when you hold the wheel with your foot? If the front wheel is completely off the ground, it shouldn't take much effort to rotate. These disks are not full floaters. The mounts allow some movement, but the rotors are held pretty snug. If they are not flat you might very well feel it. Some guys have pried the spring tabs outward on the buttons to allow for more floating. But if the rotors are very warped, even then, this might be felt. So if the dealer is indeed correct and the rotors are not warped, there is either a hard spot in the metal(i think you should be able to see this, maybe feel with your fingers, as the wear pattern will be different. there will be a shiny spot on either side of the rotor) or there is a spot that is thicker(maybe on the inside where the dealer did not check). You'd really feel this. I would pull both rotors and clean with a scotchbright pad to do a thorough cleaning. Then take a close look and feel. If all still looks OK I would then clamp a micrometer on in as many spots as you can stand. think i would then reinstall the wheel( as suggested, make sure the spacers are in correctly and you get the proper sequence from the manual) without rotors and see if the wheel spins freely. It not, it's not the rotors and likely the bearings. Rick Same discs as a Yam FZR. A little while ago I was searching the AF1 site and came upon a brake rotor upgrade in the Mille Forum. I am not quite sure who to credit for this idea, but I want to pass it on. Basically it was a mod to convert the buttons/rivets into free floating rivets like the Spiegler rotors that Befbever recently wrote about. I checked it out and it appeared that the Futura uses a similar (if not identical) rivet/rotor assembly. 1 The futura rotor rivets are backed on the inner side with an eight tab spring washer. If you bend the tabs back the rivets become free floating. I did this today. I can now rotate the rivets by hand, and I can actually feel movement between the carrier and the rotor when I tug on it. A quick test ride showed noticeable improvement in the braking efficiency. Some of you may remember that I started a post a while back that my brakes seemed to have lost some of their "edge", and that I felt that I was pulling harder on the lever to get the same stopping power. Well, this mod brought it back like I remembered. Follow this thread "original buttons on front rotors" and go down to post #9 for the pictures: After a rush hour commute of equal amounts (time wise) of 80 mph, 60 mph and stop & go traffic, the mod is an unqualified success. No softness, just good progressive feel from the moment you can feel the pads bite. The boys on the Mille Forum were complaining about the noise/rattle of the rotors after the mod. I did not notice any untoward noise coming off the rotors. 2 I have approx. 100 miles on the Futura since the mod, and in most every traffic situation you can think of. I have nothing but good to say about the change. And you can't beat the price! It took me maybe 1/2 hour per rotor. I rotated the washer until a tab was centered over the crack between the rotor and carrier. I found a thin bladed screwdriver that fit into the crack and pushed up on the edge from the underside. Then rotated the washer until the next tab was centred. First ride with full floaters commuting this morning. And there is absolutely an improvement. The level feels less "soft" now, and there is an improvement in brake performance. After a few miles I adjusted the lever one click down to get the grip corrected. Noticed that there was a lot of sand and dust under the spring washers when doing the mod. And I bended and cleaned the buttons two days ago. Looks like sand is coming in, but not getting out again. Hope the new master cylinders shows up soon. I have the same pulsing problem and it got bad. Went from mild pulsing to the whole front end shaking during braking. I cleaned the buttons but that didn‟t help, I bent the wave washers until the had no spring pressure at all and the rotors rattled on the carriers. That helped alot but there is still pulsing after repeated stops. I cant see how a warped rotor could cause this since they now will move side to side about 3/16 ". I bought new EBC wave rotors and HH pads, installed those parts and the pulsing/shaking got so bad I wouldn‟t ride it like that. I took they new parts off and reinstalled the old parts so it is rideable but not cured. I checked the rotor runout and one side was .002 inch and the other was .007 inch which shouldn‟t cause that much shaking. So I too wonder if a bad calliper could cause such a problem. I don't think it is a rotor. If you want to get rotors, I got my EBC wave rotors for $175.00 each from Okay, here is the deal, apparently not well understood, if at all! 1. A "warped" rotor will not directly cause strong pulsation. Callipers and rotors are made to allow side to side movement. 2. A warped rotor will eventually cause uneven wear of the rotor, by means of the pads brushing against the high points of the rotor when not braking. 3. As the high points are worn down, the rotor then becomes thinner at those points than at others. 4. The calliper cannot compensate for thickness variations. This is the cause of pulsation. End of story. Tell me how a warped non floating rotor is going to allow side to side movement? Also explain how the calliper which is fixed to the fork leg is going to compensate for this warpage when you have the brakes on & the pistons/pads are locked onto the warped rotor? If you have a warped rotor on a car you will feel it when you apply the brakes & the same is true of a fixed rotor on a bike & you won't have to wait for the high points to wear. 3 You can find replacement rotors [298mm] for the RST about anywhere.... little trick though...order them for an early '90s Yamaha fzr 600..... They‟re exactly the same as the futura's discs... On the Mille's, about 50% of the brakes pulsate over time. The fix is to remove the rotors and clean the buttons completely so that they are free od any debris / grime. This has been determined to be the root cause and solution for about 95% of the cases. If you are looking to upgrade, great. If you would rather not, take the rotors off and clean out those buttons. It will likely work as they seem (from your pic) to be the same button style . Brake rotor selection for motorcycles is an interesting topic due to all the differing opinions, designs, and options. Overall, the OE rotor design is sufficient for OD and heat capacity under normal conditions. I have spent some time in the automotive field with rotor design and development with heat capacity, cooling, and fade testing. This article will try to take a common sense approach to rotor design, function, maintenance, and aftermarket choices based on what I have learned over the years and applying it to two wheels. Normally for automotive, there are really two factors in OE rotor design – Effective Radius (rotor OD), Heat Capacity (rotor thickness), and Cooling (vent design). For motorcycles, the Effective Radius is the most important since modern motorcycle rotors are neither vented nor much different in thickness (4-6mm). In substitute of those, I‟ll talk about the fastening of the brake disc to the carrier (fixed, semi-float, full-float). Effective Radius (ER): To keep it simple, we‟ll call the ER the midpoint of the pad on the swept area of the braking surface. In general terms, brake torque can be calculated by Brake Force at the pad/rotor interface * Distance (ER) away from center. The larger your rotor OD, the more output you can generate for a given brake, all else being equal. Growing the ER is like using a longer wrench for better leverage on a stuck bolt. Increasing your ER from the OE size can get expensive pretty quick. If you are lucky, you will have available (to purchase) an adapter bracket to move the OE callipers outward to fit your larger rotors. Most brake kits do not offer just that option as, go figure, they have a calliper to sell you! Rotor Attachment Methods Why float? The purpose for not using fixed or one-piece rotors is pretty simple. First, the floating rotor allows for better pad knockback (where the rotor “knocks back” the pad such that there is no contact and reducing rolling drag). Second, it will accommodate for a small misalignment of rotor to calliper / pad. This will allow for full pad contact even when parts are not perfectly aligned. Imagine a fixed rotor with a misaligned calliper – the actual contact (and pad/rotor wear) would only be a portion of what is available. As you might think, the full-floating allows for more of the above benefits over the semi-floating design. Aside from rear rotors with no carrier that bolt directly to the rear wheel, there are a couple different methods to attach the rotor carrier that attaches directly to the wheel, and the rotor disc that the pads contact. Semi-floating Rotors: Most OE rotors, even on Italian bikes, are a semi-float design. That is, there is no direct attachment between the disc and the carrier, but they do not move freely of each other without moderate force. If you have semi-float rotors, you can move the disc independently of the carrier by pushing and pulling the disc perpendicular to the carrier. The actual attachment is a rivet-style with a spring sandwiched between 4 the rivet surface and the rotor components on each side. The springs are always in contact with the rotor components creating the „semi-float‟ effect. …continued from teaser here Full-floating Rotors: Most aftermarket rotors, are full-floating. Like the semi-floating rotors, the carrier and disc are separate parts, but that attachment mechanism between the two are different. Where the semi-float uses a rivet design, the fill floating design uses a “button” without any spring force applied to the rotor components. While the button is a mechanical attachment, the back side is secured by a snap ring, e-clip, or stacked spring that can be removed. The degree of free float is in the range of 0.51.0mm. These are completely free float and you can move them with no effort with your fingers. Comparisons: So why not just use full-floating rotors on everything if they are better? They are better for pure performance, but there is a trade-off for the benefits. The main disadvantage to the full-floating design is the noise factor. First, they rattle…all the time…high speed, low speed, they always rattle. Second, they are much more likely to make noise (probably low speed, low frequency howl or groan noise) because the mechanical attachment has been „loosened‟. I guarantee that while you and I may be willing to live with the noise given a performance benefit, the OE will not. They do not want the complaints and warranty costs associated with noisy pads. SIDEBAR: I purchased billet full-floating buttons to convert my OE Mille „R‟ Brembo rotors from semi-float to full float. Guess what – since then, every time I approach a stop light or other lower speed brake apply, I get an awful groan noise where I can actually feel the vibration in the bars. Yuck. There are reasons for my trade-off and I‟ll spare you the long story. END SIDEBAR I think a discussion regarding rotor disc metallurgy would be helpful at this point. Two basic metals are offered for the rotor discs – cast iron and steel. Now there are many versions of each with respect to processing, but lets stick to the basics for this discussion. Its also worth noting that almost 100% of automotive rotors brake surface are cast iron. First and foremost, its cheap. Second, it can be poured very easily. I think the main reason for stainless steel being used for motorcycle rotors is corrosion. Most motorcycles are seasonal and get stored for a good part of the year where they would rust. Not good. Cars that are driven every day may get surface rust, but no accumulation. Steel is available in both the OE & aftermarket sectors. It is the most popular material and usually priced cheaper than the cast iron versions. The main advantage is that they will not corrode as easy as well as the selection for brake pads is much greater. Cast iron also has its advantages, with the main being a higher friction level. There are also claims as to a better feel or modulation capability, but I have not experienced that. Given the choice where corrosion from high humidity is not a concern, the general concensus is to go with cast iron. SIDEBAR #2: Have I mentioned that an excellent way to address fade is to go with the CRG Roll-a-Click adjustable levers on the fly? I have. They aren‟t cheap at $100 each, but at the very least with the brake lever only, you can improve the feel and lever stroke of faded brakes on immediately as it occurs. Heh – you can ask for the clutch lever for your next birthday END SIDEBAR. SIDEBAR #3: Wave Rotors I really have no experience with wave rotors. I do know some racers that say they work well, but for the most part in the circle that I know, they are purchased for the bling-factor. Great. From a design side though, it seems to take away the advantage of adding heat capacity with all the cut-outs. I would also be surprised if the pad wear was not 5 compromised due to the interrupted cut that the pads see during braking. But, I have not heard any complaints first-hand. END SIDEBAR SIDEBAR #4: Slots vs. Holes and De-Gassing The purpose for the holes and/0r slots is not weight reduction or cosmetics, but to allow pads to properly de-gas especially when they are new(er). As a pad is bedded in (especially the first time you fade them), it is burning off the binders, fillers, and other materials. This gas needs an avenue to escape at the surface of the pad and the holes / slots allow for just that path. Without them, there is actually a force generated by the escaping gas in the opposite direction of the apply that works against braking force. This gives a feel like the brakes have faded when they haven‟t. So you need them. As for a preference for slots versus holes, its really not so critical on motorcycle rotors as it is in the automotive field. For autos, I would stick with slots as they do have the surface cracking propensity as rotors with cross-drilled holes. As for motorcycles, the braking capability to weight ratio is so much better that I have never cracked one myself with either design. I know, I know…your friend of a friend‟s cousin cracked a rotor riding through the mountains… Is it possible? Sure. Is it likely for a mere mortal, no way without a quality issue. END SIDEBAR Rotor Maintenance: What? Its true. Some rotors require routine maintenance. Stock Brembo‟s that are on Aprilia and Ducati sport bikes are semi-float. They are a common rotor (interchangeable) and have a common problem without maintenance – brake vibration. Almost everyone who owns an Aprilia or Ducati recognizes the bulletin board topic “Brake Vibration”. They take it to the dealership under warranty and get the rotors replaced. Unfortunately, the problem is in the rivets and it could return. They collect brake dust and other crap that binds up the movement of the disc. If the cannot move freely (as much as semi-floaters can), you will get brake vibration. Bottom line is that you have to clean the rivets with brake cleaner periodically to keep them clean and functional. Be sure to clean any braking surface you touch with your fingers with brake cleaner. Without a dissertation, just do it but don‟t get any on the pads. Other than keeping buttons and rivets clean, its best not to mess with the braking surface. This will avoid contaminants in the pads and hopefully prolong good performance. Brake Pad / Rotor InterfaceJust be aware that specific pads are for specific rotor materials. If you purchase aftermarket rotors, please ask the manufacturer (not the zit-faced kid at the dealer or on the phone that is selling you the product) which pads work well with there rotors. If the rotor manufacturer makes a specific pad for their rotor, consider using it. If there is a problem down the road, you will have a reasonable argument in hand that the system is completely „theirs‟. If you get a BrakeTech kit, use the BrakeTech recommended Ferodo pads. It is that simple. WWABD: I have a good deal of experience with stock and aftermarket rotors for motorcycles as well as background in automotive rotor design and performance. I have owned Brembo, PM, AP, and BrakeTech rotor kits including slotted and cross-drilled as well as aluminium and magnesium carriers. This also includes all of the above listed button designs. In general, the OE rotors are fine for every day riding and most mountain twisties. Aftermarket rotor kits that either increase the ER or increase the friction level are a good idea for those who do the regular track day or race at any level. I would also recommend them for those who partake in the tight mountain twisties where a lot of braking is needed like the famous Deal‟s Gap. 318 turns in 11 miles is pretty hard on the brakes. Finally, don‟t try to address fade with rotors alone. Since cast iron and steel have similar heat capacity and density, unless you go up in rotor OD (adding total disc weight), you will not improve fade. For motorcycles, fade is probably best addressed with pad selection unless you have loads of money. 6 What a great article. I‟ve got a 2001 Triumph Sprint ST with what I believe are Brembo semifloating front rotors. I have a bad vibration when braking hard from about 80 mph. The vibration is disconcerting and braking distances seem much increased. Rotor thickness is consistent and there is about .006 maximum lateral runout. I have “worked” the buttons and they all have what I would consider acceptable movement, but tonight I will clean them all and blow them out with compressed air. I‟ll let you know how that turns out. Thanks, Rick In this case, it is no different. To get the rotors to float (move) on the ‟semi-float‟ versions takes much more force that the contact of the dial indicator probe. Runout can still be measured even though there is not a fixed attachment. I had this very problem on a previous bike and measured the runout…it was too high. I was able to reduce it by two things: First, try indexing the rotor. This means try all the positions (six?) that the rotor can be mounted on the wheel (this takes some time, but can fix the problem). Pick a bolt hole on the rotor and mount the rotor with this same bolt hole at each wheel hole position. If the rotor indexing does not solve the problem, go with the position that has the least runout and vary the bolt torque slightly. The polarity of your dial indicator will determine if you tighten or loosen a little. Friday, March 25th, 2005 at 9:45 pm by angrybob Master cylinders often create varying answers on bulletin boards when the question “Should I get a radial pump master cylinder for my bike?”. The problem with those varying answers is that only a small handful of responses are correct. Those along the lines of changing lever feel, volume, and force requirements are on the right track. However, that‟s about it. With modern motorcycles, an aftermarket will not greatly help fade, stiffness, or effectiveness of the brake system. The purpose of this article is to unpack all that I know about master cylinders (as a brake system engineer) in plain English and apply it to the motorcycle arena. I‟ll cover the following topics: Purpose Master Cylinder Sizing…Ok there‟s a little math involved in this section Types of Master Cylinders Aftermarket Units Real World Benefits - WWABD? Purpose: The purpose of a hydraulic master cylinder (m/c) is to provide a source for pressure to be applied to the brakes. In other words, the function is to translate the rider‟s input lever force into brake line pressure in order to apply the brakes. Without getting into the valving too much, you have a brake lever connected to a pushrod connected to a piston inside the m/c bore. The pressure generated is captured and maintained by a rubber seal between the bore and the piston. That‟s it. OK, there‟s a little more to it than that, but thats the basics. Master Cylinder Sizing: This is where many people stray from reality when explaining master cylinders. An OE master cylinder is sized to be able to have enough fluid capacity for the combined total calliper piston volume consumed at maximum „calculated‟ running clearance (the gap between the pads and the rotors - usually less than 1mm). Its not the total piston volume as that would be huge, but the following simple equation [pad gap * piston area of all pistons in circuit]. Most calliper piston diameters are in the 30mm range while most m/c‟s are on the 1320mm range. 7 OE m/c‟s are sized to give the rider the best blend of lever force and travel characteristics. Since the m/c‟s purpose is to translate a lever force into fluid pressure (force per unit area = psi), the bore diameter determines how the lever feels. To understand the impact of bore diameter, think of the equation force/area with the force being lever force and the area being the area of the m/c bore. To display the math a little, I‟ll use nice round numbers. Say you can generate 1000lbs of force and have a 1 in2 m/c bore area. That equals 1000lbs/1 in2 or 1000psi. By increasing the m/c bore area to 1.25 in2, using the same equation, you can only generate 800 psi. Likewise, by decreasing the m/c bore area to 0.75 in2 you generate 1333 psi. M/C bore area summary: The bigger the area of the bore, the less pressure is generated for a given input lever force. The smaller the bore area, the more pressure can be generated from that same input force …continued from teaser here Lever stroke is also impacted by m/c bore area. The total volume of fluid generated in the m/c is the equation [m/c bore area * m/c piston travel]. Again, using the 1 in 2 m/c bore area from above and keeping the m/c piston travel constant at 0.5 in, the original case 0.5 in3of fluid volume. Increase the bore area to 1.25 in2 = 0.625 in3. Likewise, decreasing the m/c bore area to 0.75 in2 = 0.375 in3. M/C volume summary: The bigger the area of the bore, the less stroke required to move a given volume. The smaller the bore area, the more stroke is required to move that same volume. Combining the two summaries is the key to understanding master cylinder sizing: The bigger the bore, less stroke but more force will be required to reach a given pressure. The smaller the bore, more stroke but less force will be required to reach that same given pressure. The balance between force and stroke is what the tuners at the OE call “feel”. From my experience, I have seen smaller m/c‟s on OE machines which leads me to believe that the goal is to give a system with less effort and more stroke than the other way around. Many stock units are around 13mm in diameter. Types of Master Cylinders: There are two basic types of master cylinders available on OE bikes and in the aftermarket sector. Most bikes still get the standard type m/c where the piston bore is parallel to the clip-on or handlebars, where a few of the new(er) sport bikes are starting to get the radial pump as stock equipment. Aftermarket Units: The common m/c on stock bikes. cost and sizing. Most stock the volume that the bigger usually cast aluminium. The taken up on the bars and the lack of lever adjustment (either none or 4 adjustments). standard design is still the most My guess for the reasoning is brake systems do not require radial pumps offer and are disadvantages are in the space While the radial pump has been around a while in the aftermarket, its only been stock on upper end sport bikes for the last year or two Brembo is still the household name among radial pumps although many other brands exist (AP, Speigler, Magura to name a few) in the 8 aftermarket sector. The „base‟ models are forged (pictured) and the „bling‟ models are machined from billet. The main advantages are they offer larger diameter bores, a fine adjustment for the lever position, and a selection of pivot lengths. Brembo sells a 19mm bore x 16,18, or 20mm pivot lengths. The smaller pivot length has the same affect as a smaller m/c bore size - the 16 requires the least effort to generate a given pressure, but has the longest stroke. The 20 requires the highest force to generate a given pressure but has the shortest stroke (this is the one req‟d for 6-piston calipers). AP has a design that has a variable pivot length controlled by a dial & set screw - very cool. The main disadvantage in the aftermarket radial pumps is the fact that they do not come with a brake switch. No big deal for a track bike, but for a street bike that needs a brake light, more $$$ needs to be spent. You can dump from $20 for a banjo bolt / pressure switch type to $80 or so for the bling Brembo switch setup. I‟ve only owned the cheap kind and the pressure response to illuminate the brake light was variable. The other disadvantage is that if you break a lever, they are usually pricey. NOTE: A common misconception is that the bigger bore m/c‟s make the brakes stiffer. They do not. The increase in required force and more importantly shorter lever stroke is mistakenly called increased stiffness because the brakes engage sooner. Real World Benefits - WWABD?: I have owned both Brembo and AP (non variable pivot length) radial pumps for street and track bikes. My opinion is that unless you are racing, save your money. For the street and even canyon carving, its really not necessary or at least not the best first step(s) for a street bike to improve the feel or fade. Braided lines and brake pad selection are better first steps IMO. The next step if you are concerned about or are getting brake fade would be the CRG Roll-A-Click Adjustable Levers. The lever can be adjusted out (to address fade) on the fly with your thumb. I have these on my Mille R and they work great. Heh I also have the stock m/c! If you race, that may be a different story…especially for endurance racing where fade and shorter stroke are more important. Stock Front Brake Rotors made Perfect for $0.00 I'd been cleaning, shaking, and freeing the front brake rotors from their carriers regularly on my '02 Mille for too long, just to have the rotor buttons tighten back up and my brakes start pulsing within a week or less of riding. Enough was enough, but I wasn't about to spend $500+ on new rotors. I pulled my front wheel, removed the front rotors, and solved the problem in less than 30 minutes without spending a dime. Since the fix, after 1,500+ miles, I've never felt a single brake pulse, nor have the rotor buttons/rivets even begun to seize up again. In a nutshell, you'll turn "semi-floating" rotors into full floaters, without replacing the rivets. Below is a picture of a Mille's brake rivet beforehand. The fringed-edge spring washer is the cause of the problem. 9 Notice the snugness of the fringed washer's edges to the rotor and carrier. A combination of the tight fit, oxidation from the different metals touching, and pocket created under the convex washer (trapping dirt/brake dust/etc.) are preventing the rotor from even "semi"-floating on it's carrier, resulting in brake pulse and eventually, if unchecked, rotor warpage. Here's my tactic: I sharpened the tip of a flat tip screwdriver, and used it to flatten the "fringed" spring washers found on the inside of the rotors' "semi-floating" rivets/buttons. The key is just to flatten the convex fringed spring washers, without bending the fringes upward (ie: don't make them concave) . The edges of the washers shouldn't be more than 1mm off the surface of the rotor when you're done. Here's a picture of after: It's easiest to get underneath the edge of one of the spring washer's fringed edges by starting in the gap between the rotor and carrier. Once the screwdriver tip (or other equivalent sharp, narrow tipped chisel) is slid under the fringe, only lift it slightly to bend the fringe just barely away from the rotor. Instead of having to work the sharp tip under each fringe of the washers, slide the tip sideways from one fringe to the next, like so: After the above procedure, the rivets should all be loose, and the flattened spring washers should spin on the rivet with only a light push with your finger. Grasp the assembly by the carrier, shake it, and the rotor should rattle a bit. I sprayed the rotor rivets with brake cleaner when I was done, and the pressure of the spray can's stream was actually enough to spin the spring washers on the rivets! The only even slightly negative result of this mod is the increased noise. With normal or even heavy braking, the difference in braking volume isn't noticeable, but ride over a pothole at low speed (without the brake on), and you'll hear the rotors jingle a bit. The tradeoff is well worth it. You could try cleaning the buttons first - if you still get the shakes/pulsing - check if the run-out is within spec. You'll need a a dial gauge. I think the spec is 0.1 to 0.3 mm. I've resurrected a pair of rotors with a good clean - but now they need doing again I did this rotor buttons mod before I went to ride at Philip Island in March this year and yes it fixed the problem by about 90%. I still get pulsating from front braking at high-speed (we're talking a difference of pulsating at 80km/h to now happening at about 150-160km/h). I used to notice the problem a lot on street riding but have not felt it anymore (except on track where brakes get used a lot more often). One other suspect is too much compression dampening causing some minor hydraulic locking in the forks. 10 I noticed this same problem on a brand new 04 Factory at Philip Island too (only slightly better than my modified rotor buttons). __________________ I actually went with billet full-floating buttons on the stock rotors. That too solved the problem and saved about a full pound (really) off the front wheel, but at a cost of $125. The free way explained in the post above is probably the best route after a good cleaning of the buttons. Its very rare that these rotors would actually warp, even in race conditions. Free brake buttons will allow you to convert semi floating rotors into full floating rotors. Free floating rotors reduce the drag from the pad which in turn reduces the heat build up in the rotors and the heat transfer to the fluid. These free floating buttons will allow the bike to roll easier and reduce the unsprung rotating weight by over .5 pound. Hard Anodized aluminium buttons with hard anodized clips. Buttons are sold each, please order the total amount you will need. Tech Info: What is Full-Floating? Full floating rotors, such as were originally conceived, were designed to reduce the tendency towards thermal stress induced distortion due to uneven thermal expansion under load. Prior to the introduction (by Brembo) of this design, brake rotors in the motorcycle industry were simply round discs bolted solidly to the wheel. You may remember if you've been around long enough, the rotors on the early CB750 and Z-1's were nearly 7mm thick and weighed accordingly. This was in effort to keep them from warping. Now days, the only road bikes coming through with solid mount (front) brakes are the Cruisers and budget bikes. Today's Sportbikes brake rotors work remarkably well considering their mass-produced (read: stamped) manufacturing process. These are technically semi-floaters as the outer SS blade is nearly bolted solid to the carrier via the stamped stainless steel rivets. True full-floaters move on the carriers, this allows them to self-centre in the calliper for reduced brake drag and "float" unimpeded for unrestricted expansion and contraction during repeated thermal cycling. The only serious down side is a bit of rattle that reminds you these are indeed full-floaters. Does all this guarantee they won't distort under severe duty conditions? No, unfortunately, there's precious few guarantee's these days. But they do perform as advertised in improving overall braking performance while significantly reducing that distortion tendency. BTW: All Superbikes, GP machines and the like unanimously have full-floating brake rotors 11 I am looking for a rotor to be disassembled. I need to get the measurements from the semi-float button. I have a friend who owns a screw/bolt/rivet machining company locally here in Phoenix. What I want to do is make a set of full-floating buttons out of the same stainless material. The idea is to make the stock rotors full-floating w/o spending a boatload of cash on aftermarket ones. I know that cast iron offers a better heat soak than the stock stainless material, but I don't really want to spend the money for new ones when mine are perfect. Second, it will probably <!> eliminate the semi float button problem of 'sticking' - the cause of much of the brake vibration. The difference...The current Brembo buttons are finish-machined (turned). My firend's outfit does cold rolling/forming. We reviewed the tolerances on some estimate dimensions and the largest was .005" or .1mm and that was in total length on the button. That should not cause a problem. I am a brake system engineer for the automotive world and have a pretty damn good understanding of rotor/calliper interface and design GD&T. The idea is to use a button with a groove machined in it for a snap ring. In between the snap ring and the rotor carrier will be a stainless washer...like on the current rotor. It looks like I can sell these for about $40 or so for a 'kit' of 16 buttons, washers, & snap rings. I have to cover a $600 tooling cost plus materials, etc. Yes, to do that there is a few bucks for me involved. Don't know how much yet...don't really care as I'm keeping my day job. Of course I am going to be the guinea pig and fit these on my bike first. I have owned Brembo, AP, & Ferodo full-floating rotors and don't really see a problem. This design is very similar to the AP style except a simpler fastener - snap ring versus a coil-type retainer. Is there any interest out there for this? I need to double check the 00.5 & older design, but I think the buttons are common so it should work for all 99-02 models. Dunno about the '03. Dunno shit about the '04. And all of the Ducati 748/916/996/998 models as well. Let me know here or at [email protected] Floater Aluminium Floater for the change of the brake disks on swimming storage. Increases the brake performance. Available in black, blue, red, gold and aluminium nature. Please note colour and type of brake disk (strength of the disk). Price per piece. 12 Brembo sells FF button kits to service their FF rotors, p/n 105715910 www.tawvehicle.com talk to Jolene. These are 14mm diameter buttons and come with a .3mm shim and clip, 10 to a package for $17. www.mcmaster.com sells SS metric shims in varying thickness. p/n 98089A392 = 1.0mm p/n 98089A348 = .5mm p/n 98089A305 = .3mm 25 to a package for $6 I'm not sure what is the diameter of the stock rotor buttons but since the disks are thinner than the real FF types, you'll need to shim accordingly. My Brembo FF rotors had .5 mm play when new. Tu as un ou plusieurs pistons de grippés dans les étriers !! Regarde tes plaquettes, si l'usure est inégale, bingo !! Oui, j'ai eu ca, et ca arrive qu'a petite vitesse. J'ai change de plaquettes, et fini le problème. 13 Brake rotor selection for motorcycles is an interesting topic due to all the differing opinions, designs, and options. Overall, the OE rotor design is sufficient for OD and heat capacity under normal conditions. I have spent some time in the automotive field with rotor design and development with heat capacity, cooling, and fade testing. This article will try to take a common sense approach to rotor design, function, maintenance, and aftermarket choices based on what I have learned over the years and applying it to two wheels. Normally for automotive, there are really two factors in OE rotor design – Effective Radius (rotor OD), Heat Capacity (rotor thickness), and Cooling (vent design). For motorcycles, the Effective Radius is the most important since modern motorcycle rotors are neither vented nor much different in thickness (4-6mm). In substitute of those, I‟ll talk about the fastening of the brake disc to the carrier (fixed, semi-float, full-float). Effective Radius (ER): To keep it simple, we‟ll call the ER the midpoint of the pad on the swept area of the braking surface. In general terms, brake torque can be calculated by Brake Force at the pad/rotor interface * Distance (ER) away from center. The larger your rotor OD, the more output you can generate for a given brake, all else being equal. Growing the ER is like using a longer wrench for better leverage on a stuck bolt. Increasing your ER from the OE size can get expensive pretty quick. If you are lucky, you will have available (to purchase) an adapter bracket to move the OE callipers outward to fit your larger rotors. Most brake kits do not offer just that option as, go figure, they have a calliper to sell you! Rotor Attachment Methods Why float? The purpose for not using fixed or one-piece rotors is pretty simple. First, the floating rotor allows for better pad knock back (where the rotor “knocks back” the pad such that there is no contact and reducing rolling drag). Second, it will accommodate for a small misalignment of rotor to calliper / pad. This will allow for full pad contact even when parts are not perfectly aligned. Imagine a fixed rotor with a misaligned calliper – the actual contact (and pad/rotor wear) would only be a portion of what is available. As you might think, the full-floating allows for more of the above benefits over the semi-floating design. Aside from rear rotors with no carrier that bolt directly to the rear wheel, there are a couple different methods to attach the rotor carrier that attaches directly to the wheel, and the rotor disc that the pads contact. Semi-floating Rotors: Most OE rotors, even on Italian bikes, are a semi-float design. That is, there is no direct attachment between the disc and the carrier, but they do not move freely of each other without moderate force. If you have semi-float rotors, you can move the disc independently of the carrier by pushing and pulling the disc perpendicular to the carrier. The actual attachment is a rivet-style with a spring sandwiched between the rivet surface and the rotor components on each side. The springs are always in contact with the rotor components creating the „semi-float‟ effect. …continued from teaser here Full-floating Rotors: Most aftermarket rotors, are full-floating. Like the semi-floating rotors, the carrier and disc are separate parts, but that attachment mechanism between the two are different. Where the semi-float uses a rivet design, the fill floating design uses a “button” without any spring force applied to the rotor components. While the button is a mechanical attachment, the back side is secured by a snap ring, e-clip, or stacked spring that can be removed. The degree of free float is in the range of 0.514 1.0mm. These are completely free float and you can move them with no effort with your fingers. Comparisons: So why not just use full-floating rotors on everything if they are better? They are better for pure performance, but there is a trade-off for the benefits. The main disadvantage to the full-floating design is the noise factor. First, they rattle…all the time…high speed, low speed, they always rattle. Second, they are much more likely to make noise (probably low speed, low frequency howl or groan noise) because the mechanical attachment has been „loosened‟. I guarantee that while you and I may be willing to live with the noise given a performance benefit, the OE will not. They do not want the complaints and warranty costs associated with noisy pads. Permalink 4 Comments What a great article. I‟ve got a 2001 Triumph Sprint ST with what I believe are Brembo semifloating front rotors. I have a bad vibration when braking hard from about 80 mph. The vibration is disconcerting and braking distances seem much increased. Rotor thickness is consistent and there is about .006 maximum lateral runout. I have “worked” the buttons and they all have what I would consider acceptable movement, but tonight I will clean them all and blow them out with compressed air. I‟ll let you know how that turns out. Thanks, Rick Comment by Rick Banasik | November 8th, 2005 5:42 am | Permalink I have cleaned all the buttons and verified the pistons are all moving freely. Pulsation is much reduced and the brake lever has much less travel. BUT I still have some vibration. Can you tell me the proper procedure for measuring runout on a semi-floating disc? I suspect the process is different from how you check a fixed rotor. I have a dial indicator. Thanks in advance, Rick Comment by Rick Banasik | November 26th, 2005 8:00 pm | Permalink In this case, it is no different. To get the rotors to float (move) on the ‟semi-float‟ versions takes much more force that the contact of the dial indicator probe. Runout can still be measured even though there is not a fixed attachment. I had this very problem on a previous bike and measured the runout…it was too high. I was able to reduce it by two things: First, try indexing the rotor. This means try all the positions (six?) that the rotor can be mounted on the wheel (this takes some time, but can fix the problem). Pick a bolt hole on the rotor and mount the rotor with this same bolt hole at each wheel hole position. If the rotor indexing does not solve the problem, go with the position that has the least runout and vary the bolt torque slightly. The polarity of your dial indicator will determine if you tighten or loosen a little. Make sense? Brake Fade? Hi All, I am new to the Fut and so far I love it, awesome bike! Girlfiend loves it too, so much better than 15 the VFR and the CBR that we had before. I'm based out of San Francisco and hoping to meet up with some CA riders soon, we should have a mod party on the west coast maybe? However, quick question. Have you guys experienced any brake fade in heavy traffic of hard going twisty's? I noticed this just the other day. Plenty of pad life left but I have no idea if they are after markt pos or oem pads. What do you use? Whats best? Later, Digs I have 5000 miles on my fut and never had any brake fade perhaps you could try changing pads they may have glazed over if they were used in hard braking before your self. If this does not work you could also try braided hoses We are looking at $579 for both masters w/ integrated reservoirs, and braided lines in any color you choose. This will include connections for the brake light switch and clutch switch. These are not the "race" brembo masters, they are similar to the masters you would find on the 2004 RSVR and RSVR Factory. There is no interference when turning bars lock to lock. They take basically the same room that the stock masters take, and only a person who knows the difference would know the bike didn't come that way stock. To put radial calipers on your futura you would either need to upgrade to a 2003 or newer ohlins front fork, with new OZ wheel, and 320mm discs or upgrade to the 2005 RSVR showa fork bottoms with the radial calipers and 320mm discs. For a less expensive mod than the radial calipers, you can upgrade to the 4-pad calipers. You can also upgrade to any year base model fork bottoms (assuming the tubes are the same size, which I think they are) and go to the 320mm discs with the 4-pad calipers. The brake and clutch master can rotate downward or futher upward to adjust to your riding style. The levers have adjustment in and out to adjust the span of the lever, and there is a small nut to adjust the free play on the plunger as well. The levers are the same as found on the 2004-2005 RSVR / Factory so can be ordered from any aprilia dealership, and we stock them as well. Basically Aprilia skimped on the masters on the Futura, so we decided to offer a kit that upgrades to the newest, best available masters without going to a "race" setup. My impression of the change is that the brakes and clutch have far smoother action, with an easier pull on the clutch, and better modulation on the brakes. The reservoirs have far greater capacity than the undersized stock reservoirs, and are clear so you can make sure there is plenty of fluid in them. Oh yeah, and they look sweet! 16 This past weekend, I had the good luck to have AF1 ask me if they could use my RST as a test mule for some new products they're offering up for that model. "Sure," I said. So, I took the bike in and they installed the following: Brembo Radial brake and clutch master cylinders with integrated reservoirs A new braided brake line A new braided clutch line Heck, these are worth having if only for the symmetry and the removal of that brain-dead design of a brake reservoir (sorry, I'm suffering from Post-Traumatic Crappy Clutch System Luck Syndrome, if you've followed the travails of my bike on this). But these babies are more than just that, of course. Here are a few more pics...argh, editing won't let me show 'em all, go to the link above for images, or look at this post.... Clutch: Clutch switch: 17 Brake: Brake switch (much nicer than the problematic stocker). These wire connections are preproduction; see next photo for the production version. 18 Production version of the brake wire connections: The levers have a bit of adjustment, as you can see: I measured 15mm for the brake, and 5mm 19 for the clutch. I wanted to move the brake lever in even more, since I figured it might help overgrabbing the more powerful system; Jon at AF1 says that Evoluzione offers replacement levers that can move them a bit closer. The clutch was fine for me. From Jon at AF1: "Installation is a snap, and connectors will be supplied for splicing the brake and clutch switch into the system. They have a top side bleeder which is inside the reservoir making it very easy to bleed the system." I've had my RST since June of '02, and over time, have noticed the brakes getting a bit soft on the intial lever travel, then grabbing pretty nicely. The action with the new pumps is much more positive. In fact, with a firm grab, they REALLY pull the nose (and speed) down in a hurry. Additionally, they're pretty consistent, with good feedback at all positions. I've always enjoyed the easy pull of my Evo-clutch-slave equipped clutch system, but the radial makes it even smoother and easier under power. This is really nice when I'm stuck in crappy stop&go traffic on the commute home. Jon rode the bike a bit, too; perhaps he can provide a more experienced commentary (although he's used to the AF1 race bike). I've only ridden a bit with it, but I'm already hooked. This seems to me to be some quality stuff. I'm keeping 'em. Jon tells me they'll be gearing up for shipments in a few weeks. Contact AF1 for pricing and any additional information that doesn't show up in this thread. Here's some additional info from Ed at AF1: "The braided lines were required due to a slightly longer length needed to hit the banjo on the new masters. The radials have a banjo about 1-2" further out than the stock masters. "I investigated the claim of the stock lines being like braided, and while I didn't cut the line open, I did bend it around a bit. The stock line is definitely stiffer than a basic rubber line, but still not as stiff as the aftermarket braided line. I put a braided line on the stock master, and the lever did have a stiffer feel. "The radial levers actually have a very nice feel to them, far better than the older brembo style originally on the futura. The levers are longer and have a better contour, alowing for your hand to be in more positions on the bars. The adjustment knob is no longer the 4 position dial, but now an 8 position adjustment for the lever distance, as well as an adjustment for the plunger rod length. These are very similar to the masters on the 2004-2005 RSVR, and the levers are the same." You gotta love AF1 for looking out for us Futuristi... __________________ I have been in the process of upgrading my forks, brake disks and maybe the calipers. What I have found so far is a set of Mille forks with Ohlins internals and a pair of 320 mm rotors from a Tuono (Futura have 300 mm disks). I found a site that will sell a adapter to convert a pair of radial calipers to a non-radial fork leg so you can use radial brakes. http://www.ema-usa.com/brakes/brakes_PVM.shtml 20 But I am thinking if I go for the 4-pad caliper, this may be enough for me. The only reason I am thinking about this mod is when I ride two up (about 60 to 70 % of the time) the suspension was not up to the task of working with a combined weight (with bags and gear) of around 470 lbs. My question is.... Will these master cyl make any difference if I go with the 4-pad calipers? PS The bolt pattern on the wheel apears to be the same as the other Aprilia/Ducati models using Brembo brake stuff. These pumps are 15x18 clutch and 18x19 brake, which are the same dimensions as the 20042005 bike. They will fit the capo, but the lines would have to be made a different length. I have not installed them on a capo, so I would have to find a local's bike to measure up, but I could dig one of those up. The stock clutch and brake pumps are the same futura to capo. The levers cost $79.99 each from us, which is i think both brembo and aprilia retail. Yes the pumps and lines will also be available seperately, but the package saves you $100. Brake switch, which I just realized is MUCH nicer than the stock "wrap it with a little tape to keep it from coming on because the wind is pushing the lever ever so slightly" one: Clutch again: 21 Brake reservoir: The radial master cylinders have the plunger of the master facing forwards on the bike, close to a 90 angle to the lever. Basically your lever movement is directly proportional to the movement of the plunger. The traditional master cylinder the plunger is parallel to the lever, and is actuated by a turnbuckle, aka a 90 degree arm off the lever. As you pull the lever the ratio changes depending on the angles. Basically the radial master cylinders give you a better feel and better pull. In addition to the different style, aprilia put the crappiest brembo masters made on the Futura, you could find better components on a Kawasaki EX500... To go to the compression adjustment you have to go to mille fork bottoms, which means you need to go to 320 mm rotors. If you go to the rotors you might as well go to the 4-pad calipers as well. Then you would have the whole front end off a 2004 RSVR... You could also have someone drill your fork bottoms and install the compression adjusters, but I don't know if anyone can, or will do that and you can't order the compression adjuster seperately, that I know of. We do have a set of good showa fork bottoms here, just missing some black paint. It can be done but will be very costly. I asked when I had my front suspension done. I had seperate adjusters with me, you can get them from any damaged Showa RSV fork leg. In fact I had two lower fork legs with me as well. It's much simpler just to get a set of forks from an RSV or Falco. Then you can go for other brake discs much easier too. Everyone has the 320 mm's, the 298's are much harder to come by and there's less designs to choose from. And you can stick a carbon wheel in there as well. 22